Posts mit dem Label Ubiquiti werden angezeigt. Alle Posts anzeigen

Dienstag, 7. April 2020

Ubiquiti USG Remote User VPN RADIUS Authentication

The following steps will setup Windows Server 2012 R2 RADIUS authentication via Network Policy Server (NPS) with your Ubiquiti UniFi Security Gateway (USG) for a USG Remote User VPN. This will allow users to use their current Active Directory Domain Services (AD DS) credentials to authenticate to the Virtual Private Network (VPN).
I am using the UniFi controller version 5.4.14 hosted in Microsoft Azure on a Linux Server with PostFix for alerting.
Step 1: Configure Windows NPS Server
  1. From the Server Manager Dashboard, install the Network Policy and Access Server role using Add Roles and Features accepting all defaults.
  2. Once installed,  open the Network Policy Server Administrator Tool. Expand the RADIUS Clients and Servers, then right Click on RADIUS Clients and click New.
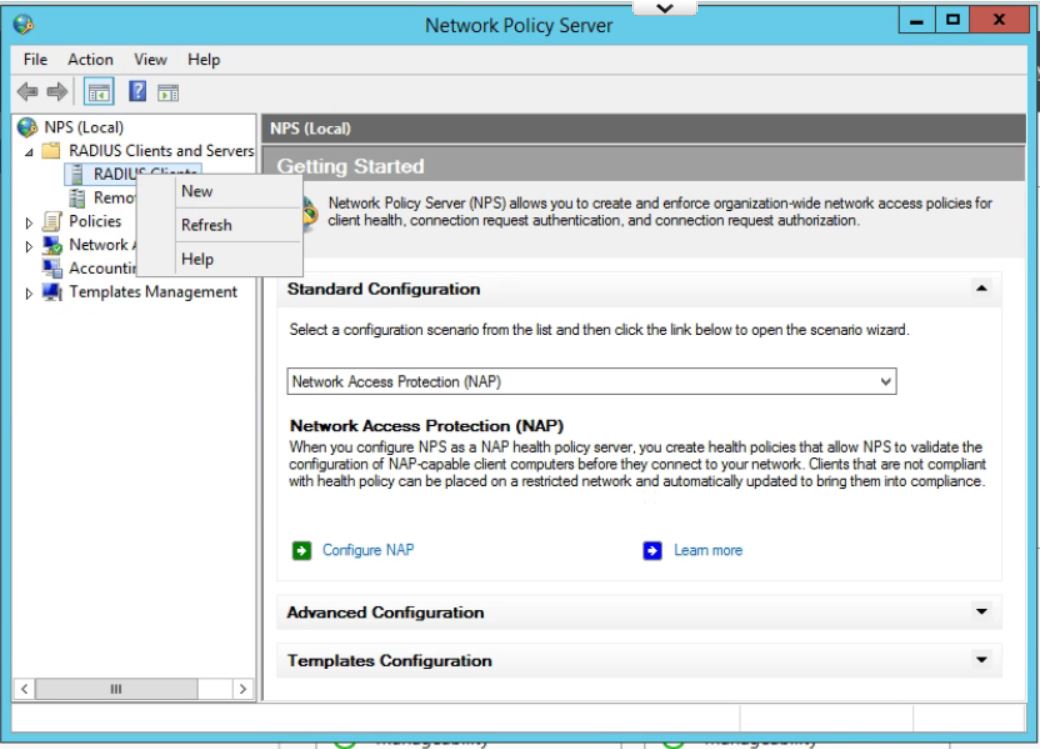
    USG Remote User VPN - Create New RADIUS Client
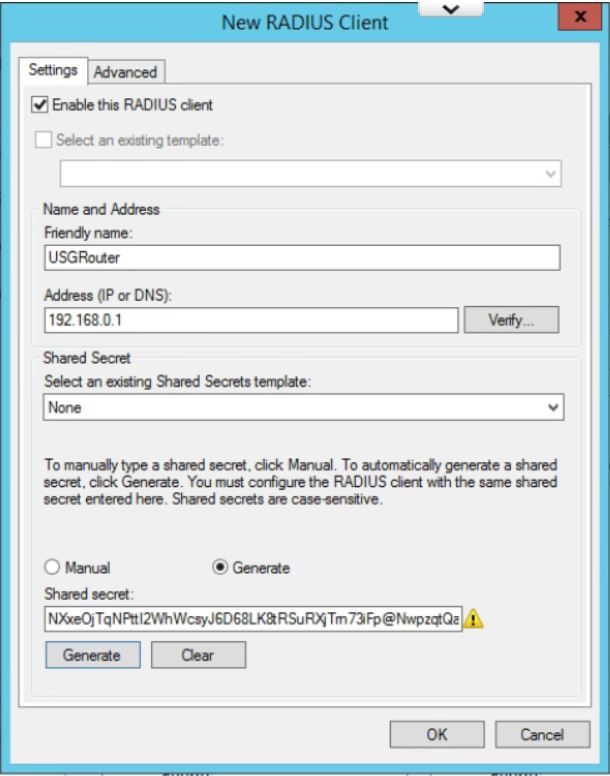
  3. Give the USG router a Friendly Name. Type in the IP Address of the inside interface of the USG on the same network as the Windows Server. (This is the IP that the RADIUS requests will come from.) Click the Generate radio button, then click the generate button. Copy this Shared Secret to be pasted later. Click OK. USG Remote User VPN - Create New RADIUS Client
  4. In the Network Policy Server window, expand Policies, right click on Network Policies, and then click New.
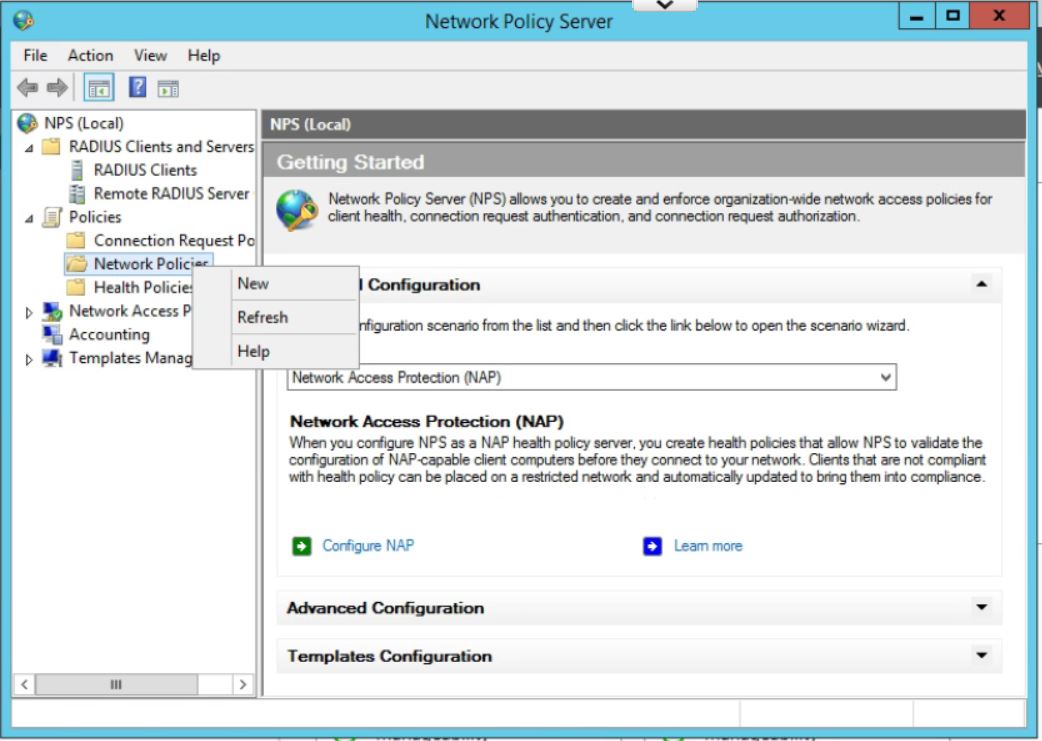
    USG Remote User VPN - Create New Network Policy
  5. Enter a policy name and leave Type of Network Access Server as Unspecified. Click on Next.
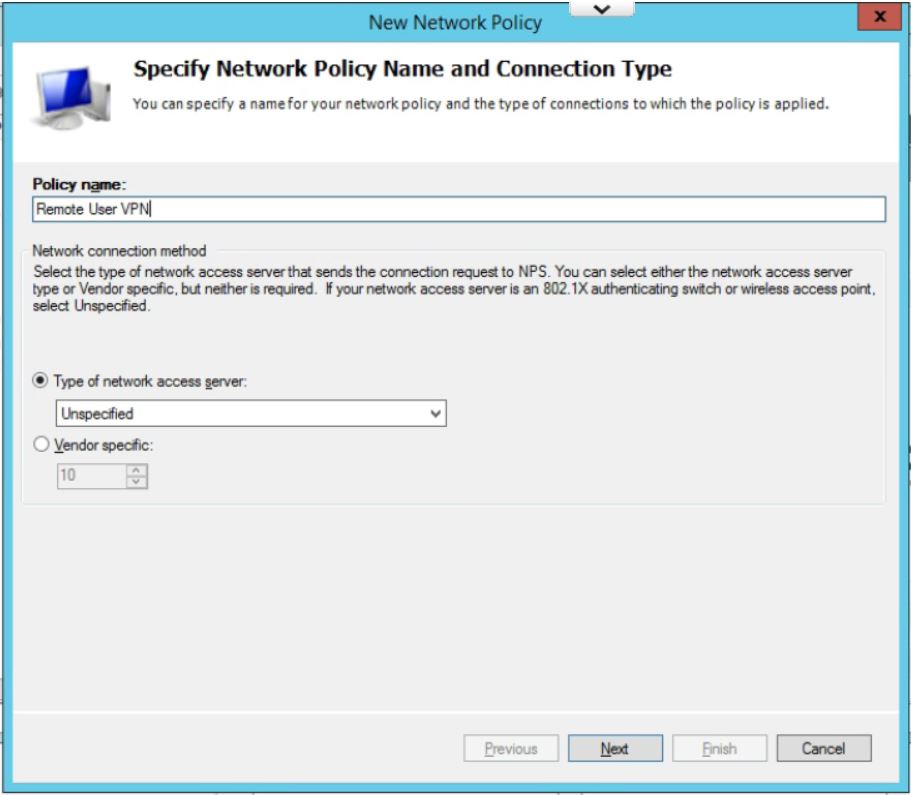
    USG Remote User VPN - Create New Network Policy
  6. In Specify Conditions click Add.. and then select Windows Group, and pick the AD Group you want to use to allow VPN access.  (If you have not already then you will need to add all users who will be accessing the VPN into a seperate group.) Click Add… then Add Groups… which brings up the typical AD search box. Type in the name of the VPN Windows Group and click on OK. Click OK again. Click on Next
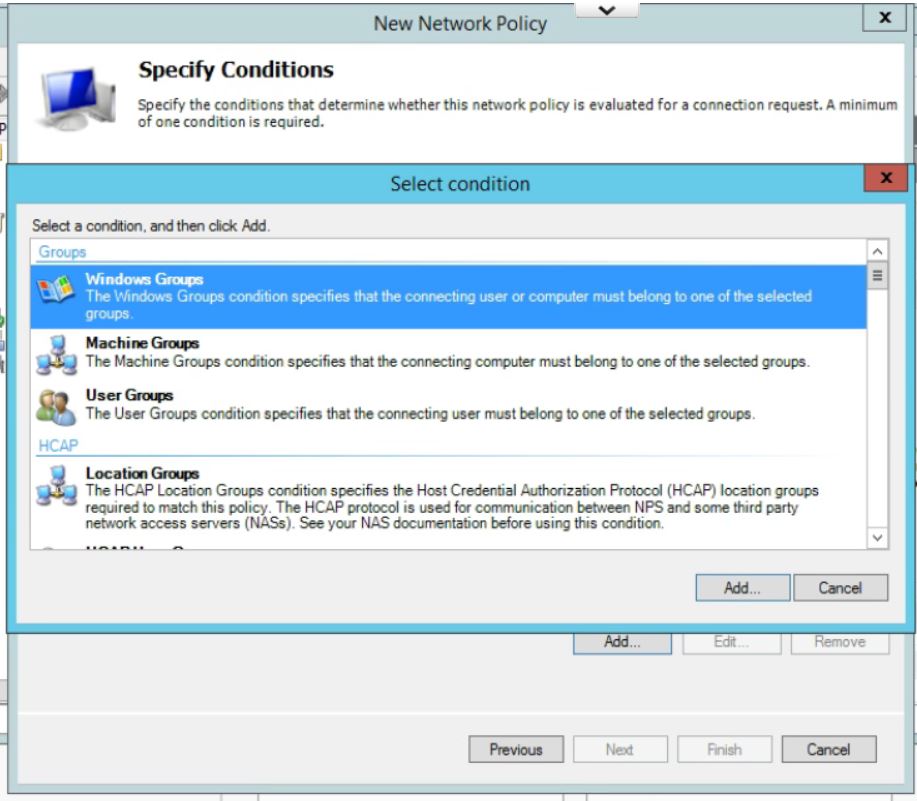
    USG Remote User VPN - Create New Network Policy
  7. Leave the Specify Access Permissions at the defaults (Access Granted, Dial-in box unchecked). Click Next.
  8. Uncheck all authentication methods other than MS-CHAPv2. Click on Next.
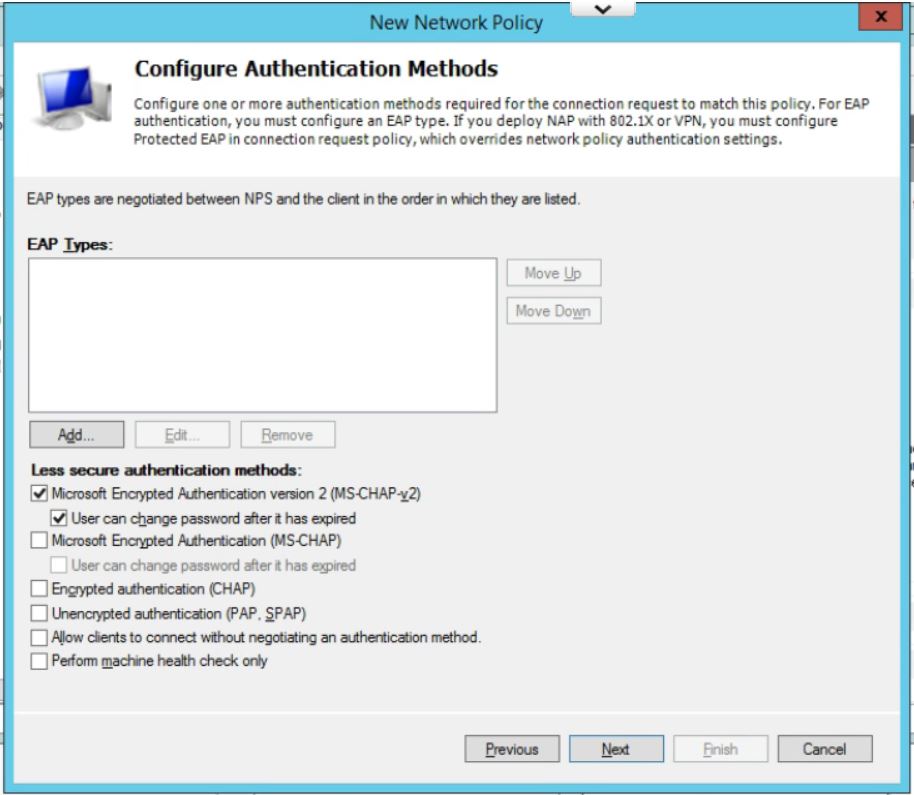
    USG Remote User VPN - Create New Network Policy
  9. Accept the defaults under Configure Constraints. Click Next.
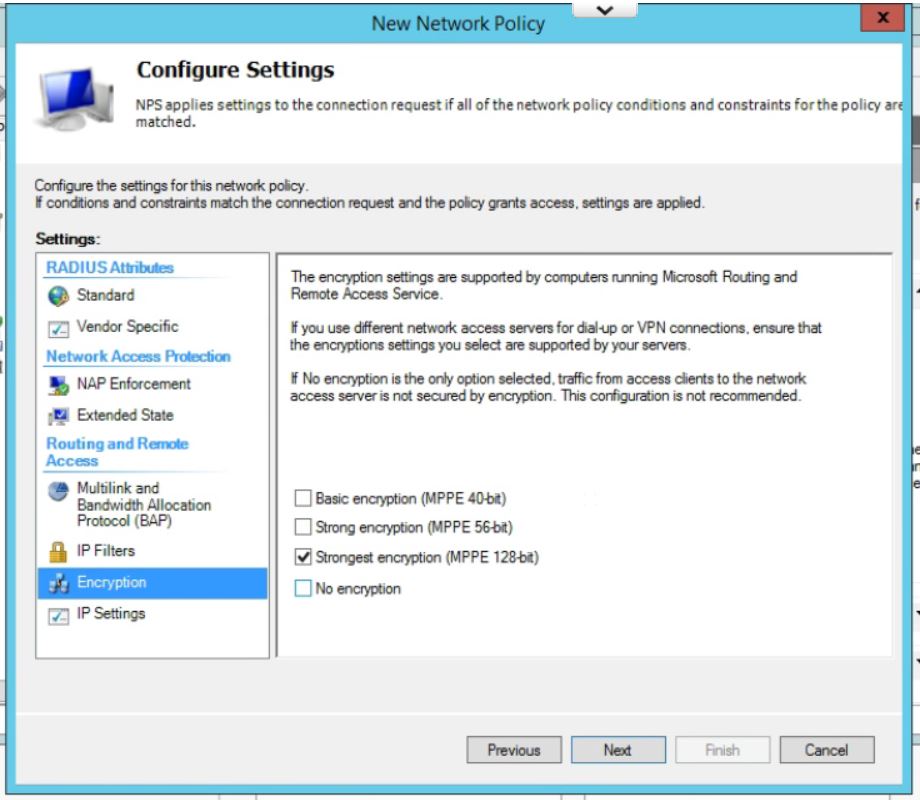
  10. Leave all setting at the default on this page except for under Encryption. Uncheck everything except for MPPE 128-bit. Click Next.USG Remote User VPN - Create New Network Policy
  11. Check your settings on the last page. Click Finish.
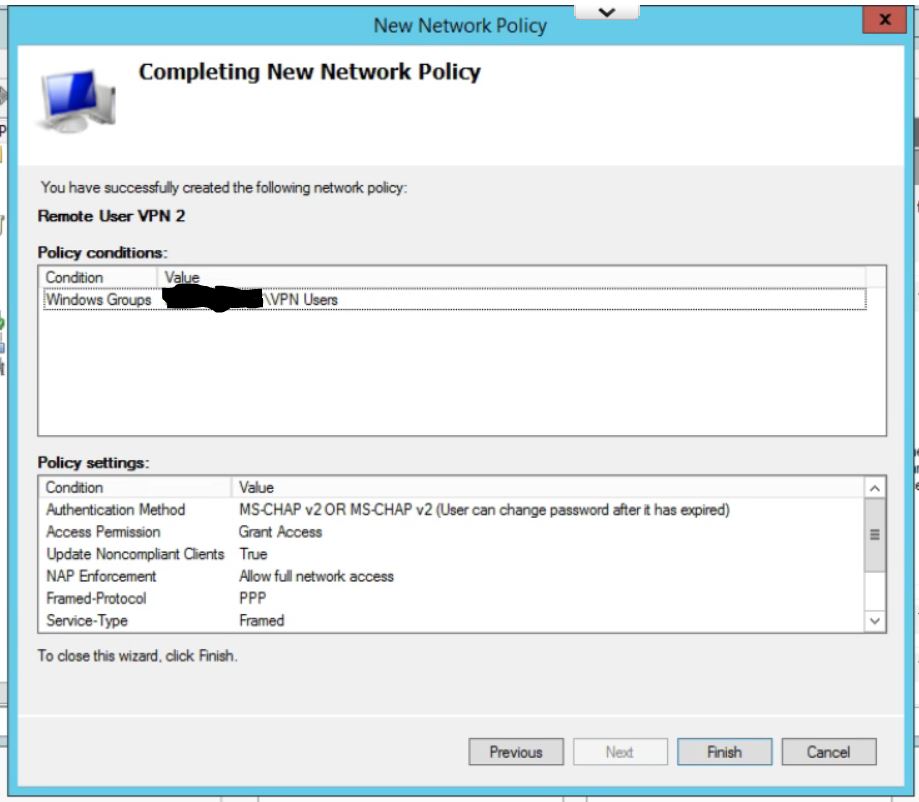
    USG Remote User VPN - Create New Network Policy
  12. Finally, move the new policy above the two default policies in the list by right clicking and choosing Move  Up.
Step 2: Configure the USG Remote User VPN
  1. To create the remote access network, in the UniFi controller, go to Settings, then Networks, and click Create New Network, give the network a name and select Remote User VPN.
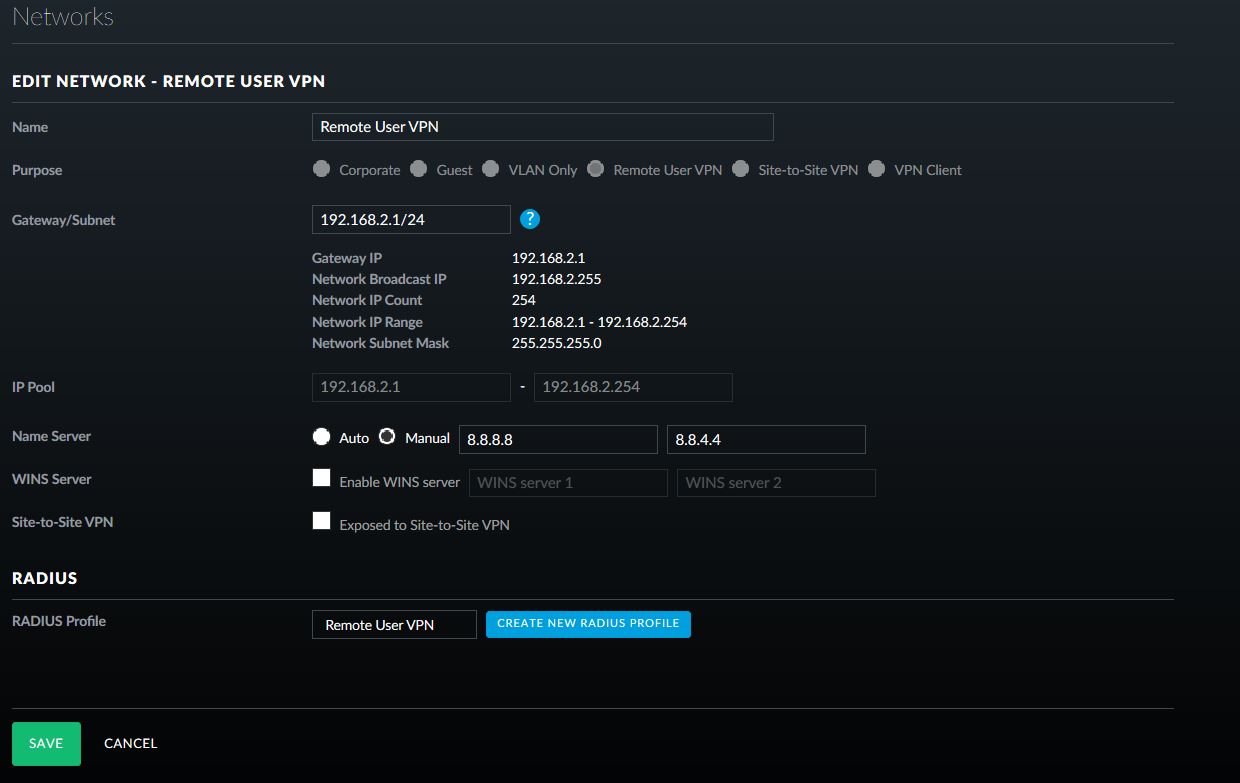
    USG Remote User VPN - Network Setup
  2. Fill in the appropriate Gateway/Subnet information for your environment. Make sure it is not the same as any of your current networks.
  3. Add Manual DNS servers, if required for your environment.
  4. Click on Create New RADIUS Profile.
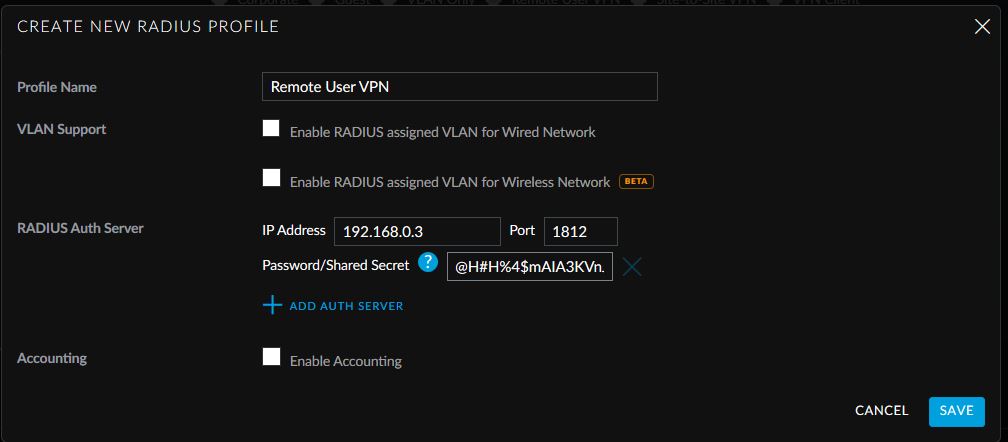
  5. Give the Profile a name, enter in the IP address of the Windows Server 2012 R2 server that will be used for RADIUS authentication and paste in the generated shared secret.USG Remote User VPN - Create New RADIUS Profile
  6. Click Save. Click on Save again.
This allows easy access from Windows default VPN connections to network assets behind the USG device.

Dienstag, 14. August 2018

Manually Adding Ubiquiti Unifi Access Point or Switch to Unifi Contoller

This is the process to add a new Unifi AP or Switch to the Unifi controller when discovery doesn’t work.  In our case, we have a central Unifi controller managing APs or Switch on multiple networks.  But, the routers don’t allow the discovery tool to see new APs on other networks, so this is how we add one.  In this example, we’ll say the Unifi controller is at 192.168.8.9.


1) Write down (or take a picture on your phone) the MAC address for the new Device

2) Connect the new Unifi AP or Switch

3) Check DHCP or  IP Scanner to see what IP address was given to the Unifi Device.

Once you have the IP, we’ll use putty to ssh into the device.  In this example, we’ll use 192.168.10.40.

start putty01

NOTE: If the Device has been provisioned before, you’ll have to use the password for the Unifi controller it was provisioned by.

login as: ubnt
password: ubnt


NOTE: If the Device has been provisioned before, you’ll have to reset it to factory defaults.  to do that, use the following command, and then SSH back into the device when it comes back up.

> syswrapper.sh restore-default

Aften than update the Firmware on your device

> upgrade "FW url"

Example:
> upgrade http://dl.ubnt.com/unifi/firmware/US24P250/3.9.42.9152/US.bcm5334x.v3.9.42.9152.180709.2252.bin

Since this is a brand new Device for us, we just need to do this:

> set-inform http://192.168.8.9:8080/inform

Next, we go connect to the Unifi command center.  In a few minutes, we should see an alert stating a new device has checked in.  If you don’t see the alert, check the device list, it should show up there as “Unknown”.  From either location (alerts or ap device list), you should have a button that says “Adopt”.  Adopt the new AP and go back to the SSH shell.

Send the command again, this should allow the AP to see that it has been adopted.

> set-inform http://192.168.1.55:8080/inform

Now you should see the new AP provisioned in the Unifi controller and you can edit the name and update the AP firmware.

Rename Onedrive Business root folder

Rename Onedrive Business root folder Here is what I remember: In the Office 365 web admin pages, change the organization name to a shorte...