Posts mit dem Label vSphere 5 werden angezeigt. Alle Posts anzeigen

Mittwoch, 19. September 2012

Installing FreeNAS 8 on VMware vSphere (ESXi)


FreeNAS is an Open Source Storage Platform and version 8 benefits not only from a complete rewrite – it also boats a new web interface and support for the ZFS filesystem. It is also worth mentioning that FreeNAS supports Advanced Format drives (something that my Windows Home Server does not).
The features of ZFS are many but it is the data integrity and large capacity support that caught my attention when I first started to ponder alternatives to Windows Home Server (WHS).
The other ZFS contender that has piqued my interest is Nexenta whose community edition has an 18TB limit (although you can run the Nexenta Core version with a community developed GUI without any storage limit). One key difference to be aware of (and these will be moving goalposts) are the versions of ZFS that both of these projects are running. At the moment, for example, it looks like FreeNAS does not support de-duplicationof data while Nexenta does.
FreeNAS is designed to be run from a flash drive which is nice in that all of your hard drives can be dedicated to storage. A 1GB drive is recommended as the minimum requirement and this can hold several FreeNAS images – so you can roll back to a previous installation if you experience troubles during an upgrade for example. I will be installing FreeNAS to a 1GB virtual hard disk instead.
I have yet to decide between FreeNAS and Nexenta yet – but for today wanted to get the ball rolling installing FreeNAS 8 in VMware vSphere 4.x.
First download the FreeNAS 8 .iso and copy it to your vSphere datastore.
Create a new virtual machine and specify the following Guest Operating System properties – Other andFreeBSD (64-bit).
I configured 4Gb of RAM with the default LSI Logic Parallel SCSI controller with a 1GB vitrual hard disk.
Finally point the virtual CD-ROM of the virtual machine to the uploaded FreeNAS .iso and boot the virtual machine:
Press 1 to begin installation:
Press Enter to install to default device:
Press Enter again to install to the VMware virtual disk:
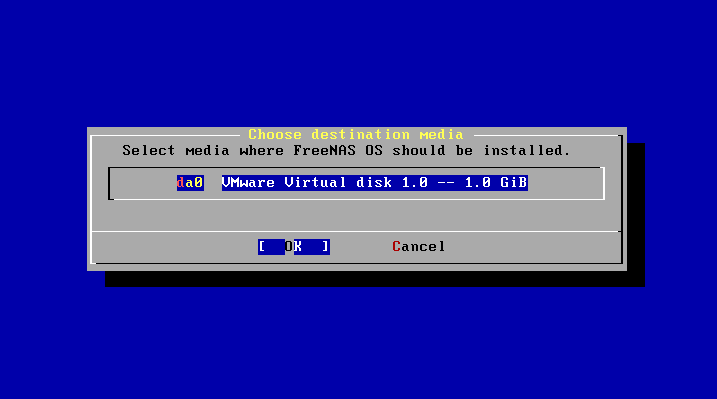
Press Enter again to confirm installation to hard drive (installation to USB is the preferred method for FreeNAS but this is not practical on ESXi):
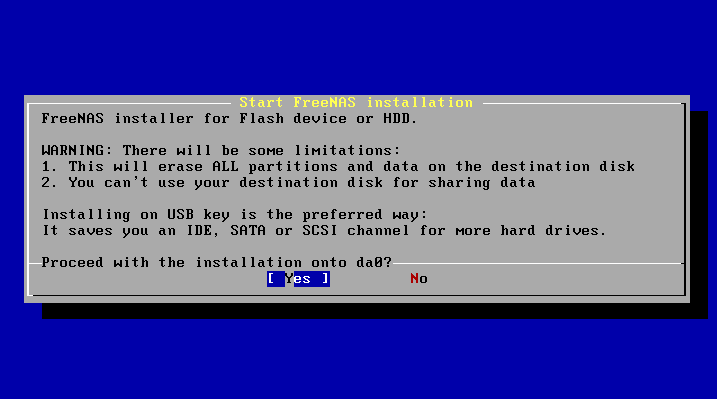
Wait for FreeNAS to copy the image to the virtual drive:
Reboot the virtual machine:
As you can see there are various options for configuring FreeNAS when it boots. For now I will take a quick look at the Web interface.
Open Firefox and browse to the IP address of your FreeNAS installation (as detailed in the previous screenshot).
Use admin for the Username and freenas for the password.
Welcome to the FreeNAS interface!
As you can see there are plenty of options available to configure FreeNAS and (now that installation is complete) that will be the topic of a later blog-post.

Creating a Nested ESXi 5 Environment


Since vSphere 5 was released earlier this year, it is now time to get ready to pass the VCP exam.  I am a VCP for both 3.5 and 4, and decided I would post some updates along the way as I study before taking the VCP 5 exam.

The first thing I did was create a lab environment. I currently use 2 whitebox ESXi 5 servers, attached to iSCSI storage.
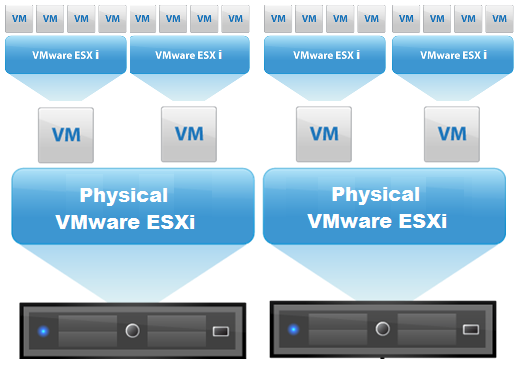
However, since I am studying VMware products, I don’t want to configure, and reconfigure these 2 ESXi servers constantly.  Thankfully, I can run Nested ESXi Servers – or, run ESXi 5 inside of ESXi 5.  I can even run 64bit guests inside of my virtualized ESXi servers!  See below:
Now, I can run more than 2 ESXi servers, and blow them away and recreate if needed. (yes, it will be slow).

In order to run ESXi 5 inside of ESXi 5, there are a couple of steps we need to do:
First, we will need to add a line to the etc/vmware/config file.  Using SSH to connect to your ESXi server, type the following:
echo ‘vhv.allow = “true” ‘ >> /etc/vmware/config
Second, we need to make sure the networking is setup properly.  On each host, for your VM Network, enable promiscuous mode for the port group.
  • click Configuration
  • click Networking
  • click Properties for your vSwitch with the VM Network (assuming your haven’t renamed”
  • Click “VM Network” and choose Edit.
  • Click Security
  • Check Promiscuous Mode and choose Enable.
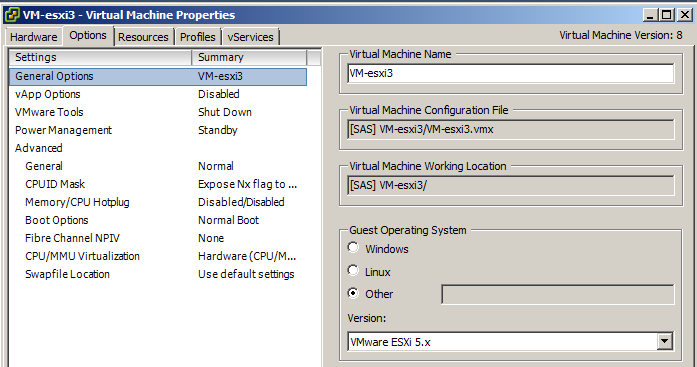
Next, create a VM for each ESXi host with 2CPUs, and at least 4GB of RAM. When creating the VM, make sure that it is version 8 HW, and that for the operating system you choose “other” and select “Other (64 bit)”.  Once the VM is created, we will choose to edit it’s settings.  In the Options tab, you can now change the OS to “VMware ESXi 5.x”
Last, we need to make sure that under “CPUID Mask” that we expose the NX/XD Flag to the guest if it is not already.
Now, you can power on the VM, and install ESXi 5 from an ISO image.
Once installed, you can then create 64bit guests inside of your virtual ESXi server.

 VMware Workstation 8
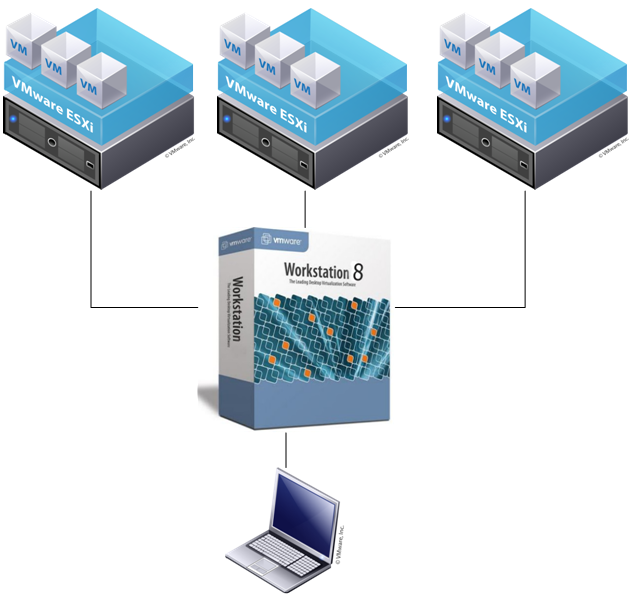
The best thing about VMware, is I can also virtualize ESXi inside VMware Workstation!  So on my laptop, in VMware Workstation, I can run multiple ESXi servers, that in turn have VMs inside them.  Even better is the fact that I can have 64bit guests inside my ESXi servers running inside VMware Workstation.  Sounds confusing as I type, so here’s a diagram:
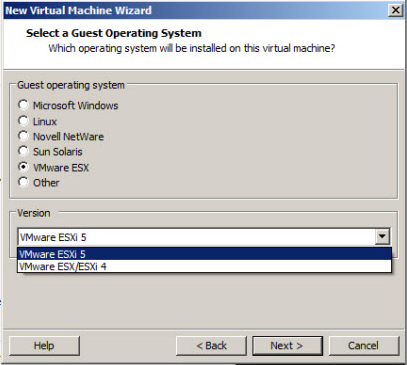
In order to run ESXi inside VMware workstation, we simply need to select “VMware ESXi 5″ as the operation system of the guest VM we are creating.
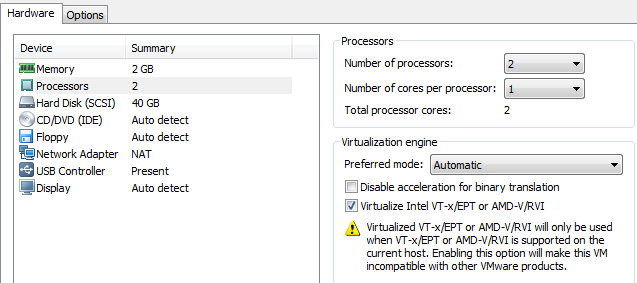
Then, Edit the VM’s Settings, and under the Hardware tab, and processors, check the box to Virtualize Intel VT.
The option to run ESXi inside of VMware workstation is great, especially for when you don’t have a lot of physical hardware to test with.

Donnerstag, 2. August 2012

Creating (a better) vSphere 5 ESXi embedded USB Stick


In a previous post I blogged about creating a vanilla vSphere 5 ESXi USB drive using the VMware .iso file from VMware. This post shows how to create one using the HP version of vSphere ESXi (5.0_Oct_2011_ESXi_HD-USB-SDImgeInstlr_Z7550-00253.iso).
Note: (You can use any vendor customized vSphere ESXi .iso file: VMware, Dell and IBM).
The HP version comes pre-installed with all the HP CIM providers which work very well with HP servers, including the HP MicroServer. Using the HP version gives you the more details in the Hardware Status tab.
I’m going to be using a different method, recommended by Will Rodbard (thanks Will), who is a colleague of mine at VMware, you can see his comments from the previous post. In summary the steps are:
  1. Find and download the following tools:
  2. Run the HPUSBFW tool, click on the USB drive, select ‘Fat32′ and click Format
  3. Run UNETBOOTIN, select Diskimage and browse to the ESXi 5 ISO file
  4. Select the USB drive you have just formatted and click OK
  5. If you want to make more USB keys for more servers, then now is the time to create .IMG files using WinImage, then you can basically clone the image of the USB key to more USB keys. Or if you don’t wish to use WinImage then just perform steps 1 to 4 again.
Once completed your USB drive will boot into the ESXi 5 installer. Once booted, install the ESXi 5 Hypervisor to the USB drive (overwriting the installer). This will then leave you with the installed ESXi Hypervisor on the USB.
Note that using this method creates a brand new bootable USB key for use in a new installation of vSphere ESXi. You will have to go through the process of installing ESXi onto the USB key, or another disk or LUN on the target server. If you want a USB key that is already installed with ESXi which saves you from going through the installation wizard, you can use the other method in this post.

Samstag, 9. Juni 2012

Building a DD-WRT Image In vSphere 5.0


Introduction

I have a need to put a router between my test ESXi 5.0 server and my network. At home, I use a Linksys E3000 (both 2.4Ghz & 5Ghz Wireless-N, gigabit) router, with OpenSource DD-WRT custom firmware. There is a x86 variant that can be downloaded, people mention in the forums about using it on old PCs, I thought I would give making a VM a go.

Pre-Requisites

    1. An installed copy of ESXi 5.0 (this is almost certain to work on 4.0, but not 3.5)
    2. The DD-WRT x86 Image. I chose the VGA public image. This is a free version, limited to 4096 connections (fine for my purposes) and without Wi-Fi support. The image that is used is here.
    3. physdiskwrite – A Windows tool for writing raw images to a hard disk.
    4. An existing Windows image.
      Installation

      Creating the Virtual Machine

  1. Create a virtual Machine. Select a configuration type of Custom.
    New_VM_-_Custom
  2. Name the VM something appropriate.
  3. Select a datastore for the Virtual Machine.
  4. Select ‘Virtual Machine Version: 8’ (if using ESXi 4.0, using version 7)
    New_VM_-_Virtual_Machine_Version
  5. For Guest Operating System type, choose ‘Linux’ and select ‘Other 2.6.x Linux (32-bit) from the drop down.
    New_VM_-_Guest_Operating_System
  6. Choose 1 virtual sockets, with one core per virtual socket.
    New_VM_-_CPUs
  7. Choose 512MB RAM.
    New_VM_-_RAM
  8. Select the appropriate number of NICs (nearly always 2), E1000, and choose the port groups. (I have found that the first NIC is assigned to the WAN)
    New_VM_-_NICs
  9. SCSI Controller, choose any. This will be replaced.
  10. Choose not to create a disk.
    New_VM_-_No_Disk
  11. Tick Edit the virtual machine settings before.
  12. In the Virtual Machine Properties, click Add. Select Hard Disk.
    New_VM_-_Add_Hard_Disk
  13. Select ‘Create a new virtual disk’
    New_VM_-_Create_New_Virtual_Disk
  14. Make the capacity of the disk 1GB. I chose to make it Thin Provisioned.
    New_VM_-_1GB_Cpacity
  15. Set the Virtual Device Node to IDE (0:0)
    New_VM_-_IDE
  16. Press OK, then Finish. Wait for the VM to be created.

Install the image to the Disk

  1. Choose your Windows VM. Power it off if necessary.
  2. Edit the Windows VM’s properties. Press Add.
  3. Select a Hard Disk.
  4. Choose ‘Use Existing Virtual Disk’
    Edit_VM_-_Add_Exiting_Virtual_Disk
  5. In Advanced Options, ensure that the Virtual Device Node is ‘IDE (0:0)’
  6. Click OK, then Finish. Power on the Windows VM.
  7. Load PhysGUI (make sure you elevate it)
  8. Ensure that you select the ‘VMware Virtual IDE Hard Drive ATA Device’, right click select ‘Image laden’ –> ‘Öffinen’. Select the downloaded DD-WRT image.
    PhysGUI_-_Select_Image
  9. Click OK through the prompts.
    PhysGUI_-_Remove_2GB
  10. Wait until the disk completes writing. Shut down the VM.
    PhysGUI_-_Write_to_Disk
  11. Edit the Windows VM’s properties. Select the DD-WRT virtual disk and press remove. Ensure ‘Remove from virtual machine’ is selected. Click OK.
  12. Start up the DD-WRT VM.

Connecting to the Router

    1. Load another VM on the same LAN as the router. Ensure that it is configured to automatically obtain an IP address.
    2. It should be assigned an IP by the DD-WRT router’s DHCP server service. You can see this by performing an ipconfig (if using a Windows client)
    3. Presuming that you have an IP address, use the web browse to connect to 192.168.1.1
      DD-WRT_System_Information
    4. It will ask to set the username and password. Note that if you SSH into the router at a later point, it will use the username ‘root’ with the password set here.
      DD-WRT_-_Set_Creds
    5. You are presented with the DD-WRT System Information page. This will show the current hardware, configuration, DHCP client list, etc.
Wenn euch das zu viel arbeit ist könnt ihr auch hier die fertige VM herunterladen


Rename Onedrive Business root folder

Rename Onedrive Business root folder Here is what I remember: In the Office 365 web admin pages, change the organization name to a shorte...