Posts mit dem Label VMWare werden angezeigt. Alle Posts anzeigen

Sonntag, 28. Juli 2019

ESX 6.5 AND 6.7 ON HPE G6/G7 SERVER PSOD FIX

Background

HP’s done it again. They’ve managed to break their custom ESX ISO on the G6 and G7 servers. I suspect it’s the same for G8.
If like me you found yourself perplexed by the PSOD (pink screen of death) after upgrading from ESX 6.0 to 6.5, keep on reading for the fix (skip to the bottom for the download link to an already fixed ISO).

The issue

It seems the “hpe-smx-provider” driver version 6.5.0 from the ESX 6.5 ISO is causing the PSOD.

The fix and the drawbacks

(Simply) Replace the driver with it’s older counterpart (version 6.0.0) and reinstall (see below for the procedure or check the “download link” section at the very end for an already fixed ISO).  Unfortunately if you decide to create a custom ISO with the previous version of “hpe-smx-provider”, you will no longer be able to upgrade to any future ESX version and will need to do a full installation every time (thank you HP!). That being said, here is the procedure to customize the ISO:

Customize your own HPE ESX ISO

  1. Install PowerCLI from here.  At the time of this writing, the latest version was 6.5.0R1.
  2. Download both the ESX 6.5 and 6.0 offline bundles and save them to a convenient place (ex: C:\HP) — download from this link. To make it easier, rename them to something like HPE_ESX6.5.zip and HPE_ESX6.0.zip.
  3. Open up PowerCLI and do the following:Add the 6.5 bundle

    # check that the profile was loaded and the vendor is HPE

    # clone the profile (feel free to specify whatever you like for the “vendor” when prompted)

    # double check the profile was indeed cloned

    # Remove the “hpe-smx-provider” driver from the clone

    # Add the 6.0 bundle

    # check the profile

    # check driver versions from both bundles

    # Add hpe-smx-provider version 6.00 to the custom profile

    # Export the profile to an ISO

Download links

The following images have hpe-smx-provider version 600.03.11.00.9-2768847. Nothing else was changed. The 6.5.0d (build 5310538) is running on an HP Proliant DL380 G7 since March 2018 and was also tested on a DL380 G6 for a couple of months. For convenience, I’ve also built a 6.7.0 ISO and at the request of a reader, 6.7.0 Update1 from April of 2019:
Enjoy!

@THX to www.claud-computing.net/

Sonntag, 15. Dezember 2013

HOW TO INSTALL VSPHERE 5.5 CLIENT ON A DOMAIN CONTROLLER

I get really excited when a new version of software comes out because I’m anxious to try out all of the new features. While exploring vSphere 5.5 however, I noticed that there are some serious consequences to diving in head first. Whether it’s the incompatibility of vSphere 5.5 hardware version 10 with the vSphere thick client or trying to do simple things like install vSphere 5.5 client on a domain controller, VMware has really started sticking it to their fans who use their free products.
For example, note in this screen shot that “In vSphere 5.5, all new vSphere features are available only through the vSphere Web Client.” In other words, if you want to use the features we’ve released, pay us a ton of money and go buy vCenter Server. I’m completely befuddled by this response to their fans given Microsoft’s push to drive virtualization costs down by including the fairly full featured hypervisor in it’s server package.
VMwarevSphereClient
Alas, I digress…

Installing vSphere 5.5 Client on a Domain Controller

I’m certainly not going to avoid using vSphere 5.5, but I if I’m going to use it, I really needed to be able to install vSphere on a Domain Controller. If youdownload the vSphere 5.5 client and launch it on a domain controller, you get the following message.
vSphereClientOnDomainController
I started doing some research and it turns out that getting the vSphere 5.5 client installed on a domain controller is as simple as launching the installer from the CLI with a simple flag on the end.
VMware-viclient-5.5.exe /VSKIP_OS_CHECKS="1"
Launching it this way causes the client to disregard the fact that it’s installing on a domain controller.
Rumor has it that this way of disuading people from installing vSphere client on a domain controller is actually a result of Microsoft’s best practices given the following statement reportedly from VMware directly.
“We did this deliberately to enforce a Microsoft standard that our guys agree with – don’t install software on a DC, but they made that decision in isolation. Nothing more than that. So use the workaround safely and hopefully we can undo this in the future.”
In any case, I’ve done it in a production environment without any issues whatsoever and feel comfortable recommending that others do so as well, just like you’ve likely done in the past. Enjoy, and as always, let me know if this helped you. Thanks! 

Freitag, 11. Oktober 2013

UPGRADING VMWARE VCENTER APPLIANCE 5.X TO 5.5


Last week VMware vSphere 5.5 went GA, so it is time to update the home lab to the latest version. I am using the VMware vCenter Appliance (VCSA), and it is the latest version. I never did an upgrade of the VCSA so I start searching the knowledgebase of VMware and found an article describing the upgrade process (VMware KB2058441).
Prerequisites
  • Before attempting the upgrade, if you are using custom SSL certificates, ensure that they meet the requirements as per Configuring Certificate Authority (CA) signed certificates for vCenter Server Appliance 5.5 (2057223).
  • Ensure that you have taken a backup/snapshot of your existing vCenter Server Appliance and the external database.
Procedure
  1. Deploy the new VMware vCenter Appliance.
  2. Connect to both the old and new appliances in separate browser windows. For example, use a URL similar tohttps://ip_address_of_vCenter_VM:5480
  3. In the new appliance, start the vCenter Server Setup wizard and accept the end user license agreement.
  4. In the Configure Options panel, select Upgrade from previous version and then click Next.
  5. Copy the key from the Import this key into the source appliance field.
  6. If you are upgrading vCenter Server Appliance 5.0.x to 5.5:
    • In the old vCenter Server Appliance 5.0, click the Appliance Upgrade tab.
    • Select source for the appliance role and click Set role.
    • Click Establish Trust.
    • Paste the local appliance key into the Remote appliance key field.
    • Click Import remote key.
    • Copy the local appliance key.
    • In the new vCenter Server Appliance 5.5, paste the local appliance key into the Remote appliance key field and click Next.
  7. If you are upgrading vCenter Server Appliance 5.1 to 5.5:
    • In the old vCenter Server Appliance 5.1, paste the key from Step 5 into the Upgrade key field.
    • Click Import key.
    • Stop vCenter Server.
    • Copy the Upgrade key.
    • In the new appliance, paste the Upgrade key to the Paste the source appliance key into the field below field and click Next.
    • If there are issues detected with your SSL certificates, select the Replace the SSL certificates option. You are prompted for SSO password for user admi...@vsphere.local.
This looks pretty easy. First I deployed a new VCSA with a new name (VCSA 5.5), configured the IP settings, different than my original VCSA (VCSA 5.1). After the OVF deployment I started the VCSA and went to the management page. I accepted the EULA on my new VCSA 5.5.

Donnerstag, 7. Februar 2013

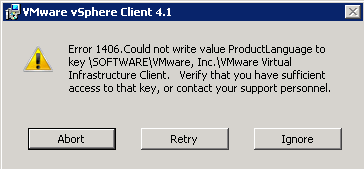
vSphere client: Error 1406. Could not write value Productlanguage to key …


Got this nice notification trying to install the vSphere Client 4.1 on Server 2008 R2.
To fix this, you have to delete the following Registry key:
HKEY_LOCAL_MACHINE\SOFTWARE\Wow6432Node\VMware, Inc.
And press retry. The Sphere Client 4.1 setup will finish without errors.

Mittwoch, 19. September 2012

Installing FreeNAS 8 on VMware vSphere (ESXi)


FreeNAS is an Open Source Storage Platform and version 8 benefits not only from a complete rewrite – it also boats a new web interface and support for the ZFS filesystem. It is also worth mentioning that FreeNAS supports Advanced Format drives (something that my Windows Home Server does not).
The features of ZFS are many but it is the data integrity and large capacity support that caught my attention when I first started to ponder alternatives to Windows Home Server (WHS).
The other ZFS contender that has piqued my interest is Nexenta whose community edition has an 18TB limit (although you can run the Nexenta Core version with a community developed GUI without any storage limit). One key difference to be aware of (and these will be moving goalposts) are the versions of ZFS that both of these projects are running. At the moment, for example, it looks like FreeNAS does not support de-duplicationof data while Nexenta does.
FreeNAS is designed to be run from a flash drive which is nice in that all of your hard drives can be dedicated to storage. A 1GB drive is recommended as the minimum requirement and this can hold several FreeNAS images – so you can roll back to a previous installation if you experience troubles during an upgrade for example. I will be installing FreeNAS to a 1GB virtual hard disk instead.
I have yet to decide between FreeNAS and Nexenta yet – but for today wanted to get the ball rolling installing FreeNAS 8 in VMware vSphere 4.x.
First download the FreeNAS 8 .iso and copy it to your vSphere datastore.
Create a new virtual machine and specify the following Guest Operating System properties – Other andFreeBSD (64-bit).
I configured 4Gb of RAM with the default LSI Logic Parallel SCSI controller with a 1GB vitrual hard disk.
Finally point the virtual CD-ROM of the virtual machine to the uploaded FreeNAS .iso and boot the virtual machine:
Press 1 to begin installation:
Press Enter to install to default device:
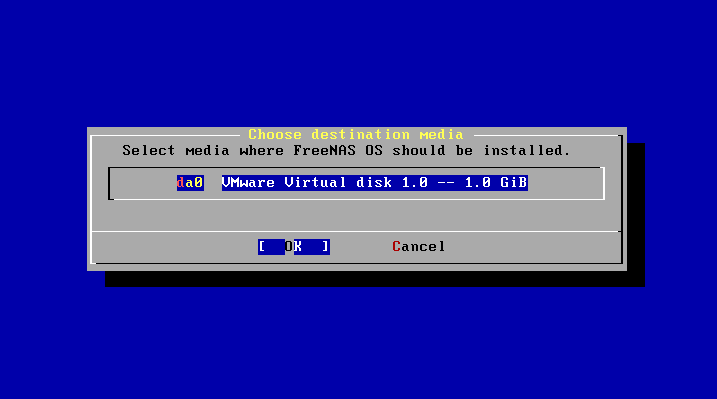
Press Enter again to install to the VMware virtual disk:
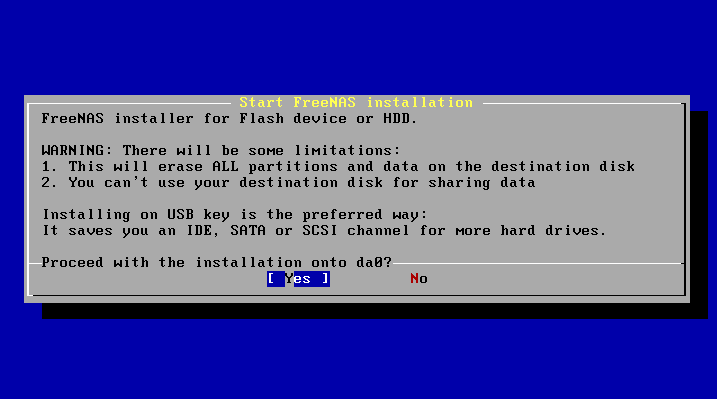
Press Enter again to confirm installation to hard drive (installation to USB is the preferred method for FreeNAS but this is not practical on ESXi):
Wait for FreeNAS to copy the image to the virtual drive:
Reboot the virtual machine:
As you can see there are various options for configuring FreeNAS when it boots. For now I will take a quick look at the Web interface.
Open Firefox and browse to the IP address of your FreeNAS installation (as detailed in the previous screenshot).
Use admin for the Username and freenas for the password.
Welcome to the FreeNAS interface!
As you can see there are plenty of options available to configure FreeNAS and (now that installation is complete) that will be the topic of a later blog-post.

Rename Onedrive Business root folder

Rename Onedrive Business root folder Here is what I remember: In the Office 365 web admin pages, change the organization name to a shorte...