Posts mit dem Label Exchange werden angezeigt. Alle Posts anzeigen

Montag, 25. Februar 2013

PST Capture 2.0


Earlier this week, we released a brand new version of the free PST Capture tool that allows you to hunt down PST files on client computers across your network. After it finds PST files on users’ computers, the tool consolidates the PST files to a central location, and then easily injects PST data to primary or archive mailboxes on your on-premises Exchange Servers or Exchange Online.

What’s new in PST Capture 2.0?

PST Capture 2.0 includes the following improvements:
  • Support for Microsoft Exchange Server 2013
  • Updated profile generation code to use Outlook Anywhere (RPC over HTTP).
  • Fixed Exchange Online import failure issue when PST Capture is not installed on an Exchange server.
  • Removed User Interface limit of 1,000 users when performing an import to Exchange Online.
  • General performance improvements
Download PST Capture 2.0 from the Download Center check out the PST Capture documentation and then go get those PSTs!

Mittwoch, 17. August 2011

Finding users who have Send-As or Full Access permissions to mailboxes

The following one-liner lists all mailboxes where another user has Send-As permissions, and who that user is:
Get-Mailbox -Resultsize Unlimited | Get-ADPermission | ? {($_.ExtendedRights -like "*send-as*") -and -not ($_.User -like "nt authority\self")} | ft Identity, User -auto

And this one-liner displays all mailboxes where another user has Full Access permissions, and who that user is:

Get-Mailbox -ResultSize Unlimited | Get-MailboxPermission | ? {($_.AccessRights -match "FullAccess") -and -not ($_.User -like "NT AUTHORITY\SELF")} | ft Identity, User

Both of these one-liners are very useful to determine who has access to other people's mailboxes.

Montag, 13. Dezember 2010

Exchange Server 2007/2010: Managing And Filtering Anti-Spam Agent Logs

Exchange 2007 includes a number of anti-spam agents to filter spam. The anti-spam agents log their actions in (anti-spam) agent logs. The default agent log locations:
  • Exchange 2010: \Exchange Server\V14\TransportRoles\Logs\AgentLog
  • Exchange 2007: \Exchange Server\TransportRoles\Logs\AgentLog

After you run the Install-AntispamAgents.ps1 script, restart the Microsoft Exchange Transport service, and set the InternalSMTPServers parameter.

You need to be assigned permissions before you can perform this procedure. To see what permissions you need, see the "Hub Transport server" entry in the Transport Permissions topic.


Run the following command from the %system drive%/Program Files\Microsoft\Exchange Server\V14\Scripts folder.
./install-AntispamAgents.ps1


After the script has run, restart the Microsoft Exchange Transport service by running the following command.
Restart-Service MSExchangeTransport

Agent Log Configuration

You can’t change the agent log location. Here are the available config options:
  1. Enable/Disable agent log: On transport servers with anti-spam agents installed, agent logging is enabled by default. You can disable it by adding the AgentLogEnabled key, and setting it to FALSE.
  2. Max file size: By default, the maximum file size of each agent log is 10 Mb (10485760 bytes). You can modify it by adding AgentLogMaxFileSize key and providing the desired value (in bytes). Parsing very large log files can be slower— the default max file size works for most deployments.
  3. Max directory size:: By default, the size of the directory is capped at 250 Mb(262144000 bytes). You can modify it by adding the AgentLogMaxDirectorySize key and providing the desired value (in bytes). In a high volume environment, you must consider the volume of log files generated in a day, and determine the space required based on how many days’ worth of log files you want to retain for troubleshooting or to meet your organization’s retention requirements.
  4. Agent log age: The age of a log is capped at 30 days. You can modify it by adding theAgentLogMaxAge key and providing the desired value. Logs are flushed when they’re older than the AgentLogMaxAge, or if the directory size reaches the AgentLogMaxDirectorySize(250 Mb by default), whichever happens first. If it’s important to maintain agent logs for a certain number of days, you must consider the volume of logs generated daily, and raise the AgentLogMaxDirectorySize if required.
Exchange 2007 RTM has only one configuration option for the agent log – that to enable or disable it. Exchange Server 2007 SP1 includes the additional configuration parameters listed above to control the max directory size, file size and age of agent logs added.
The agent log configuration parameters can be controlled by editing theEdgeTransport.exe.config file, located in \Exchange Server\Bin folder on Edge and Hub Transport servers.
Note, the key names in EdgeTransport.exe.config are case-sensitive.

Disable agent logging

To disable agent logging, insert the following key under  in the config file:

Modify agent log configuration

In the following example, we modify max directory size to 500 Mb, file size to 20 Mb, and age to 60 days, by creating new keys in EdgeTransport.exe.config:


Parsing the agent log

You can parse the agent log using the Get-AgentLog command from the shell.
By default, the Get-AgentLog cmdlet parses agent logs in the default location (\Exchange Server\TransportRoles\Logs\AgentLog). Depending on your troubleshooting and log retention requirements, you can move older files to an another location. To parse agent logs in an alternate location, you must specify the path. In this example, the agent logs have been copied to Z:\Antispam Agent Logs directory:
Get-AgentLog -location “Z:\AntiSpam Agent Logs”

Agent log format and fields

Agent log file names are named AGENTLOGyyyymmdd-nnnn.log. It’s easy to decipher yyyy stands for the year, mm is the month, and dd is the date. The nnnn is a serial number, starting at 0001, rolled over when more than one log is generated in a day. The date is UTC.
Each agent log starts with the following header fields:
#Software: Microsoft Exchange Server
#Version: 8.0.0.0
#Log-type: Agent Log
#Date: 2010-08-07T00:00:01.500Z
#Fields: Timestamp,SessionId,LocalEndpoint,RemoteEndpoint,EnteredOrgFromIP,
MessageId,P1FromAddress,P2FromAddresses,Recipient,NumRecipients,
Agent,Event,Action,SmtpResponse,Reason,ReasonData,Diagnostics
Here’s what an entry in the agent log looks like, as output by the Get-AgentLog cmdlet. Note, not all fields are displayed by default when you use the cmdlet:

Timestamp : 4/16/2007 12:39:49 AM
SessionId : 08C948C83FB951AC
IPAddress : 72.46.133.113
MessageId :
P1FromAddress : ret@noncornelan.com
P2FromAddresses : {}
Recipients : {foo@yourdomain.com}
Agent : Connection Filtering Agent
Event : OnRcptCommand
Action : RejectCommand
SmtpResponse : 550 5.7.1 Recipient not authorized, your IP has been found on a block list
Reason : BlockListProvider
ReasonData : Spamhaus SBL-XBL
Diagnostics :
As seen in the above output, the logs provide adequate information for reporting on anti-spam activity, as well as for troubleshooting anti-spam issues like messages not being received/wrongly filtered out.
Getting to know the agent logs will make troubleshooting such issues much easier.

Searching agent logs

By default, the Get-AgentLog command returns all the entries in the agent logs. This can take a long time and results in all entries scrolling by quickly in your shell window. The only filtering options available with the Get-AgentLog cmdlet are start and end dates.

Filter by date and time

Agent logs can be constrained to a particular date and time – the recommended way to perform most agent log searches, unless you want to immerse yourself in 30 days (or 250 Mb) of anti-spam goodness! This is done using the -StartDate and -EndDate parameters, as shown in this example:
Get-AgentLog -StartDate “4/16/2007″ -EndDate “4/17/2007″
You can also constrain it further by adding time of the day:
Get-AgentLog -StartDate “4/17/2007 8:00 AM” -EndDate “4/17/2007 2:00 PM”

Search messages by recipients and senders

Although the Get-AgentLog command only takes these 3 parameters – location, StartDate, and EndDate, you can further filter the logs using most of its logged fields by using pipelining.
To filter the log to show messages to a particular recipient:
Get-AgentLog -StartDate “4/16/2007″ -EndDate “4/17/2007″ | where {$_.recipients -like “foo@yourdomain.com”}
To search for messages from a particular sender:
Get-AgentLog -StartDate “4/16/2007″ -EndDate “4/17/2007″ | where {$_.P1FromAddress -like “aqe@easymoney2u.com” -or $_.P2FromAddresses -like “aqe@easymoney2u.com”}

Search messages from a sender domain

To search for messages from a particular domain:
Get-AgentLog -StartDate “4/16/2007″ -EndDate “4/17/2007″ | where {$_.P1FromAddress -like “*somedomain.com” -or $_.P2FromAddress -like “*somedomain.com”}

Search messages filtered by a specified anti-spam agent

To filter by the anti-spam agent that acted on a message, e.g. Connection Filtering Agent:
Get-AgentLog -StartDate “4/15/2007″ -EndDate “4/17/2007″ | where {$_.Agent -eq “Connection Filtering Agent”}
Similarly, you can filter by other agents that write to the agent logs: 1) Content Filter Agent 2) SenderID agent 3) Sender Filter agent 4) Recipient Filter agent and 5) Edge Rules agent.

Searching by IP address

To filter agent logs by the sending host’s IP address, use the following command:
Get-AgentLog -StartDate “4/15/2007″ -EndDate “4/17/2007″ | where {$_.IPAddress -eq “72.46.133.113″}

Search messages blocked by RBLs

The reason field in each log entry specifies the reason supplied by the anti-spam agent that takes the action. For instance, as seen in the agent log entry shown earlier in this article, the agent that acted on the message is the Connection Filtering Agent, the reason isBlockListProvider (i.e. “RBL” or “Real-time Block List”, known as IP Block Lists in Exchange Server 2007). The ReasonData field gives you the name of the IP Block List Provider, as configured in Exchange. In the above agent log entry, it is “Spamhaus SBL-XBL”. To constrain the search for messages blocked by IP Block List Providers:
Get-AgentLog -StartDate “4/15/2007″ -EndDate “4/17/2007″ | where {$_.Reason -eq “BlockListProvider”}
To get a list of all IP addresses blocked by IP Block List Providers:
Get-AgentLog -StartDate “12/21/2007″ | where {$_.Reason -eq “BlockListProvider”} | ft Timestamp,IPAddress,ReasonData
You can also look for messages blocked by a particular IP Block List Povider:
Get-AgentLog -StartDate “4/15/2007″ -EndDate “4/17/2007″ | where {$_.ReasonData -eq “Spamhaus SBL-XBL”}

Search by SCL thresholds

For messages scanned by the Content Filter Agent, the Reason field contains details likeSCLAtOrAboveDeleteThreshold, SCLAtOrAboveRejectThreshold, etc. The ReasonData field contains the SCL value assigned to the message. To get a list of messages above the SCLDeleteThreshold, use the following command:
Get-AgentLog -StartDate “4/15/2007″ -EndDate “4/17/2007″ | where {$_.reason -eq “SCLAtOrAboveDeleteThreshold”}
As shown in the above examples, you can use the Get-AgentLog command and pipe the data to filter it based on the fields logged. You can get more details about agent logs – including the fields logged, from the Managing Agent Logging section in Exchange Server 2007 documentation.

Donnerstag, 18. November 2010

Import Exchange Global Address List (GAL) images into Active Directory (Part 3)

ADPhoto

Outlook 2010, Lync 2010 und diverse andere Lösungen können neben dem Namen und Mailadressen auch Bilder angezeigt werden. Hier zwei Beispiele: Einmal der Lync 2010 Client mit Herrn Deutinger (Ferrari Electronic) als Partner in der Federation und Herr Ulbrich in Outlook. 
 
Da stellt sich natürlich die Frage, wo dieses Bild hinterlegt ist. Im Fall von Outlook könnte man noch tricksen, indem man einen Kontakt mit dem Bild anlegt. In Lync kann ich ein Bild auf einem Webserver ablegen und über eine URL erreichbar machen und so "verbreiten".
Zumindest für Mitarbeiter ist es aber schon seit Windows 2003 möglich, solche Informationen im Active Directory mit zu hinterlegen.
Berechtigungen: Ein Benutzer kann sein Bild nicht selbst aktualisieren. Es muss also ein administrativer Benutzer sein, welcher auf das Feld "ThumbnailPhoto" zum Schreiben berechtigt ist.
Solche Updates muss also ein entsprechend auf das Benutzerobjekt privilegiertes Konto durchführen.

Hintergrund "ThumbnailPhoto"

Das Feld welches von Outlook, Exchange und Lync genutzt wird, ist das Property "ThumbnailPhoto". Allerdings gibt es noch andere Felder, die ähnliche Funktionen haben und daher leicht verwechselt werden können:
FeldnameSchema VersionTyp/Größe 
ThumbnailphotoWindows 2003 und höherOktet 0-10240 byte
Einwertig
Im GC ab Windows 2008
Einsatz in OCS/Outlook
jpegPhoto
http://msdn.microsoft.com/en-us/library/ms676813
Windows 2003 und höherOktet ohne grenzen
Mehrwertig
nicht genutzt
ThumbnaillogoWindows 2003 und höher0-32767
Einwertig
nicht genutzt
Relevant ist, wie gesagt, nur das Feld "Thumbnailphoto", dessen genaue Definition im Schema zu sehen ist:

Import mit Bordmittel

Da diese Funktion erstmalig mit Exchange 2010 und Outlook 2010 verfügbar wurde, gibt es auch ein Exchange Commandlet zum Import.
Import-RecipientDataProperty 
  -Identity username 
  -Picture -FileData ([Byte[]]$(Get-Content -Path "c:\user.jpg" -Encoding Byte -ReadCount 0))
Wer also die Bilder schön z.B. mit dem SamAccountName benannt hat, kann recht einfach eine Schleife durch das Verzeichnis der Bilder drehen und die dazu gehörigen Benutzer entsprechend aktualisieren. Allerdings kann dieses Commandlet das Bild nicht auf die richte Größe zusammenschrumpfen. Sie müssen schon selbst dafür sorgen, dass das Bild maximal 10 kB groß ist.

ADPhotoEdit

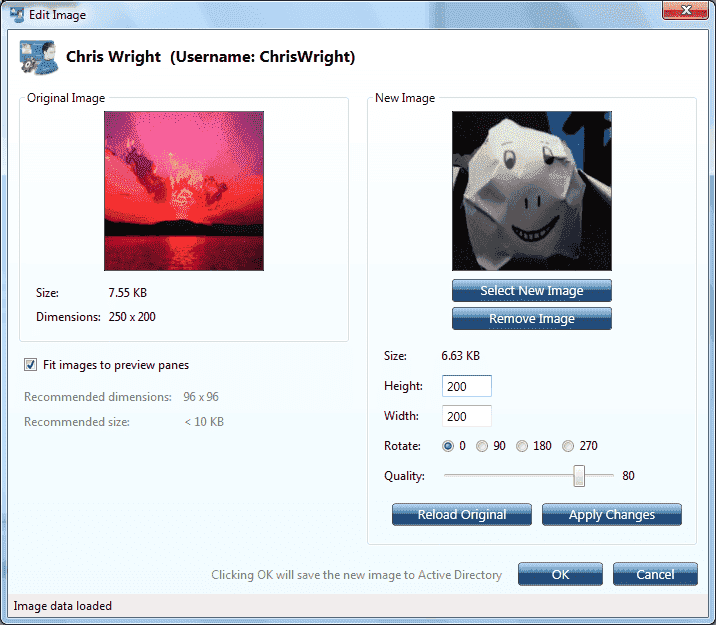
Wo Bordmittel an ihre Grenzen stoßen, öffnet sich ein Markt für Drittanbieter oder Freeware-Tools. Unter all den vielen Programmen und Skripten, die die JPG-Bilder in das passende Feld im AD importieren, gibt es mit ADPhotoEdit ein nettes Programm, welches die Verwaltung per GUI stark vereinfacht und sogar die Bilder zurecht schrumpfen kann.
Das Programm "AD Photo Edit" kann per GUI einfach Bilder anzeigen und auch verändern und wieder speichern.
http://www.cjwdev.co.uk/Software/ADPhotoEdit/Info.html
Das kleine ZIP-Paket muss einfach ausgepackt und das Setup aufgerufen werden.
Das Programm prüft beim Aufruf nach Updates, indem es versucht auf www.cjwdev.co.uk zuzugreifen.

Aber unschön ist es
Das Programm selbst ist ein kleines .NET Programm mit grade mal wenigen kb Größe. Wobei natürlich das .NET Framework vorhanden sein muss.
Nach dem Start suche sie nach den Benutzern. Wenn Sie im Filterfeld ein "*" eintragen, dann werden alle Benutzer gesucht.
Sie sehen dann sofort die Benutzer und neben dem SAMAccountName auch die Mailadresse und das Bild, sofern vorhanden. Das Bild ist dabei nicht auf eine bestimmte Größe (in Pixel) beschränkt, sondern in der Dateigröße. Das Programm ist smart genug, auch ein sehr großes Bild so zu verkleinern, dass es in die 10kb des Feldes ThumbnailPhoto passt. Da fehlt dann wirklich nur noch der Bulk Import.
Schade, dass ein Benutzer das Bild nicht selbst aktualisieren kann. Dazu fehlen ihm sowohl die Rechte als auch die Hilfsmittel.

Montag, 15. November 2010

Import Exchange Global Address List (GAL) images into Active Directory (Part 2)

Over the years, displaying recipient photographs in the Global Address List (GAL) has been a frequently-requested feature, high on the wish lists of many Exchange folks. Particularly in large organizations or geographically dispersed teams, it's great to be able to put a face to a name for people you've never met or don't frequently have face time with. Employees are commonly photographed when issuing badges/IDs, and many organizations publish the photos on intranets.
There have been questions about workarounds or third-party add-ins for Outlook, and you can also find some sample code on MSDN and elsewhere. A few years ago, an IT person wrote ASP code to make employee photos show up on the intranet based on the Employee ID attribute in Active Directory (AD) - which was imported from the company's LDAP directory. A fun project to satisfy the coder alter-ego of the IT person.
Luckily, you won't need to turn to your alter-ego to do this. Exchange 2010 and Outlook 2010 make this task a snap, with help from AD. AD includes the Picture attribute (we'll refer to it using its ldapDisplayName: thumbnailPhoto) to store thumbnail photos, and you can easily import photos— not the high-res ones from your 20 megapixel digital camera, but small, less-than-10K-ish ones, using Exchange 2010's Import-RecipientDataProperty cmdlet.
The first question most IT folks would want to ask is— What's importing all those photos going to do to the size of my Active Directory database? And how much Active Directory replication traffic will this generate? The thumbnailPhoto attribute can accomodate photos of up to 100K in size, but the Import-RecipientDataProperty cmdlet won't allow you to import a photo that's larger than 10K. (Note, the attribute limit was stated as 10K earlier. This has been updated to state the correct value. -Bharat)
The original picture used in this example was 9K, and you can compress it further to a much smaller size - let's say approximately 2K-2.5K, without any noticeable degradation when displayed at the smaller sizes. If you store user certificates in Active Directory, the 10K or smaller size thumbnail pictures are comparable in size. Storing thumbnails for 10,000 users would take close to 100 Mb, and it's data that doesn't change frequently.
Note: The recommended thumbnail photo size in pixels is 96x96 pixels.
With that out of the way, let's go through the process of adding pictures.

A minor schema change

First stop, the AD Schema. A minor schema modification is required to flip the thumbnailPhoto attribute to make it replicate to the Global Catalog.
  1. If you haven't registered the Schema MMC snap-in on the server you want to make this change on, go ahead and do so using the following command:
    Regsvr32 schmmgmt.dll
  2. Fire up a MMC console (Start -> Run -> MMC) and add the Schema snap-in
  3. In the Active Directory Schema snap-in, expand the Attributes node, and then locate the thumbnailPhoto attribute. (The Schema snap-in lists attributes by its ldapDisplayName).
  4. In the Properties page, select Replicate this attribute to the Global Catalog, and click OK.

    Figure 1: Modifying the thumbnailPhoto attribute to replicate it to Global Catalog

Loading pictures into Active Directory

Now you can start uploading pictures to Active Directory using the Import-RecipientDataProperty cmdlet, as shown in this example:
Import-RecipientDataProperty -Identity "Bharat Suneja" -Picture -FileData ([Byte[]]$(Get-Content -Path "C:\pictures\BharatSuneja.jpg" -Encoding Byte -ReadCount 0))
To perform a bulk operation you can use Get-Mailbox cmdlet with your choice of filter (or Get-DistributionGroupMember if you want to do this for members of a distribution group), and pipe the mailboxes to a foreach loop. You can also retrieve the user name and path to the thumbnail picture from a CSV/TXT file.

Thumbnails in Outlook 2010

Now, let's fire up Outlook 2010 and take a look what that looks like.
In the Address Book/GAL properties for the recipient

Figure 2: Thumbnail displayed in a recipient's property pages in the GAL

When you receive a message from a user who has the thumbnail populated, it shows up in the message preview.

Figure 3: Thumbnail displayed in a message
While composing a message, the thumbnail also shows up when you hover the mouse on the recipient's name.

Figure 4: Recipient's thumbnail displayed on mouse over when composing a message
There are other locations in Outlook where photos are displayed. For example, in the Account Settings section in the Backstage Help view.
Update from the Outlook team
Our friends from the Outlook team have requested us to point out that the new Outlook Social Connector also displays GAL Photos, as well as photos from Contacts folders and from social networks, as shown in this screenshot.

Figure 5: Thumbnail photos displayed in the People Pane in the Outlook Social ConnectorMore details and video in Announcing the Outlook Social Connector on the Outlook team blog.

GAL Photos and the Offline Address Book

After you've loaded photos in Active Directory, you'll need to update the Offline Address Book (OAB) for Outlook cached mode clients. This example updates the Default Offline Address Book:
Update-OfflineAddressBook "Default Offline Address Book"
In Exchange 2010, the attributes in an OAB can be customized. This is done using the ConfiguredAttributes property of the OAB (see Set-OfflineAddressBook cmdlet). ConfiguredAttributes is populated with the default set of attributes, and you can modify it to add/remove attributes as required.
By default, thumbnailPhoto is included in the OAB as an Indicator attribute. This means the value of the attribute isn't copied to the OAB— instead, it simply indicates the client should get the value from AD. If an Outlook client (including Outlook Anywhere clients connected to Exchange using HTTPS) can access AD, the thumbnail will be downloaded and displayed. When offline, no thumbnail downloads. Another example of an Indicator attribute is the UmSpokenName.
You can list all attributes included in the default OAB using the following command:
(Get-OfflineAddressBook "Default Offline Address Book").ConfiguredAttributes
For true offline use, you could modify the ConfiguredAttributes of an OAB to make thumbnailPhoto a Value attribute. After this is done and the OAB updated, the photos are added to the OAB (yes, all 20,000 photos you just uploaded...). Depending on the number of users and sizes of thumbnail photos uploaded, this would add significant bulk to the OAB. Test this scenario thoroughly in a lab environment— chances are you may not want to provide the GAL photo bliss to offline clients in this manner.
To prevent Outlook cached mode clients from displaying thumbnail photos (remember, the photo is not in the OAB— just a pointer to go fetch it from AD), you can remove the thumbnailPhoto attribute from the ConfiguredAttributes property of an OAB using the following command:
$attributes = (Get-OfflineAddressBook "Default Offline Address Book").ConfiguredAttributes
$attributes.Remove("thumbnailphoto,Indicator")
Set-OfflineAddressBook "Default Offline Address Book" -ConfiguredAttributes $attributes

Import Exchange Global Address List (GAL) images into Active Directory (Part 1)

If you are using Outlook 2010 then you have probably noticed the ability for Outlook to display an image/photo for each user or contact in the Global Address List (GAL) – if you don’t know what this feature is, see here.
Import Exchange Global Address List images into Active Directory - AD PHOTO EDIT - Standard Results Import Exchange Global Address List images into Active Directory - AD PHOTO EDIT - edit image
As you will note from that article, the only method that Microsoft provides for importing images into the Active Directory attribute that Outlook 2010 pulls these images from is a PowerShell cmdlet that comes with Exchange 2010 (you don’t need Exchange 2010 for this to work). This cmdlet also limits you to selecting images that are less than 10 KB even though the thumbnailPhoto attribute in Active Directory is only limited to 100 KB.
So I decided to make a user friendly GUI for adding/removing/editing these images to Active Directory.

Rename Onedrive Business root folder

Rename Onedrive Business root folder Here is what I remember: In the Office 365 web admin pages, change the organization name to a shorte...