Posts mit dem Label Exchange 2007 werden angezeigt. Alle Posts anzeigen

Donnerstag, 19. April 2012

Abgelehnte Besprechungsanfragen bei Exchange 2007


Will man einen Raum länger als 1440 Minuten (24 Stunden) buchen, dann bekommt man (in der Standardeinstellung) folgende Mitteilung vom Exchange 2007 Server:
Ihre Besprechungsanfrage wurde abgelehnt.
Diese Ressource akzeptiert keine Besprechungen, die länger als 1440 Minuten dauern.
Bei einem Exchange 2010 Server kann man dies leicht umgehen und jeden Raum in der grafischen Oberfläche einstellen. In der 2007er Version muss man dies über die Shell machen.
Der Befehl für einen Raum lautet (Änderung auf 5 Tage):
Set-MailboxCalendarSettings -Identity "Raumname" -MaximumDurationInMinutes 7200
Um alle Räume zu ändern (auch 5 Tage):
get-mailbox | Where-Object { $_.IsResource -eq 'true'} | Set-MailboxCalendarSettings -MaximumDurationInMinutes 7200
Um die Funktion komplett zu deaktivieren (für alle angelegte Räume)
get-mailbox | Where-Object { $_.IsResource -eq 'true'} | Set-MailboxCalendarSettings -EnforceSchedulingHorizon $false

Samstag, 31. Dezember 2011

How to renew a self signed certificate in Exchange Server 2007


When a new Exchange Server 2007 role is installed on a computer the server automatically generates a self signed certificate to be used with services like transport (SMTP), POP,  IIS (OWA and Exchange Web Services) and IMAP. This certificate expires right after the completion of one  year from the date server was installed or the certificate was reassigned manually. To check the status of the certificate using Exchange Management Shell. Executing the cmdlet Get-ExchangeCertificate |FL displays all relevant information about all the certificates assigned, enabled and being used or not used by Exchange Services.
image_thumb2
You may see more than one certificate listed on your exchange server(s) and that may be simply because you or someone else from your team have already tried working with certificates on the server.
If you see the above picture, you will notice that the certificate I have on my server is valid till 24th March 2010. NotAfter holds the value in mm/dd/yyyy h:mm:ss format.NotAfter – means this certificate will not be valid after the time stamp listed in this field. On the other hand the value NotBefore – means that this certificate will not be valid before the time stamp mentioned.
So once you cross the date listed in field NotAfter the certificate becomes invalid and indeed may open up doors to many other troubles like connectivity to web services, SMTP transport, POP and IMAP retrieval, etc. To renew the certificate you can simply run a cmdlet and get a new self signed certificate. But, this is just not as simple as simply running a cmdlet and get a new certificate, there is a procedure to do it. Check the following steps:
1. Run Get-ExchangeCertificate |FL – This will list details of all certificates that you have assigned to Exchange Services. Please understand, this cmdlet does not retrieve any information about any other certificate from local certificate store which is not used by Exchange. Once you get the output printed on the screen; note down theThumbprint of certificate into a notepad.
2. Run Get-ExchangeCertificate –Thumbprint “58C846DEEA2865CA9E6DD4B42329A9AC994EBF63” | New-ExchangeCertificate . This renews the certificate. You will notice the moment you press enter on keyboard you may be prompted to confirm if you want to use the same certificate for SMTP service.
image_thumb24
3. Check if the certificate is renewed. This can be simply examined by looking at the changes in thumbprint of the certificate after running the cmdlet mentioned in step 2. You can see the changed thumbprint in below picture.
image_thumb25
4. Looking correctly to the above picture you will also notice that the certificate is not being used to secure IIS based services anymore though the NotAfter and NotBefore dates have changed. To enable this renewed certificate for IIS as well run Enable-ExchangeCertificate – Thumbprint “E0BB201793DC74D0F94F3275E6AA53BA75907565” –Services IIS
5. Verify all the services are working correctly after renewing and enabling the certificate.
6. Remove old certificate by running Remove-ExchangeCertificate –Thumbprint “58C846DEEA2865CA9E6DD4B42329A9AC994EBF63”

Montag, 10. Oktober 2011

Find an email address in Exchange / Active Directory


In Active Directory when you have an Exchange server a user or group, even a public folder can have multiple smtp email addresses associated with the entity (user/group/public folder etc.), but finding the non-default email address can be tedious. A great way to search for it is:
Go to Active Directory Users and Computers –> right click on the domain and click find –> in the find field, change the criteria to ‘custom search’ –> click the advanced tab where you can type in a LDAP query. If you are trying to find out who hassales@yourdomain.com, type proxyAddresses=smtp:sales@yourdomain.com.
Wildcards can be added to the email address portion, and you can also type a wildcard ie. *.yourdomain.com and then change the view to add the proxyaddress column to see all of the entities with their proxyAddresses (email addresses)

Donnerstag, 15. September 2011

How to install Exchange Server 2007 SP3 on a computer that is running Windows SBS 2008

This article discusses the steps that are required to install Microsoft Exchange Server 2007 Service Pack 3 (SP3) on a computer that is running Windows Small Business Server (Windows SBS) 2008.

To download and install Microsoft Exchange Server 2007 SP3, visit the following Microsoft website:


Note Microsoft Exchange Server 2007 Service Pack 2 (SP2) on a computer that is running Windows SBS 2008, you first had to install an installation tool. For more information about the Microsoft Exchange Server 2007 SP 2 Installation Tool for Windows SBS 2008, click the following article number to view the article in the Microsoft KNowledge Base:

974271  Description of the Microsoft Exchange Server 2007 Service Pack 2 Installation Tool for Windows Small Business Server 2008

This tool is not required to install Microsoft Exchange Server 2007 SP3 on a computer that is running Windows SBS 2008.
  1. Stop the following services:
    • FSCController
    • Microsoft Exchange Information Store
    • Microsoft Exchange Transport
  2. Open an elevated command prompt.

    To open an elevated command prompt, click Start
    the Start button
     , type cmd in the Start Search box, right-clickcmd.exe in the Programs list, and then click Run as administrator.

    User Account Control permission
     If you are prompted for an administrator password or for confirmation, type the password, or provide confirmation.
  3. Change the current directory to the following directory:
    C:\Program Files (x86)\Microsoft Forefront Security\Exchange Server
  4. At the command prompt, type the following command, and then press ENTER:
    fscutility /disable
    After you run this command, you receive the following message:
    Removing dependencies...
    dependency on FSCController removed from Microsoft Information Store
    dependency on FSEIMC removed from Microsoft Exchange Transport Service
    Microsoft Exchange Transport Service Agent registration removed

    Status: Microsoft Forefront Server Security NOT Integrated.
After the Forefront Client Security (FCS) scan engine is disabled, you should be able to install the service pack.

After the service pack setup is complete, you must enable Forefront Client Security (FCS) scan engine if you disabled it. To do this, follow these steps:
  1. Stop the following services:
    • Microsoft Exchange Information Store
    • Microsoft Exchange Transport
  2. Open an elevated command prompt.

    To open an elevated command prompt, click Start
    the Start button
     , type cmd in the Start Search box, right-clickcmd.exe in the Programs list, and then click Run as administrator.

    User Account Control permission
     If you are prompted for an administrator password or for confirmation, type the password, or provide confirmation.
  3. Change the current directory to the following directory:
    C:\Program Files (x86)\Microsoft Forefront Security\Exchange Server
  4. At the command prompt, type the following command, and then press ENTER:
    fscutility /enable
  5. Restart the following services:
    • Microsoft Exchange Information Store
    • Microsoft Exchange Transport

Known issues that may occur after you install Exchange Server 2007 SP3

After you install Exchange Server 2007 SP3, you may be unable to access the following Web sites:
  • https://sites/owa
  • https://sites/remote
Note This issue occurs only if the Internet Address Management wizard has not already been run on the computer.

To resolve this issue, edit the bindings for the SBS Web Applications site to select the correct certificate. To do this, follow these steps:
  1. Open Internet Information Services (IIS) Manager.
  2. Expand server_name.

    Note The server_name placeholder represents the name of the server.
  3. Expand Web Sites.
  4. Right-click SBS Web Applications, and then click Edit Bindings.
  5. Click HTTPs port 443, and then click Edit.
  6. Under SSL certificate, select the Sites certificate.

Mittwoch, 17. August 2011

Folder C:\InetPub\LogFiles are filling up the C drive


The C drive of your Small Business Server 2008 or 2011 is filling rapidly and when you look with a disk analyzer tool like treesize or windirstat you see that the folder C:\inetpub\logs\LogFiles\W3SVC and a 9 or 10 digit number is several or even dozens of GB. When you open one of the logfiles you see only lines with “POST /ApiRemoting30/WebService.asmx – 8530” in it.
The log file directory belongs to the WSUS Administration IIS website, this is using port 8530. But it is not WSUS that is filling these logfiles rapidly but they are filled if you let the SBS console open. Beside closing the SBS console when not needed, there are 2 option to keep the log files under control.
Option 1:
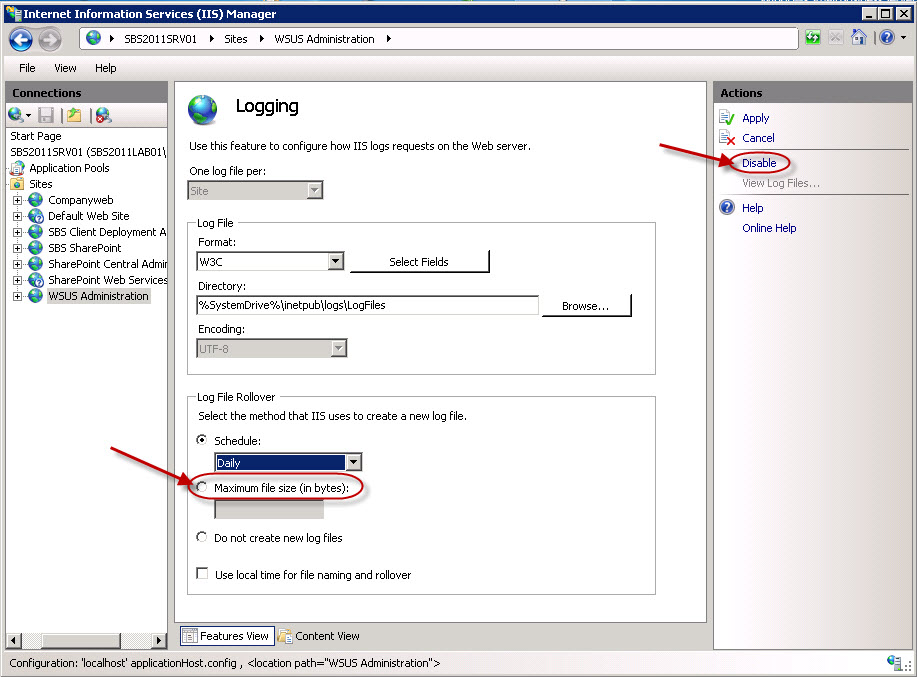
Open Administrative Tools – Internet Information Services (IIS) Manager, browse through Sites and select the WSUS Administration site and open Logging.
You have 2 options, first you can set the “maximum file size (in bytes):” option under Log file rollover to limit the maximum log file size.
Second option is to completely disable logging, by choosing “Disable” on the Actions menu on the right.
Make sure after you changed anything choose Apply on the upper right and do a iisreset.
Option 2:
The another way for controlling these logfiles is, in SBS 2011 there is by default a scheduled task configured that cleans the logfiles older than 100 days. The same task is added to SBS 2008 by installing Update Rollup 5 (KB2458094) only the default setting with this task is to delete the logfile older than 30 days.
You can change the number of days by opening Administrative Tools, Task Scheduler, go to Microsoft, Windows, Windows Small Business Server 2011 Standard, right click the WSUSLogCleaner task and choose properties. Go to the tab Actions and choose Edit…
The value given by Add arguments (optional) is the value for the number of days the logfiles will be kept. So if your logfile directory is stil really big you can decrease the number of days to something more manageable like 30 days or if this is still to much to something like 14 days.
Conclusion:
The grown of the logfiles is caused by not closing the SBS console. My logfiles have shrunken to 20% of the original size with the console open whole day. There are 2 options to control the growth of these logfiles, IIS to disable logging or maximize the logfile size or the task added in sbs 2008 rollup 5 or sbs 2011 to control the maximum number of days logfiles are kept.

Finding users who have Send-As or Full Access permissions to mailboxes

The following one-liner lists all mailboxes where another user has Send-As permissions, and who that user is:
Get-Mailbox -Resultsize Unlimited | Get-ADPermission | ? {($_.ExtendedRights -like "*send-as*") -and -not ($_.User -like "nt authority\self")} | ft Identity, User -auto

And this one-liner displays all mailboxes where another user has Full Access permissions, and who that user is:

Get-Mailbox -ResultSize Unlimited | Get-MailboxPermission | ? {($_.AccessRights -match "FullAccess") -and -not ($_.User -like "NT AUTHORITY\SELF")} | ft Identity, User

Both of these one-liners are very useful to determine who has access to other people's mailboxes.

Mittwoch, 2. Februar 2011

Sicherheitswarnung beim Starten von Outlook 2007 und Verbinden mit einem Postfach auf einem Server mit Exchange Server 2007 oder 2010: "Der auf dem Sicherheitszertifikat angegebene Name ist ungültig oder stimmt nicht mit dem Namen der Site überein"

Problembeschreibung:


Sie starten Microsoft Office Outlook 2007 und stellen dann eine Verbindung mit einem Postfach her, das auf einem Postfachserver gespeichert ist, auf dem Microsoft Exchange Server 2007 oder Microsoft Exchange Server 2010 ausgeführt wird. In diesem Szenario wird die folgende Sicherheitswarnung angezeigt:
Der auf dem Sicherheitszertifikat angegebene Name ist ungültig oder stimmt nicht mit dem Namen der Site überein.
Hinweis Dieses Szenario betrifft nur Outlook-Clients, die aus dem lokalen Netzwerk heraus eine Verbindung mit Exchange herstellen. Es betrifft keine Outlook-Remoteclients, die die Verbindung mit Exchange über Outlook Anywhere herstellen.


Ursache:


Das Problem tritt auf, wenn die folgenden Bedingungen vorliegen:
  • Sie ersetzen das standardmäßige selbstsignierte Exchange Server 2007- oder Exchange Server 2010-Zertifikat durch ein anderes Zertifikat. 

    Hinweis Bei der Installation von Exchange Server 2007 oder Exchange Server 2010 erstellt das Setupprogramm ein standardmäßiges selbstsigniertes Zertifikat.
  • Der allgemeine Name des Ersatzzertifikats entspricht nicht dem vollqualifizierten Domänennamen (Fully Qualified Domain Name, FQDN) der URL, die in den folgenden Objekten gespeichert ist:
    • Dienstverbindungspunkt-Objekt für den AutoErmittlungsdienst
    • InternalUrl-Attribut des Exchange 2007-Webdiensts (EWS)
    • InternalUrl-Attribut des Offlineadressbuch-Webdiensts
    • InternalUrl-Attribut des Exchange Unified Messaging-Webdiensts (UM)
Standardmäßig verweist die in diesen Objekten gespeicherte URL auf den NetBIOS-Namen des Servers. Beispielsweise wird eine URL gespeichert, die wie folgt aussieht:
https://NetBIOS-Name.contoso.com/autodiscover/autodiscover.xml
Diese kann von dem im FQDN des Ersatzzertifikats verwendeten Hostnamen abweichen. Das Ersatzzertifikat kann z. B. einen FQDN ähnlich dem folgenden FQDN aufweisen:
mail.contoso.com
Dieses Problem führt zu einem Namenskonflikt. Daher wird die Sicherheitswarnung angezeigt, wenn Sie versuchen, eine Verbindung von Outlook 2007 zum Postfach herzustellen.


Lösung:


Um das Problem zu beheben, ändern Sie die URLs der entsprechenden Exchange 2007-Komponenten. Gehen Sie hierzu folgendermaßen vor:
  1. Starten Sie die Exchange-Verwaltungsshell.
  2. Ändern Sie die AutoErmittlungs-URL im Dienstverbindungspunkt. Der Dienstverbindungspunkt ist im Active Directory-Verzeichnisdienst gespeichert. Um diese URL zu ändern, geben Sie den folgenden Befehl ein, und drücken Sie anschließend die EINGABETASTE:
    Set-ClientAccessServer -Identity CAS-Servername -AutodiscoverServiceInternalUri https://mail.contoso.com/autodiscover/autodiscover.xml
  3. Ändern Sie das Attribut InternalUrl des EWS. Geben Sie hierzu den folgenden Befehl ein, und drücken Sie die EINGABETASTE:
    Set-WebServicesVirtualDirectory -Identity "CAS-Servername\EWS (Standardwebsite)" -InternalUrl https://mail.contoso.com/ews/exchange.asmx
  4. Ändern Sie das Attribut InternalUrl für die Verteilung des webbasierten Offlineadressbuchs. Geben Sie hierzu den folgenden Befehl ein, und drücken Sie die EINGABETASTE:
    Set-OABVirtualDirectory -Identity "CAS-Servername\oab (Standardwebsite)" -InternalUrl https://mail.contoso.com/oab
  5. Ändern Sie das Attribut InternalUrl des UM-Webdiensts. Geben Sie hierzu den folgenden Befehl ein, und drücken Sie die EINGABETASTE:
    Set-UMVirtualDirectory -Identity "CAS-Servername\unifiedmessaging (Standardwebsite)" -InternalUrl https://mail.contoso.com/unifiedmessaging/service.asmx
    Hinweis Dieser Befehl ist nur in einer Exchange 2007-Umgebung erforderlich. In Exchange 2010-Umgebungen existiert der Befehl nicht mehr. Stattdessen wird die WebServices-URL zu diesem Zweck verwendet.
  6. Öffnen Sie IIS-Manager.
  7. Erweitern Sie den lokalen Computer und dann Anwendungspools.
  8. Klicken Sie mit der rechten Maustaste auf MSExchangeAutodiscoverAppPool, und klicken Sie dann auf Wieder verwenden.
Wichtig Bei diesen Schritten wird davon ausgegangen, dass ein Hostdatensatz im DNS existiert, um den angegebenen FQDN der IP-Adresse des CAS-Servers zuzuordnen. Stellen Sie sich beispielsweise das folgende Szenario vor:
  • Die ursprünglichen internen URLs für die Exchange-Komponenten zeigen auf den internen FQDN des Servers. Eine dieser URLs zeigt beispielsweise auf folgendes Ziel:
    https://Servername.contoso.com/ews/exchange.asmx
  • Der auf dem Zertifikat angegebene FQDN zeigt auf den für den externen Zugriff verwendeten Hostnamen des Servers. Im Zertifikat wird z. B. ein FQDN wie "mail.contoso.com" angegeben.
In diesem Szenario müssen Sie einen Hostdatensatz für den Mailhostnamen hinzufügen, der der intern für den Zugriff verwendeten IP-Adresse des CAS-Servers zugeordnet ist, um internen Clients den Zugriff auf den Server zu ermöglichen.

Montag, 13. Dezember 2010

Exchange Server 2007/2010: Managing And Filtering Anti-Spam Agent Logs

Exchange 2007 includes a number of anti-spam agents to filter spam. The anti-spam agents log their actions in (anti-spam) agent logs. The default agent log locations:
  • Exchange 2010: \Exchange Server\V14\TransportRoles\Logs\AgentLog
  • Exchange 2007: \Exchange Server\TransportRoles\Logs\AgentLog

After you run the Install-AntispamAgents.ps1 script, restart the Microsoft Exchange Transport service, and set the InternalSMTPServers parameter.

You need to be assigned permissions before you can perform this procedure. To see what permissions you need, see the "Hub Transport server" entry in the Transport Permissions topic.


Run the following command from the %system drive%/Program Files\Microsoft\Exchange Server\V14\Scripts folder.
./install-AntispamAgents.ps1


After the script has run, restart the Microsoft Exchange Transport service by running the following command.
Restart-Service MSExchangeTransport

Agent Log Configuration

You can’t change the agent log location. Here are the available config options:
  1. Enable/Disable agent log: On transport servers with anti-spam agents installed, agent logging is enabled by default. You can disable it by adding the AgentLogEnabled key, and setting it to FALSE.
  2. Max file size: By default, the maximum file size of each agent log is 10 Mb (10485760 bytes). You can modify it by adding AgentLogMaxFileSize key and providing the desired value (in bytes). Parsing very large log files can be slower— the default max file size works for most deployments.
  3. Max directory size:: By default, the size of the directory is capped at 250 Mb(262144000 bytes). You can modify it by adding the AgentLogMaxDirectorySize key and providing the desired value (in bytes). In a high volume environment, you must consider the volume of log files generated in a day, and determine the space required based on how many days’ worth of log files you want to retain for troubleshooting or to meet your organization’s retention requirements.
  4. Agent log age: The age of a log is capped at 30 days. You can modify it by adding theAgentLogMaxAge key and providing the desired value. Logs are flushed when they’re older than the AgentLogMaxAge, or if the directory size reaches the AgentLogMaxDirectorySize(250 Mb by default), whichever happens first. If it’s important to maintain agent logs for a certain number of days, you must consider the volume of logs generated daily, and raise the AgentLogMaxDirectorySize if required.
Exchange 2007 RTM has only one configuration option for the agent log – that to enable or disable it. Exchange Server 2007 SP1 includes the additional configuration parameters listed above to control the max directory size, file size and age of agent logs added.
The agent log configuration parameters can be controlled by editing theEdgeTransport.exe.config file, located in \Exchange Server\Bin folder on Edge and Hub Transport servers.
Note, the key names in EdgeTransport.exe.config are case-sensitive.

Disable agent logging

To disable agent logging, insert the following key under  in the config file:

Modify agent log configuration

In the following example, we modify max directory size to 500 Mb, file size to 20 Mb, and age to 60 days, by creating new keys in EdgeTransport.exe.config:


Parsing the agent log

You can parse the agent log using the Get-AgentLog command from the shell.
By default, the Get-AgentLog cmdlet parses agent logs in the default location (\Exchange Server\TransportRoles\Logs\AgentLog). Depending on your troubleshooting and log retention requirements, you can move older files to an another location. To parse agent logs in an alternate location, you must specify the path. In this example, the agent logs have been copied to Z:\Antispam Agent Logs directory:
Get-AgentLog -location “Z:\AntiSpam Agent Logs”

Agent log format and fields

Agent log file names are named AGENTLOGyyyymmdd-nnnn.log. It’s easy to decipher yyyy stands for the year, mm is the month, and dd is the date. The nnnn is a serial number, starting at 0001, rolled over when more than one log is generated in a day. The date is UTC.
Each agent log starts with the following header fields:
#Software: Microsoft Exchange Server
#Version: 8.0.0.0
#Log-type: Agent Log
#Date: 2010-08-07T00:00:01.500Z
#Fields: Timestamp,SessionId,LocalEndpoint,RemoteEndpoint,EnteredOrgFromIP,
MessageId,P1FromAddress,P2FromAddresses,Recipient,NumRecipients,
Agent,Event,Action,SmtpResponse,Reason,ReasonData,Diagnostics
Here’s what an entry in the agent log looks like, as output by the Get-AgentLog cmdlet. Note, not all fields are displayed by default when you use the cmdlet:

Timestamp : 4/16/2007 12:39:49 AM
SessionId : 08C948C83FB951AC
IPAddress : 72.46.133.113
MessageId :
P1FromAddress : ret@noncornelan.com
P2FromAddresses : {}
Recipients : {foo@yourdomain.com}
Agent : Connection Filtering Agent
Event : OnRcptCommand
Action : RejectCommand
SmtpResponse : 550 5.7.1 Recipient not authorized, your IP has been found on a block list
Reason : BlockListProvider
ReasonData : Spamhaus SBL-XBL
Diagnostics :
As seen in the above output, the logs provide adequate information for reporting on anti-spam activity, as well as for troubleshooting anti-spam issues like messages not being received/wrongly filtered out.
Getting to know the agent logs will make troubleshooting such issues much easier.

Searching agent logs

By default, the Get-AgentLog command returns all the entries in the agent logs. This can take a long time and results in all entries scrolling by quickly in your shell window. The only filtering options available with the Get-AgentLog cmdlet are start and end dates.

Filter by date and time

Agent logs can be constrained to a particular date and time – the recommended way to perform most agent log searches, unless you want to immerse yourself in 30 days (or 250 Mb) of anti-spam goodness! This is done using the -StartDate and -EndDate parameters, as shown in this example:
Get-AgentLog -StartDate “4/16/2007″ -EndDate “4/17/2007″
You can also constrain it further by adding time of the day:
Get-AgentLog -StartDate “4/17/2007 8:00 AM” -EndDate “4/17/2007 2:00 PM”

Search messages by recipients and senders

Although the Get-AgentLog command only takes these 3 parameters – location, StartDate, and EndDate, you can further filter the logs using most of its logged fields by using pipelining.
To filter the log to show messages to a particular recipient:
Get-AgentLog -StartDate “4/16/2007″ -EndDate “4/17/2007″ | where {$_.recipients -like “foo@yourdomain.com”}
To search for messages from a particular sender:
Get-AgentLog -StartDate “4/16/2007″ -EndDate “4/17/2007″ | where {$_.P1FromAddress -like “aqe@easymoney2u.com” -or $_.P2FromAddresses -like “aqe@easymoney2u.com”}

Search messages from a sender domain

To search for messages from a particular domain:
Get-AgentLog -StartDate “4/16/2007″ -EndDate “4/17/2007″ | where {$_.P1FromAddress -like “*somedomain.com” -or $_.P2FromAddress -like “*somedomain.com”}

Search messages filtered by a specified anti-spam agent

To filter by the anti-spam agent that acted on a message, e.g. Connection Filtering Agent:
Get-AgentLog -StartDate “4/15/2007″ -EndDate “4/17/2007″ | where {$_.Agent -eq “Connection Filtering Agent”}
Similarly, you can filter by other agents that write to the agent logs: 1) Content Filter Agent 2) SenderID agent 3) Sender Filter agent 4) Recipient Filter agent and 5) Edge Rules agent.

Searching by IP address

To filter agent logs by the sending host’s IP address, use the following command:
Get-AgentLog -StartDate “4/15/2007″ -EndDate “4/17/2007″ | where {$_.IPAddress -eq “72.46.133.113″}

Search messages blocked by RBLs

The reason field in each log entry specifies the reason supplied by the anti-spam agent that takes the action. For instance, as seen in the agent log entry shown earlier in this article, the agent that acted on the message is the Connection Filtering Agent, the reason isBlockListProvider (i.e. “RBL” or “Real-time Block List”, known as IP Block Lists in Exchange Server 2007). The ReasonData field gives you the name of the IP Block List Provider, as configured in Exchange. In the above agent log entry, it is “Spamhaus SBL-XBL”. To constrain the search for messages blocked by IP Block List Providers:
Get-AgentLog -StartDate “4/15/2007″ -EndDate “4/17/2007″ | where {$_.Reason -eq “BlockListProvider”}
To get a list of all IP addresses blocked by IP Block List Providers:
Get-AgentLog -StartDate “12/21/2007″ | where {$_.Reason -eq “BlockListProvider”} | ft Timestamp,IPAddress,ReasonData
You can also look for messages blocked by a particular IP Block List Povider:
Get-AgentLog -StartDate “4/15/2007″ -EndDate “4/17/2007″ | where {$_.ReasonData -eq “Spamhaus SBL-XBL”}

Search by SCL thresholds

For messages scanned by the Content Filter Agent, the Reason field contains details likeSCLAtOrAboveDeleteThreshold, SCLAtOrAboveRejectThreshold, etc. The ReasonData field contains the SCL value assigned to the message. To get a list of messages above the SCLDeleteThreshold, use the following command:
Get-AgentLog -StartDate “4/15/2007″ -EndDate “4/17/2007″ | where {$_.reason -eq “SCLAtOrAboveDeleteThreshold”}
As shown in the above examples, you can use the Get-AgentLog command and pipe the data to filter it based on the fields logged. You can get more details about agent logs – including the fields logged, from the Managing Agent Logging section in Exchange Server 2007 documentation.

Rename Onedrive Business root folder

Rename Onedrive Business root folder Here is what I remember: In the Office 365 web admin pages, change the organization name to a shorte...