Posts mit dem Label Zertifikat werden angezeigt. Alle Posts anzeigen

Montag, 7. September 2015

SSL Certificates CSR Creation :: IIS 8 and IIS 8.5

IIS 8 and IIS 8.5 SSL Certificate CSR Creation

If you already have your SSL Certificate and just need to install it, see IIS 8 and IIS 8.5 SSL Certificate Installation.
How to create a CSR on Windows Server 2012 - IIS 8 and Windows Server 2012 R2 - IIS 8.5
You can use the to create your CSR and to automatically install the certificate on any Windows server.
  1. From the Start screen, click or search for Internet Information Services (IIS) Manager and open it.
  2. Click on the server name.
  3. From the center menu, double-click the "Server Certificates" button in the "IIS" section (it is in the middle of the menu).
    IIS 8 Security Certificates
  4. Next, from the "Actions" menu (on the right), click on "Create Certificate Request..." This will open the Request Certificate wizard.
    IIS 8 Create Certificate Request
  5. In the "Distinguished Name Properties" window, enter the information as follows:
    Common Name - The name through which the certificate will be accessed (usually the fully-qualified domain name, e.g., www.domain.com or mail.domain.com).
    Organization - The legally registered name of your organization/company.
    Organizational unit - The name of your department within the organization (frequently this entry will be listed as "IT," "Web Security," or is simply left blank).
    City/locality - The city in which your organization is located.
    State/province - The state in which your organization is located.
    Country/region - If needed, you can find your two-digit country code in our list.
    IIS 8 Distinguished Name Properties
  6. Click Next.
  7. In the "Cryptographic Service Provider Properties" window, enter the following information and then, click Next:
    Cryptographic service provider - In the drop-down list, select Microsoft RSA SChannel..., unless you have a specific cryptographic provider.
    Bit length - In the drop-down list, select 2048 (or higher).
    IIS 8 Cryptographic Service Provider Properties
  8. Click the ... box to browse to a location where you want to save the CSR file. If you just enter a filename without browsing to a location, your CSR will end up in C:\Windows\System32.
    Remember the filename that you choose and the location to which you save it. You will need to open this file as a text file and copy the entire body of it (including the Begin and End Certificate Request tags) into the online order process when prompted.
    IIS 8 CSR Pending Request Filename
  9. After you receive your SSL Certificate, you can install it.
After DigiCert issues your SSL Certificate, you will first need to install it to the server from which the certificate request was generated. Instructions for:
How to install and configure your SSL Certificate on Windows Server 2012 - IIS 8 and Windows Server 2012 R2 – IIS 8.5 (Single Certificate)
  1. Open the ZIP file containing your certificate. Save the file named your_domain_name.cer to the desktop of the web server you are securing.
  2. From the Start screen, click or search for Internet Information Services (IIS) Manager and open it.
  3. Click on the server name.
  4. From the center menu, double-click the "Server Certificates" button in the "IIS" section (it is in the middle of the menu).
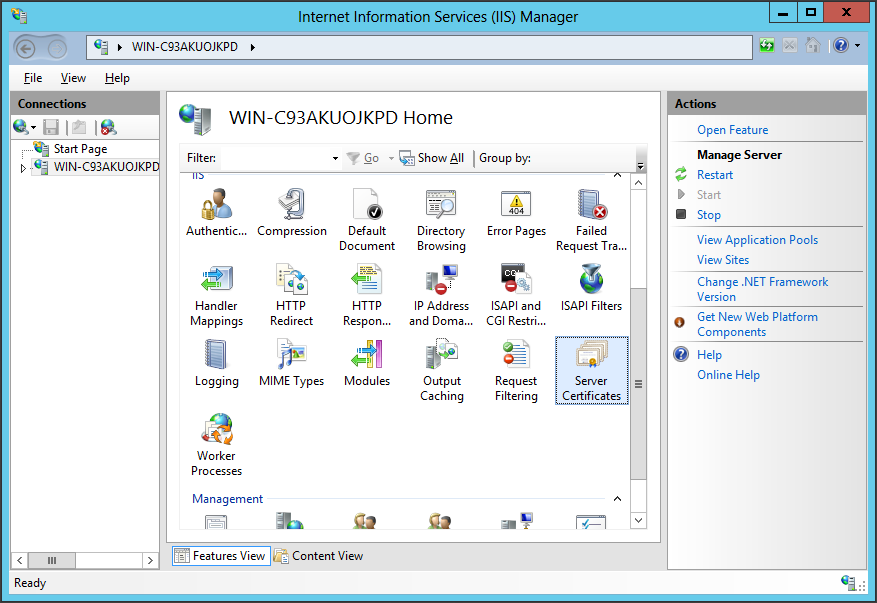
  5. From the "Actions" menu (on the right), click on "Complete Certificate Request..." This will open the Complete Certificate Request wizard.
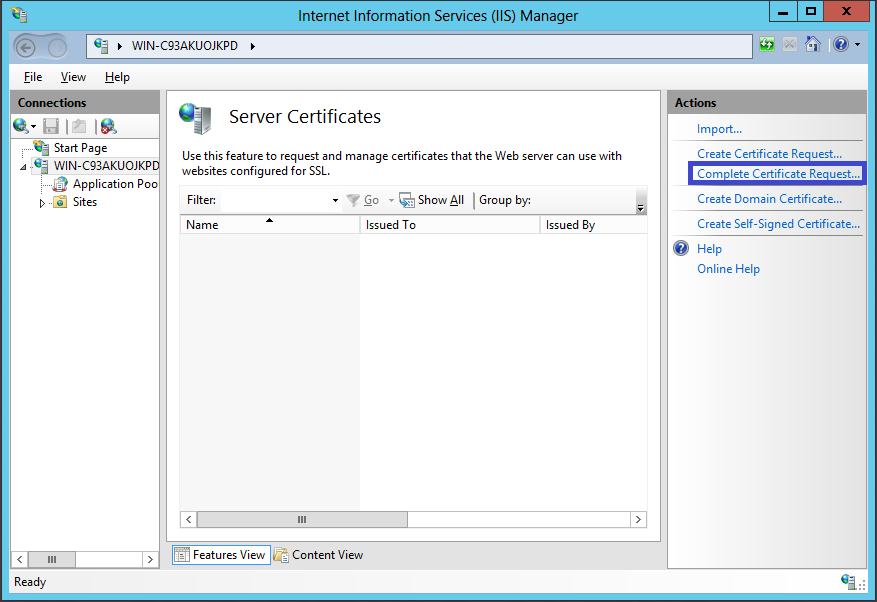
  6. Browse to your_domain_name.cer file that was provided to you by DigiCert. You will then be required to enter a friendly name. The friendly name is not part of the certificate itself, but is used by the server administrator to easily distinguish the certificate. Choose to place the new certificate in thePersonal certificate store.
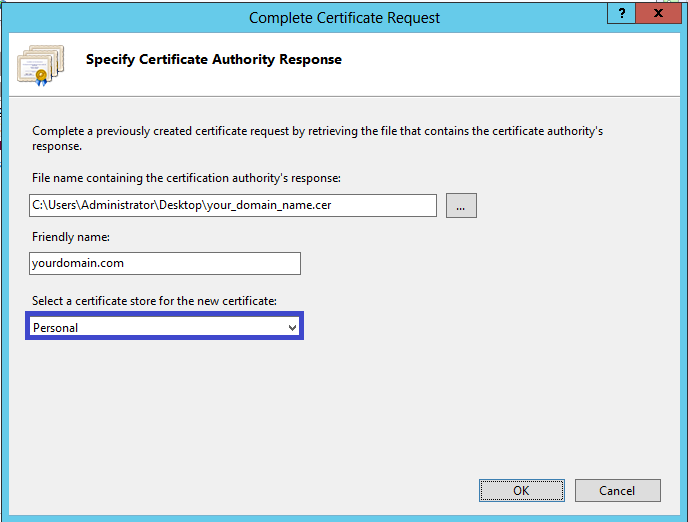
  7. Clicking "OK" will install the certificate to the server.
  8. Once the SSL Certificate has been successfully installed to the server, you will need to assign that certificate to the appropriate website using IIS.
  9. From the "Connections" menu in the main Internet Information Services (IIS) Manager window, select the name of the server to which the certificate was installed.
  10. Under "Sites," select the site to be secured with SSL.
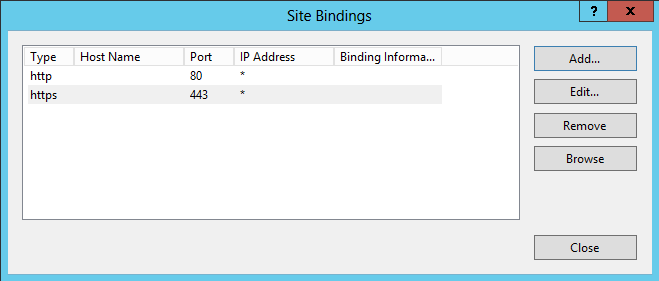
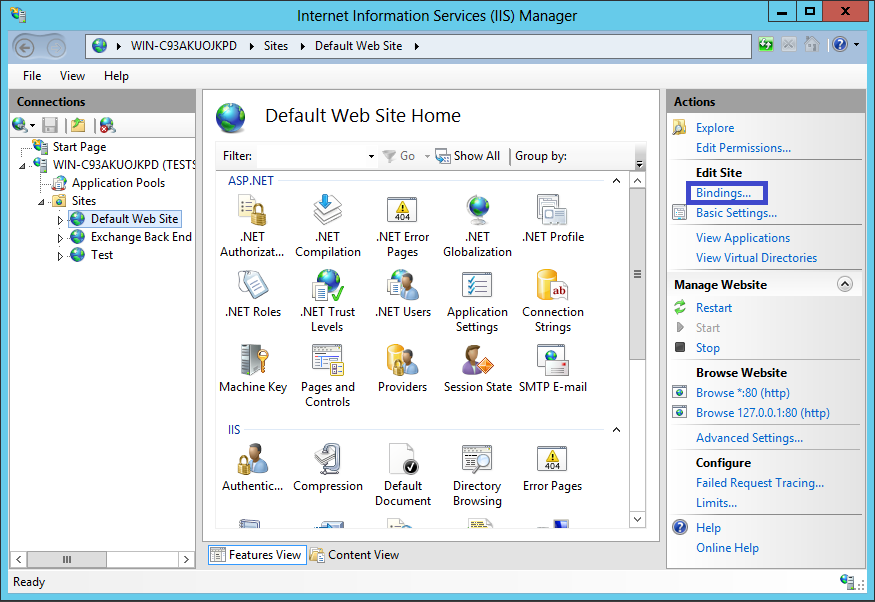
  11. From the "Actions" menu (on the right), click on "Bindings..." This will open the "Site Bindings" window.
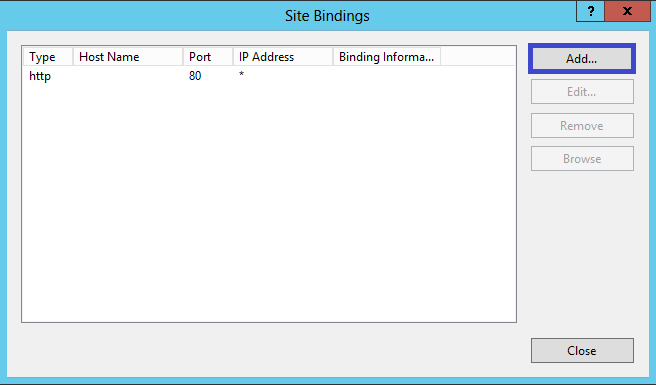
  12. In the "Site Bindings" window, click "Add..." This will open the "Add Site Binding" window.
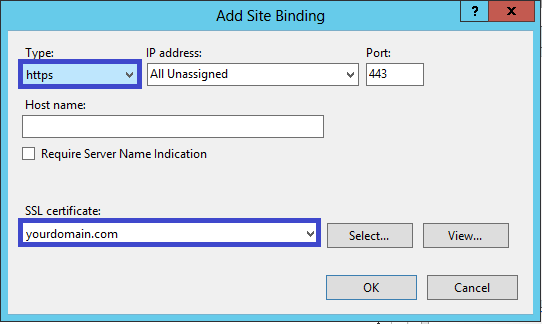
  13. Under "Type" choose https. The IP address should be the IP address of the site or All Unassigned, and the port over which traffic will be secured by SSL is usually 443. The "SSL Certificate" field should specify the certificate that was installed in step 7.
  14. Click "OK."
  15. Your SSL certificate is now installed, and the website configured to accept secure connections.
To enable your SSL certificate for use on other Windows servers, see our PFX export instructions for help.
How to install and configure your SSL Certificate on Windows Server 2012 - IIS 8 and Windows Server 2012 R2 - IIS 8.5 (Multiple Certificates Using SNI)
  1. Open the ZIP file containing your certificate. Save the file named your_domain_name.cer to the desktop of the web server you are securing.
  2. From the Start screen, click or search for Internet Information Services (IIS) Manager and open it.
  3. Click on the server name.
  4. From the center menu, double-click the "Server Certificates" button in the "IIS" section (it is in the middle of the menu).
  5. From the "Actions" menu (on the right), click on "Complete Certificate Request..." This will open the Complete Certificate Request wizard.
  6. Browse to your_domain_name.cer file that was provided to you by DigiCert. You will then be required to enter a friendly name. The friendly name is not part of the certificate itself, but is used by the server administrator to easily distinguish the certificate. Choose to place the new certificate in the Web Hosting certificate store.
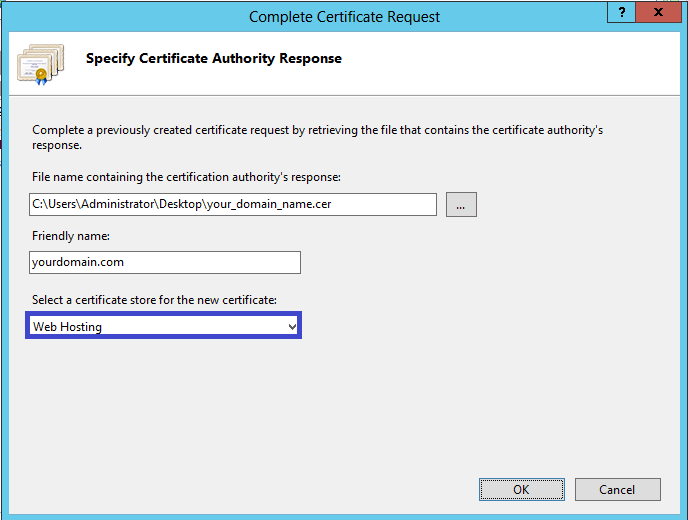
  7. Clicking "OK" will install the certificate to the server.
    Note: There is a known issue in IIS 8 giving the following error: "Failed to remove the certificate" If this is the same server that you generated the CSR on then, in most cases, the certificate is actually installed. Simply cancel the dialog and press "F5" to refresh the list of server certificates. If the new certificate is now in the list, then it did install to the server, but you may want to check and make sure the certificate is in the Web Hosting certificate store. If not, you can move it there (see our How to Move Certificate to Another Certificate Store instructions) If it is not in the list, you will need to reissue your certificate using a new CSR (see our CSR creation instructions for IIS 8). After creating a new CSR, login to your DigiCert account and click the re-key button for your certificate.
  8. Once the SSL Certificate has been successfully installed to the server, you will need to assign that certificate to the appropriate website using IIS.
  9. From the "Connections" menu in the main Internet Information Services (IIS) Manager window, select the name of the server to which the certificate was installed.
  10. Under "Sites," select the site to be secured with SSL.
  11. From the "Actions" menu (on the right), click on "Bindings..." This will open the "Site Bindings" window.
  12. In the "Site Bindings" window, click "Add..." This will open the "Add Site Binding" window.
  13. Under "Type" choose https. The IP address should be the IP address of the site or All Unassigned, and the port over which traffic will be secured by SSL is usually 443. The "SSL Certificate" field should specify the certificate that was installed in step 7.
  14. Click "OK."
  15. Your first SSL certificate is now installed, and the website configured to accept secure connections.
  16. Repeat the steps for creating a CSR for your 2nd+ site.
  17. Install the certificate file as mentioned above, up through step 12.
  18. Under "Type" choose https. The IP address should be the IP address of the site or All Unassigned, and the port over which traffic will be secured by SSL is usually 443. Enter the host name you will be securing and check the box that says Require Server Name Indication. This is required for all additionalsites (not required on the primary site as shown in step 13) The "SSL Certificate" field should specify the certificate that was installed in step 7 for your additional certificate.
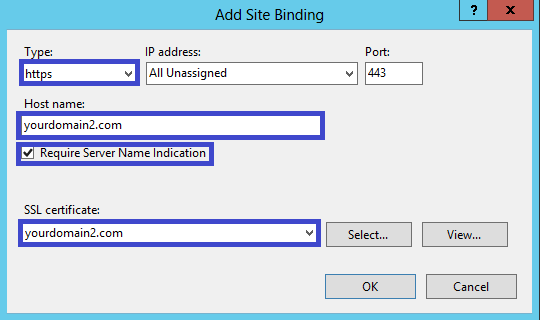
  19. Click "OK."
  20. Your second SSL certificate is now installed, and the website configured to accept secure connections.
  21. Repeat steps sixteen through nineteen to set up any other additional sites.

Sonntag, 15. Januar 2012

Export Non-Exportable Windows Certificates


Jailbreak is a tool for exporting certificates marked as non-exportable from the Windows certificate store. This can help when you need to extract certificates for backup or testing. You must have full access to the private key on the file system in order for Jailbreak to work.
The download is available here.

Using Jailbreak to Export a Certificate with its Private Key

Jailbreak is a tool for exporting certificates with their private keys, even if the private key was marked as non-exportable in the first place. Since auto-generated self-signed certificates usually have their private key marked as non-exportable, Jailbreak can become very handy.
First, download Jailbreak from http://www.isecpartners.com/application-security-tools/jailbreak.html, and extract it. Right-click “Jailbreak.exe” and select “Run as administrator”:
Jailbreak should now launch MMC (Microsoft Management Console) with the “certificates” snap-in. Unlike the regular console, this one will allow the exporting of private keys even if they were marked as non-exportable. To start the certificate exportation wizard, go in “Certificates (Local Computer)/Remote Desktop/Certificates”, right-click the certificate listed on the right, and then select “All Tasks→Export”:
This should launch the certificate export wizard. From this point, it should be the same as a regular certificate export. Follow the rest of the instructions in the Certificate Export article.

Samstag, 31. Dezember 2011

Home Downloads Exchange 2010 EMC and Certificates Management


Microsoft chose moving to secure messaging and secure service access since Exchange Server 2007. The only troublesome task for administrators was to manage these certificates. Folks who are highly addicted to GUI found it little hectic. Good news for those who don’t want to take too many efforts and would like to have a graphical interface that can manage certificates for exchange!
Though not with exchange 2007, Exchange 2010 Beta offers some extended functionality of creating, removing and managing certificates using GUI.
To create a new certificate you can choose the following options;

1. Select Server Configuration from left hand side pane in EMC and Exchange Certificates tab in left hand pane.
image

2. Right click in free space in left hand side pane of Exchange Certificates tab and select New Exchange Certificate
image

3. Selecting New Exchange Certificate from the context menu will bring up the introduction screen.
image
Here at this screen you are prompted to enter a friendly name for the certificate that will appear in EMC as a primary reference for management of certificates if you have multiple certificates created for multiple websites.
4. Once you have specified a friendly name for the certificate you are taken to the next screen upon clicking the Next button. This New Exchange Certificate screen will now gather the actual required information where you get a chance to choose among the options to use this certificate for various services.
Services like IIS based web services including Autodiscover, OWA EAS and other services like POP/IMAP, Outlook Anywhere and UM.
You can observe the screenshot below and notice that you get an option to write the URL of the service locations for OWA, EAS, Federated Services, SMTP transport, Etc. These URLs will be used in the certificate request which will be further used to write the SAN certificate information.
image

5. here the wizard collects the Organization related information like company name, department, location, etc. At this stage the wizard has collected almost all the information it needed. You may notice that the path right beside the Browse button is the path to the certificate request file path.
image

6. Next screen summarizes the information you entered.
image

7. And there you go with the final screen of the wizard where it displays the powershell command it will be attempting to generate the certificate request. Once you hit the Finish button the wizard completes the certificate request.
image

8. Here a point to be noted is; the wizard does not create an actual certificate. It will simply generate the request and keep it accessible via EMC. So when you are done with the wizard you have to manually send this request to the online CA within your Exchange/AD premises.
image
Limitations of New Exchange Certificate Wizard:
  1. The new Exchange Certificate Wizard does not send the request to the online CA directly unless you manually complete the pending request.
  2. Renewals of expired certificates can not be done using Exchange Certificate Wizard. You still have to user EMS for renewal of certificates.
  3. New certificates created using New Exchange Certificate Wizard does not get assigned to IIS directly though you do specify the certificate utilization for Exchange Web Services and other IIS integrated exchange services. (You may refer Permanent Link to How to renew a self signed certificate in Exchange Server 2007 for renewal of certificates)
This is the second part of the blog entry Exchange 2010 EMC and Certificate Management in the previous post I wrote about creating a certificate request and the limitations of the new certificate request wizard. In this part we will be looking at obtaining a new certificate and then installing it on the server.
To complete installing a new certificate on your Exchange Server 2010 server you first need to obtain a certificate from CA within your organization or from a third party CA. As stated in last post the New certificate wizard generates a request in a .req file.
1. To obtain a certificate from a third party CA or your internal CA, your first need to copy the contents of the .req file and paste it to the web console of your certification authority. For my internal Enterprise CA the picture looked like below. Please see carefully that the Certificate Template used for this certificate request is Web Server.
image
2. Once you are done with above interface by pasting the contents of .req file and choosing a correct template you will be presented with another page in your browser to download the certificate. This interface may vary depending upon the configuration of your CA. You may need to wait till the certificate is approved and issued by CA administrator if configured so. You can now download the certificate in DER encoded format or Base 64 encoded format and save it to some location on your desktop or server. You will also need to download the whole certificate chain if the issuing authority is not a trusted CA by your server.
image
3. Now, as you have downloaded the certificate to the server. You will need to complete the pending certificate request in your EMC. Select the complete pending request by right clicking on the pending certificate request in EMC.
image
4. A new interface asking you the path to the certificate will pop up. This wizards will ask the location for newly downloaded certificate. Click on the Browse button, select the newly downloaded .cer file and click on complete button.
image
5. You may recall, Exchange 2007 to have the imported certificate to be enabled before it can be used actually used exchange services. E14 is not an exception to it but you don’t need to use Enable-ExchangeCertificate this time. You can do it using  GUI easily. Now that you know, you have a new certificate imported correctly. You need to assign it to the services those will be using it.
Again, locate the new imported certificate in EMC and right click on it. Select Assign Services to Certificate… from the context menu.
One quick difference you may notice between the step 3 and now. That is the certificate status. It changes from Pending to Valid and icon in front of the certificate gets blue colored check mark on it.
image
6. Assign Services to Certificate… will list the services on a window those will be assigned to use this certificate. Select the services you want to use this certificate with and click on Assign button. In my case I did not have the UM role installed on the server so the Unified Messaging check box is grayed out.
image
7. You may notice a pop up asking your consent to assign this certificate to SMTP service on the server as the default certificate will be replaced if you have selected Simple Mail Transport Protocol to use the new certificate in step 6. Click Yes and your default self signed certificate created and assigned to SMTP during server  install will be replaced with new one.
image
Click Finish in the wizard and you are done.
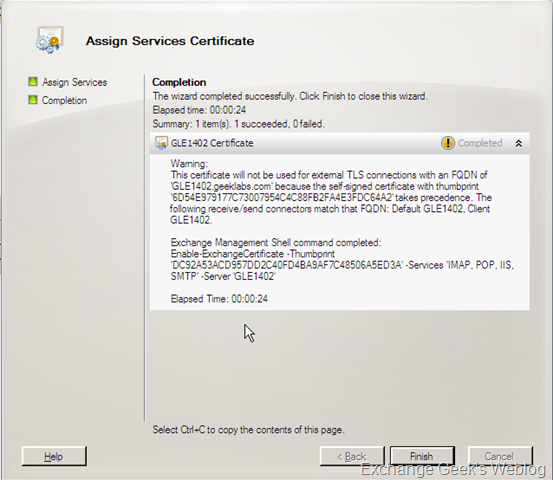
In some cases you may end up with a warning message; warning you that this certificate will not be used for TLS connections. Something like below:
image
Here you need to really understand the configurations you choose at the time of new certificate request. If you want to use this new certificate for a connector which provides a TLS connections, you will have to mention that during the New Certificate Request Wizard.

Few things to note:
  • You must make sure that you have chosen the option to use new certificate for TLS connections during the request generation.
  • You must have the root CA and the entire certificate chain installed your Exchange Server as well as clients if you are using your internal CA for new request processing. Outlook as well as Outlook Anywhere and other web based services may be affected otherwise.
  • You must back up the certificate as soon as it is enabled on the server. I will write about it in Part-3 of this series.
  • I recommend backing up and removing any old certificate from the server as soon as the new certificate is active and fully functional.

How to renew a self signed certificate in Exchange Server 2007


When a new Exchange Server 2007 role is installed on a computer the server automatically generates a self signed certificate to be used with services like transport (SMTP), POP,  IIS (OWA and Exchange Web Services) and IMAP. This certificate expires right after the completion of one  year from the date server was installed or the certificate was reassigned manually. To check the status of the certificate using Exchange Management Shell. Executing the cmdlet Get-ExchangeCertificate |FL displays all relevant information about all the certificates assigned, enabled and being used or not used by Exchange Services.
image_thumb2
You may see more than one certificate listed on your exchange server(s) and that may be simply because you or someone else from your team have already tried working with certificates on the server.
If you see the above picture, you will notice that the certificate I have on my server is valid till 24th March 2010. NotAfter holds the value in mm/dd/yyyy h:mm:ss format.NotAfter – means this certificate will not be valid after the time stamp listed in this field. On the other hand the value NotBefore – means that this certificate will not be valid before the time stamp mentioned.
So once you cross the date listed in field NotAfter the certificate becomes invalid and indeed may open up doors to many other troubles like connectivity to web services, SMTP transport, POP and IMAP retrieval, etc. To renew the certificate you can simply run a cmdlet and get a new self signed certificate. But, this is just not as simple as simply running a cmdlet and get a new certificate, there is a procedure to do it. Check the following steps:
1. Run Get-ExchangeCertificate |FL – This will list details of all certificates that you have assigned to Exchange Services. Please understand, this cmdlet does not retrieve any information about any other certificate from local certificate store which is not used by Exchange. Once you get the output printed on the screen; note down theThumbprint of certificate into a notepad.
2. Run Get-ExchangeCertificate –Thumbprint “58C846DEEA2865CA9E6DD4B42329A9AC994EBF63” | New-ExchangeCertificate . This renews the certificate. You will notice the moment you press enter on keyboard you may be prompted to confirm if you want to use the same certificate for SMTP service.
image_thumb24
3. Check if the certificate is renewed. This can be simply examined by looking at the changes in thumbprint of the certificate after running the cmdlet mentioned in step 2. You can see the changed thumbprint in below picture.
image_thumb25
4. Looking correctly to the above picture you will also notice that the certificate is not being used to secure IIS based services anymore though the NotAfter and NotBefore dates have changed. To enable this renewed certificate for IIS as well run Enable-ExchangeCertificate – Thumbprint “E0BB201793DC74D0F94F3275E6AA53BA75907565” –Services IIS
5. Verify all the services are working correctly after renewing and enabling the certificate.
6. Remove old certificate by running Remove-ExchangeCertificate –Thumbprint “58C846DEEA2865CA9E6DD4B42329A9AC994EBF63”

Freitag, 30. Dezember 2011

How To Renew Exchange Server 2010 Certificates


I am sure a lot of you have found these posts helpful. All of these posts however did not talk about the certificates issued by public CAs. I thought it would be even more helpful to put up a separate post that would talk more about the certificate renewal process in Exchange 2010 which indeed would cover few steps for Exchange 2007 certificate renewals as well.
If you run through the Exchange 2010 EMC and Certificate Management posts you would know how it really works when you are preparing, requesting and assigning a new certificate to your Exchange 2010 CAS and HT servers but these posts do not talk about renewal of the certificates once you assign them and they are just about to expire :-O
A little bit of stuff that you may or you may not know:
Whenever you work with certificates on an exchange server role installed on any OS, you are dealing with the local computer certificate stores on the at OS which is easily accessible by using Start—> Run –> MMC –> Add/Remove Snap In –> Certificates –> Local Computer. Just take a look at the local computer’s Personal certificate store and you wouldn’t be surprised to see these certificates in there. The only reason I wanted to bring this point here in this post because you may really need to run through this sometimes if you experience something that was mentioned in one of previous posts Missing Private Key on Exchange Certificate
So let’s have a look at what is it and how to do it!
GUI:
Just like above linked two posts talking about how to manage the exchange certificates using GUI, you need to locate the certificate that you need to renew in EMC. Right click on the certificate and select Renew
 
Provide the path in the wizard that appears which will save you a .req file. Once you have completed the wizard you are ready to use this .req file to be supplied to any certification authority that supports  your request. The reason I said ‘any CA that supports your request’ is because, some CAs do not support SAN extensions supplied in the request.
Once you supply the contents of the file generated above your CA will provide you a certificate that can be imported here. To import a certificate using GUI follow steps mentioned in Exchange 2010 EMC and Certificates Management Part – 2
Powershell:
We have a lot of powershell lovers by now and they feel powershell is much easier than GUI sometimes. For all of those
Find the certificate you need to renew using Get-ExchangeCertificate
Copy the certificate thumbprint and run following command to generate the CSR
Get-ExchangeCertfiicate -Thumbprint <Thumbprint> | Renew-ExchangeCertificate -GenerateRequest:$True -PrivateKeyExportable:$True
The above command displays the CSR that you need to be supplied to the CA. Copy the CSR and paste it to the CA interface.
Once you have downloaded the certificate issued by the CA use below command to import it. You need to make sure that you have not removed the certificate request generated by your last operation using EMC or powershell. This will lead you to another situation where you wouldn’t be able to import the certificate.
Import-ExchangeCertificate  -FileData ([Byte[]]$(Get-Content -Path C:\Users\Milind\Documents\Certificate.cer -Encoding Byte -ReadCount 0))
If you have recieved your certificate in .pfx format then use
Import-ExchangeCertificate  -FileData ([Byte[]]$(Get-Content -Path C:\Users\Milind\Documents\Certificate.pfx -Encoding Byte -ReadCount 0)) -Password:(Get-Credential).Password
And the final stage is to enable it for the services
Enable-ExchangeCertificate -Thumprint <Thumbprint> -Services IIS,IMAP,POP
Same procedure applies to Hub Transport Server Role certificate renewal as well but the Edge Transport Server Role. To manage certificates on the Edge Transport Server Role  you must be logged on the server and use powershell.
After you have renewed certificate on an edge transport server, you need to resubscribe it to the site since the subscription contains the certificate information in it too. Read more about Edge Transport here

Dienstag, 22. November 2011

In SBS2008 selbst erstellte Zertifikate nutzen


Es tauchen immer wieder Probleme mit SBS2008 um Bezug selbsterstellte Zertifikate und „Sites“ auf.
Dieses Problem ist wie folgt zu lösen.

Folgende Schritte sind zu machen:

1.       Zertifikat mit mehreren DNS-Namen erstellen (z.B. Kunde.dyndns.org)
2.       Zertifikat in das IIS einbinden
3.       Zertifizierungsstellenzertifikat exportieren
4.       Zertifizierungsstellenzertifikat  auf externen Clients installieren (nur nötig wenn der PC NICHT in der Domäne ist)

Inhaltsverzeichnis
Zertifikat erstellen
Zertifikat in IIS einbinden
Zertifizierungsstellenzertifikat exportieren
Zertifikat auf NICHT DomänenPC’s oder Telefonen installieren


Zertifikat erstellen


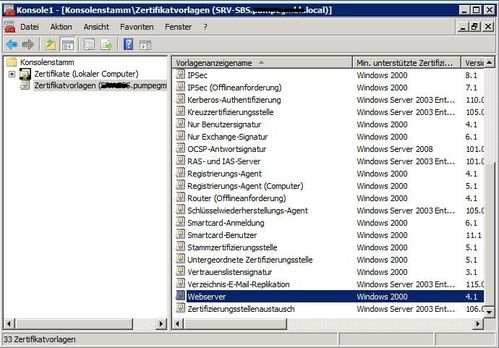
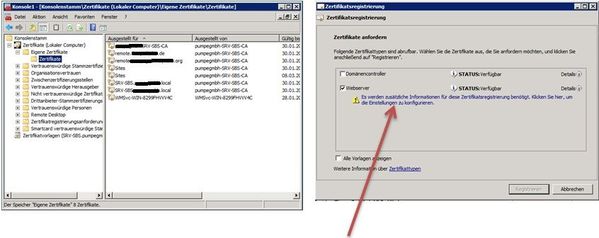
Auf dem Server MMC ausführen und die Snapins Zertifikate (Computerkonto) und Zertifikatvorlagen hinzufügen.

Bild1


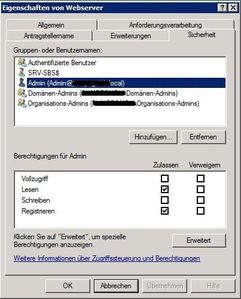
Jetzt müssen die Rechte für die Vorlage „Webserver“ anpassen.  In den Eigenschaften muss der SBS-SERVER und der ADMINISTRATOR hinzugefügt werden. Beide müssen „Lesen“ und „Registrieren“ können.
Bild2


Jetzt können wir das Zertifikat erstellen. Dazu bitte in „Zertifikate -> eigene Zertifikate -> Zertifikate“ rechte Maustaste „Alle Aufgaben -> Neues Zertifikat anfordern…“ anklicken.
Bild4
Jetzt weiter klicken, dann auf „Webserver“ klicken, dann hier klicken.

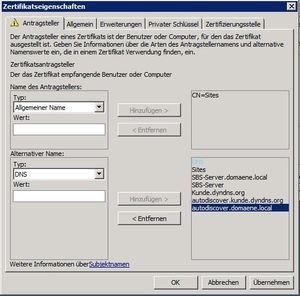
Jetzt werden die internen und externen Namen vergeben. Wichtig bei SBS ist der Eintrag „Sites“.
Bild5

Folgende Namen sollten drin sein:
Sites
remote.externaldomain.com
internaldomain.local
autodiscover.externaldomain.com
autodiscover.internaldomain.local
Servername FQDN
Servername NetBios

Und nach belieben weitere. Danach auf “ok” und dann auf “Registrieren” klicken. Das Zertifikat wurd jetzt angelegt.


Zertifikat in IIS einbinden

Jetzt müssen wir das Zertifikat in den Webserver einbinden. Dazu bitte die IIS-Konsole starten.
In der Konsole den Punkt „Sites -> SBS Web Applications“ gehen. Jetzt rechts auf „Bindungen“ klicken.
Auf den Typ „https“ gehen und auf „Bearbeiten“ gehen. Hier jetzt das neue Zertifikat auswählen.
Jetzt bitte den IIS neu starten (Start -> Ausführen -> iisreset).
 Bild6
Bild7

Zertifizierungsstellenzertifikat exportieren


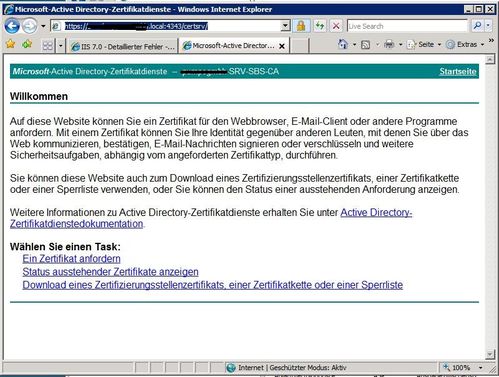
Zum exportieren des Zertifizierungsstellenzertifikat folgende Adresse eingeben:
Bild8 


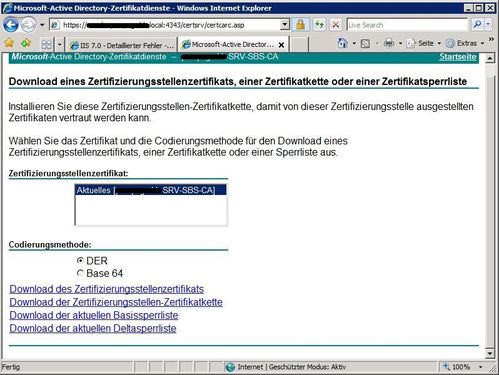
Dort auf „Download eines Zertifizierungsstellenzertifikat, einer Zertifikatskette oder einer Sperrliste“ klicken.
Bild9

Jetzt auf „Download des Zertifizierungsstellenzertifikats“ und das Zertifikat im Ort des Wunsches abspeichern.


Zertifikat auf NICHT DomänenPC’s oder Telefonen installieren


Das Zertifikat einfach auf den PC kopieren und dort mit einem Doppelklick ausführen.
Bild10    


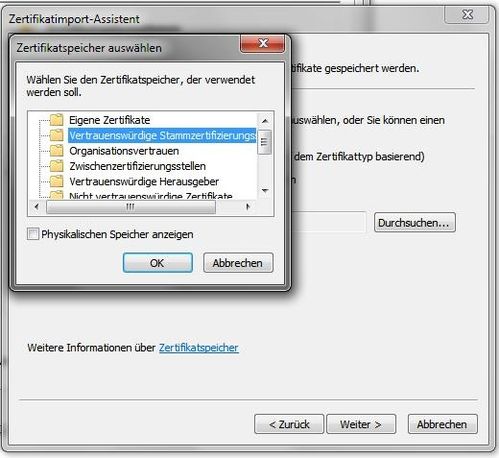
Das „Zertifikat installieren…“  klicken und das Zertifikat in die „Vertrauenswürdigen Stammzertifizierungstellen“ kopieren.
 Bild11   


Jetzt kann man vom IE oder Outlook via RPC-over-http auf den Server von Extern ohne Zertifikatsfehler zugreifen.

Rename Onedrive Business root folder

Rename Onedrive Business root folder Here is what I remember: In the Office 365 web admin pages, change the organization name to a shorte...