Posts mit dem Label Hyper-V werden angezeigt. Alle Posts anzeigen

Samstag, 18. Januar 2020

HP WINDOWS SERVER ROK UND HYPER-V

Je nach Windows-Server-Version sind verschiedene Virtualisierungsrechte enthalten. Möchte man z.B. Windows Server 2012 nicht nur physikalisch sondern auch virtuell installieren, schließlich sind zwei Instanzen in der Standard-Edition enthalten, so muss im Falle eines HP ROK-Mediums eine Änderung an Hyper-V vorgenommen werden.
Hintergrund dieser Notwendigkeit ist, das die ROK-Medien einen Bios-Lock enthalten. Ohne entsprechend angepasste Hyper-V-Konfiguration kann von diesen Medien nicht installiert werden.
Um Windows Server 2012 als virtuellen Computer unter Hyper-V installieren zu können muss folgender Befehl ausgeführt werden:
Reg Add "HKLM\SOFTWARE\Microsoft\Windows NT\CurrentVersion\Virtualization" /v BiosLockString /t REG_SZ /d "HP                              "
Achtung: Die Leerstellen zwischen >“HP< und dem abschließenden >“< beachten!

Freitag, 6. Dezember 2019

Veeam Error – Changed Block Tracking Will Not Be Used For This VM Until You Upgrade the VM Hardware to Version 8.0 or Later on Server 2016


If you have recently upgraded your HyperV Servers or Cluster to Server 2016 and you are running Veeam, you may see the following error:


Changed Block Tracking Will Not Be Used For This VM Until You Upgrade the VM Hardware to Version 8.0 or Later

What this means is that Veeam will only perform FULL backups and not incrementals which is a bit of a crisis for most companies.

Fortunately this is easy to fix, you simply need to upgrade the “Virtual Machine Version” (not to be confused with the Cluster Version, if you are using a Cluster):
On each of your HyperV hosts, shut down all of the VM’s
.
Run the following PowerShell Command:
Update-VMVersion *
.
Run the following PowerShell Command to ensure that all VM’s are at “8”
Get-VM * | Format-Table Name, Version
.

Once all of your VM’s are at version 8, you can restart your Veeam backup jobs and all will be well.

For more information on this process read this Microsoft doc.

Sonntag, 11. September 2016

Netzwerkverbindung an Hyper-V Server extrem langsam

Ein Kunde von mir hat sich einen neuen DEL Server gekauft und Windows Server 20120 R2 als Hyper-V installiert.
Als zweiten Schritt wurden die virtuellen Server von alten HOST auf den neuen HOST (DELL) verschoben
und dann waren die Netzwerkperformace Probleme da.

Lösung:
PowerShell

Get-NetAdapterVmq -Name * | Where-Object -FilterScript { $_.Enabled }

und dann nur noch

Disable-NetAdapterVmq -Name * | Where-Object -FilterScript { $_.Enabled }

Donnerstag, 20. Februar 2014

Hyper-V High Ping Latency


Had an interesting issue today, an insanely slow, brand new server….. or so I thought. First a bit of background on the client, they are fairly large, with over 400 client access devices to maintain, not including server, network equipment etc. to support this the client has 3 servers, one purchased a year and the oldest one thrown out, keeping all devices in warranty and with modern powerful equipment to keep things running, in addition to this there are two other servers that are replaced every three years, these are treated differently as these are speciality servers, and only do one task.

So, building a new server for a client, in this case a HP ML350p gen8 with Windows Server 2012 R2 STD running as a Hypervisor, nothing special in that, I do this exceedingly regularly so it has become more of a routine build for me. What got me with this one though was during testing I was getting insanely high ping latency, not only to the virtual machines from the network and vice versa, but also from the hypervisor to the machines and vice versa. Pings to other virtual machines on others server, on different LAN segments were all responding normally in <1MS

My first thought was there was something wrong with the virtual machines and that I had butchered something in the migration, but as they worked on other hypervisors without delays, that knocked that one on the head. Then I thought network location issue, but that does not make any sense due the fact that pinging from a hypervisor to guest does not go across a physical network, so it has to be the brand new server.

Ok, so what’s new about this server, well its got newer Processors, greater memory, faster HDD’s with larger capacity’s, basically it was more a case of what wasn’t different to the last server. Not going to go through the whole process of troubleshooting, but basically it was to do with the NIC’s, fine now what about them is it. After trial and error, and of course every techs most important tool, Google I came across the issue what is it…


THE ISSUE IS VMQ or Virtual Machine Queuing inside the Broadcom NIC drivers as shown below, disable this and the issue clears instantly


Pings and other indicators are now back down to <1ms which is what I expected to see in the first place.

Hardware effected by this was as follows

HP ML350p gen8
Server 2012 R2 Standard
onboard Broadcom Quad Port NIC

Freitag, 4. Januar 2013

Windows Server 2012: Convert VHD to VHDX using Hyper-V Manager


How To Convert VHD to VHDX with Hyper-V 3

Windows Server 2012 and Windows 8 introduce a new virtual hard disk file format, VHDX, which is an upgrade from the current VHD format and provides for superior performance, reliability and several enhancements including:
  • Support for virtual hard disks larger than 2TB and up to 64TB.
  • Better performance of dynamic and difference files through new larger block sizes.
  • Improved alignment of the virtual hard disk on large sector disks.
Many of you already have a virtual infrastructure based on Microsoft Hyper-V and would need to upgrade all your existing VHDs in order to take advantage of all the new features and capabilities. Luckily, The Hyper-V team has taken that into consideration and provided a very simple way to convert existing VHDs into VHDX. Here's how to do it:
  1. Launch Hyper-V manager and from the right side Action pane and select Edit Disk .
  2. The Edit Virtual Hard Disk Wizard starts; click Next to get past the initial screen.
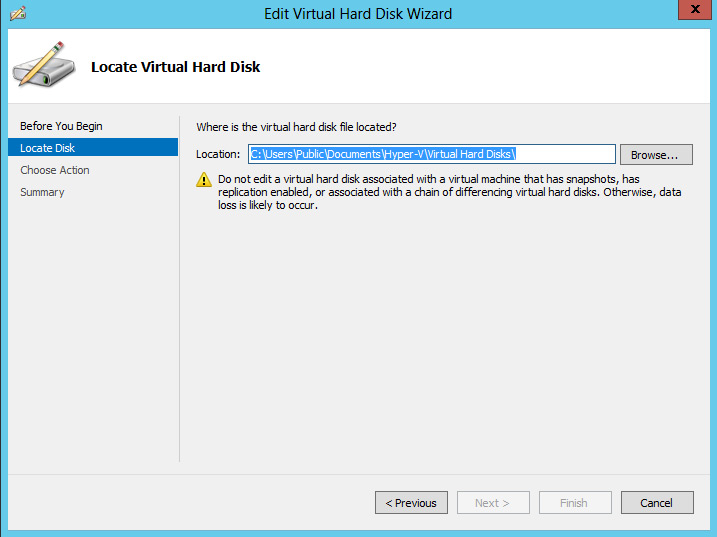
  3. Enter the name and location of the existing VHD file (see Fig. 1) and click Next.
    Enter name and location of VHD file and click Next
    Figure 1. Enter name, location of VHD file and click Next. (Click image to view larger version.)
  4. Select Convert and click Next.
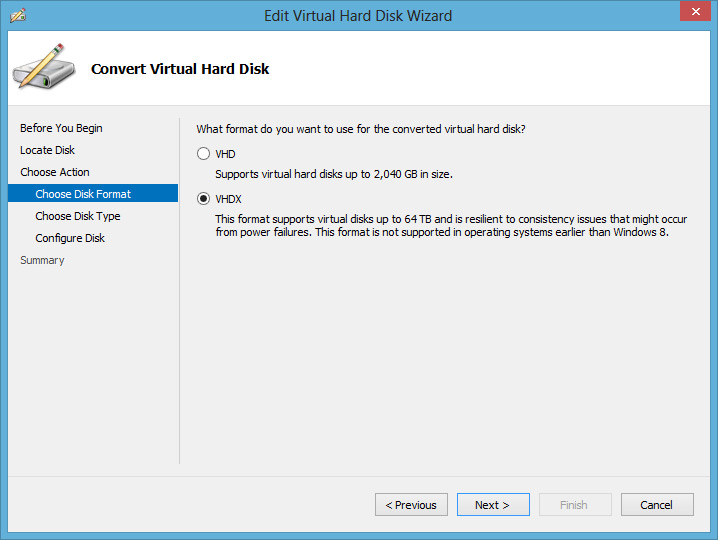
  5. Select the VHDX file format and click Next (see Fig. 2).
  6. Complete the wizard by selecting the settings you need.
Select VHDX file format
Figure 2. Select VHDX file format and click Next. (Click image to view larger version.)
This process makes an exact copy of your existing VHD file, except now it's in the new VHDX format. And should the need arise, you can always use the same process to convert from VHDX back to VHD.

Dienstag, 9. Oktober 2012

How to Convert Hyper-V VHD Disks to VHDX

Windows Server 2012 Hyper-V offers a new virtual disk type called VHDX.  VHDX virtual disks have many benefits, including larger maximum disks up to 64TB, protection against data corruption, and improved alignment of the virtual hard disk format to work well on large sector disks.  See http://technet.microsoft.com/en-us/library/hh831446.aspx for more information about the VHDX disk type.

You can convert existing older format VHD disks to the new VHDX format using the Hyper-V Manager console.  This process will create a new VHDX disk and copy the data from the existing VHD to the new disk.  At the end of the procedure you will have two disks, the original VHD disk and a new VHDX disk with the same contents.  You can safely delete the original VHD disk once you have confirmed that the new VHDX disk is fully functional.

Here are the steps to convert an existing VHD disk to a VHDX disk:
  • Shut down the VM that is accessing the disk, if necessary.  You cannot convert a disk that is in use.
  • Open the Hyper-V VM settings, navigate to the hard drive you wish to convert, and click the Edit button, as shown below:
  • The Edit Virtual Hard Disk Wizard will start.  Select Convert from the Choose Action page and clickNext.
  • Select the VHDX disk format and click Next.
  • Choose whether the new disk should be fixed size or dynamically expanding.  Note that this gives you the opportunity to change disk types from the previous disk type.  Click Next.
  • Select the name and location for the new VHDX disk and click Next.
  • Review the summary and click Finish to create the new disk.  This may take a few minutes depending on the size of the VHD and the speed of your hard drive(s).  A 30GB VHD converted in less than two minutes on my SSD drive.  The size of the new VHDX disk will be slightly larger than the original VHD disk.

  • The last step is to mount the new VHDX disk to the Hyper-V VM.  Note the new VHDX extension.

Once you have started up your VM with the new VHDX disk you can safely delete the old VHD disk.  There are no other configurations necessary.
Did you find this information useful? Post a comment and share it with others!

Dienstag, 16. August 2011

Error 2927 creating VM in VMM


Error (2927)
A Hardware Management error has occurred trying to contact server tools-hun-wsd.wsd.edu.
(Unknown error (0x8033811e))

Recommended Action
Check that WinRM is installed and running on server tools-hun-wsd.wsd.edu. For more information use the command "winrm helpmsg hresult".

I also ran the following
winrm helpmsg 0x8033811e
The WS-Management service cannot process the request. The WMI provider returned
an 'invalid parameter' error.


I've checked that winrm is installed and running on host servers as well as the VMM server.


For Hyper-V, you need to set up constrained delegation so the vm-host can access the necessary iso remotely. constrained delegation authorizes the proper impersonation required between the library server and the HYper-v host.

Constrained Delegation Checklist:
1. Verify that the VMM Server service (vmmservice.exe) is running under a domain account and not the LocalSystem account.
2. Open dsa.msc and connect to a Domain Controller
3. Locate the computer account of the server running Hyper-V, right-click and select Properties
4. Select 'Trust this computer for Delegation to Specified services Only'.
5. Select Use Any Autenthication Protocol
6. Click the Add button, click users or computers and search for the computer account of the server with the VMM library
7. Select the cifs service type
8. Accept the changes and close the windows. You`ll nedd to repeat these steps for each Hyper-V host that you want to link ISOs to the vmm library.

Recommended post W2K8R2 SP1 Clustering and Hyper-V Hotfixes


One of the visitors of this blog asked the question if we could publish a list of recommended post Windows Server 2008 R2 SP1 hotfixes related to either Clustering or Hyper-V. Well here it is!
For a complete overview of what was rolled-up in SP1 take a look at the Excel sheet (Updates in Win7 and WS08R2 SP1.xls) which can be found on here.
Note I. Microsoft will release hotfixes if a issue occurs that needs to fixed before releasing a roll-up update or a service pack. However, the hotfix in question is intended to correct only the problem that is described in the article. Apply the hotfix only to systems that are experiencing the problem that is described in the articles. The hotfix might receive additional testing. Therefore, if you are not severely affected by this problem, we recommend that you wait for the next software update that contains this hotfix.
Note II. Updates can be applicable to Windows Server 2008 R2 (RTM) and/or Windows Server 2008 R2 SP1.


TitleTypeRequiredIC Version
KB976932: Windows 7 en Windows Server 2008 R2 Service Pack 1 Service PackYes6.1.7601.17514
KB2446607: You cannot enable BitLocker on a disk volume in Windows Server 2008 R2 if the computer is a failover cluster nodeCluster HotfixYes, only applicable to described situation
KB2462576: The NFS share cannot be brought online in Windows Server 2008 R2 when you try to create the NFS share as a cluster resource on a third-party storage diskCluster Hotfix Yes, only applicable to described situation
KB2485543: You cannot access or mount a Windows Server 2008 R2-based NFS share after a failover if the NFS share uses Krb5 or Krb5i authenticationCluster Hotfix Yes, only applicable to described situation
KB2494162: The Cluster service stops unexpectedly on a Windows Server 2008 R2 failover cluster node when you perform multiple backup operations in parallel on a cluster shared volumeCluster Hotfix Yes, only applicable to described situation
KB2485986: An update is available for Hyper-V Best Practices Analyzer for Windows Server 2008 R2Hyper-V HotfixYes, only applicable to described situation
KB2519946: Timeout Detection and Recovery (TDR) randomly occurs in a virtual machine that uses the RemoteFX feature in Windows Server 2008 R2Hyper-V HotfixYes, only applicable to described situation
KB2520235: "0x0000009E" Stop error when you add an extra storage disk to a failover cluster in Windows Server 2008 R2Cluster Hotfix Yes, only applicable to described situation
KB2517329: Performance decreases in Windows Server 2008 R2 when the Hyper-V role is installed on a computer that uses Intel Westmere or Sandy Bridge processorsHyper-V HotfixYes, only applicable to described situation
KB2460971: MPIO failover fails on a computer that is running Windows Server 2008 R2Cluster Hotfix Yes, only applicable to described situation
KB2494036: A hotfix is available to let you configure a cluster node that does not have quorum votes in Windows Server 2008 and in Windows Server 2008 R2Cluster Hotfix Yes, only applicable to described situation 
KB2523676: GPU is not accessed leads to some VMs that use the RemoteFX feature to not start in Windows Server 2008 R2 SP1Hyper-V HotfixYes, only applicable to described situation 
KB2521348: A virtual machine online backup fails in Windows Server 2008 R2 when the SAN policy is set to "Offline All"Hyper-V HotfixYes, only applicable to described situation 
KB2494016: Stop error 0x0000007a occurs on a virtual machine that is running on a Windows Server 2008 R2-based failover cluster with a cluster shared volume, and the state of the CSV is switched to redirected accessCluster Hotfix Yes, only applicable to described situation 
KB2531907: Validate SCSI Device Vital Product Data (VPD) test fails after you install Windows Server 2008 R2 SP1Cluster Hotfix Yes, only applicable to described situation 
KB2512715: Validate Operating System Installation Option test may identify Windows Server 2008 R2 Server Core installation type incorrectly in Windows 7 or in Windows Server 2008 R2Windows UpdateYes, only applicable to described situation 
KB2525835: MS11-047: Vulnerability in Microsoft Hyper-V could cause denial of service: June 14, 2011Security BulletinYes 
KB2549448: Cluster service still uses the default time-out value after you configure the regroup time-out setting in Windows Server 2008 R2Cluster Hotfix Yes, only applicable to described situation 
KB2549472: Cluster node cannot rejoin the cluster after the node is restarted or removed from the cluster in Windows Server 2008 R2Cluster Hotfix Yes, only applicable to described situation 
KB2552040: A Windows Server 2008 R2 failover cluster loses quorum when an asymmetric communication failure occursCluster Hotfix Yes, only applicable to described situation 
KB2496034: Cluster service stops when an error occurs in the registry replication process of a failover cluster in Windows Server 2008 R2 or in Windows Server 2008Cluster Hotfix Yes, only applicable to described situation 
KB2550569: "0×20001" Stop error when you start a Linux VM in Windows Server 2008 R2 SP1Hyper-V HotfixYes, only applicable to described situation 
KB2580360: A heap memory leak occurs when an application or service queries the MSCluster_Resource WMI class in Windows Server 2008 R2Cluster HotfixYes, only applicable to described situation
KB2582281: Slow failover operation if no router exists between the cluster and an application serverCluster HotfixYes, only applicable to described situation
KB2575625: Cluster service initiates a failover after a delay of about 80 seconds when you shutdown the active node in Windows Server 2008 R2Cluster HotfixYes, only applicable to described situation 
KB2578113: The Cluster service takes about 30 seconds to fail over IPv6 IP addresses in Windows Server 2008 R2Cluster HotfixYes, only applicable to described situation 
KB2579052: New registration entries are added to the Persistent Reservation table when the physical disk resource that is associated with the CSV is taken offline on a Windows Server 2008 R2-based Failover ClusterCluster HotfixYes, only applicable to described situation 
KB2550886: A transient communication failure causes a Windows Server 2008 R2 failover cluster to stop workingCluster HotfixYes, only applicable to described situation 
KB2550894: Cluster service leaks memory when the service handles state change notifications in Windows Server 2008 R2Cluster HotfixYes, only applicable to described situation 
KB2547551: Hyper-V Export function consumes all available memory in Windows Server 2008 or in Windows Server 2008 R2 Hyper-V HotfixYes, only applicable to described situation 
KB2550894: Cluster service leaks memory when the service handles state change notifications in Windows Server 2008 R2 or Windows Server 2008 NEW!Hyper-V HotfixYes, only applicable to described situation 
The information is gathered from a number of places. First of all the from the monthly or two-monthly “released knowledge base articles” that we publish on this blog which can be found here: February, March, April, May-Juneand July-August (yet to be unpublished). Besides these overviews I used these websites for layout and checks: “List of Hyper-V Packages Updated After the Release of Windows Server 2008 R2 Service Pack 1 (SP1)” and “List of Cluster Hotfixes for Windows Server 2008 R2”.

Dienstag, 2. August 2011

Step-by-step: Using the Microsoft iSCSI Software Target with Hyper-V (Standalone, Full, VHD)


Overview
In this post, I will show all the steps required to run Windows Server 2008 Hyper-V with the Microsoft iSCSI Software Target. We will cover the specific scenario of a standalone Windows Server 2008 server (as opposed to a clustered one) on a full install (as opposed to a core install) and using a VHD file (as opposed a pass-through disk).
In order to follow these instructions you will need at least two computers. One computer will run a full install of Windows Server 2008 with the Hyper-V role enabled. The other computer needs to be a Windows Storage Server (WSS) with the iSCSI pack or Windows Unified Data Storage Server (WUDSS). Optionally, you could add a Client for your Virtual Machine and a computer for remote Hyper-V Management.
Configuring the Networks
For your server running Hyper-V, you should consider having at least three Network Interface Cards (NICs). One will be dedicated to iSCSI traffic. The second will be connected to the Virtual Switch and used for traffic going to your virtual machine. The third NIC you will dedicate to remote management. This configuration is showed in the diagram below:
01 
Checking the Windows Storage Server
WSS (with the Microsoft iSCSI Software Target) comes preinstalled from the hardware vendor. This special OS release is not available the Microsoft sales channels like software retailers or volume licensing. You can find more information about WSS and WUDSS at http://www.microsoft.com/storageserver. Windows Storage Server 2008 is also available from MSDN or TechNet subscriber downloads for non-production use (see details athttp://blogs.technet.com/josebda/archive/2009/05/13/windows-storage-server-2008-with-the-microsoft-iscsi-software-target-3-2-available-to-msdn-and-technet-plus-subscribers.aspx).
You should make sure you have the proper credentials (username and password) with administrator privileges on the Storage Server. You should also make sure you have remote access to the Storage Server via Remote Desktop. Once you log on to the Storage Server via Remote Desktop, verify that you can locate the Microsoft iSCSI Software Target Management Console (MMC), which can be found in the Administration Tools menu. From a Storage Server perspective, we’ll perform all the configuration actions using the iSCSI Target MMC.
02 
Checking the Server running Hyper-V
On the server running Windows Server 2008 Hyper-V, you should make sure to run Windows Update to get the latest updates. This will ensure that you have the final release of Hyper-V, not the beta version that was released with Windows Server 2008.
You will also need to enable the Hyper-V role. This is done using Server Manager by right-clicking the “Roles” node on the tree on the left and selecting “Add Roles”.
03
This will bring up the “Add Roles Wizard”, where you will find “Hyper-V” on the list of roles:
 04
While configuring the Hyper-V role on the wizard, you should see the three (or more) NICs on your server on the “Create Virtual Networks” step.
Make sure you do not select the NICs used for iSCSI traffic and Hyper-V remote management in the “Create Virtual Networks”.
05
You will need to restart the server after you add the Hyper-V role.
Loading the iSCSI Initiator
The next step now is to configure the iSCSI initiator on the Hyper-V server.
You can find the “iSCSI Initiator” under “Administrative Tools” in Windows Server 2008. You can also find it in the “Control Panel”.
The first time you load the iSCSI initiator, it will ask you two questions.
The first question is about loading the Microsoft iSCSI Initiator service every time:
06
The second question is about configuring the firewall to allow the iSCSI traffic:
07
You should click on “Yes” for both questions.
After that, the iSCSI Initiator Properties windows will load, showing the “General” tab.
This tab gives you an important piece of information: your initiator name or IQN. We’ll need this later when configuring the target:
07
Configuring the target portal
The next step is configure the initiator with the address of your iSCSI target portal.
In our case, this is the computer running Windows Storage Server and the Microsoft iSCSI Software Target.
In the iSCSI Initiator Properties window, select the “Discovery” tab and add the IP address of the Storage Server to the list of Target Portals.
09
Click on “Add Portal…” to add the information. You will need the IP address of your Storage Server at this point. Port 3260 is the default.
10
Here’s the screen after the Target Portal is added:
11
Now, if you switch over the “Targets” tab of the iSCSI Initiator Properties windows, you will see this:
12
This blank list of targets is expected at this point, since we haven’t configured any targets yet.
We’ll do that next.
Creating the iSCSI Target
Now we switch over the Microsoft iSCSI Software Target side, on the Windows Storage Server.
We will create the target using the Microsoft iSCSI Software Target MMC we mentioned before.
13
After starting the wizard, skip the introduction page by clicking “Next”.
14
Next, you will provide the name and description for the target. We’ll be using simply “T1” for the name.
15
On the following screen, you need to provide the identification for the target.
Here you can use an IQN (iSCSI Qualified Name) or you can use the advanced setting to go with an IP address, DNS name or MAC address.
16
Since our initiator in this case already contacted the Storage Server, you can simply click on “Browse” and pick the IQN from there.
17
Once you get the right IQN, click “Next” to proceed.
18
Finally, click “Finish” to create the target.
19
Adding LUNs to the iSCSI Target
Now that the target is created, you need to add virtual disks or LUNs to it. These will be the logical units that will be presented to the initiator.
You will do this by right-clicking the target T1 and selecting the option to “Create Virtual Disks for iSCSI Target”.
20
You will start the wizard. Click “Next” on the introduction page.
21
Next, you will provide a path to the file to use as your virtual disk or LUN. This file will have a VHD extension.
22
Next, you will specify the size for the virtual disk or LUN. We’ll create a 20GB LUN here, which is enough to install Windows Server 2008 later on. The iSCSI target uses fixed-sized VHD files, but you can extend them if needed.
23
Next, you will specify a description for the virtual disk or LUN.
24
Finally, click “Finish” to create the virtual disk. Depending on the size, it could take a while.
25
At this point, you can see the target and its virtual disk on the Microsoft iSCSI Software Target MMC:
26
You can check the properties of the target, including the target IQN, by right-clicking the target name and clicking on “Properties”.
27
Now we go back to the initiator side.
Configuring the iSCSI Initiator targets
When we last checked the “Targets” tab of the iSCSI Initiator Properties windows, we had an empty list.
With the target properly configured, you should see the it showing after you click on “Refresh”:
28
Now you need to click on “Log on…” to connect to the target.
On the “Log On to Target” window, be sure to check the box to “Automatically restore this connection when the computer starts”.
29
Once you log on, the target status will change to “Connected”.
30
The LUN should also appear in the list of “Volumes and Devices” in the iSCSI Initiator Properties:
31
Now we need to work on that LUN to turn it into an NTFS volume with a drive letter.
That is done in Disk Management.
Preparing the Volume
If you followed all the steps so far, you should already have the LUN as an offline, uninitialized, unallocated volume in Server Manager, under Disk Management:
32
The first thing you need to do here is to online the volume, by right-clicking on the disk:
33
The volume will be onlined automatically if you are running the Standard Edition of Windows Server 2008.
After that, the volume will be online, but still uninitialized. You will then select the option to “Initialize Disk”:
34
At this point you need to select a partition style (MBR or GPT). The older MBR style is commonly used for small partitions. GPT is required for partitions larger than 2TB.
35
After this, you have a basic disk online which you could use to create an NTFS volume. If you right click it again, there will be an option to create a “New Simple Volume”.
36
Once you go through that wizard, format the volume and assign it a drive letter, you will have the final result in Disk Management as drive E:
37
We’ll use this drive E: as our storage for Hyper-V.
Creating the Virtual Machine
Last but not least, we must now create our Virtual Machine. We’ll do this in the Hyper-V Manager:
38
There are two places in the New Virtual Machine Wizard where you will refer to the E: disk.
The first one is when you select the location of your virtual machine configuration files:
39
The second one is when you specify the location of the virtual hard drive used by that virtual machine:
40
In this case, by using the wizard, we selected the default option of using a Dynamically Expanding VHD file that is exposed to the child partition as Virtual IDE.
You can verify that looking at the settings for the resulting Virtual Machine:
41
If you click on the “Inspect” button, you can see it’s a Dynamic VHD:
42
You could, of course, use any of the other types of VHD files or even a pass-through disk, but that’s a topic for another blog post…
Conclusion
I hope this blog post has helped you understand all the steps required to use the Microsoft iSCSI Software Target to provision storage for your Windows Server 2008 server running Hyper-V.
This post covered a scenario where Hyper-V runs on a full install of Windows Server 2008, using a VHD file on the parent and without Failover Clustering.

Rename Onedrive Business root folder

Rename Onedrive Business root folder Here is what I remember: In the Office 365 web admin pages, change the organization name to a shorte...