Posts mit dem Label VHD werden angezeigt. Alle Posts anzeigen

Freitag, 4. Januar 2013

Windows Server 2012: Convert VHD to VHDX using Hyper-V Manager


How To Convert VHD to VHDX with Hyper-V 3

Windows Server 2012 and Windows 8 introduce a new virtual hard disk file format, VHDX, which is an upgrade from the current VHD format and provides for superior performance, reliability and several enhancements including:
  • Support for virtual hard disks larger than 2TB and up to 64TB.
  • Better performance of dynamic and difference files through new larger block sizes.
  • Improved alignment of the virtual hard disk on large sector disks.
Many of you already have a virtual infrastructure based on Microsoft Hyper-V and would need to upgrade all your existing VHDs in order to take advantage of all the new features and capabilities. Luckily, The Hyper-V team has taken that into consideration and provided a very simple way to convert existing VHDs into VHDX. Here's how to do it:
  1. Launch Hyper-V manager and from the right side Action pane and select Edit Disk .
  2. The Edit Virtual Hard Disk Wizard starts; click Next to get past the initial screen.
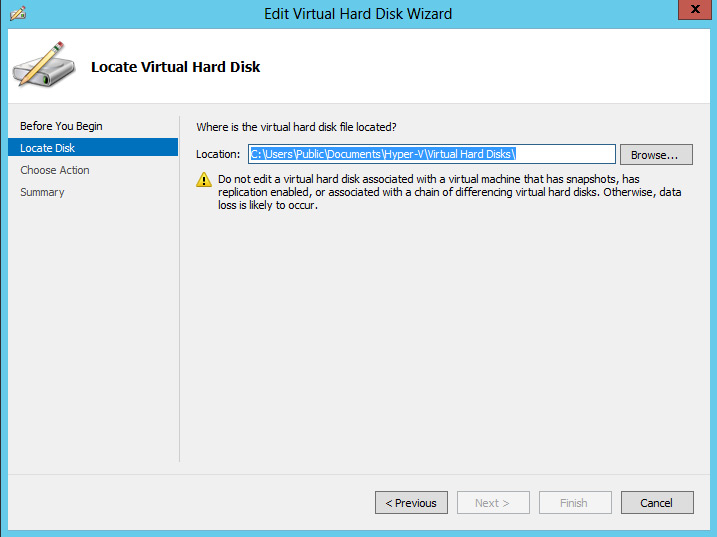
  3. Enter the name and location of the existing VHD file (see Fig. 1) and click Next.
    Enter name and location of VHD file and click Next
    Figure 1. Enter name, location of VHD file and click Next. (Click image to view larger version.)
  4. Select Convert and click Next.
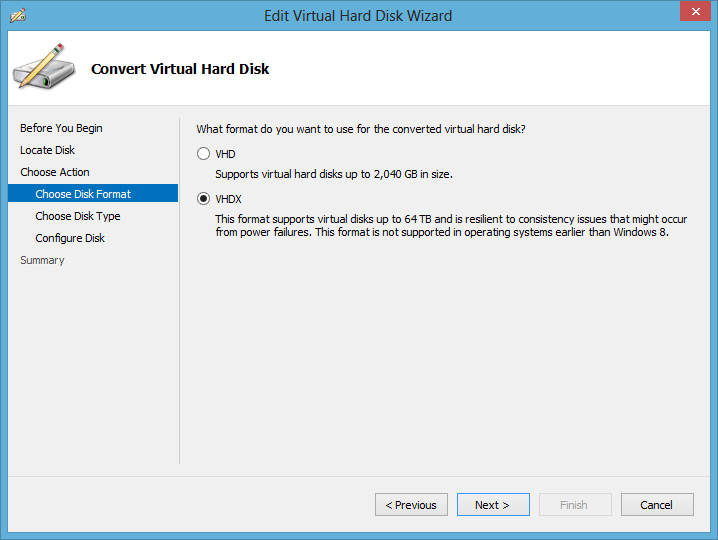
  5. Select the VHDX file format and click Next (see Fig. 2).
  6. Complete the wizard by selecting the settings you need.
Select VHDX file format
Figure 2. Select VHDX file format and click Next. (Click image to view larger version.)
This process makes an exact copy of your existing VHD file, except now it's in the new VHDX format. And should the need arise, you can always use the same process to convert from VHDX back to VHD.

Dienstag, 9. Oktober 2012

How to Convert Hyper-V VHD Disks to VHDX

Windows Server 2012 Hyper-V offers a new virtual disk type called VHDX.  VHDX virtual disks have many benefits, including larger maximum disks up to 64TB, protection against data corruption, and improved alignment of the virtual hard disk format to work well on large sector disks.  See http://technet.microsoft.com/en-us/library/hh831446.aspx for more information about the VHDX disk type.

You can convert existing older format VHD disks to the new VHDX format using the Hyper-V Manager console.  This process will create a new VHDX disk and copy the data from the existing VHD to the new disk.  At the end of the procedure you will have two disks, the original VHD disk and a new VHDX disk with the same contents.  You can safely delete the original VHD disk once you have confirmed that the new VHDX disk is fully functional.

Here are the steps to convert an existing VHD disk to a VHDX disk:
  • Shut down the VM that is accessing the disk, if necessary.  You cannot convert a disk that is in use.
  • Open the Hyper-V VM settings, navigate to the hard drive you wish to convert, and click the Edit button, as shown below:
  • The Edit Virtual Hard Disk Wizard will start.  Select Convert from the Choose Action page and clickNext.
  • Select the VHDX disk format and click Next.
  • Choose whether the new disk should be fixed size or dynamically expanding.  Note that this gives you the opportunity to change disk types from the previous disk type.  Click Next.
  • Select the name and location for the new VHDX disk and click Next.
  • Review the summary and click Finish to create the new disk.  This may take a few minutes depending on the size of the VHD and the speed of your hard drive(s).  A 30GB VHD converted in less than two minutes on my SSD drive.  The size of the new VHDX disk will be slightly larger than the original VHD disk.

  • The last step is to mount the new VHDX disk to the Hyper-V VM.  Note the new VHDX extension.

Once you have started up your VM with the new VHDX disk you can safely delete the old VHD disk.  There are no other configurations necessary.
Did you find this information useful? Post a comment and share it with others!

Samstag, 20. November 2010

'General access denied error' (0x80070005) when Starting Hyper-V Virtual Machines


Rechte für neuen Ordner VM manuell vergeben


wenn ich unter WS2008R2 eine VM exportiere und an einen neuen Ort (nicht auf dem System Volume) imporiere, schlägt der Import fehl. Es fehlen Rechte im Ordner "Virtual Machines". Im Ordner "Virtual Hard Disks" werden diese automatisch gesetzt. Für diesen Ordner gibt es ein Konto "Virtuelle Computer", das im Ordner "Virtual Machines" beim Importprozess nicht angelegt wird. Es gelingt mir nicht, manuell dem Konto "Virtuelle Computer" Rechte zuzuordnen, da ich dieses nicht auswählen kann. Auch der Befehl

ich habe gerade leider keine Deutsche Installation zur Hand, aber meine Vermutung bleibt weiterhin bei den Objektnamen. Wir könnten es aber auch anders rum probieren (der SID sollte theoretisch der gleiche für alle Installationen sein)

was sagt psgetsid S-1-5-83-0 ?

funktioniert die Zuordnung der Berechtigungen direkt per SID?

icacls "S:\VM\Virtual Machines" /grant *S-1-5-83-0:(CI)(F)


oder

icacls "S:\VM\Virtual Machines" /grant NT VIRTUELLER COMPUTER\Virtuelle Computer:(CI)(F)

sollte für eine deutsche Installation dann auch passen.

und ja, die NT Virtual Machine/NT Virtueller Computer Domäne (S-1-5-83wird vom System in den Benutzer abfragen nicht gelistet, da diese hauptsächlich nur von Hyper-V intern benutzt wird. Unter dieser Domäne befinden sich die VM SIDs (jede VM Datei hat eine speziellen Eintrag im ACL in Form eines GUIDs) die zur Berechtigungserteilung (für den Dateizugriff vom VM Worker Process) benutzt werden. 

Donnerstag, 10. Juni 2010

How to manually merge Hyper-V snapshots into a single VHD

Okay, so you have to recreate your VM configuration and you absolutely know that your VM had a snapshot at some time.You also realize that if you just link to the base VHD that you will lose the current state of your VM - what do you do?
You manually merge your snapshots into your base VHD before you boot your VM. (I am assuming that you know how to connect to an existing VHD using the new VM wizard).Merging of snapshots can be performed manually. This is achieved by:
On your Hyper-V host.Power off the Virtual Machine.
Make a copy of the VHD and its corresponding AVHD files.
Rename the AVHD extension to VHD.
Write down the order of the disks from youngest to oldest (the oldest should be the root VHD). You can do this by looking at the last modified time stamp on the origional AVHD files, find the one that last changed. And find the last one that changed before it.
In the Hyper-V manager, open the Edit Disk wizardBrowse to the youngest VHD in the chain, then choose 'reconnect' to point to the next youngest (the one that came before).
Open the Edit Disk wizard a second time and merge.
Then repeat the process until you have only a single VHD.
In a disaster case, you need to recover a copy of the root VHD prior to attaching it to a new VM and booting it (the act of booting it, modifies it)
Usually the most difficult part of this process is finding the last AVHD (differencing disk) in the chain.
The easiest way to do this is to find the configuration file for the VM.

Rename Onedrive Business root folder

Rename Onedrive Business root folder Here is what I remember: In the Office 365 web admin pages, change the organization name to a shorte...