Posts mit dem Label Server 2012 werden angezeigt. Alle Posts anzeigen

Samstag, 6. Oktober 2018

WSUS unter Windows Server 2012 und 2016 funktioniert nicht (Error 503, 0x80040154, 0x80245002)

Problem

Ein frischer Windows Server 2016 (oder 2012/2012R2) WSUS-Server funktioniert nicht. Clients werden in der WSUS-Console zwar aufgeführt, aber es werden keine Updates verteilt. Stattdessen sagen die %SystemRoot%\WindowsUpdate.log Logfiles, das der Fatale Fehler 0x80040154 oder 0x80245002 aufgetreten sei. Die DNS-Auflösung des WSUS-Servers klappt aber ohne Probleme.
Zudem wirft die manuell aufgerufene URL http://<WSUS-SERVERNAME>/ClientWebService/client.asmx einen HTTP-Fehler, und zwar den http-error 503.

Lösung (und ein Tipp)

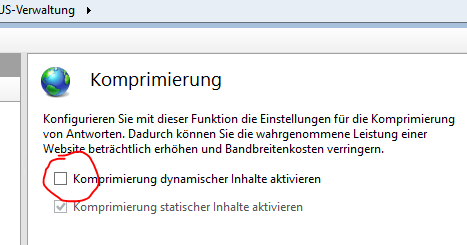
Bei der Installation des IIS ist vermutlich die dynamische Komprimierung installiert worden. Aus magischen Gründen wird diese bei der Installation auf allen neu angelegten Sites („WSUS-Verwaltung“) auch gleich aktiviert. Die dynamische Kompression muss ausgeschaltet sein, sonst mag der Windows Update Client die HTTP-Antworten nicht mehr verstehen.
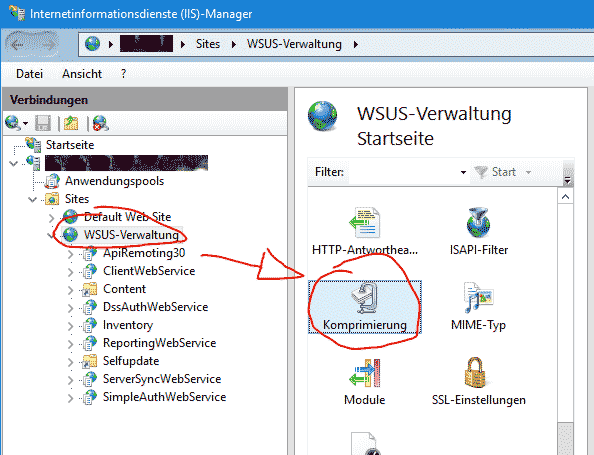
IIS-Manager > Sites > WSUS-Verwaltung > Komprimierung (rechts) > Dynamische Kompression AUSSCHALTEN

Tipp

Bei mehr als 190 WSUS-Clients steigt der WSUS-Applikationspool im IIS regelmäßig aus, wenn die Clients anfangen ihren Patchstand zu reporten. Der Pool beendet sich mit ienem „Out of Memory“ Fehler.
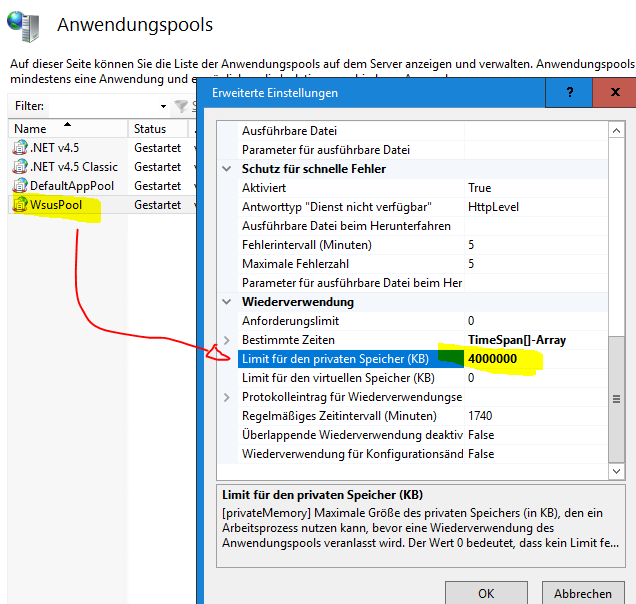
Wir raten daher eindringlichdazu, den Arbeitsspeicher des Pools von den knapp gerechneten ~1,8g (1.843.200kb) auf mindestens 4gb zu erhöhen. Dananch tritt der Fehler (zumindest bis 800 Clients) nicht mehr auf.
IIS-Manager > Anwendungspools > WsusPool > Erweiterte Eigenschaften > Wiederverwendung/“Limit für den privaten Speicher“ auf 4000000 (4Mio) setzen.

Mittwoch, 23. April 2014

Step-By-Step: Active Directory Migration from Windows Server 2003 to Windows Server 2012 R2

With the end of support for Windows XP, Office 2003 and Exchange 2003 now upon us, April 8th 2014 to be exact, attention now turns to Windows Server or specifically Windows Server 2003.  End of support for Windows Server 2003 is currently slated for July 14th 2015 and a great many organizations still utilize said offering as the cornerstone to their infrastructure to this day.  One question to keep in mind though is that with the move on the client end to Windows 8.1, will Windows Server 2003 or 2003 R2 be robust enough to properly enable employees and provide secure access to the plethora of devices in a world now dominated by BYOD?  Alternatively an IT administrator might ponder on the further enablement invoked via the deployment of Windows Server 2012 R2 should it be deployed in said organization.  Lets explore this possibility via the cornerstone of access enablement offered via Windows Server by investigating the evolution of the Active Directory offering now found in Windows Server 2012 R2
As you may know, Active Directory provides authentication and authorization mechanisms as well as framework from within other related services that can be deployed. As an LDAP compliant database, it commonly contains the most used objects such as users, computers, and groups organized into organizational units or OUs by any number of logical or business needs. Group Policy Objects or GPOs are then linked to OUs to centralize the settings for various users or computers across an organization. Part of the quandaries that IT professionals face is taking advantage of nuances provided in Active Directory in newer server offerings such as Windows Server 2012.  As detailed in Pierre's post, "Windows Server 2012 Active Directory – What’s New?", Active Directory provided in Windows Server 2012 R2 is provided impactful enhancements.  Yet some organizations choose not to migrate due to reasons of uncertainty.
This Step-By-Step has been created to assist with that uncertainty and provide guidance for IT professionals looking to migrate their organizations Active Directory offering from Windows Server 2003 to 2012 R2.

Transferring the Flexible Single Master Operations (FSMO) Role
  1. Open the Active Directory Users and Computers console on your new Windows Server 2012 R2 computer.
  2. Right click your domain and select Operations Masters in the sub menu.
  3. In the Operations Masters window, ensure the RID tab is selected.
  4. Select the Change button.

  5. Select Yes when asked about transferring the operations master role.
  6. Once the operations master role has successfully transferred, click OK to continue.
  7. Ensure the Operations Master box now shows your new 2012 R2 Windows Server.
  8. Repeat steps 4 to 6 for the PDC and Infrastructure tabs.
  9. Once completed, click Close to close the Operations Masters window.
  10. Close the Active Directory Users and Computers window.

Changing the Active Directory Domain Controller 
  1. Open the Active Directory Domains and Trusts console on your new Windows Server 2012 R2 computer.
  2. Right click your domain and select Change Active Directory Domain Controller... in the sub menu.
  3. In the Change Directory Server window, select This Domain Controller or AD LDS instance.
  4. Select your new 2012 R2 Windows Server.

  5. Click OK to continue.
  6. Back in the Active Directory Domains and Trusts window, hover over the Active Directory Domains and Trusts found in the folder tree on the left hand side to ensure the server now reflects your new 2012 R2 Windows server.
  7. Right click Active Directory Domains and Trusts found in the folder tree and select Operations Manager... in the sub menu.
  8. In the Operations Master window, click Change to transfer the domain naming master role to the 2012 R2 Windows Server.
  9. When asked if you are sure you wish to transfer the operations master role to a different computer,click Yes.
  10. Once the operations master is successfully transferred, click OK to continue.
  11. Click Close to close the Operations Master window.
  12. Close the Active Directory Domains and Trusts console.

Changing the Schema Master
  1. Open a command prompt in administration view on your new Windows Server 2012 R2 computer.
  2. On the command prompt window, enter regsvr32 schmmgmt.dll and hit enter.
  3. Once completed successfully, click OK to close the RegSvr32 window.

  4. Close the command prompt.

Add the Active Directory Schema Console from MMC
  1. Open a MMC console on your new Windows Server 2012 R2 computer.
  2. Click File > Add/Remove Snap-in...
  3. In the Add or Remove Snap-ins window, select Active Directory Schema and click the Add >button.

  4. Click OK to continue.

Change the Schema Master
  1. In the same MMC console, right click Active Directory Schema and select Change Active Directory Domain Controller... in the sub menu.
  2. In the Change Directory Server window, select This Domain Controller or AD LDS instance.
  3. Select your new 2012 R2 Windows Server.
  4. Click OK to continue.
  5. A warning will appear stating that the Active Directory Schema snap-in in not connected. Click OK to continue.
  6. Hover over the Active Directory Schema folder in the folder tree to ensure the new Windows Server 2012 R2 computer is shown. 
  7. Now right click Active Directory Schema and select Operations Master... in the sub menu.
  8. In the Change Schema Master window, click Change to transfer the schema master role to the 2012 R2 Windows Server. 
  9. When asked if you are sure you wish to transfer the schema master role to a different computer,click Yes.
  10. Once the schema master is successfully transferred, click OK to continue.
  11. Click Close to close the Change Schema Master window.
  12. In the MMC, click File > Exit.
  13. When asked to save the console, click No.
 Once completed, open the Active Directory Users and Computers console to verify that the Active Directory database successfully replicated to your new Windows Server 2012 R2 computer.  Be aware that the database replication may take some time depending on the number of objects in Active Directory.

Removing the 2003 Windows Server from the Global Catalog Server
  1. Open Active Directory Sites and Services on your new Windows Server 2012 R2 computer.
  2. Expand the Sites folder, then the Default-First-Site-Name folder, then the Servers folder.
  3. Expand both listed servers. One should be your new 2012 Windows Server and one should be you 2003 Windows Server.
  4. Right click NTDS Settings found under your old 2003 Windows Server.
  5. In the sub menu, select Properties.
  6. Under the General Tab, unselect Global Catalog and then click the Apply button.
  7. Click OK to continue.
  8. Close the Active Directory Sites and Services window.
  9. Verify that your new 2012 R2 Windows Server is running the FSMO role by opening the command prompt in Administrative view and running the following command: Netdom query fsmo.
  10. In the Network and Sharing Center, be sure to change the Preferred DNS server to match the Alternate DNS server, then delete the IP address listed under the Alternate DNS server should it currently be pointed to the old 2003 Windows Server.

All that's left is to demote the old 2003 Windows server by first adding the new 2012 R2 Windows Server as the Primary DNS, followed by running DCPROMO to demote the old 2003 Windows server.

Unable to install Microsoft Windows Server 2012 into a VMware ESXi 5.x or Hyper-V virtual machine with HP provided media

Symptom

When users try to install Microsoft Windows Server 2012 using HP provided media into VMware vSphere ESXi 5.1 managed virtual machine or under Microsoft Hyper-V, the Windows Installer will pop-up a window with the following message:
 Debug Assertion Failed!
Program: x:\tools\BIOSCHECK64.exe
File: c:\Program Files (x86)\Microsoft Visual Studio 10.0\VC\atlmfc\include\atlsmpstr.h
Line:112
Expression: nRefs !=0
For information how your program can cause an assertion failure, see the Visual C++ documentation on asserts.
(Press Retry to debug the application)"
Users can click on the Ignore button to continue with the installation.

Affected configurations

The system is configured with at least one of the following:
  • Microsoft Windows Server 2012, any service pack
  • VMware ESXi 5.0 Update 1, Update 2
  • VMware ESXi 5.1, any Update
This tip is not system specific.
This tip is not option specific.
Note: This does not imply that the network operating system will work under all combinations of hardware and software.

Workaround

It is recommended to use the retail media rather than HP provided media to install Microsoft Windows Server 2012 into a virtual machine to prevent the warning.
If it is necessary to use HP provided media to install Windows Server 2012 to a virtual machine, the user can do the following:
  • For Hyper-V, the user can just ignore the warning message and go on with the installation
  • For VMware, the user can just ignore the warning message and go on with the installation or follow the instructions below to configure the virtual machine to reflect host System Management Basic Input/Output System (SMBIOS) structure to fix the issue.
Either of the following two (2) methods can do the work:
  • Edit the virtual machine's .vmx file to contain the following line:
 SMBIOS.reflectHost = "true"

Dienstag, 25. Dezember 2012

Step-by-Step: Building a FREE Hyper-V Server 2012 Cluster


Leverage the FREE Hyper-V Server 2012 to provide an Enterprise-ready
Private Cloud Foundation!
Overhead at one of my recent IT Pro events:
“The FREE Hyper-V Server 2012 sounds AWESOME! With the same features and scalability as the Hyper-V role in the full Windows Server 2012 OS, I could really use this to virtualize my application workloads very cost effectively.  But … I need high availability too! 
HOW EASY IS IT TO CONFIGURE HYPER-V SERVER 2012 IN A CLUSTER?
- Kris”
Great question, Kris! Configuring our FREE Hyper-V Server 2012 in a highly available cluster can be really easy.  In this article, I’ll step through the configuration of a Hyper-V host cluster configuration that uses Hyper-V Server 2012 so that you'll have the details to step through this process in your own lab environment.
In Part 2 of this article series, I’ll finish up with the steps needed to provision and test a highly available virtual machine within your new cluster.

Let’s start with a common scenario …

In this article, we’ll be building a small 2-node Hyper-V Server 2012 host cluster, but the same steps below can be applied to much larger cluster configurations – the FREE Hyper-V Server 2012, like Windows Server 2012, supports up to 64 physical nodes and up to 8,000 virtual machines per cluster.
To build the operating system on each of the Hyper-V hosts, we can leverage the Getting Started Guide to perform the following basic post-installation configuration tasks using the SConfig.cmd script:
  • Set static IP address information on each NIC
     
    • I’d recommend at least three (3) physical NICs for each cluster host as follows:
       
      • One NIC for cluster management and storage
        • Connect to a local storage subnet and do not set a default gateway address
        • Note that NIC teaming should not be used for storage networks using iSCSI.  Instead, if more bandwidth and/or resiliency is needed than a single NIC can provide, consider using multiple NICs or iSCSI HBAs with MPIO configured.
           
      • One NIC or NIC Team for live migration traffic
        • Connect to a local live migration subnet and do net set a default gateway address
           
      • One NIC or NIC Team for client network traffic to/from the VMs.  
        • Connect to your client network, configure default gateway and DNS info on this NIC or NIC team.
           
    • Note: If you are interested in leveraging NIC teaming on your Hyper-V hosts to create high bandwidth resilient network connections for live migration and client network traffic interfaces, see this study guide on configuring NIC teaming from our “Early Experts” study group.
       
  • Set a desired computer name on each host
     
  • Join each host to an Active Directory domain
    • Note that Active Directory is required for normal operation of Failover Clustering in Hyper-V Server 2012 and Windows Server 2012.  However, the product team has enhanced clustering a bit so that a cluster can now be brought online in disaster recovery situations where Active Directory may not be available on the network.
       
  • Enable Remote Management and Remote Desktop
Once you’ve gone through these steps, you should now have two standalone Hyper-V hosts that are ready to be configured as part of a cluster.

But wait! I need Shared Storage, Don’t I?

Yes, indeed – for Hyper-V Host Clusters you’ll need to provide shared storage in one way or another that each Hyper-V host can access for storing highly available VM’s.  Commonly, shared storage between Hyper-V hosts in a cluster can be provided via:
  • Fibre Channel (FC) SAN Arrays
  • iSCSI SAN Arrays
  • SAS JBOD Enclosures with SAS Expanders
  • SMB 3.0 Shared Folders on a Windows Server 2012 file server or, preferably, by a Windows Server 2012 clustered file services role for continuous storage availability.
If you already have an investment in FC or iSCSI SAN storage, Windows Server 2012 and Hyper-V Server 2012 will certainly continue to support those array options as shared storage solutions – in fact, with new features, like support for Offloaded Data Transfer (ODX), newer intelligent SAN arrays can perform amazingly better than ever with Windows Server 2012 and Hyper-V Server 2012!
However, if you haven’t invested yet in an intelligent SAN array for shared storage, SAS and SMB 3.0 can be cost-effective shared storage alternatives worth your consideration for a Hyper-V host cluster.

SAS? SMB? I don’t recognize those as shared storage options for VMs!

Support for shared SAS enclosures and SMB 3.0 shared folders as shared storage options for VMs in a cluster is new with Windows Server 2012 and Hyper-V Server 2012.  Both options can provide cost effective alternatives to more expensive intelligent SAN arrays.
  • SAS enclosures are supported as shared storage in a failover cluster via our new Storage Spacessubsystem in Windows Server 2012 and Hyper-V Server 2012.  Along with OEM partners, we’ve demonstrated SAS solutions based on Storage Spaces that have achieved ~1 Million IOPs using commodity storage components.
     
  • SMB 3.0 has been enhanced in Windows Server 2012 and Hyper-V Server 2012 for large amounts of random IO in big files, such as what you’d typically find with VM’s hosted in a shared folder, andcontinuous availability of shared folders when configured in a Windows Server 2012 file services cluster.  In fact, when leveraging hardware that supports SMB Direct, our testing has shown that SMB storage traffic can be within 2% of the performance of direct attached storage!
Both of these options can simplify shared storage configurations tremendously by leveraging commodity storage components over easily configured interfaces.

It’s SMB 3.0 for ME!

I already have a Windows Server 2012 Failover Cluster that supports a number of clustered File Services roles in my environment, so I’ll be using SMB 3.0 shared folders as shared storage locations for my Hyper-V host cluster in this article.  I’ll create two “continuously available” shared folders on one of my clustered File Services roles as follows:
  • \\CAFSC01\HVCVMWitness – this clustered shared folder will be used as a witness by the new Hyper-V host cluster. A witness is a special resource that is used when a physical cluster node fails to determine which node is the “surviving” node to which clustered resources should failover.  In particular, it’s important to use a witness resource when you have an even number of physical nodes within your cluster, as we do in this 2-node cluster scenario.
     
  • \\CAFSC01\HVCVMStorage – this is a shared folder that I will use as a storage location for highly available virtual machines that I provision in the Hyper-V host cluster.
Note that each of your Hyper-V Server 2012 computer accounts in Active Directory will need to be granted Full Permissions to each of these shared folders and the underlying NTFS folder structure.

Let’s Build Our Hyper-V Host Cluster!

OK … now that we’ve got the basic infrastructure needs addressed, let’s start off by installing the Failover Clustering feature on each Hyper-V host and configuring an external Virtual Network Switch for VM network traffic.  Then we can move on to validating and configuring our new cluster.
Note: We can configure a Hyper-V host cluster remotely by using the Failover Cluster Manager GUI tool from a remote Windows Server 2012 management host or a Windows 8 admin client with the Remote Server Admin Toolkit (RSAT) installed.  However, in this article, I’ll make the assumption that you’ll be doing all of the cluster configuration from the Hyper-V Server 2012 host consoles directly using PowerShell … It’s really very easy!
On our Hyper-V Server 2012 consoles, we can configure our new Hyper-V host cluster by using a bit of PowerShell as follows:
  1. Install the Failover Clustering feature on each Hyper-V Server 2012 host using the Install-WindowsFeature cmdlet:
     
    Install-WindowsFeature –Name Failover-Clustering –IncludeManagementTools
     
  2. Configure an external virtual network switch on each Hyper-V Server 2012 host.  Be sure to use exactly the same virtual switch name on each host.  You can use the Get-NetAdapterName cmdlet first to verify the name of each network adapter to make sure you select the correct NIC for binding to the new virtual switch.
     
    Get-NetAdapterName
    Now that I know the name of my network adapter, I’m going to use the New-VMSwitch cmdlet to configure a new external switch named KEMLABNET01.
     
    New-VMSwitch “KEMLABNET01” –NetAdapterName “Ethernet 2” –AllowManagementOS:$True 
     
  3. Next, let’s validate the configuration of our Hyper-V Server 2012 hosts to make sure they are compatible with a cluster configuration by using the Test-Cluster cmdlet.  For my new cluster, my individual Hyper-V host computer names are KEMLABHV06 and KEMLABHV07.
     
    Test-Cluster –Node KEMLABHV06,KEMLABHV07
     
    The output of the Test-Cluster cmdlet will be written to:
     
    C:\Users\[username]\AppData\Local\Temp\1\Validation Report [Date] at [Time].xml.mht
     
    Ultimately, we want to review this report and make sure that the cluster validation tests passed on each of our hosts.
     
  4. Now that we’ve validated our host configurations, we can create our new cluster with the New-Clustercmdlet.  I’m going to name my new cluster KEMLABHVC01.
     
    New-Cluster –Name KEMLABHVC01 –Node KEMLABHV06,KEMLABHV07 –StaticAddress 192.168.249.40
     
    The output from the New-Cluster cmdlet will be logged to:
     
    C:\Windows\Cluster\Reports\Create Cluster Wizard [Cluster_Name] on [Date] at [Time].mht
     
    After creating your new cluster, it’s a good idea to review this report to ensure that no unexpected errors occurred.
     
  5. After our new cluster is created, our final step is to configure our file share witness with the Set-ClusterQuorum cmdlet:
     
    Set-ClusterQuorum –Cluster KEMLABHVC01 –NodeAndFileShareMajority \\CAFSC01\HVCWitness    

That’s it! Our new Hyper-V host cluster is now built!

To test the status of our new cluster, we can use the Get-ClusterGroup cmdlet:
Get-ClusterGroup
This command should show that our Cluster Group resource group is online on one of our nodes.  Note that the Available Storage cluster resource group may show as Offline because in our configuration above, we aren’t using any shared disk storage – just SMB 3.0 shared folders!

What’s Next? Your Turn!

Now, you try it!
  • Download our FREE Hyper-V Server 2012 installation bits
  • Complete the process outlined above to build out your own Hyper-V Host Cluster
In Part 2 of this article series, I’ll step through provisioning and testing new virtual machines that are highly available on our new Hyper-V host cluster.

In the meantime …

Be sure to check out our “Early Experts” study group and our new “Virtualizer Quest" athttp://aka.ms/EarlyExpertsVirtualizer.  The Virtualizer Quest includes structured study guides that walk through configuring the other new features associated with the Hyper-V role in Windows Server 2012 and Hyper-V Server 2012. 
Along the way, you’ll be preparing for the new MCSA on Windows Server 2012 certification exams and be entered into a chance to win FREE MCSA Exam Vouchers in our December sweepstakes!

Are you ready to Cluster?

Did the article help you prepare for clustering Hyper-V hosts in your environment?  Be sure to leave your feedback, questions and comments below!

This article is Part 2 in a two-part series on building a FREE Hyper-V Server 2012 Cluster to support highly available virtual machines as a foundation to a Private Cloud solution. If you missed it, be sure to check outPart 1 of this article series on the initial steps for building Hyper-V Server 2012 hosts in a Failover Cluster configuration.
In this article, we’ll walk through provisioning highly available virtual machines on our new FREE Hyper-V Server 2012 cluster and testing Live Migration failover scenarios.

It’s Time to Build Highly Available VMs!

Now that we have our Hyper-V failover cluster up and running, it’s time to provision our virtual machines in a highly available configuration.  Once provisioned in this manner, highly available virtual machines can failover to other physical nodes within our cluster in both planned and unplanned failover scenarios.
If you’ve installed the Hyper-V Manager and Failover Cluster Manager GUI tools on a Windows Server 2012management server or Windows 8 admin workstation, you can easily perform these steps remotely using these tools.  See my article on the Remote Server Admin Toolkit for Windows Server 2012 to learn how to setup a Windows 8 admin workstation for remote management of Windows Server 2012 and Hyper-V Server 2012 hosts.
However, in this article, we’ll assume that you’ll be performing these tasks from the console of your Hyper-V Server 2012 hosts using our built-in Hyper-V cmdlets and Failover Clustering cmdlets in PowerShell 3.0.  PowerShell 3.0 ROCKS and is really quite easy to use for these tasks as you’ll see below.
Here’s the steps that we’ll be using to build each highly available virtual machine:
  1. Create new Virtual Hard Disks (VHDs or VHDXs) in a shared storage location that is accessible to your clustered configuration. 
     
    As you may recall from my Part 1 article, we’re using the new SMB 3.0 shared application folder functionality to provide a shared storage location for our highly available VM’s.  To create a new virtual hard disk in this shared location, I’ll use the New-VHD cmdlet in PowerShell 3.0:
     
    New-VHD -Path \\CAFSC01\HVCVMStorage\HAVM01.VHDX -Dynamic -Size 127GB 
     
  2. Now that we have our Virtual Hard Disk(s) sitting in a shared storage location that is accessible from our clustered hosts, next we’ll use the New-VM cmdlet to provision each new Virtual Machine in the same shared storage location:
     
    New-VM -Name HAVM01 -Path \\CAFSC01\HVCVMStorage -Memory 1GB -SwitchName "KEMLABNET01" -BootDevice CD -VHDPath \\CAFSC01\HVCVMStorage\HAVM01.VHDX
     
  3. After each new Virtual Machine is provisioned, we can use additional cmdlets, such as Set-VM, Add-VMDvdDrive and Add-VMHardDiskDrive, to set additional VM settings and/or attach additional virtualized storage devices, as necessary. 
     
    Since my new Virtual Machine in this example is using a blank Virtual Hard Disk for its storage, I’ll attach an ISO image as a DVD boot device to this VM so that I can install Windows Server 2012 when this VM starts up for the first time:
     
    Add-VMDvdDrive -VMName HAVM01 -Path \\CAFSC01\ISO\WS2012RTM.ISO
     
  4. Since the Failover Cluster manages the startup and failover of highly available VMs, we’ll want to disable the Hyper-V Automatic Start Options for each of our VMs in this scenario.  This will prevent Hyper-V from trying to directly manage the startup of these VMs and instead rely on the cluster for startup and failover tasks:
     
    Set-VM -Name HAVM01 -AutomaticStartAction Nothing
     
  5. Our VM’s are now setup with the necessary VM configuration settings.  To add our new VMs to the cluster and make them highly available, we’ll now use the Add-ClusterVirtualMachineRole cmdlet as follows:
     
    Add-ClusterVirtualMachineRole -VirtualMachine HAVM01       
     
  6. Once you’ve setup your new highly available VM’s you can check their status and bring them online with the following cmdlets:
      Get-ClusterGroup
     
    Start-ClusterGroup –Name “HAVM01”
         
     
  7. Your Virtual Machines will start up and you can now connect to their consoles via the VMConnect.execommand-line tool from a remote Windows Server 2012 management server or Windows 8 admin workstation.  VMConnect is included with the Hyper-V Management GUI tools.
     
    VMConnect.exe <Hyper-V Host> <Virtual_Machine_Name>     
     
    We can use our VMConnect remote console connection to complete the installation and configuration of the Guest OS within each new virtual machine.

We’re finished … Let’s Test!

Our highly available VMs are up and running in our cluster, so let’s test our failover cluster with a Live Migration planned failover using the Move-ClusterVirtualMachineRole cmdlet.  I’ll move one of my highly available VMs to the second physical node in my cluster live while it’s running with the following command line syntax:
Move-ClusterVirtualMachineRole -Name "HAVM01" -Node KEMLABHV07

Now it’s Your Turn! Are you Clustered Yet?

Download our FREE Hyper-V Server 2012 using the link below and step through the commands in Part 1 andPart 2 (this article) of this article series to build your own Hyper-V Cluster with highly available VMs.
Once you’ve finished building your lab, be sure to continue your learning and study on Windows Server 2012 by leveraging our “Early Experts” FREE Online Study Group at …
  • Join us! Be an “Early Expert” on Windows Server 2012!
Feel free to leave your feedback, results and questions in the comments below to share your experiences in building a Hyper-V Cluster!
Hope this helps,

VMware ESXi 5.1 can run Microsoft Hyper-V Server 2012 VMs

Here's the gist:

  1. Create a "Microsoft Windows Server 2012 (64-bit)" VM, using Typical Configuration
  2. right-click the new VM and Upgrade Virtual Hardware to Version 9
  3. tweak the VMX, adding these 4 lines:
    • mce.enable = TRUE
    • hypervisor.cpuid.v0 = FALSE
    • featMask.vm.hv.capable = “Min:1″
    • vhv.enable = TRUE
  4. be sure it's assigned to a network where the vSwitch has Promiscuous Mode set to Accept
  5. power up the new Hyper-V VM
  6. perform typical install and configure of Hyper-V, hard-code IP if you'd like, create an Admin username/password that matches a client system
  7. create a Windows 8 "client" VM, since Hyper-V Manager takes just a few seconds to add
  8. fix COM Security on that client system
  9. use that VM's Hyper-V Manager to connect to Hyper-V, then...
  10. create a Hyper-V hosted Virtual Machine, connect to it, and turn it on to test

I'm eager for any suggestions or alternative methods, but for now, this was the only way I could get it working in my own lab, figured others might want to try to replicate this excercise.


youtube Link: http://www.youtube.com/watch?v=u7rhWn0dNac


You heard all about guestOS = "winhyperv" here first.

What if you just want to virtually “kick the tires” on the latest Microsoft Hyper-V Server 2012, without committing dedicated hardware, to focus more on learning the features than the performance? Well, if you already have the prerequisites:

a) an ESXi 5.1 lab where you’re allowed to tweak the Hyper-V VM’s vmx file slightly (not changing anything in the ESXi host configuration)
b) a current subscription to MSDN or TechNet Professional, or even the free eval obtained by clicking the Free Download button here

then you’re in luck. Just leave your VMware VMs going, and add a Hyper-V VM without the server UI stuff (called the Core version), for a smaller resources footprint, and the ability to “nest” Hyper-V VMs.

The video walk-through seen at the end is 32 minutes, but you can skip the video and deploy this in your lab in well under 15 minutes, if you already have the 1.7GB ISO file downloaded that is. Just follow along with the screenshots below!

Backstory:
Windows Server 2012 with Hyper-V includes these lofty claims:
Why Hyper-V? Competitive Advantages of Windows Server 2012 Hyper-V over VMware vSphere 5.1.

More info here:
Microsoft Hyper-V Server 2012and in TechNet here:
technet.microsoft.com/en-us/library/hh833684.aspx.

Yes, the initial learning curve for Hyper-V without the full GUI is a bit rough:
Standalone Hyper-V is too painful to usebuy hey, all you really care about is getting it to run multiple VMs, so do you really need a fancy UI, do you? I finally got this all working just this past weekend, so I didn’t waste any time getting this word out there (early Monday).

In other words, if you got VMware ESXi 5.1 working on your hardware, that means your BIOS and CPU are capable with Intel VT-x or AMD-V explained here, and you will very likely be able to get ESXi 5.1 to run Windows Server 2012 with Hyper-V.

Back on ESXi 5.0, luck with running nested Hyper-V VMs didn’t work out well. By nesting, I mean getting ESXi 5.0 to run Hyper-V to run Hyper-V VMs at all, explained here:
tinkertry.comhyper-v-server-2012-release-candidate-x64-runs-fine-on-esxi-5-update-1

Doing a little research that included combing the best of these recent articles:

How to Enable Nested ESXi & Other Hypervisors in vSphere 5.1, Wednesday, August 29, 2012
www.virtuallyghetto.com/2012/08/how-to-enable-nested-esxi-other.html

How To Install CentOS 6.3 KVM on vSphere 5.1, by Chris Colotti,
www.chriscolotti.us/vmware/nicira-nvp/how-to-install-centos-6-3-kvm-on-vsphere-5-1

coupled with the incentive that this really should work, based on folks’ discussions over here (that didn’t exactly spell out the exact steps):

Server 2012 Hyper-V under ESXi 5.x??, Sep 14, 2012 7:41 PM
communities.vmware.com/message/2115423

Running Nested VMs, Created on: Nov 30, 2008 9:17 PM by jmattson – Last Modified: Sep 12, 2012 2:06 PM by jmattson
communities.vmware.com/docs/DOC-8970

I was finally able to prototype and get this whole procedure going , and boiled it down to the simplest method I could come up with. I even managed to avoid the step of having to use the vSphere Web Client to expose hardware assisted virtualization to the guest OS, to speed you along toward success.


VMware ESXi 5.1 can run Microsoft Hyper-V Server 2012 VMs
Comprehensive Implementation Guide


1 ) Install VMware ESXi 5.1:
Assuming your hardware platform is compatible, such as tinkertry.com/vzilla, installation and configuration instructions of ESXi 5.1 can be seen here:
tinkertry.com/install-esxi-5-1-flash-drive-then-configure-and-run-vms


2 ) Turn on SSH on ESXi using the vSphere Client:
If you haven’t done this already, the steps are shown on VMware’s site here, or a more visual approach here:
www.thomasmaurer.ch/2011/08/enable-ssh-on-esxi-5-via-vsphere-client


3 ) Download the 1.7GB ISO:
Microsoft Hyper-V Server 2012 Release Candidate (x64) – DVD (English)
Visit MSDN’s download site, with the permalink to the x64 English version here:
msdn.microsoft.com/subscriptions/downloads#FileId=50558

The actual file you’re grabbing is:
en_microsoft_hyper-v_server_2012_x64_dvd_915600.iso
or from the free eval site here by clicking the Free Download button, or just use the direct download link here, with a file named:
9200.16384.WIN8_RTM.120725-1247_X64FRE_SERVERHYPERCORE_EN-US-HRM_SHV_X64FRE_EN-US_DV5.ISO

These 2 files are identical, so doesn’t matter which you choose (seen pictured below):


4 ) Use Datastore Browser (or Veeam FastSCP) to transfer the ISO file to your ESXi storage:
Consider creating a folder named ISO, then use Datastore Browser to upload your ISO file to that new folder


5 ) Configure your ESXi host network properly, turning on “Promiscuous Mode”:
You’ll need to enable “Promiscuous Mode” on your vSwitch that this Hyper-V VM network will use (there are a variety of ways to layout your network, including dedicating a NIC for this Promiscous mode Hyper-V that will still be accessible by clients), also seen in the video atthis exact spot.


Source:
www.ivobeerens.nl/2012/06/28/nest-windows-server-2012-hyper-v-in-vmware-esxi-5

If you forget this step, you may get the Hyper-V Manager RPC Error ”Cannot connect to the RPC service on computer. Make sure your RPC service is running.”


6 ) Configure a new VM:
In the video, you’ll see me create a new VM called “TEMPLATE-hyperv-Microsoft Server 2012 with Hyper-V” using the Typical wizard, pictured below.
The finalized product name was actually ”TEMPLATE-hyperv-Microsoft Hyper-V Server 2012″ so despite the screenshots, you may wish to go with that name instead.


Navigate to the ISO file, and be sure Connect at power on checkbox is on, click “Finish”:


7 ) Upgrade Virtual Hardware to Version 9:


8 ) Tweak the VM’s .vmx File:
Use free WinSCP to edit the .vmx file for the VM you just created. VMware’s jmattson has informed me this is the only tweak needed in the VMware Nested Virtualization forum:

Change this one line from:


guestOS = "windows8srv-64"
to
guestOS = "winhyperv"

and add the following line to the very end
featMask.vm.hv.capable = "Min:1"

followed by a carriage return, then save your changes.


Those changes, along with VM Hardware version 9 upgrade, are the “secret sauce” to success. And potentially a bit easier than trying to do this from vSphere Web Client or VMware Workstation 9.

Sources:

The definitive simplification was from jmattson’s response at http://communities.vmware.com/message/2119895#2119895, and his Running Nested VMs overview.
www.virtuallyghetto.com/2011/07/how-to-enable-support-for-nested-64bit.htmlcommunities.vmware.com/docs/DOC-8970tw.linkedin.com/in/aliao and www.youtube.com/watch?v=I-rjR4OawvQ
and Chris Colloti’s article giving me the idea to compare the vmx file before and after editing with the vSphere Web Client to ”Expose hardware assisted virtualization to the guest OS” as Chris explains here:
www.chriscolotti.us/vmware/nicira-nvp/how-to-install-centos-6-3-kvm-on-vsphere-5-1


9 ) Power on the VM, and install Hyper-V:
Proceed with a normal install


10) Configure Hyper-V:
Configure basic Hyper-V settings if you’d like, including allow Remote Management, and creating an administrator account for the remote client system that you’ll be connecting, using the same username and password.


11) Install Hyper-V Manager on Windows 8 Release Preview:
Go to Add/Remove Programs, Add/Remove Windows Components, then turn on the Hyper-V Management Tools checkbox. I used my convenient, 3-minutes-to-deploy Windows 8 VM for the client, because the Hyper-V management UI is extremely easy to install.


If you’re on Windows 7, get the equivalent function from
Remote Server Administration Tools for Windows 7 with Service Pack 1 (SP1).


12) Run Hyper-V Manager and connect to Hyper-V:
Now you’re ready to hit the Windows key on your keyboard, and type “hyper” and hit enter, and the Hyper-V Manager should start right up and allow you to connect, or at least try to, but you’ll get this error:
“Access denied. Unable to establish communication between”

So finding COM Management to fix this in Windows 8 wasn’t easy like it was on Windows 7:
tokyoimage.wordpress.com/2010/10/15/hyper-v-manageraccess-denied-unable-to-establish-communication-betweenbut I finally found this post:
http://www.calvinirwin.net/tag/hyper-vwhich told me to use Start, Run, DCOMCNFG, then click “Properties”, “COM Security”, “Edit Limits…”, turn on the “Remote Access” checkbox and click OK


13) Created a simple “nested” VM:
Use all the defaults for a VM you create, but on the Connect Virtual Hard Disk, choose “Attach a virtual hard disk later”. Why? We’re just trying to test if a nested VM is allowed to boot succesfully, either it works, or it doesn’t.


14) Power on to test the “nested” VM:
It not only works, it seems to work pretty well, with less CPU load noticed on the ESXi 5.1 host than the betas, this is a good sign.


Of course, future tests will exercise this new nested lab of mine considerably harder, with nested VMs with full operating systems, and Hyper-V live migrations. I’ll also test conversions of VMware VMs to Hyper-V with Microsoft’s tools here, just to compare with VMware Converter. And I need to test if Hyper-V VMs can actually see the network properly, and if the better vmxnet3 network driver would work.

mce.enable = TRUE
hypervisor.cpuid.v0 = FALSE
featMask.vm.hv.capable = "Min:1"
vhv.enable = TRUE

youtube Link: http://www.youtube.com/watch?v=u7rhWn0dNac
Dienstag, 9. Oktober 2012

How to Convert Hyper-V VHD Disks to VHDX

Windows Server 2012 Hyper-V offers a new virtual disk type called VHDX.  VHDX virtual disks have many benefits, including larger maximum disks up to 64TB, protection against data corruption, and improved alignment of the virtual hard disk format to work well on large sector disks.  See http://technet.microsoft.com/en-us/library/hh831446.aspx for more information about the VHDX disk type.

You can convert existing older format VHD disks to the new VHDX format using the Hyper-V Manager console.  This process will create a new VHDX disk and copy the data from the existing VHD to the new disk.  At the end of the procedure you will have two disks, the original VHD disk and a new VHDX disk with the same contents.  You can safely delete the original VHD disk once you have confirmed that the new VHDX disk is fully functional.

Here are the steps to convert an existing VHD disk to a VHDX disk:
  • Shut down the VM that is accessing the disk, if necessary.  You cannot convert a disk that is in use.
  • Open the Hyper-V VM settings, navigate to the hard drive you wish to convert, and click the Edit button, as shown below:
  • The Edit Virtual Hard Disk Wizard will start.  Select Convert from the Choose Action page and clickNext.
  • Select the VHDX disk format and click Next.
  • Choose whether the new disk should be fixed size or dynamically expanding.  Note that this gives you the opportunity to change disk types from the previous disk type.  Click Next.
  • Select the name and location for the new VHDX disk and click Next.
  • Review the summary and click Finish to create the new disk.  This may take a few minutes depending on the size of the VHD and the speed of your hard drive(s).  A 30GB VHD converted in less than two minutes on my SSD drive.  The size of the new VHDX disk will be slightly larger than the original VHD disk.

  • The last step is to mount the new VHDX disk to the Hyper-V VM.  Note the new VHDX extension.

Once you have started up your VM with the new VHDX disk you can safely delete the old VHD disk.  There are no other configurations necessary.
Did you find this information useful? Post a comment and share it with others!

Rename Onedrive Business root folder

Rename Onedrive Business root folder Here is what I remember: In the Office 365 web admin pages, change the organization name to a shorte...