Posts mit dem Label TMG werden angezeigt. Alle Posts anzeigen

Samstag, 30. Juli 2011

Using TMG, one-time passwords and Kerberos Constrained Delegation


Access to corporate resources from external computers requires secure authentication methods. This article explains how to configure One-Time Password pre-authentication.
In the previous article of this Kerberos Delegation series, you learned how to configure Kerberos Constrained Delegation. Today, I will discuss pre-authentication methods that are not based on Active Directory. Users can pre-authenticate using Windows Active Directory authentication, RADIUS OTP authentication, Certificate authentication or LDAP authentication, and even with PKI certificates.
In the example here, we will use a one-time password solution that provides a simple, user friendly and very secure solution that is ideal for securing access to corporate resources when used with Microsoft (TMG) and Kerberos Constrained Delegation. I will describe how Protocol Transition works with TMG, i.e. how you can authenticate users with one method and then pass the credentials to the backend using Kerberos.
So how is the end-user experience when multiple pre-authentication methods are used without Credential Delegation? If you were to use RADIUS One-Time Password pre-authentication on the TMG Listener, a user would have to enter his OTP credentials first and then provide his Windows credentials for access to the web server.
Why is this not good? You expose critical security information (Domain username and password, which are static) when a user has to enter Domain credentials on a machine that doesn’t belong to your corporate network. This is especially problematic in a “hostile” environment such as internet cafes or the “mother-in-law” computer (I heard this term at a Microsoft presentation for UAG and I just had to use it). You can probably imagine the variety of threats in those environments. Such a machine could run key logging malware that collects static passwords and other information that could be used in a subsequent attack.
How can a security minded administrator make sure that users would enter only OTP credentials when accessing backend HTTP/HTTPS based services? It’s obvious that you can’t achieve this by using Basic Credential Delegation which means passing username and password from the TMG server to the backend server. For working with OTP credentials, Kerberos Constrained Delegation and Protocol Transition is required.
In my previous article, I already explained how to configure Kerberos Constrained Delegation in a Publishing rule. In this post, I will describe how to configure the Listener to use OTP and PKI pre-authentication. But first we have to configure TMG to query an authentication server. We will do this by defining a RADIUS server with TMG. First select “Tasks” in the TMG console.
One-time passwords TMG - Configure Autentication
TMG – Configure Authentication
Locate “Configure Authentication Server settings”
A new window will pop up, click “add” and enter the relevant information (IP, Shared Secret And Port). Also be aware, that if your RADIUS server uses a port other than 1812, you will have to allow it independently.
TMG One-time passwords Configure authentication server
TMG – Authentication Servers
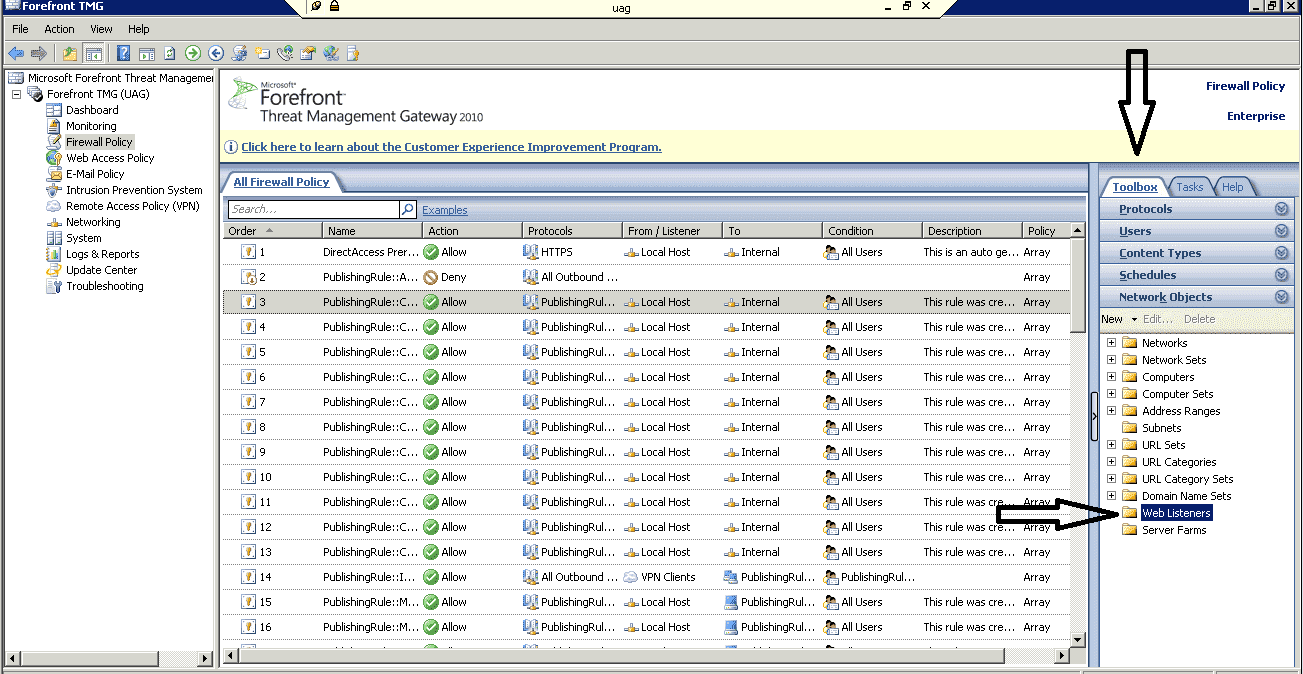
I continue by reconfiguring the Listener on the TMG from the previous article. Select “Toolbox” and then click on “Network Objects” in the TMG Console.
One-time passwords TMG - Web Listener
TMG – Web Listeners
Locate and open the “Web Listener” dialog at the bottom and right click the Listener that you created in the previous article.
One-time passwords - Authentication Validation Method
Authentication Validation Method
Now select “RADIUS OTP” authentication in the Authentication settings tab. You can then use this Listener in a Publishing Rule. The Publishing Rule from the previous article can be used without reconfiguration. Click OK and Apply.
How would an end user experience this? When a user first accesses the URL of the published web application, he will be asked to enter his OTP credentials. The TMG would then authenticate him to the backend application using a Kerberos Token by delegating the credentials. The user has successfully logged in using only his OTP credentials without being asked to enter his domain credentials. In the next article, I will explain how to use Smart Cards and PKI credentials to access published resources.

How to configure TMG for SSL Client Certificate Authentication


SSL Client Certificate Authentication allows users authenticate to TMG using smart cards. This post explains how to configure TMG and Active Directory for certificate authentication.
In my previous article I explained the use of one-time passwords with Forefront Threat Management Gateway (TMG). Today, I will discuss an alternative to this method that leverages smart cards and Public Key Infrastructure (PKI). I will describe how to use certificates that are published on the TMG.
For this to work, you don’t’ have to deploy an Enterprise Certification Authority. You can use any certificate issued by a public or private CA. Two things are required for this:
  1. The CA that issued the user certificate has to be added to the Certificate trust list (CTL) on the TMG Listener
  2. The user certificate has to be mapped to the user’s Active Directory credentials
First, locate the Listener from our previous articles.
SSL Client Certificate Authentication TMG Web Listener
TMG Web Listener
Next, click the Toolbox tab, and then Network Objects.
Now, right click on the listener that you created before and select the “Authentication” tab.
SSL Client Certificate Authentication
Select “SSL Client Certificate Authentication” from the dropdown menu. You can only choose “Windows Active Directory” to validate the credentials.
Click on “Advanced”, and then select the Client Certificate Trust list. You have two options here:
SSL Client Certificate Authentication - Advanced Authentication Options
SSL Client Certificate Authentication – Advanced Authentication Options
You can either allow certificates from all issuers that are trusted on the TMG, or select only specific trusted certificates. I suggest accepting certificates only from those CAs that your users will actually use. If you want to accept certificates from a public CA that is not in the Trust List, you must also add the CA Root certificate to the TMG.
You can map a certificate to a user account using Active Directory, but first you need the user’s exported public key. Open Active Directory Users and Computers, select “View” and click on “Advanced Features”.
SSL Client Certificate Authentication - Active Directory Advanced Features
SSL Client Certificate Authentication – Active Directory Advanced Features
Now, navigate to the user account, right click the user name and select “Name Mappings”,
SSL Client Certificate Authentication - Name Mappings
SSL Client Certificate Authentication – Name Mappings
Click “Add” and point to the CER file that contains the user’s public key. This user can now be authenticated on the TMG Listener.
SSL Client Certificate Authentication - Security Identity Mapping
SSL Client Certificate Authentication – Security Identity Mapping
Do not confuse this method with smart card authentication on workstations; you will still require specific certificates for smart card logins. I strongly recommend that you allow only user certificates that are stored on smart cards. As far as I know, this can’t be enforced on the TMG.
When a user accesses Outlook Web Access (OWA), he will be asked to provide a certificate and a smart card PIN. Once he authenticated successfully to the TMG, he will be automatically logged on to OWA.

Dienstag, 19. Juli 2011

Forefront TMG Console – Script Error


Seit der Installation von Internet Explorer 9 bekomme ich auf meinem Windows 7 Client folgende Fehlermeldungen beim Öffnen der Forefront TMG Management Console:
Script Error: An Error has occurred in the script on this page.
image
Forefront TMG Error: Refresh failed
Error 0x80020003: Member not found
image
Dieses Problem kann man einfach lösen, man schnappt sich ein Notepad (Achtung: mit administrativen Rechten) und öffnet die Datei “TabsHandler.htc”. Diese befindet sich standardmäßig unter folgendem Pfad: “C:\Program Files\Microsoft Forefront Threat Management Gateway\UI_HTMLs\TabsHandler”
In dieser Datei gibt es drei Zeilen die mit “m_aPages [niPage].m_tdMain.style.paddingTop” beginnen. Diese drei Zeilen müssen mit “//” auskommentiert werden und schon läuft die Konsole wieder normal. Hier noch ein Beispiel:
// m_aPages [niPage].m_tdMain.style.paddingTop             = ((m_nBoostUp < 0) ? -m_nBoostUp : 0) ;

Montag, 11. Oktober 2010

What are the Differences between TMG and UAG?

Let’s begin by examining the features of each product:
  • Microsoft Forefront Threat Management Gateway (TMG) 2010 is an integrated edge security gateway. An enterprise-class firewall (Common Criteria certification pending – ISA 2006 and ISA 2004 were both EAL4+ certified), it includes support for proxy services (forward and reverse proxy), content caching, and VPN (both remote access and site-to-site). It can be deployed in all of these roles, or any subset of them.
  • Microsoft Forefront Unified Access Gateway (UAG) 2010 is a dedicated remote access gateway. It provides browser-based remote access to published applications via an SSL VPN portal. It includes limited support for traditional client access VPN with Secure Socket Tunneling Protocol (SSTP) and Network Connector (a proprietary UAG component that provides network-level access). UAG can also serve as a DirectAccess gateway, a deployment scenario for which the UAG provides incredible value.
Fundamentally, TMG is a network-centric access control solution. With it you can provide fine-grained control over all types of communication going through the firewall, both web-based and non web-based protocols. TMG controls access inbound and outbound, and allows for the configuration of multiple perimeter (DMZ) networks.
By contrast, UAG is an application-centric remote access solution. It provides inbound access only; there are no outbound access capabilities provided by UAG. This is a common source of confusion, as UAG includes TMG under the hood. Many administrators mistakenly believe they can leverage the underlying TMG installation to provide forward proxy or VPN services. This is not supported. Other than mail server publishing, TMG may not be used for any other purpose. It is installed to provide protection for the UAG application only.
UAG takes one of the TMG deployment roles, the VPN/remote access role, and supercharges it. UAG includes advanced application publishing capabilities not provided by TMG, such as endpoint configuration and health detection, customizable data manipulation, session clean up, and more. For example, an administrator can allow full access to a published application to any system that has anti-virus software running and up-to-date, has the firewall enabled, and has the latest system updates applied. If the system does not meet these requirements, the administrator can determine if access should be granted with reduced privileges, or perhaps denied access altogether. An administrator might mask specific data sent to a user (such as credit card numbers, social security numbers, etc.) if the user is accessing the published web application from an untrusted device (non-managed workstation, kiosk, etc.). When the user closes their session, all temporarily downloaded files are removed from the workstation, ensuring that no sensitive data is left behind.
So when do you deploy TMG and when do you deploy UAG? If you want to control outbound web access (forward proxy or firewall), TMG is your only option. If you want to publish multiple applications with a single URL (an application portal), UAG is the answer. There are, however, areas where there is overlap between TMG and UAG capabilities. For example, let’s say you want to publish a single application such as Outlook Web App (OWA). Which solution do you choose? TMG can publish OWA quite capably, as can UAG. The answer depends on your specific requirements. If you need to restrict access to only those systems that meet your specific configuration requirements, publishing OWA with UAG is the solution. If you wish to grant access to OWA to anyone who authenticates successfully, then TMG will suffice.
Licensing often plays a role in determining which solution to deploy for remote access. UAG is licensed using Client Access Licenses, or CALs. Each user of the system is required to have a UAG CAL. The UAG CAL is included in the Microsoft Enterprise CAL (eCAL), so this may not be an issue for larger enterprises. TMG is licensed per processor. There are no CALs required for users of TMG (advanced web protection features do require the Web Protection Services Subscription license, however, which is licensed per user or per device annually). For more information, refer to the licensing FAQs for TMG and UAG.
In summary, TMG is a rock-solid firewall, proxy, content cache, and VPN access gateway that has basic support for application publishing. UAG is an advanced remote access gateway dedicated to application publishing, and is highly customizable and limited in functionality only by your programming skills, creativity, and imagination.
In a nutshell, think of TMG and UAG like this:
TMG – Keeps the bad guys out.
UAG – Lets the good guys in.

Montag, 16. August 2010

Reporting improvements in Forefront TMG SP1


Forefront TMG SP1 includes some significant improvements to the reporting functionality:
- New look-and-feel for all existing reports – cleaner aesthetics that match other Forefront products.
- User Activity Report: provides detailed information about the activity of specific users.
- Reports added for new features introduced in SP1 - User Overrides and BranchCache integration.
Here are some examples of how the existing reports look after redesign:
image
image

User Activity Reports

This kind of report allows you to see the web activity of specified users. User Activity report does not take its data from the summaries, but extracts it directly from Forefront TMG logs, so the report is always up-to-date at creation time.
This is a One-Time report which means that you can’t make a recurring User Activity report.
The users can be specified by their username (e.g. contoso\evgeny) or by IP address. Forefront TMG must require user authentication in order to be able to specify users for the report by username, otherwise all web traffic will be marked as anonymous and the report can only be generated by specifying IP addresses instead of usernames.
Here is a walk-through for generating a User Activity Report:
1. Go to ‘Logs & Reports’ à Reporting Tab and click Create User Activity Report Job
image
2. After typing the new report name in the wizard, a Reporting Details dialog will open.
In this dialog you should choose the period of time and list of the users you want to get a report for.
The list of users (and IP addresses) should be separated by semicolons.
image
3. After that you need to configure publishing location and email address to send the report to, finish the wizard and click Apply the configuration.
4. Select the just created report and click Generate Selected Report.
Please note, the generation is expected to take more time than a generation of regular one-time report, since the data is taken directly from the logs rather than from summary tables.
image
5. And this is the report that we get:
image

Reports for User Override feature

User Override for blocked URL categories is a feature introduced in SP1 which allows the user to override the policy restriction when permitted and access the blocked site.
This feature has two reports:
- The first report displays which URLs were overridden most by the users. This can indicate a need to reevaluate the policy regarding these URLs.
image
- The second report displays a list of ‘Top overriders’ and the URLs overridden by them.
If the authentication is not enabled by access rules, IP addresses will be shown instead of user names.
- This report can indicate a possible abuse of the policy by these users and may require further investigation of the users’ actions.
image

Reports for BranchCache feature

This report summarizes the overall cache utilization for both the Forefront TMG cache and BranchCache. It provides an estimation of the amount of bandwidth saved by the combination of caches.
image

Donnerstag, 17. Juni 2010

How to migrate Microsoft ISA Server 2006 to Microsoft Forefront TMG

ntroduction

Microsoft Forefront TMG (Threat Management Gateway) is the upcoming successor of ISA Server 2006 and will be available in 2009. This article is based on a beta version of Microsoft Forefront TMG. If you want to evaluate Forefront TMG, a public beta is available at the following website: Forefront TMG. If you want to have a look at a special version of Microsoft Forefront TMG which is already RTM, you should evaluate Microsoft Windows Essential Business Server 2008 which contains Forefront Threat Management Gateway, Medium Business Edition. But keep in mind that this is not the same version of TMG which Microsoft will publish in 2009 as a standalone product.


Before we start upgrading ISA Server 2006 to Microsoft Forefront TMG, we have to understand the following upgrade and migration limitations:

  • You cannot update ISA Server 2006 to Forefront TMG on the same machine, because ISA Server 2006 is running only on 32 Bit systems, Forefront TMG will only run on Windows 2008 64 Bit.
  • ISA Server 2006 cannot be upgraded to Forefront TMG during an in-place upgrade of Windows Server 2003 to Windows Server 2008.
  • Microsoft Forefront TMG does not support more than 300 licensed users.
  • It is not possible to migrate from ISA Server 2006 Enterprise to Microsoft Forefront TMG.
  • It is not possible to migrate from ISA Server 2000 and 2004 to Forefront TMG, you first have to update both older versions to ISA Server 2006.
  • You cannot upgrade ISA Server 2006 Standard Edition in workgroup mode to Forefront TMG. ISA 2006 must be a member of a domain, but it is possible to migrate ISA 2006 to Forefront TMG which is not part of a Windows domain.
  • If you have enabled the Local Host network to listen for Web proxy client requests, this setting is not migrated.
  • The migration process doesn’t migrate custom log fields you selected in ISA Server 2006.
  • Report configuration settings are not migrated.
  • All features from the ISA Server 2006 Supportability Pack are not available after the migration, but I think that many of these feature will be part of Forefront TMG when the product is finalized.
  • Before you upgrade to Forefront TMG you should check if installed third party software is compatible with Microsoft Forefront TMG.

Setup requirements for Forefront Threat Management Gateway

  • A PC with a 64-bit processor
  • Windows Server 2008 64-bit operating system
  • 1 GB RAM or more
  • 150 MB free hard disk space and some more disk space for additional log files, cache drives and temporary Anti Malware files (Attention: The setup process of TMG says that about 630 MB are needed!)
  • A local hard disk partition that is formatted with NTFS
  • A minimum of one network adapter if Forefront TMG should be used only as a proxy or reverse publishing Server. One or more additional network adapters are needed for full Firewall functionality

More considerations

There are some more considerations when you plan to use Forefront TMG. I gathered this information from the Microsoft Forefront TMG website:

Forefront TMG installed in an Essential Business Server scenario drops all IPv6 traffic. For a following Forefront TMG installation note the following:

  • Forefront TMG denies all IPv6 traffic
  • ISATAP (Intra-Site Automatic Tunnel Addressing Protocol) is disabled
  • The 6to4 interface is disabled. This mechanism allows IPv6 packets to be transmitted over an IPv4 network.
  • Whenever the Forefront TMG Control service restarts the Forefront TMG server reregisters with DNS to ensure that there is only an A record registered for the server, and no AAAA (IPv6) record. It also clears the DNS, Address Resolution Protocol (ARP), and Neighborhood Discovery (IPv6 version of ARP) caches.
  • Changing the Forefront TMG installation folder is not supported.
  • By default Forefront TMG is configured to log to a local SQL Server Express database. Forefront TMG installs a number of SQL Server Express components, including an instance for logging and an instance for reporting.
  • Forefront TMG installs the Web Server (IIS) role. Note that this component is not removed if Forefront TMG is uninstalled.
  • Services and driver files installed by Forefront TMG are placed in the Forefront TMG installation folder.
  • You can use Forefront TMG on a computer that has only one network adapter. Typically, you will do so when another firewall is located on the edge of the network, connecting your corporate resources to the Internet.

Migration process

OK, now that we have discussed some limitations about the migration process and the installation requirements of Microsoft Forefront TMG, I will show you the high level steps to upgrade your ISA Server 2006 to Microsoft Forefront TMG:

  • Export the ISA Server 2006 configuration to an XML file
  • Install Microsoft Forefront TMG on a 64 Bit Windows Server 2008 machine
  • Import the exported ISA Server 2006 XML file into the Forefront TMG management console
  • Check functionality, available hotfixes, event logs and more
  • Modify certificate and VPN authentication settings if required
  • Take your old ISA Server 2006 down and bring Forefront TMG into your production environment

Attention:
This article deals with a beta version of Forefront TMG. You should not use the beta version of Forefront TMG as a production server.

Export settings

As a first step log on to your ISA Server 2006 machine, start the ISA Server 2006 management console and click the Server object to Export (Back Up) the entire ISA Server 2006 configuration.


Figure 1: Export / Backup the entire ISA Server 2006 configuration

It is possible to export confidential information like RADIUS shared secrets or ISA Server role settings. If you want to export confidential information you must specify a password which protects the XML file for unauthorized import attempts.


Figure 2: Export confidential information

As a next step specify a file name for the ISA Server 2006 configuration file.

Forefront TMG Installation

Start the Forefront TMG installation and choose the setup scenario you want to establish. If you want to install a complete set of Forefront TMG services without dependencies, select the first installation option.


Figure 3: Choose which setup scenario is the right for you

Select the components you want to install. In this case we install every component available.


Figure 4: Modify which features you want to use

Installing Forefront TMG takes a while longer than ISA Server 2006 installations, so you should have the time for a short coffee break.

After the Forefront TMG installation is successful, the first time Forefront TMG management console starts the Getting Started Wizard which will guide you through some basic setup steps. This step is not required if you want to import an ISA Server 2006 configuration. You can use the Getting Started Wizard after a successful migration of the ISA Server 2006 settings.


Figure 5: Forefront TMG Getting Started Wizard

Import (Restore) the ISA Server 2006 configuration.


Figure 6: Import (Restore) the exported ISA Server 2006 configuration

Specify the file name with the exported ISA Server 2006 configuration.


Figure 7: Specify the XML file with the exported ISA Server 2006 configuration

During the migration process, the Microsoft ISA Server 2006 configuration will be updated to Forefront TMG.


Figure 8: ISA 2006 configuration is getting updated to TMG format

Enter the password which you had to enter when you exported the ISA Server 2006 configuration with the Export confidential settings enabled.


Figure 9: Enter the password required for opening the Export file

Forefront TMG will now import and convert the settings from the ISA Server 2006 configuration. This could take a few minutes, depending on the size of the exported ISA Server 2006 configuration and the performance of the Forefront TMG machine.


Figure 10: Depending on the Server performance and the amount of import data, importing the configuration can take while

After all settings are successfully imported, click Apply to save the configuration changes.

It is now time to test if all ISA settings have successfully migrated. Some settings may not be imported because they differ between ISA Server 2006 and Forefront TMG.


Figure 11: Congratulation, the Firewall policy was successfully imported

Note:
The ISA Server 2006 forms part of the Windows 2003 domain and the Windows group which has access to the VPN functions of ISA Server. The destination Forefront TMG Server is member of a workgroup, so the account information in the VPN configuration gets orphaned. You manually have to remove these and other settings.


Figure 12: Orphaned Windows user group because the destination Server is not part of the same domain/Forest

For the migration process, the statically configured VPN client address ranges were not successfully imported. The Forefront TMG dashboard displayed a configuration error that the VPN client address range is empty. I think that this issue is specific to my machine or if not, Microsoft will address this problem in the final version of Forefront TMG.


Figure 13: The are some configuration errors after the configuration has been imported

Microsoft Forefront TMG has many log files which will be created during the TMG installation process or while the import process from ISA Server 2006 is running. You should have a look at these files if you are experiencing problems with the migration process.


Figure 14: There are a lot of TMG log files created during the installation of TMG / the import process

Decommissioning ISA 2006

After successfully importing the configuration into Forefront TMG, it is time to replace the ISA Server with Forefront TMG. These are the necessary steps:

  • Disconnect Forefront TMG from all networks
  • Assign all IP addresses from ISA Server to Forefront TMG
  • Turn off the TMG Server
  • Connect all network cables from ISA Server to the TMG Server
  • Shutdown ISA Server
  • Start the Forefront TMG Server
  • Check that the Forefront TMG server is working properly
  • Start ISA Server again with no network connection and uninstall ISA Server from the old machine

Conclusion

In this article, I have tried to show you how to migrate your ISA Server 2006 configuration to a new Microsoft Forefront TMG Server. There is no in-place update possible because Microsoft Forefront TMG will only run under Windows Server 2008 64 Bit and ISA Server 2006 only runs on 32 Bit platforms, so you have to export the configuration from a running ISA Server 2006 and import this configuration on a newly installed Microsoft Forefront TMG Server. The migration process is similar to updating ISA Server 2004 to ISA Server 2006 but please keep in mind that this article is based on a beta version of Microsoft Forefront TMG and some things could change when the final version of Microsoft Forefront TMG is released.

Related links

Installing and Migrating

Essential Business Server 2008 Editions

Public Microsoft Forefront TMG version

Export, Import, and Backup Functionality in ISA Server 2004

Rename Onedrive Business root folder

Rename Onedrive Business root folder Here is what I remember: In the Office 365 web admin pages, change the organization name to a shorte...