Posts mit dem Label SBS 2008 werden angezeigt. Alle Posts anzeigen

Dienstag, 3. September 2013

How To Enable SSL 3.0 Server 2008 /SBS 2008/SBS2011


Problem

Server 2008,server 2008 SBS and SBS 2011 do have the functionality for SSL 3.0 however by default it does not understand anything that tries to connect with this protocol. For security reasons if you need to enable SSL 3.0 on your server we can enable it with some additional registry keys. Follow the step by step guide below.


Resolution

(MAKE SURE THAT YOU BACKUP YOUR REGISTRY BEFORE APPLYING THOSE CHANGES)

• Using regedit to add the following keys ( right click on protocols -> new -> key -> “SSL 2.0″ then “SSL 3.0″ then “TLS 1.0″ )HKEY_LOCAL_MACHINE\SYSTEM\CurrentControlSet\ Control\SecurityProviders\SCHANNEL\Protocols\SSL 2.0 HKEY_LOCAL_MACHINE\SYSTEM\CurrentControlSet\ Control\SecurityProviders\SCHANNEL\Protocols\SSL 3.0 HKEY_LOCAL_MACHINE\SYSTEM\CurrentControlSet\ Control\SecurityProviders\SCHANNEL\Protocols\TLS 1.0


• Under each of the keys above you need to create additional keys “Client” and “Server”
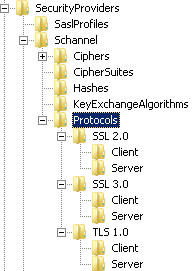

Enable ssl 3.0


For SSL 2.0:HKEY_LOCAL_MACHINE\SYSTEM\CurrentControlSet\ Control\SecurityProviders\SCHANNEL\Protocols\SSL 2.0\Client HKEY_LOCAL_MACHINE\SYSTEM\CurrentControlSet\ Control\SecurityProviders\SCHANNEL\Protocols\SSL 2.0\Server


For SSL 3.0:HKEY_LOCAL_MACHINE\SYSTEM\CurrentControlSet\ Control\SecurityProviders\SCHANNEL\Protocols\SSL 3.0\Client HKEY_LOCAL_MACHINE\SYSTEM\CurrentControlSet\ Control\SecurityProviders\SCHANNEL\Protocols\SSL 3.0\Server


For TLS 1.0:HKEY_LOCAL_MACHINE\SYSTEM\CurrentControlSet\ Control\SecurityProviders\SCHANNEL\Protocols\TLS 1.0\Client HKEY_LOCAL_MACHINE\SYSTEM\CurrentControlSet\ Control\SecurityProviders\SCHANNEL\Protocols\TLS 1.0\Server


Then you will have to create DWORD (32bit) value called “Enabled” under each “Client” and “Server” key for “SSL 2.0, SSL 3.0 and TLS 1.0″
DWORD (32bit) Value


Value name = Enabled

Value date = 0

Value date can be set to “1″ – Enabled or “0″ – Disabled

In my scenario the values were “enabled” (set to 1) for SSL 3.0 and TLS 1.0 and “disabled” (set to 0) for SSL 2.0

Here is a disabled value for ssl 2.0


Enable ssl 3.0 server 2008

and here is SSL 3.0 enabled


Enable ssl 3.0 server 2008


• Next step is to add correct Ciphers, to do so you will have to navigate to the following key in the registryHKEY_LOCAL_MACHINE\SYSTEM\CurrentControlSet\ Control\SecurityProviders\SCHANNEL\Ciphers


• (right click on “Cliphers” New -> Key)HKEY_LOCAL_MACHINE\SYSTEM\CurrentControlSet\ Control\SecurityProviders\SCHANNEL\Ciphers\RC2 128/128 HKEY_LOCAL_MACHINESYSTEM\CurrentControlSet\ Control\SecurityProviders\SCHANNEL\Ciphers\RC4 128/128 HKEY_LOCAL_MACHINE\SYSTEM\CurrentControlSet\ Control\SecurityProviders\SCHANNEL\Ciphers\Triple DES 168/168


• That’s all! Now you need to restart your server to apply those changes.

• If you are using TMG 2010 or ISA 2006 to publish the website externally you will need to apply exactly the same settings to registry to it.

Dienstag, 22. November 2011

In SBS2008 selbst erstellte Zertifikate nutzen


Es tauchen immer wieder Probleme mit SBS2008 um Bezug selbsterstellte Zertifikate und „Sites“ auf.
Dieses Problem ist wie folgt zu lösen.

Folgende Schritte sind zu machen:

1.       Zertifikat mit mehreren DNS-Namen erstellen (z.B. Kunde.dyndns.org)
2.       Zertifikat in das IIS einbinden
3.       Zertifizierungsstellenzertifikat exportieren
4.       Zertifizierungsstellenzertifikat  auf externen Clients installieren (nur nötig wenn der PC NICHT in der Domäne ist)

Inhaltsverzeichnis
Zertifikat erstellen
Zertifikat in IIS einbinden
Zertifizierungsstellenzertifikat exportieren
Zertifikat auf NICHT DomänenPC’s oder Telefonen installieren


Zertifikat erstellen


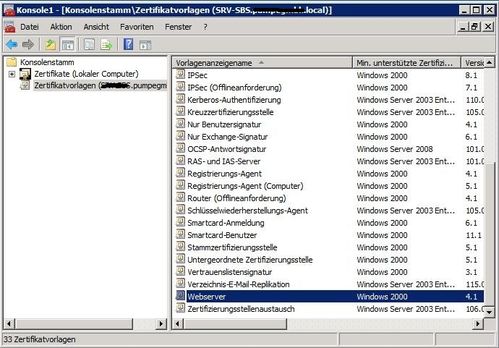
Auf dem Server MMC ausführen und die Snapins Zertifikate (Computerkonto) und Zertifikatvorlagen hinzufügen.

Bild1


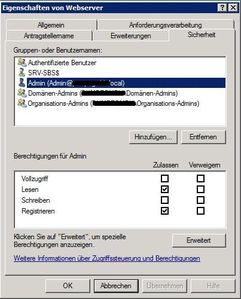
Jetzt müssen die Rechte für die Vorlage „Webserver“ anpassen.  In den Eigenschaften muss der SBS-SERVER und der ADMINISTRATOR hinzugefügt werden. Beide müssen „Lesen“ und „Registrieren“ können.
Bild2


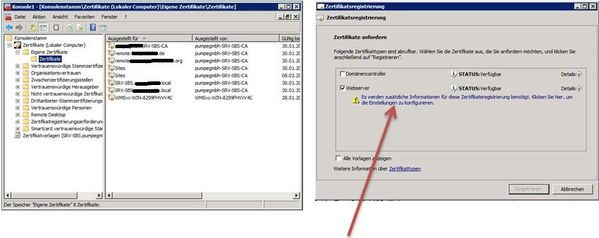
Jetzt können wir das Zertifikat erstellen. Dazu bitte in „Zertifikate -> eigene Zertifikate -> Zertifikate“ rechte Maustaste „Alle Aufgaben -> Neues Zertifikat anfordern…“ anklicken.
Bild4
Jetzt weiter klicken, dann auf „Webserver“ klicken, dann hier klicken.

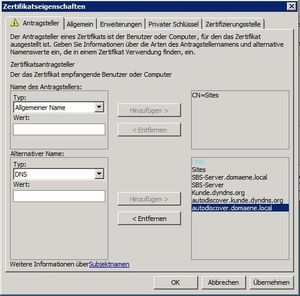
Jetzt werden die internen und externen Namen vergeben. Wichtig bei SBS ist der Eintrag „Sites“.
Bild5

Folgende Namen sollten drin sein:
Sites
remote.externaldomain.com
internaldomain.local
autodiscover.externaldomain.com
autodiscover.internaldomain.local
Servername FQDN
Servername NetBios

Und nach belieben weitere. Danach auf “ok” und dann auf “Registrieren” klicken. Das Zertifikat wurd jetzt angelegt.


Zertifikat in IIS einbinden

Jetzt müssen wir das Zertifikat in den Webserver einbinden. Dazu bitte die IIS-Konsole starten.
In der Konsole den Punkt „Sites -> SBS Web Applications“ gehen. Jetzt rechts auf „Bindungen“ klicken.
Auf den Typ „https“ gehen und auf „Bearbeiten“ gehen. Hier jetzt das neue Zertifikat auswählen.
Jetzt bitte den IIS neu starten (Start -> Ausführen -> iisreset).
 Bild6
Bild7

Zertifizierungsstellenzertifikat exportieren


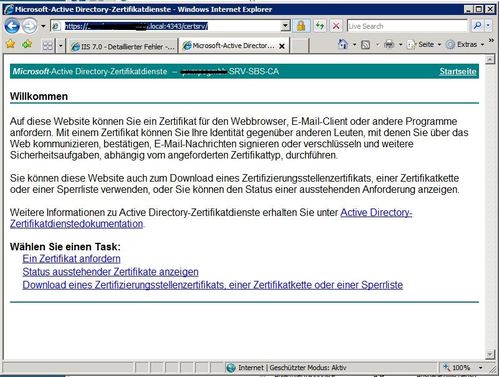
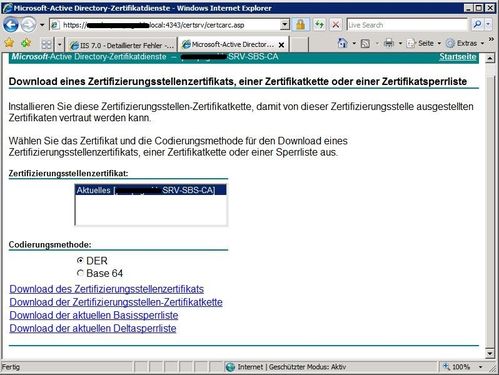
Zum exportieren des Zertifizierungsstellenzertifikat folgende Adresse eingeben:
Bild8 


Dort auf „Download eines Zertifizierungsstellenzertifikat, einer Zertifikatskette oder einer Sperrliste“ klicken.
Bild9

Jetzt auf „Download des Zertifizierungsstellenzertifikats“ und das Zertifikat im Ort des Wunsches abspeichern.


Zertifikat auf NICHT DomänenPC’s oder Telefonen installieren


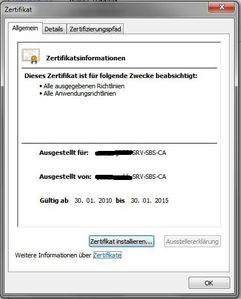
Das Zertifikat einfach auf den PC kopieren und dort mit einem Doppelklick ausführen.
Bild10    


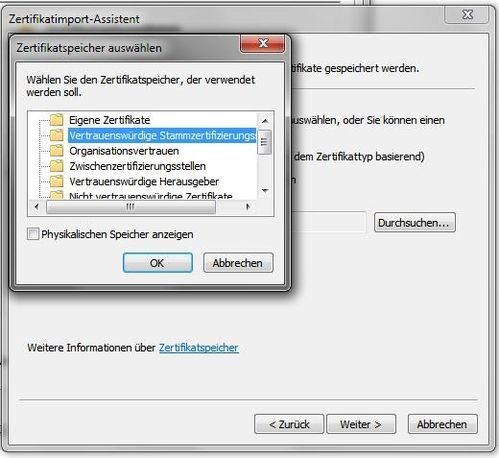
Das „Zertifikat installieren…“  klicken und das Zertifikat in die „Vertrauenswürdigen Stammzertifizierungstellen“ kopieren.
 Bild11   


Jetzt kann man vom IE oder Outlook via RPC-over-http auf den Server von Extern ohne Zertifikatsfehler zugreifen.

Donnerstag, 15. September 2011

How to install Exchange Server 2007 SP3 on a computer that is running Windows SBS 2008

This article discusses the steps that are required to install Microsoft Exchange Server 2007 Service Pack 3 (SP3) on a computer that is running Windows Small Business Server (Windows SBS) 2008.

To download and install Microsoft Exchange Server 2007 SP3, visit the following Microsoft website:


Note Microsoft Exchange Server 2007 Service Pack 2 (SP2) on a computer that is running Windows SBS 2008, you first had to install an installation tool. For more information about the Microsoft Exchange Server 2007 SP 2 Installation Tool for Windows SBS 2008, click the following article number to view the article in the Microsoft KNowledge Base:

974271  Description of the Microsoft Exchange Server 2007 Service Pack 2 Installation Tool for Windows Small Business Server 2008

This tool is not required to install Microsoft Exchange Server 2007 SP3 on a computer that is running Windows SBS 2008.
  1. Stop the following services:
    • FSCController
    • Microsoft Exchange Information Store
    • Microsoft Exchange Transport
  2. Open an elevated command prompt.

    To open an elevated command prompt, click Start
    the Start button
     , type cmd in the Start Search box, right-clickcmd.exe in the Programs list, and then click Run as administrator.

    User Account Control permission
     If you are prompted for an administrator password or for confirmation, type the password, or provide confirmation.
  3. Change the current directory to the following directory:
    C:\Program Files (x86)\Microsoft Forefront Security\Exchange Server
  4. At the command prompt, type the following command, and then press ENTER:
    fscutility /disable
    After you run this command, you receive the following message:
    Removing dependencies...
    dependency on FSCController removed from Microsoft Information Store
    dependency on FSEIMC removed from Microsoft Exchange Transport Service
    Microsoft Exchange Transport Service Agent registration removed

    Status: Microsoft Forefront Server Security NOT Integrated.
After the Forefront Client Security (FCS) scan engine is disabled, you should be able to install the service pack.

After the service pack setup is complete, you must enable Forefront Client Security (FCS) scan engine if you disabled it. To do this, follow these steps:
  1. Stop the following services:
    • Microsoft Exchange Information Store
    • Microsoft Exchange Transport
  2. Open an elevated command prompt.

    To open an elevated command prompt, click Start
    the Start button
     , type cmd in the Start Search box, right-clickcmd.exe in the Programs list, and then click Run as administrator.

    User Account Control permission
     If you are prompted for an administrator password or for confirmation, type the password, or provide confirmation.
  3. Change the current directory to the following directory:
    C:\Program Files (x86)\Microsoft Forefront Security\Exchange Server
  4. At the command prompt, type the following command, and then press ENTER:
    fscutility /enable
  5. Restart the following services:
    • Microsoft Exchange Information Store
    • Microsoft Exchange Transport

Known issues that may occur after you install Exchange Server 2007 SP3

After you install Exchange Server 2007 SP3, you may be unable to access the following Web sites:
  • https://sites/owa
  • https://sites/remote
Note This issue occurs only if the Internet Address Management wizard has not already been run on the computer.

To resolve this issue, edit the bindings for the SBS Web Applications site to select the correct certificate. To do this, follow these steps:
  1. Open Internet Information Services (IIS) Manager.
  2. Expand server_name.

    Note The server_name placeholder represents the name of the server.
  3. Expand Web Sites.
  4. Right-click SBS Web Applications, and then click Edit Bindings.
  5. Click HTTPs port 443, and then click Edit.
  6. Under SSL certificate, select the Sites certificate.

Mittwoch, 17. August 2011

Folder C:\InetPub\LogFiles are filling up the C drive


The C drive of your Small Business Server 2008 or 2011 is filling rapidly and when you look with a disk analyzer tool like treesize or windirstat you see that the folder C:\inetpub\logs\LogFiles\W3SVC and a 9 or 10 digit number is several or even dozens of GB. When you open one of the logfiles you see only lines with “POST /ApiRemoting30/WebService.asmx – 8530” in it.
The log file directory belongs to the WSUS Administration IIS website, this is using port 8530. But it is not WSUS that is filling these logfiles rapidly but they are filled if you let the SBS console open. Beside closing the SBS console when not needed, there are 2 option to keep the log files under control.
Option 1:
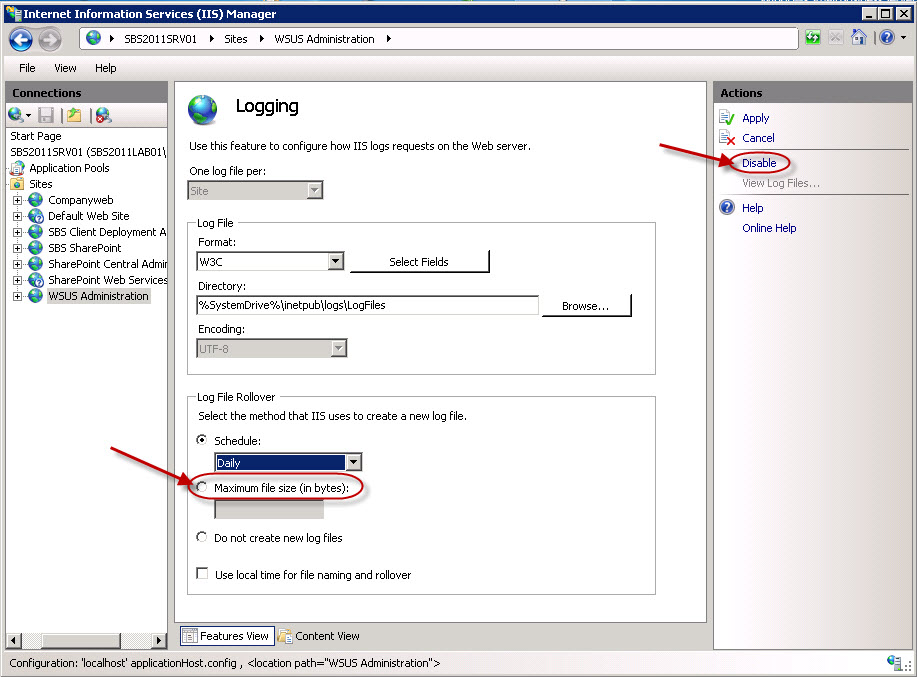
Open Administrative Tools – Internet Information Services (IIS) Manager, browse through Sites and select the WSUS Administration site and open Logging.
You have 2 options, first you can set the “maximum file size (in bytes):” option under Log file rollover to limit the maximum log file size.
Second option is to completely disable logging, by choosing “Disable” on the Actions menu on the right.
Make sure after you changed anything choose Apply on the upper right and do a iisreset.
Option 2:
The another way for controlling these logfiles is, in SBS 2011 there is by default a scheduled task configured that cleans the logfiles older than 100 days. The same task is added to SBS 2008 by installing Update Rollup 5 (KB2458094) only the default setting with this task is to delete the logfile older than 30 days.
You can change the number of days by opening Administrative Tools, Task Scheduler, go to Microsoft, Windows, Windows Small Business Server 2011 Standard, right click the WSUSLogCleaner task and choose properties. Go to the tab Actions and choose Edit…
The value given by Add arguments (optional) is the value for the number of days the logfiles will be kept. So if your logfile directory is stil really big you can decrease the number of days to something more manageable like 30 days or if this is still to much to something like 14 days.
Conclusion:
The grown of the logfiles is caused by not closing the SBS console. My logfiles have shrunken to 20% of the original size with the console open whole day. There are 2 options to control the growth of these logfiles, IIS to disable logging or maximize the logfile size or the task added in sbs 2008 rollup 5 or sbs 2011 to control the maximum number of days logfiles are kept.

Montag, 25. April 2011

SBS 2008/2011, Receive- + POP3-Connector und das Problem mit der Nachrichtengröße

Bei einem SBS sind folgende Empfangsconnectoren mit zugehörigem Empfangslimit vorinstalliert:

Name: Default
Empfangslimit: 10240 KB
Zweck: LAN-weiter Empfangsconnector für internen, gesicherten und authentifizierten SMTP-Empfang auf TCP-Port 25

Name: Windows SBS Fax Sharepoint Receive
Empfangslimit: 10240 KB
Zweck: Lokaler Empfangsconnector für E-Mails aus der Faxconsole, dem lokalen POP3-Connector und weiteren, lokalen Anwendungen via authentifizierten SMTP-Empfang auf TCP-Port 25

Name: Windows SBS Internet Receive
Empfangslimit: 10240 KB
Zweck: Internet-weiter Empfangsconnector für direkten, anonymen SMTP-Empfang aus dem Internet auf TCP-Port 25

Hintergründe hierzu erfährt man hier:

Exchange 2007 - Receive Connectors
http://technet.microsoft.com/en-us/library/aa996395(EXCHG.80).aspx

Desweitern existieren folgende, weitere Einschränkungen seitens der Nachrichtengröße:

-> Exchange-Verwaltungskonsole
-> Organisationskonfiguration
-> Hub-Transport
-> Globale Einstellungen
-> Transporteinstellungen
-> Eigenschaften
-> Allgemein

- sowie -

-> Exchange-Verwaltungskonsole
-> Empfängerkonfiguration
-> Postfach
->
-> Eigenschaften
-> Nachrichtenübermittlungseinstellungen
-> Einschränkungen für die Nachrichtengröße

Deswegen kommt es immer wieder zu Fehlkonfigurationen und Fragen hinsichtlich der Nachrichtengröße und einem POP3-Connector

Besser: Umstellung auf direkten SMTP-Empfang und den entsprechenden Empfangsconnector, globale Transporteinstellungen sowie die jeweiligen max. Postfachnachrichtengröße nur in engen Grenzen und bei wirklich notwendigen, unternehmenswichtigen Voraussetzungen erhöhen, da:

E-Mail KEIN Datencontainer darstellt!

Dafür gibt es FTP, HTTP-GET usw. -> Daten (gesichert durch Authentifizierung) zentral zur Verfügung stellen und lediglich E-Mails mit zugehöriger URL auf die jeweilige Datei verschicken. Zugriff verläuft dann lediglich on-Demand und dafür protokolliert.

Vorteil: Die beteiligten E-Mail Systeme bleiben weiterhin schlank und leicht händelbar.

Freitag, 15. April 2011

Installing WSUS SP2 on SBS 2008

Installing WSUS 3 sp2 is needed to support patching Win7 on your network.

To install, you'll see that you'll need to run through the install process by clicking next, next, next......... and importantly at the end...cancel.

Click to accept the install

When you click FINISH, there's a final important step

When the wizard begins, hit CANCEL, and your install will be done. It will pick up your existing settings and make no changes.

In past installs it might also look to the largest free drive, so just in case you may want to temp disable a large external usb drive just to be sure.

Don't forget (as I just did)


From: Dave Nickason FYI, when you install WSUS 3.0 SP2, you need to upgrade to the newest
version of the report viewer. I've installed both the SP and the viewer on
my SBS 2003 and my Vista workstation. Both installed easily and with no
reboot required. After the server install the configuration wizard starts -
just cancel it.

Microsoft Report Viewer Redistributable 2008

Montag, 14. März 2011

SBS 2011 Hardware Empfehlung für Hauptserver


Basierend auf den langjährigen Erfahrungen mit seinem Vorgänger, dem SBS 2008, hier nun der aktualisierte Vorschlag zur Berechnung* bzgl. einer realistischen Abschätzung der Hardwareanforderungen in einem SBS 2011 Umfeld:
Als Einstiegssystem für einen ausgewogenen, produktiven SBS 2011 Hauptserver (AD, Exchange, WSUS, File/Print, DNS/WINS/DHCP, IIS/RDS-Gateway, SBSMonitoring, Backup) für 5 CALs und Leistungsreserven für bis zu 10 CALs käme folgende Vorgabe in Betracht:
  • Quad-Core 2GHz 64-Bit (x64) CPU (4 Sockets max.)
  • 12GB RAM (32GB max.)
  • 400 IOPS** Storage Subsystem (~ 4x10k RAID10)
  • 120GB für die System Partition
  • Größe der Daten Partition hängt von den jeweiligen Anforderung ab
    (Aber: IOPS** kommt vor Kapazität)
  • Single 1GBit/s Server NIC
Empfehlung für mehr als 10 CALs:
  • One Core alle 10 weiteren CALs
  • 1GB RAM alle 10 weiteren CALs
  • 100 IOPS** alle 10 weiteren CALs (~ 10k HDD)
Für Einstiegssysteme bei Kleinstkunden hier ein Vorschlag für ein Server mit 1..3 CALs bzw. max. 5 CALs:
  • Quad-Core 2GHz 64-Bit (x64) CPU
  • 10GB RAM
  • 200 IOPS** Storage Subsystem (~ 2x10k RAID1 oder 3x7.2k RAID5)
  • 120GB für die System Partition
  • Größe der Daten Partition hängt von den jeweiligen Anforderung ab
    (Aber: IOPS** kommt vor Kapazität)
  • Single 1GBit/s Server NIC
Als tabellarische Übersicht ergibt sich folgendes Gesamtbild:
Anzahl CALsAnzahl Cores/vCPUs (reale CPU)Anzahl RAM (in GB)Mind. IOPS**Beispiel RAID (an Hardware RAID-Adapter mit mind. 128MB Cache)
1..54 (1x Quad)102002x10k RAID1 oder 3x7.2k RAID5
1..104 (1x Quad)124003x15k RAID5 oder 4x10k RAID10 oder 6x7.2k RAID5
205 (1x Hexa)135004x15k RAID5 oder 6x10k RAID10 oder 7x7.2k RAID5
306 (1x Hexa)146004x15k RAID5 oder 6x10k RAID10 oder 8x7.2k RAID5
407 (2x Quad)157005x15k RAID5 oder 8x10k RAID10 oder 10x7.2k RAID5
508 (2x Quad)168006x15k RAID5 oder 8x10k RAID10 oder 11x7.2k RAID5
609 (2x Hexa)179006x15k RAID5 oder 10x10k RAID10 oder 12x7.2k RAID5
7010 (2x Hexa)1810007x15k RAID5 oder 10x10k RAID10 oder 14x7.2k RAID5
* Kein Anspruch auf Absolutheit
** IOPS - Input-Output Operation per Seconds per Harddisk (konservative und vereinfachte Werte)
SATA 7.2k ~ 75 IOPS
SATA/SAS 10k ~ 100 IOPS
SAS 15k ~ 150 IOPS
MLC SSD ~ 5.000 IOPS
SLC SSD ~ 15.000 IOPS
PCIe SSD ~ 120.000 IOPS
² Da es sich beim 2. Server aus dem SBS 2011 Premium Add-On um reine Standardkomponenten (Windows Server 2008 R2 Standard inkl. ggf. Terminal Dienste, SQL Server 2008 R2 Standard usw.) handeln und das Einsatzfeld (File/Print, DC, TS, SQL, Exchange UM, Lync 2010 usw.) sehr stark variieren kann, z.B.:
+ reiner Fileserver und ggf. zusätzliche Redundanz der Dienste AD, DNS, WINS usw. (unspektakulärer Hardwarebedarf im SBS/KMU Umfeld)
+ Terminal Server für wenige bis viele Benutzer mit unterschiedlichen Applikationen und Benutzerverhalten (sehr hoher Arbeitsspeicherbedarf + Multi-Core, geringere Storage-Anforderungen)
+ dedizierter Datenbank(anwendungs)server für viele Benutzer (sehr hohe Storage-Anforderungen, hoher Arbeitsspeicherbedarf + Multi-Core)
+ dedizierter Exchange Unified Messaging Server (sehr hohe CPU Anforderungen, hoher Arbeitsspeicherbedarf + Storage-Anforderungen)
+ dedizierter Lync Server 2010 Standard (sehr hohe CPU Anforderungen, sehr hoher Arbeitsspeicherbedarf, hohe Storage-Anforderungen)
Hinweis: Alles noch im SBS-Umfeld (d.h. max. 75 CALs)
kann man keine allg. Berechnungsgrundlage wie beim SBS 2011 Standard mit seinen vorhersehbaren Einsatzrandbedingungen vorgeben, sondern es gelten vielmehr, wie in jedem anderen Szenario, auch hier die Empfehlungen des jeweiligen Entwicklerteams:
Remote Desktop Session Host Capacity Planning in Windows Server 2008 R2http://www.microsoft.com/downloads/en/details.aspx?FamilyID=ca837962-4128-4680-b1c0-ad0985939063
Exchange 2010 - Performance and Scalabilityhttp://technet.microsoft.com/en-us/library/dd351197.aspx
Lync Server 2010 - Capacity Planning Requirements and Recommendations
http://technet.microsoft.com/en-us/library/gg425715.aspx
Deswegen bezieht sich dieser Artikel ausschlieslich auf berechenbare Basiskomponenten des Hauptservers.

Vielen Dank an die Autoren der SBSfaq.de

Rename Onedrive Business root folder

Rename Onedrive Business root folder Here is what I remember: In the Office 365 web admin pages, change the organization name to a shorte...