Posts mit dem Label Server 2008 werden angezeigt. Alle Posts anzeigen

Freitag, 6. Januar 2012

Log-Tool für Anmeldeversuche und Anmeldungen


hier Beispiel: 
echo %USERNAME%;%date% %time%;%CLIENTNAME%;%COMPUTERNAME%;%LOGONSERVER%;%SESSIONNAME%;%USERDOMAIN% >> \\SERVER\Share$\log.txt

LOGON:
"echo Logon Als %USERNAME%; Am %date% Um %time%; Von %CLIENTNAME%; Über %COMPUTERNAME%;%LOGONSERVER%; An %SESSIONNAME%; Domain %USERDOMAIN% >> \\Server\Log\log.txt"
LOGOFF:
"echo Logoff Als %USERNAME%; Am %date% Um %time%; Von %CLIENTNAME%; Über %COMPUTERNAME%;%LOGONSERVER%; An %SESSIONNAME%; Domain %USERDOMAIN% >> \\Server\Log\log.txt" 

Mittwoch, 2. Februar 2011

Wie man einen externen Zeitserver zur Verwendung in Server 2008 / R2 konfiguriert

Ein Windows Server 2008/R2 synchronisiert per default meist nicht besonders zuverlässig seine Uhrzeit. Um den SBS Server mit einem Pool von NTP Zeitservern zuverlässig zu syncrhronisieren sollte folgender MS TechNet Artikel befolgt werden, der einen Kommentar von mir mit dem von mir empfohlenen CMD Befehl zum Sync mit einen zuverlässigen NTP Pool enthält:
http://technet.microsoft.com/en-us/library/cc546087(WS.10).aspx

Mein Kommentar zum direkten Kopieren und Verwenden aus diesem Artikel lautet:
w32tm /config /syncfromflags:manual /manualpeerlist:pool.ntp.org /reliable:no /update

Den Befehl einfach in einer mit Admin Rechten ausgeführten Eingabeaufforderung (CMD.exe) eingeben und anschliessend per "net stop w32time & net start w32time" in der selben CMD den Zeitservice neustarten.

Freitag, 26. November 2010

Step-by-Step Guide to Fine-Grained Passwords in Windows Server 2008


This step-by-step guide provides instructions for configuring, applying and editing fine-grained password and account lockout policies for different sets of users in Windows Server 2008.

In Microsoft Windows 2000 and Windows Server 2003 Active Directory domains, you could apply only one password and account lockout policy, which is specified in the domain's Default Domain Policy, to all users in the domain. As a result, if you wanted different password and account lockout settings for different sets of users, you had to either create a password filter or deploy multiple domains.

Fine-Grained Passwords in Windows Server 2008

In Windows Server 2008, you can use fine-grained password policies to specify multiple password policies and apply different password restrictions and account lockout policies to different sets of users within a single domain. For example, to increase the security of privileged accounts, you can apply stricter settings to the privileged accounts and then apply less strict settings to the accounts of other users.
Another valid application for using fine-grained password policies, are situations where legacy applications or other data sources require password synchronization.  These situations may require us to relax certain aspects of password complexity or length.

Step-By-Step Configuration of Fine-Grained Passwords in Windows Server 2008

I find it’s best to work with an example to demonstrate a solution, so in this case we will assume that you have a number of users who are Special Administrators and require a stronger password group policy than the standard user.  We will refer to these users as SpecialAdmins
In the following steps, we will configure a fine-grained password policy in Windows Server 2008 with the following settings:
Policy NamePolicy Setting
Enforce password history
24 passwords remembered
Maximum password age
30 days
Minimum password age
1 day
Minimum password length
12 characters
Passwords must meet complexity requirements
Disabled
Account lockout duration
0
Account lockout threshold
3
Reset account lockout counter after
30 minutes
Table 1: Password Policy
Note: yourdomainname in the following steps should be replaced with the NETBIOS name of your domain.
  1. Logon to a Windows Server 2008 domain controller using an account that has membership in the Domain Admins group, or equivalent permissions.
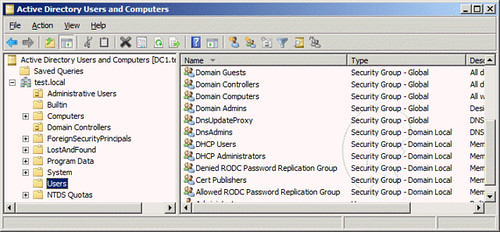
  2. Go to Start, Administrative Tools, and then select Active Directory Users and Computers

    Active Directory Users and Computers
  3. Expand yourdomainname.com, right-click on the Users container, select New, and then select Group.
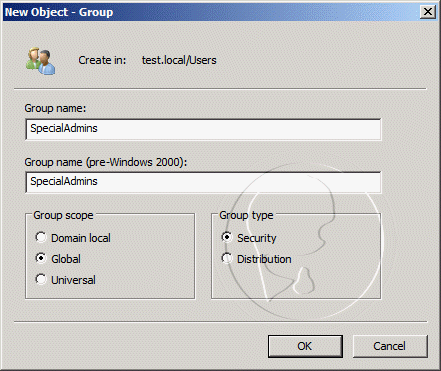
  4. On the New Object - Group window, enter SpecialAdmins into the Group Name field, and then click OK

    New Object - Group
  5. Close Active Directory Users and Computers
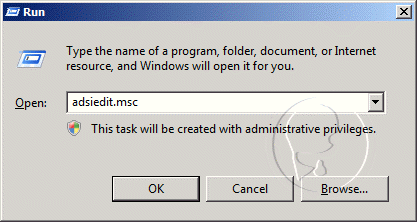
  6. Click Start, click RUN, type ADSIEDIT.MSC, and then click OK
    adsiedit.msc
  7. In the ADSI Edit snap-in, right-click ADSI Edit, and then click Connect to
  8. In the Name field, enter yourdomainname.com, and then click OK
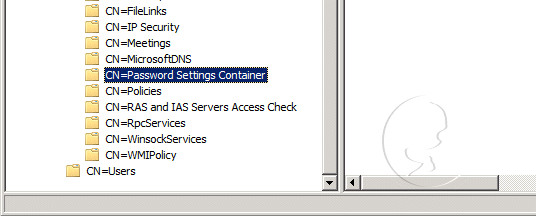
  9. Double-click yourdomainname.com in the console tree, double-clickDC=yourdomainname,DC=com, double-click CN=System, and then click CN=Password Settings Container
    CN=Password Settings Container
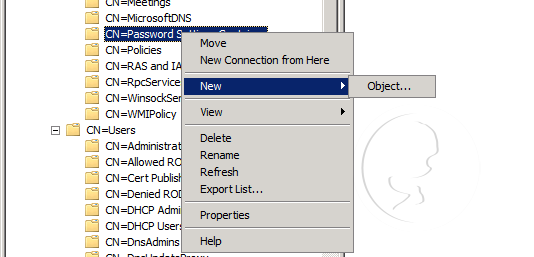
  10. Right-click CN=Password Settings Container in the console tree, click New, and then clickObject

    Password Settings Container - New Object
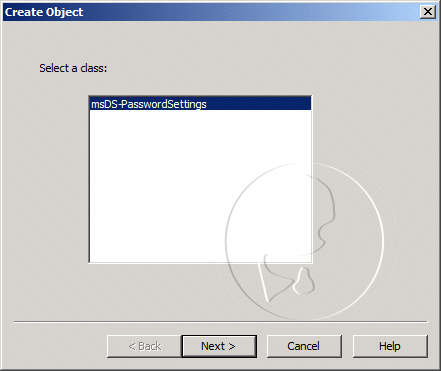
  11. In the Create Object dialog box, under Select a class, click msDC-PasswordSettings, and then click Next.

    Create Object - msDS-PasswordSettings
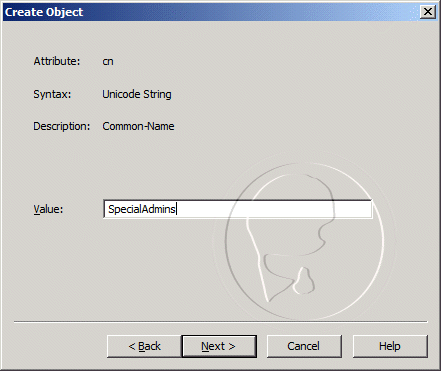
  12. In the Create Object dialog box, enter SpecialAdmins in the Value field, and then clickNext.

    Create Object - msDS-PasswordSettings Value
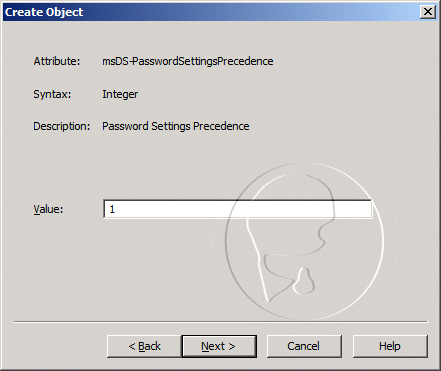
  13. For the msDS-PasswordSettingsPrecedence value, enter 1, and then click Next

    msDS-PasswordSettingsPrecedence
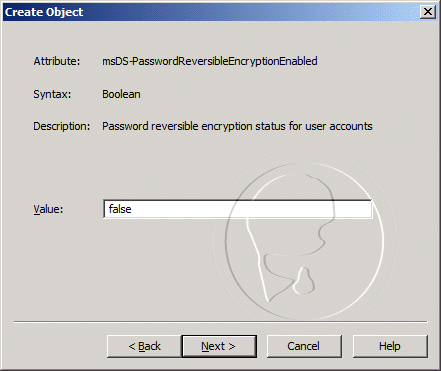
  14. For the msDS-PasswordReversibleEncryptionEnabled value, enter false, and then clickNext

    msDS-PasswordReversibleEncryptionEnabled
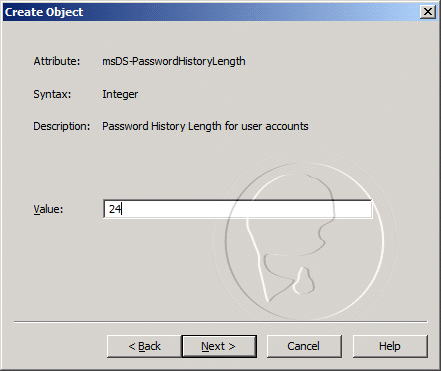
  15. For the msDS-PasswordHistoryLength value, enter 24, and then click Next

    msDS-PasswordHistoryLength
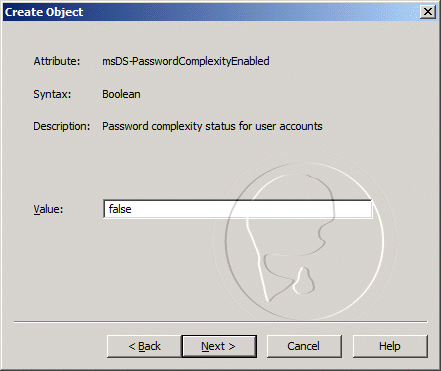
  16. For the msDS-PasswordComplexityEnabled value, enter false, and then click Next

    msDS-PasswordComplexityEnabled
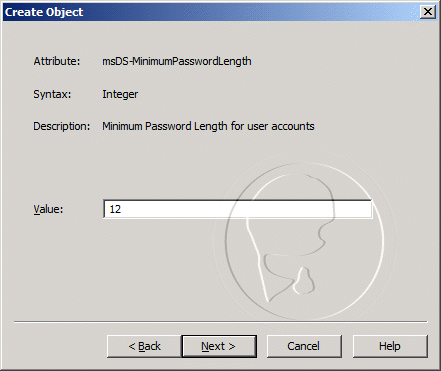
  17. For the msDS-MinimumPasswordLength value, enter 12, and then click Next

    msDS-MinimumPasswordLength
  18. For the msDS-MinimumPasswordAge, enter 1:00:00:00, and then click Next

    msDS-MinimumPasswordAge
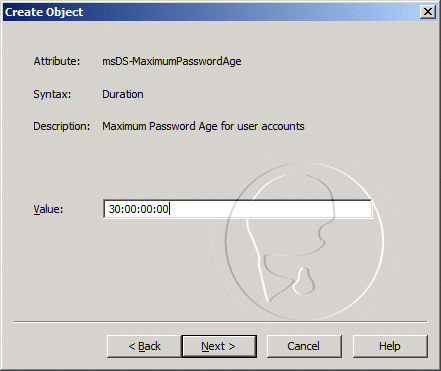
  19. For the msDS-MaximumPasswordAge, enter 30:00:00:00, and then click Next

    msDS-MaximumPasswordAge
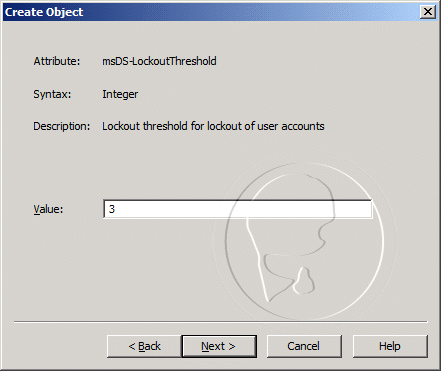
  20. For the msDS-LockoutThreshold, enter 3, and then click Next

    msDS-LockoutThreshold
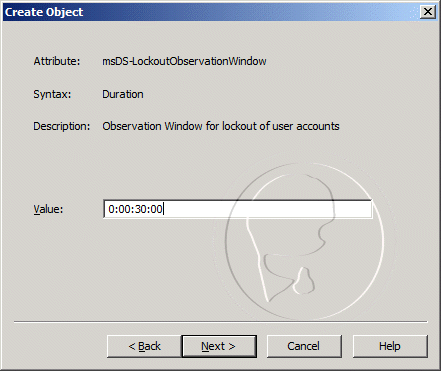
  21. For the msDS-LockoutObservationWindow, enter 0:00:30:00, and then click Next

    msDS-LockoutObservationWindow
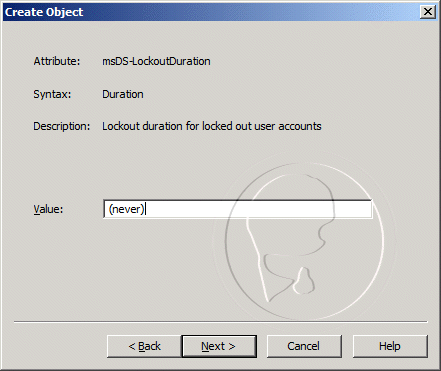
  22. For the msDS-LockoutDuration, enter (never), and then click Next, then click Finish

    msDS-LockoutDuration
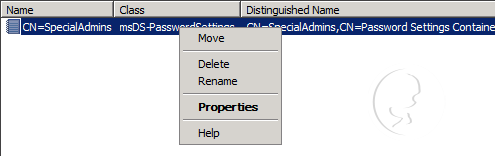
  23. Right-click on CN=SpecialAdmins in the console tree, and then select Properties

    msDS-PasswordSettings Properties
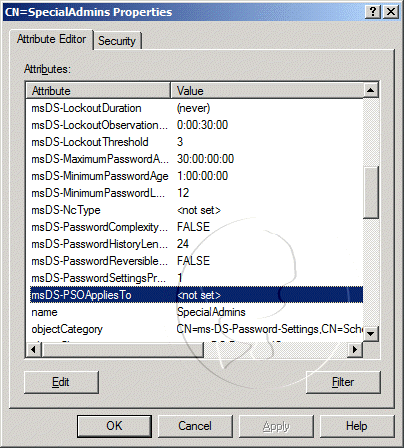
  24. On the CN=SpecialAdmins Properties window, select the msDS-PSOAppliesTo attribute, and then click the Edit button

    msDS-PSOAppliesTo
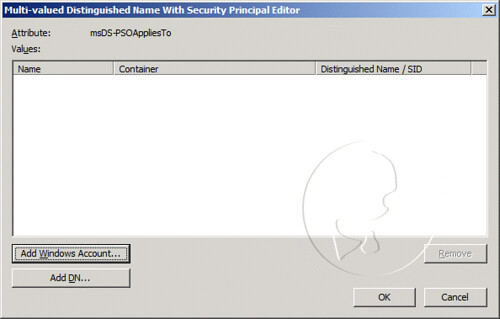
  25. On the Multi-valued Distinguished Name With Security Principal Editor window, click on the Add Windows Account button

    Multi-valued Distinguished Name With Security Principal Editor
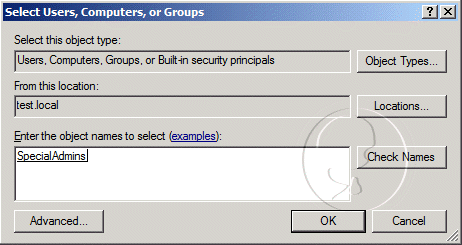
  26. On the Select Users, Computers, or Groups window, enter SpecialAdmins in the Enter the object names to select field, and then click OK

    Select Users, Computers, or Groups
  27. Click OK on the Multi-valued Distinguished Name With Security Principal Editor window
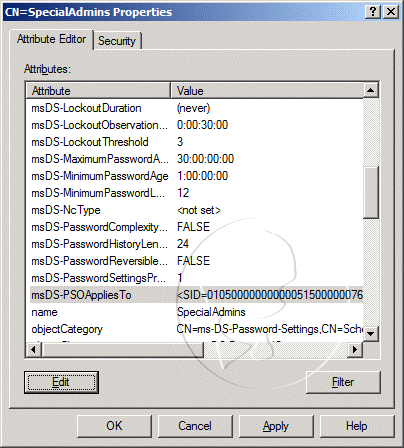
  28. Click OK on the CN=SpecialAdmins Properties window

    msDS-PSOAppliesToSetting

Conclusion

This step-by-step guide demonstrated how to configure fine-grained passwords in WindowsServer 2008.  We defined a number of password settings and applied it to a Active Directory Group.  From now on, all user members of the group will be applied with the custom password policy.

References

What is the function of the msDS-LockoutDuration element of the fine-grain account lockout policy?
http://www.ucertify.com/article/what-is-the-function-of-the-msds-lockoutduration-element-of-the-fine-grain-account-lockout-policy.html
AD DS Fine-Grained Password and Account Lockout Policy
http://technet.microsoft.com/en-us/library/cc770842.aspx

Sonntag, 31. Oktober 2010

How-to Backup Exchange 2007 on Server 2008

After all the hassle of getting Exchange 2007 setup yesterday, I found that I had no way to backup my Exchange 2007 server running on Server 2008. For whatever reason, Microsoft do not supply NTBackup and there is no in-built way of backing up Exchange 2007 when run on Server 2008.
Now, I could opt for a third party backup program or use Microsoft DPM, but for my 4 user network, this is a little bit of an overkill.
After some research, I found this article on how to install NTNackup on Vista:
http://www.petri.co.il/installing_windows_xp_ntbackup_on_windows_vista.htm
I followed this by copying the following binaries from my old server (C:\Windows\System32\) to my new server (C:\Program Files\NTBackup\):
  • ntbackup.exe
  • ntmsapi.dll
  • vssapi.dll
I installed the removable storage manager from server manager:
  • Start Server Manager
  • Click Features
  • Click Add Features
  • Select Removable Storage Manager
  • Click Install
When NTBackup starts, you will see an error regarding removable storage, but I just ignored this and clicked "Do not show this again"
Upon running NTBackup, I could see drives and system state, but no Exchange!
I copied esebcli2.dll from my old server (C:\Program Files\Exchsrvr\Bin) to my new sever (C:\Program Files\NTBackup)
I ran regedit and changed the esebcli2 key from C:\Program Files\Micrsoft\Exchange Server\Bin\esebcli2.dll to C:\Program Files\NTBackup\esebcli2.dll.
I ran NTBackup and backed up my Exchange store to disk!
NTBackup on Server 2008

Mittwoch, 29. September 2010

FSRM Beschränkung aufheben


Seit der Einführung von Windows Server 2003 R2 ist es möglich, sich diverse Berichte über die Auslastung eines Fileservers erstellen zu lassen. Leider wird die Freude über das schicke Feature sehr schnell getrübt, denn alle Berichte sind in ihrem Informationsgehalt recht begrenzt. Wenn man sich z.B. alle Dateien von einem bestimmten Besitzer anzeigen lassen will, dann wird mit folgendem Bericht konfrontiert:
Ressourcen-Manager für Dateiserver
Man kann sich also nur die ersten 1000 Dateien für jeden Besitzer anzeigen lassen. Wenn man sich aber für einen einzelnen Benutzer alle Dateien anzeigen lassen will, die er momentan im Besitz hat, dann ist dieses Feature eher  nutzlos. Um trotzdem an diese Informationen zu kommen, war bis jetzt der Einsatz von Skripten oder auch Drittanbietertools notwendig.
Seit Windows Server 2008 ist es möglich, diese Beschränkungen aufzuheben. Allerdings geht das nicht über die grafische Benutzeroberfläche des “Ressourcen-Managers für Dateiserver”, sondern muss aufwendig über Skripting realisiert werden. Um die Sache etwas zu vereinfachen, habe ich das Powershell Skript “set-fsrmstoragereportlimit.ps1” erstellt. Damit können die einzelnen Beschränkungen relativ einfach angepasst werden.
Skript:

##########################################
# Skript konfiguriert die Beschränkungen der FSRM Reports um.
#
# Einsetzbar ab Windows Server 2008
#
# Von
#
##########################################
$values = @{"-maxfiles"=1;"-maxfilegroups"=2;"-maxowners"=3;
"-maxfilesperfilegroup"=4;"-maxfilesperowner"=5;"-maxfilesperduplgroup"=6;
"-maxduplicategroups"=7;"-maxquotas"=8;"-maxfilescreenevents"=9;
"-maxpropertyvalues"=10;"-maxfilesperpropertyvalue"=11}

$int32 = New-Object System.Int32
$fsrm = New-Object -comObject "fsrm.fsrmReportManager"
#prüfe ob Parameter übergeben wurden
if($Args.count%2 -eq 0 -and $Args.count -gt 0)
{
$fsrm.SetReportSizeLimit($values.Item($Args[0]),$Args[1])
}
else{
parameters_alert
}
function parameters_alert(){

Write-host "Falsche Anzahl an Parametern oder ungültiger Parameter! Gültige Parameter sind:" -foregroundcolor red
$values.Keys | ForEach-Object {$_ + [char]9 + "(Erlaubter Wert: 0 bis 9223372036854775807)"}

"Beispiel: set-fsrmstoragelimit.ps1 -maxfiles 50000"
}


Beispiel für Aufruf Parameter:

"C:\Windows\SysWOW64\WindowsPowerShell\v1.0\powershell.exe" set-ExecutionPolicy unrestricted
"C:\Windows\SysWOW64\WindowsPowerShell\v1.0\powershell.exe" C:\Skripts\fsrmstoragelimit.ps1 -maxfiles 1000000
"C:\Windows\SysWOW64\WindowsPowerShell\v1.0\powershell.exe" C:\Skripts\fsrmstoragelimit.ps1 -maxfilegroups 1000
"C:\Windows\SysWOW64\WindowsPowerShell\v1.0\powershell.exe" C:\Skripts\fsrmstoragelimit.ps1 -maxowners 1000
"C:\Windows\SysWOW64\WindowsPowerShell\v1.0\powershell.exe" C:\Skripts\fsrmstoragelimit.ps1 -maxfilesperfilegroup 1000000
"C:\Windows\SysWOW64\WindowsPowerShell\v1.0\powershell.exe" C:\Skripts\fsrmstoragelimit.ps1 -maxfilesperowner 1000000
"C:\Windows\SysWOW64\WindowsPowerShell\v1.0\powershell.exe" C:\Skripts\fsrmstoragelimit.ps1 -maxfilesperduplgroup 1000000
"C:\Windows\SysWOW64\WindowsPowerShell\v1.0\powershell.exe" C:\Skripts\fsrmstoragelimit.ps1 -maxduplicategroups 1000000
"C:\Windows\SysWOW64\WindowsPowerShell\v1.0\powershell.exe" C:\Skripts\fsrmstoragelimit.ps1 -maxquotas 100000
"C:\Windows\SysWOW64\WindowsPowerShell\v1.0\powershell.exe" C:\Skripts\fsrmstoragelimit.ps1 -maxfilescreenevents 100000
"C:\Windows\SysWOW64\WindowsPowerShell\v1.0\powershell.exe" C:\Skripts\fsrmstoragelimit.ps1 -maxpropertyvalues 1000
"C:\Windows\SysWOW64\WindowsPowerShell\v1.0\powershell.exe" C:\Skripts\fsrmstoragelimit.ps1 -maxfilesperpropertyvalue 1000
CD..


Die Standardwerte für die einzelnen Werte sind:
ParameterStandardwert
MaxDuplicateGroups100
MaxFiles1000
MaxFileGroups10
MaxFileScreenEvents1000
MaxFilesPerDuplGroup10
MaxFilesPerFileGroup100
MaxFilesPerOwner100
MaxFilesPerPropertyValue100
MaxOwners10
MaxPropertyValues10
MaxQuotas1000
Hinweis: Das Skript funktioniert nur unter Windows Server 2008 und kann nicht unter Windows Server 2003 R2 eingesetzt werden. Bei Windows Server 2003 R2 sind die Werte der Speicherberichte statisch hinterlegt!

Freitag, 24. September 2010

IPv6 wirklich deaktivieren bei Server 2008 und 2008R2

Wenn du IPv6 wirklich deaktiviert haben möchtest, dann schrieb dir ein Reg File mit folgendem Inhalt und führ es auf dem Server aus.

REGEDIT4
[HKEY_LOCAL_MACHINE\SYSTEM\CurrentControlSet\Services\Tcpip6\Parameters]
"DisabledComponents"=dword:ffffffff

Nach dem nächsten Boot ist IPv6 deaktiviert. Nur der Hacken in den Einstellungen hilft nicht bei Server 2008 und aufwärts.

Rename Onedrive Business root folder

Rename Onedrive Business root folder Here is what I remember: In the Office 365 web admin pages, change the organization name to a shorte...