Sonntag, 28. Oktober 2012

Windows 3.11 for Workgroup - How to install the TCP/IP Protocol


With your Windows Network working and a number of resources shared, you can install the TCP/IP Protocol to allow your Windows for Workgroups 3.11 machine to connect to the internet, for browsing or picking up e-mail.
TCP/IP (Transmission Control Protocol/Internet Protocol) is simply the standard by which computers on the internet (and some local area networks) communicate with one another.

Uninstall existing TCP/IP stacks

Before you can install the TCP/IP protocol files you will need to remove any existing TCP/IP stacks installed.
A top tip I received in an email from Philip Rowett is that if you have already installed a browser, such as Internet Explorer 3.02, with a dialler then you will need to
  1. Uninstall the browser (which removes the TCP/IP stack installed by the dialler).
  2. Install the TCP/IP protocol (as described below).
  3. Reinstall the browser without the dialler option.
Philip writes:
Once I removed IE completely (and subsequently re-installed it without the dialler option), the ethernet card was immediately recognised. Both PCs now happily talk to each other behind my hardware firewall (and, should I so wish, I can browse the internet using IE 3.02 through my broadband connection!)

Download and install TCP/IP files

  1. Before you can install the TCP/IP protocol to Windows for Workgroups 3.11 you first need todownload the TCP/IP files and unzip them to a new folder.
  2. Remarkably, you can still download the TCP/IP protocol files from the Microsoft FTP server at ftp.microsoft.com/softlib/mslfiles/tcp32b.exe (Self-extracting EXE, 673 KB).

    If you have any problems, or Microsoft remove it from their server, you can also download the files from here, these are zipped: tcp32b.zip (ZIP, 661 KB).
  3. Once you have downloaded TCP32B.EXE, copy it to a new folder, e.g. C:\TCPIP and double-click it. It will now automatically unzip into the folder. (If you have downloaded the zip file you will need a 16-bit version of WinZip (Self-extracting EXE, 615 KB) to unzip the file.)

  4. In Program Manager, if it is not already open, double-click the Network group to view its icons.
  5. Now select and then double-click the Network Setup icon (below).
Network group in Program Manager
  1. A new window, called Network Setup, will open showing the following information:
Network Setup
  1. Click the Drivers... button (above) to show a list of the currently installed Network Drivers (below):
Network Drivers
  1. Now click the Add Protocol... button, on the right-hand side of the window (above).
  2. You will be prompted for the location of the TCP/IP drivers. This will be where you unzipped TCPIP32B.EXE to.
Install Driver
  1. Click on the Browse... button (above) and locate the folder you unzipped the drivers to. In this example I unzipped them to C:\TCPIP.
Browse
  1. Select the folder in the Directories dialog, and then click OK (above).
  2. You will now be returned to the Install Driver dialog, but the text box now contains the location of the TCP/IP drivers. Click the OK button.
Install Driver
  1. A new window will appear called Unlisted or Updated Protocol listing the protocol: Microsoft TCP/IP-32 3.11b. By default it should be selected. Click OK.
Unlisted or Updated Protocol
  1. The TCP/IP drivers will now install. When they have installed you will be presented back at the Network Drivers window.
  2. You will now see that Microsoft TCP/IP-32 3.11b is now added to the list of installed drivers (below).
Network Drivers
  1. Select the newly installed Microsoft TCP/IP-32 3.11b and click the Setup... button to see the Microsoft TCP/IP Configuration dialog (below).
Microsoft TCP/IP Configuration
  1. In this dialog you can enter your IP addressSubnet Mask and Default Gatewayinformation (see below). Let me explain a little.
  • Enable Automatic DHCP Configuration (Green)
    If you are connecting this PC to a router/switch which has a built-in DHCP (Dynamic Host Configuration Protocol) server then feel free to tick the "Enable Automatic DHCP Configuration" option. Your DHCP server will automatically assign your PC with an IP address and Subnet Mask. You will still need to complete the Default Gateway section (Blue) before you click OK.
  • IP Address and Default Gateway (Red)
    If you are manually assigning an IP address and Subnet Mask you can enter this information here. Each PC must have a unique IP address. For a local area network of two computers I might assign one PC as 192.168.0.1 and the other as 192.168.0.2; you may assign different values here for security reasons (this is the default setting and is easily guessable by anyone trying to hack your PC from the internet). The subnet mask MUST be the same on all PCs on the same network.
  • Default Gateway (Blue)
    If you are only setting up a two computer, peer-to-peer network without a router then you do not need to worry about this setting. If you do have a router/switch attached to your PC, allowing both PCs to access the internet (or another WAN) then enter the IP address of your router here. In this example I have assigned the IP Address 192.168.0.5 to the PC, where the IP address of the router (Default Gateway) is 192.168.0.1.
  • Primary WINS Server and Secondary WINS Server
    WINS stands for Windows Internet Name Service. This is a Windows NT service that dynamically associates the NetBIOS name of a host with a domain name. You do not need to worry about this in this setup.
Microsoft TCP/IP Configuration

If you are connecting to a router/switch

  1. If you are connecting this PC to a Router/Switch to connect to the internet then you may need to set where the Domain Name Service is located. Click the DNS... button (below).

    If you are NOT connecting to a Router/Switch then go to step 24 below.
Microsoft TCP/IP Configuration
  1. Enter the IP address of your Router/Switch in the Domain Name Service (DNS) Search Order box (red) and click the Add -> button (green). The IP address will be added to the box on the right. Now click OK (blue).
Microsoft TCP/IP - Connectivity Configuration
  1. Click OK (blue) and this will return you to the Microsoft TCP/IP Configuration window (below).
  2. Now click the Advanced... button.
Microsoft TCP/IP Configuration
  1. There shouldn't really be much you have to worry about in this section (I think!). I have both the Windows Networking Paramaters selected: Enable DNS for Windows Name Resolution and Enable LMHOSTS Lookup.
Advanced Microsoft TCP/IP Configuration
  1. Click OK. This will return you to the Microsoft TCP/IP Configuration window.
Microsoft TCP/IP Configuration

Exiting and rebooting

  1. Click OK to return you to the Network Setup window (below).
Network Setup
  1. Now click OK to exit the Network Setup window and confirm all the changes you have made.
  2. A dialog box will pop up to inform you that your SYSTEM.INI file has been updated and where the old version has been saved to (below).
Network Setup
  1. Click OK and you will be asked to reboot the machine.
Windows Setup

Test your TCP/IP connection

  1. One very good way of testing whether your TCP/IP protocol is installed properly and working is to use the PING command.

    Once you have rebooted, start an MS-DOS-Prompt window, and at the prompt type

    ping 192.168.0.1

    then press Enter.

    (Obviously substitute the 192.168.0.1 for the IP address of a PC or router on your network, if necessary.)
MS-DOS Prompt - ping successful
  1. If your TCP/IP connection is up and running well, you should see something similar to the output above. If you are experiencing problems you will see something similar to the screenshot below.
MS-DOS Prompt - Ping request timed out

Dienstag, 9. Oktober 2012

How to Convert Hyper-V VHD Disks to VHDX

Windows Server 2012 Hyper-V offers a new virtual disk type called VHDX.  VHDX virtual disks have many benefits, including larger maximum disks up to 64TB, protection against data corruption, and improved alignment of the virtual hard disk format to work well on large sector disks.  See http://technet.microsoft.com/en-us/library/hh831446.aspx for more information about the VHDX disk type.

You can convert existing older format VHD disks to the new VHDX format using the Hyper-V Manager console.  This process will create a new VHDX disk and copy the data from the existing VHD to the new disk.  At the end of the procedure you will have two disks, the original VHD disk and a new VHDX disk with the same contents.  You can safely delete the original VHD disk once you have confirmed that the new VHDX disk is fully functional.

Here are the steps to convert an existing VHD disk to a VHDX disk:
  • Shut down the VM that is accessing the disk, if necessary.  You cannot convert a disk that is in use.
  • Open the Hyper-V VM settings, navigate to the hard drive you wish to convert, and click the Edit button, as shown below:
  • The Edit Virtual Hard Disk Wizard will start.  Select Convert from the Choose Action page and clickNext.
  • Select the VHDX disk format and click Next.
  • Choose whether the new disk should be fixed size or dynamically expanding.  Note that this gives you the opportunity to change disk types from the previous disk type.  Click Next.
  • Select the name and location for the new VHDX disk and click Next.
  • Review the summary and click Finish to create the new disk.  This may take a few minutes depending on the size of the VHD and the speed of your hard drive(s).  A 30GB VHD converted in less than two minutes on my SSD drive.  The size of the new VHDX disk will be slightly larger than the original VHD disk.

  • The last step is to mount the new VHDX disk to the Hyper-V VM.  Note the new VHDX extension.

Once you have started up your VM with the new VHDX disk you can safely delete the old VHD disk.  There are no other configurations necessary.
Did you find this information useful? Post a comment and share it with others!

Dienstag, 2. Oktober 2012

Einzelne Seite im Querformat formatieren in Word 2010


Wieder einmal ein Artikel in der Rubrik “ewig gesucht und doch so einfach”:
Anforderung:
Es soll in einem Word-Dokument eine einzelne Seite im Querformat dargestellt werden. Alle übrigen Seiten sollen jedoch im Hochformat bestehen bleiben.
Lösung:
Als erstes sollte man idealerweise ein neuen sogenannten Abschnitt (nicht zu verwechseln mit einem Seitenumbruch) anlegen. In einem Abschnitt können mehrere Seiten enthalten sein. Für den Abschnitt wird anschließend das Seitenlayout festgelegt.
Im folgenden Dialog wird ein neuer Abschnitt an der Cursor-Marke eingefügt. Übrigens: wenn die Steuerzeichen eingeblendet sind, sieht man den Abschnittswechsel im Dokument.
Neuen Abschnitt einfügen
Nun wechselt man durch “Datei” -> “Drucken” in die Seitenansicht. Dort ruft man den Dialog “Seite einrichten” auf. Gleich im ersten Reiter/Tab des Dialog stellt man das Seitenlayout auf “Querformat” um. Wichtig hierbei ist das Dropdown-Menü ganz am unteren Ende des Dialogs. Hier wählt man dann “Aktuellen Abschnitt”, wenn man im ersten Schritt ein Abschnitt definiert hat.
Dialog "Seite einrichten"
Hinweis: Die Option “Dokument ab hier” eignet sich für Dokumente, in denen z.B.  ein Anhang im Querformat enthalten sein soll, der die letzten Seiten des Dokuments füllt.
Das Ergebnis der Formatierung kontrolliert man in der Seitenansicht – dort wird die Umstellung des Seitenformats sofort angezeigt, wenn man durch die Seiten scrollt.

Sonntag, 23. September 2012

Adding Drivers to Windows Deployment Services Boot Images


A while back, I posted an article on building a SharePoint development environment in Hyper-V, which included a part on automating deployment of the host machine. Although we’ve now moved to VMware Workstation, we still use this approach for automating deployment of our standard Windows 7 builds, and this commentary is generally relevant to any Windows Deployment Services (WDS) deployment.

When I learned WDS and the Windows Automated Installation Kit (which were both quite new in Windows Server 2008 R2 at the time), I contented myself with getting ~90% of the way to a fully-automated build, as the additional effort to get from 90 to 100% (mostly re: drivers) wouldn’t have paid enough immediate dividends and we needed to start capitalising on some of the other wins of our new environment. As is often the case, we never got back to that remaining 10%, but it’s become more of an issue in recent months, as we’ve added a few Dell Latitude E6410 and Lenovo W520 laptops – both of which had network drivers that the Windows 7/Windows Server 2008 R2 boot images didn’t recognise. Unfortunately the TechNet guidance on adding drivers to boot images is unclear (to me anyway), so I’m contributing this quick post to attempt to clarify the problem that we had and the simple step-by-step solution.

A matching network card driver was not found in this image

After preparing our image with current patches and making the state as general-purpose as possible, we ran SysPrep with Generalise and OOBE, then Shut Down the machine. I always Shut Down rather than rebooting because I don’t want to miss the window in which I need to hit F12 to trigger the PXE boot to capture the image. If the post-SysPrep boot initiates there’s a risk that the SysPrep rearm count will be incremented, which is rather undesirable.
During capture, I was able to run through the wizard but I was not able to connect to the WDS server during the imaging process. Not the end of the world… I just manually uploaded the image after the process completed. However, this was my first indication that all would not be well with the NIC drivers. Note: my solution below should be repeatable for the capture images as well as the boot images, correcting this issue as well.
When it came time to deploy the image, we got in to the Windows PE setup splash, but no further than this error:
WdsClient: An error occurred while starting networking: a matching network card driver was not found in this image. Please have your Administrator add the network driver for this machine to the Windows PE image on the Windows Deployment Services server.

An Outdated KB

As you will note in this knowledge base article (which dominates search results for this error), the work-around is fairly detailed and laborious. Nevertheless, I proceeded, with a few caveats.
  1. I didn’t actually get the error that the KB article describes from the Setupapi.app.log, so after a bit of head scratching, I moved on to step 2, deducing which driver I needed from my extracted NIC driver INF file.
  2. peimg /inf=driver.inf mount\Windows, from step 3h, just didn’t work for me. “PEImg” couldn’t be found. Eventually I figured out that PEImg refers to an older version of Windows Deployment Services, so this just didn’t work.
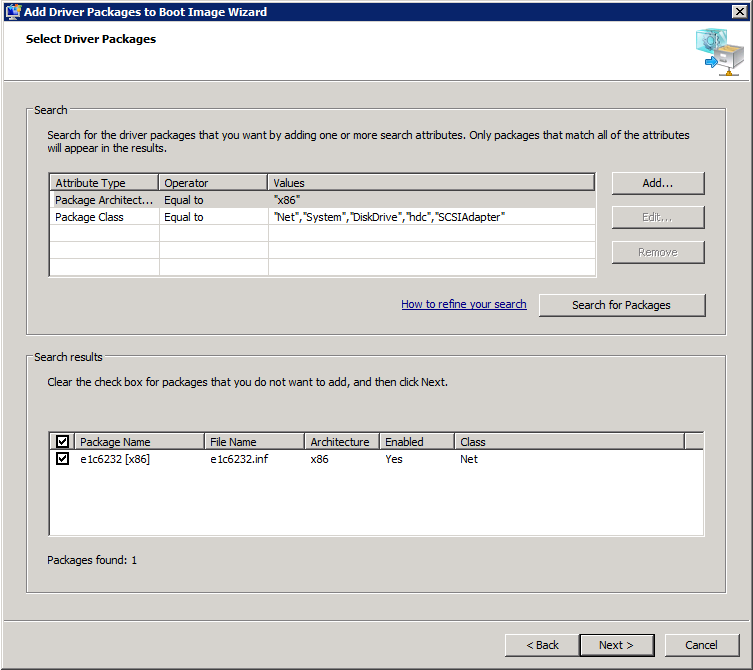
At this point I went back to the drawing board and started reviewing the Windows Server 2008 R2 TechNet documentation, leaving this KB article behind. I was pretty sure there was a less convoluted way of getting this done anyway. Eventually I found the Add Driver Packages to Boot Image Wizard, as I’ll detail in step-by-step instructions below, but now I was getting error code 0xc1420127 in the wizard, as detailed here (with a good screen shot) and here (with this solution):
  1. Clear all your temp directorys.
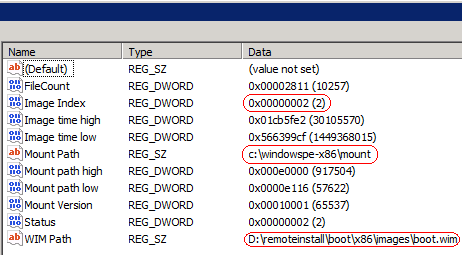
  2. Browse to “HKEY_LOCAL_MACHINE\SOFTWARE\Microsoft\WIMMount\Mounted Images” and delete any keys below this.
I think the important step here is the second one, which removes the mounted image that I never unmounted via imagex /unmount /commit mount; the registry keys align precisely with Imagex /info Drive:\remoteinstall\boot\x86\images\boot.wim andImagex /mountrw D:\remoteinstall\boot\x86\images\boot.wim 2 mountfrom steps 3f/3g/3h:
WDS RegKey Adding Drivers to Windows Deployment Services Boot Images
I purposely avoided committing the mount since I couldn’t make the PEImg changes, but this inadvertently caused the Add Driver Packages to Boot Image Wizard 0xc1420127error.

A much simpler solution

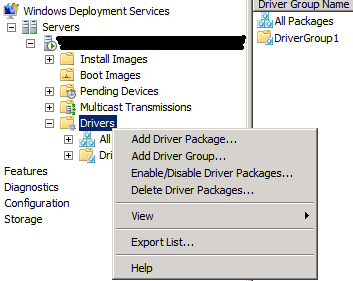
After deleting these keys, I was back on track. If I’d never stepped through the outdated KB article I could have followed these steps below and saved myself (and apparently a few others) much hassle, but for whatever reason the Add Driver Packagecommand has always eluded me – tucked away as it is under the Drivers node in WDS. I was always distracted by the Add Driver Packages to Image command under the Boot Images node, as in step 3 below, which gets you nowhere without adding the driver first. But once you find that and step through, it’s pretty easy.
  1. Add Driver Package
    WDS AddDriver1 Adding Drivers to Windows Deployment Services Boot Images
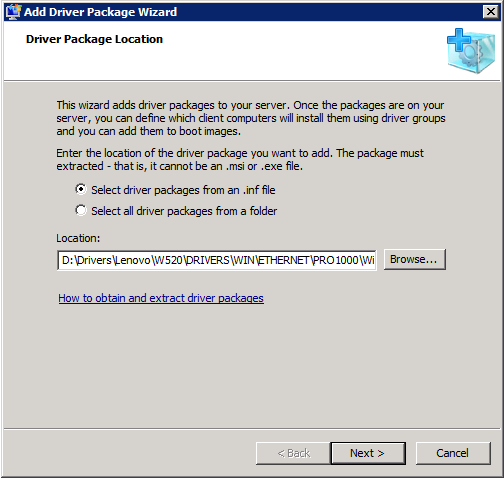
  2. Select driver packages from an .inf file
    WDS SelectINF Adding Drivers to Windows Deployment Services Boot Images
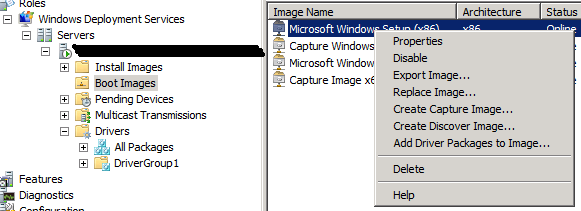
  3. On the boot image, select Add Driver Packages to Image:
    WDS AddDriverPackagesToImage1 Adding Drivers to Windows Deployment Services Boot Images
  4. Click Search for Packages:
    WDS SearchForPackages Adding Drivers to Windows Deployment Services Boot Images
  5. While adding the package to the image it will be temporarily dismounted. In order to account for this in advance you can temporarily disable the image before doing any of this and then re-enable it afterwards.
Repeat this process for other boot/capture images as needed, and make sure the driver matches the boot/capture image architecture. The install image doesn’t need to match the boot image architecture though.
Ultimately, this all shows off how much better WDS in Windows Server 2008 R2 is than its predecessors, which were dark arts that few could master. Not so any more, but unfortunately automated deployment is still confusing when it goes wrong  per the number of technologies that all support the same or similar ends, new and old, including WDS, WAIK, MDOP, SCCM, DISM, RIS, ADS and I’ve forgotten how many others, especially when the changing interrelationships between these products over time further obscures the quality of guidance.

Mittwoch, 19. September 2012

Installing FreeNAS 8 on VMware vSphere (ESXi)


FreeNAS is an Open Source Storage Platform and version 8 benefits not only from a complete rewrite – it also boats a new web interface and support for the ZFS filesystem. It is also worth mentioning that FreeNAS supports Advanced Format drives (something that my Windows Home Server does not).
The features of ZFS are many but it is the data integrity and large capacity support that caught my attention when I first started to ponder alternatives to Windows Home Server (WHS).
The other ZFS contender that has piqued my interest is Nexenta whose community edition has an 18TB limit (although you can run the Nexenta Core version with a community developed GUI without any storage limit). One key difference to be aware of (and these will be moving goalposts) are the versions of ZFS that both of these projects are running. At the moment, for example, it looks like FreeNAS does not support de-duplicationof data while Nexenta does.
FreeNAS is designed to be run from a flash drive which is nice in that all of your hard drives can be dedicated to storage. A 1GB drive is recommended as the minimum requirement and this can hold several FreeNAS images – so you can roll back to a previous installation if you experience troubles during an upgrade for example. I will be installing FreeNAS to a 1GB virtual hard disk instead.
I have yet to decide between FreeNAS and Nexenta yet – but for today wanted to get the ball rolling installing FreeNAS 8 in VMware vSphere 4.x.
First download the FreeNAS 8 .iso and copy it to your vSphere datastore.
Create a new virtual machine and specify the following Guest Operating System properties – Other andFreeBSD (64-bit).
I configured 4Gb of RAM with the default LSI Logic Parallel SCSI controller with a 1GB vitrual hard disk.
Finally point the virtual CD-ROM of the virtual machine to the uploaded FreeNAS .iso and boot the virtual machine:
Press 1 to begin installation:
Press Enter to install to default device:
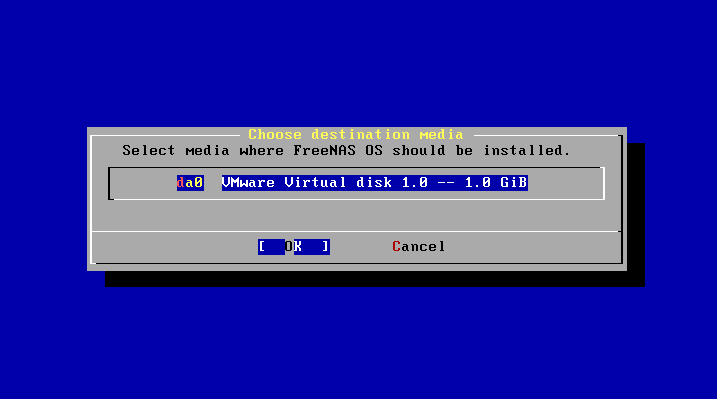
Press Enter again to install to the VMware virtual disk:
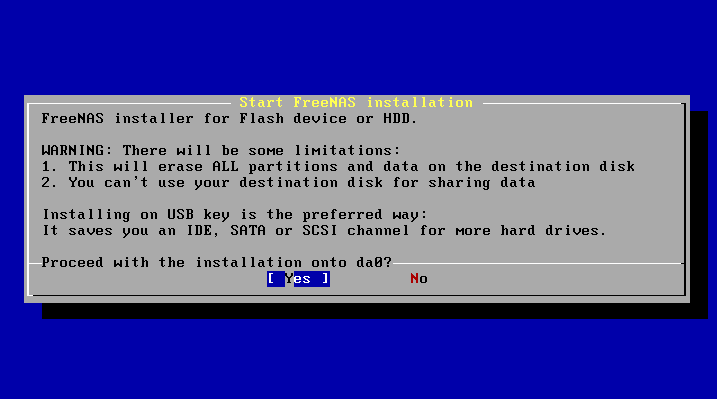
Press Enter again to confirm installation to hard drive (installation to USB is the preferred method for FreeNAS but this is not practical on ESXi):
Wait for FreeNAS to copy the image to the virtual drive:
Reboot the virtual machine:
As you can see there are various options for configuring FreeNAS when it boots. For now I will take a quick look at the Web interface.
Open Firefox and browse to the IP address of your FreeNAS installation (as detailed in the previous screenshot).
Use admin for the Username and freenas for the password.
Welcome to the FreeNAS interface!
As you can see there are plenty of options available to configure FreeNAS and (now that installation is complete) that will be the topic of a later blog-post.

Creating a Nested ESXi 5 Environment


Since vSphere 5 was released earlier this year, it is now time to get ready to pass the VCP exam.  I am a VCP for both 3.5 and 4, and decided I would post some updates along the way as I study before taking the VCP 5 exam.

The first thing I did was create a lab environment. I currently use 2 whitebox ESXi 5 servers, attached to iSCSI storage.
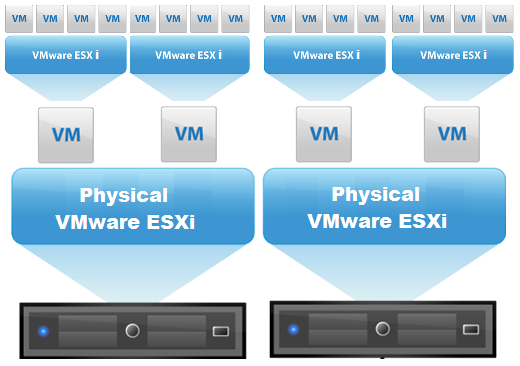
However, since I am studying VMware products, I don’t want to configure, and reconfigure these 2 ESXi servers constantly.  Thankfully, I can run Nested ESXi Servers – or, run ESXi 5 inside of ESXi 5.  I can even run 64bit guests inside of my virtualized ESXi servers!  See below:
Now, I can run more than 2 ESXi servers, and blow them away and recreate if needed. (yes, it will be slow).

In order to run ESXi 5 inside of ESXi 5, there are a couple of steps we need to do:
First, we will need to add a line to the etc/vmware/config file.  Using SSH to connect to your ESXi server, type the following:
echo ‘vhv.allow = “true” ‘ >> /etc/vmware/config
Second, we need to make sure the networking is setup properly.  On each host, for your VM Network, enable promiscuous mode for the port group.
  • click Configuration
  • click Networking
  • click Properties for your vSwitch with the VM Network (assuming your haven’t renamed”
  • Click “VM Network” and choose Edit.
  • Click Security
  • Check Promiscuous Mode and choose Enable.
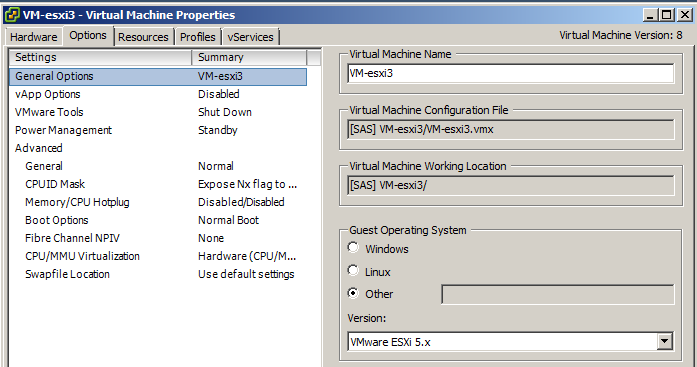
Next, create a VM for each ESXi host with 2CPUs, and at least 4GB of RAM. When creating the VM, make sure that it is version 8 HW, and that for the operating system you choose “other” and select “Other (64 bit)”.  Once the VM is created, we will choose to edit it’s settings.  In the Options tab, you can now change the OS to “VMware ESXi 5.x”
Last, we need to make sure that under “CPUID Mask” that we expose the NX/XD Flag to the guest if it is not already.
Now, you can power on the VM, and install ESXi 5 from an ISO image.
Once installed, you can then create 64bit guests inside of your virtual ESXi server.

 VMware Workstation 8
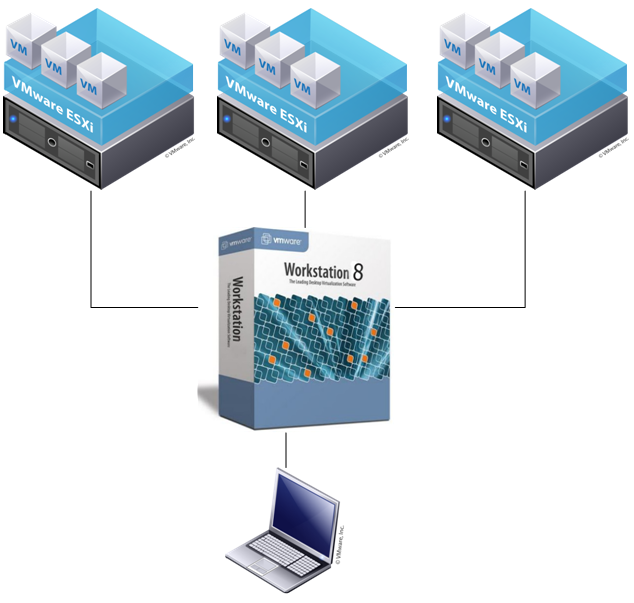
The best thing about VMware, is I can also virtualize ESXi inside VMware Workstation!  So on my laptop, in VMware Workstation, I can run multiple ESXi servers, that in turn have VMs inside them.  Even better is the fact that I can have 64bit guests inside my ESXi servers running inside VMware Workstation.  Sounds confusing as I type, so here’s a diagram:
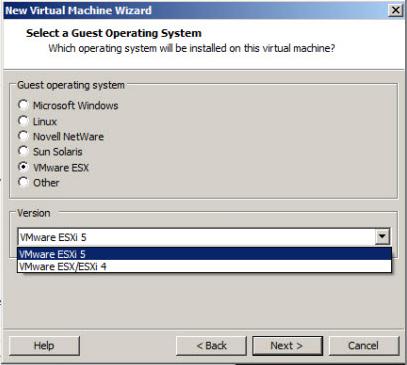
In order to run ESXi inside VMware workstation, we simply need to select “VMware ESXi 5″ as the operation system of the guest VM we are creating.
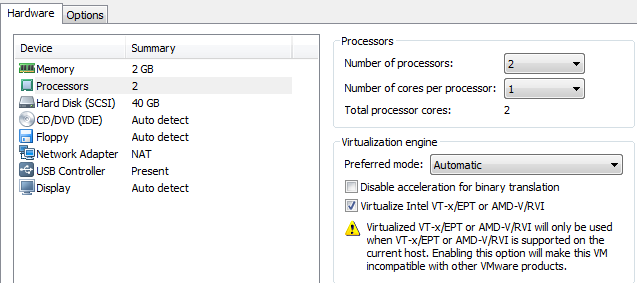
Then, Edit the VM’s Settings, and under the Hardware tab, and processors, check the box to Virtualize Intel VT.
The option to run ESXi inside of VMware workstation is great, especially for when you don’t have a lot of physical hardware to test with.

vSphere 5.1 Lab – Initial Setup


With the release of vSphere 5.1 now, and some of the new features, I decided to dedicate a new series of posts just to 5.1, and install it all in my lab environment – from the ground up.
First off – this is a clean slate – I won’t be doing any upgrades – everything will be a fresh install.
Hardware:
HP ML330 G6
  • 1 Xeon E5504 Quad Core
  • 64 GB RAM
  • 8x 300 GB SAS 15k in Raid 5
Since I am using a single server, I will be running mutiple nested ESXi servers. (See previous post – Creating a Nested ESXi 5 Environment)
Now onto the install:
Install ESXi 5.1:
This really is self explanatory anymore.  Insert CD, pres enter and F11 a couple of times – and you are good to go.  I did use the HP Customized image, since this is a HP server.
Prepare for Nested ESXi:
The steps are the same as with 5.0.
  • echo ‘vhv.allow = “true” ‘ >> /etc/vmware/config
  • Enable promiscuous mode on vswitch

Mittwoch, 5. September 2012

How to Change Product Key of Microsoft Office 2010 and Visio 2010

If you need to change your Microsoft Office 2010 or Visio 2010 product key to resolve activation issues or other reasons, then you can do so very easily. You may also find How To Use Microsoft Office 2010 for 180 days Free without Activating?useful.

Previously we have shown “How To Change Windows Product Key After Install“, so if you need to change your Windows 7 or Vista key, you can head over to that post for reference.

Now, coming back to today’s topic on How to Change Product Key of Microsoft Office2010 & Visio 2010, just follow the simple steps below:
Click on the button to open the Start Menu. Now, click on the Control Panel and then click on Programs (Uninstall a program), and finally click on Program and Features.
(Windows XP users: Start > Control Panel > Add or Remove Programs.)
From the list of installed programs, find Microsoft Office Professional Plus 2010 (or your installed version of Office 2010) or Microsoft Office Visio Professional 2010 (or your installed version of Visio 2010), which ever’s key you want to change, select it and then click on Change.


From the newly opened dialog box, select the Enter a Product Key option, and then click Continue.
Type your new product key and check the option that says Attempt to automatically activate my product online to automatically activate your Office 2010 suite. Now click on Continue and then on Install Now.
Note: Your computer must be connected to the Internet if you want to activate Office 2010 online.You can also activate Office 2010 later by running any Office 2010 app, and then clicking on the File tab > Help.

This method lets you change product key of the following Office 2010 editions and products:
  • Microsoft Office Professional Plus 2010
  • Microsoft Office Home and Business 2010
  • Microsoft Office Home and Student 2010
  • Microsoft Office Visio Professional 2010
  • Microsoft Office Professional Academic 2010

Rename Onedrive Business root folder

Rename Onedrive Business root folder Here is what I remember: In the Office 365 web admin pages, change the organization name to a shorte...