Samstag, 21. Dezember 2013

Reset Administrator Password on ILO

ESXI


Thanks to HP drivers, ILO can be configured directly inside ESXi without the need for a server reboot: going into the command line (locally or via ssh) you can move to /opt/hp/tools, and there you will find the commandhponcfg. This tool can be used to configure ILO:
first, write down the actual configuration of ILO. The easiest way to do it is by saving in an XML file:
1/opt/hp/tools # ./hponcfg -w ilo.xml
2HP Lights-Out Online Configuration utility
3Version 4.0-10 (c) Hewlett-Packard Company, 2011
4Firmware Revision = 1.81 Device type = iLO 2 Driver name = hpilo
5Management Processor configuration is successfully written to file "ilo.xml"
then, edit the XML file and configure your desired parameters:
01<!-- HPONCFG VERSION = "4.0-10.0" -->                                                                                                           
02<!-- Generated 8/6/2012 11:11:4 -->                                                                                                             
03<RIBCL VERSION="2.1">                                                                                                                           
04 <LOGIN USER_LOGIN="Administrator" PASSWORD="password">                                                                                                                                                                                                                            
05  <RIB_INFO MODE="write">                                                                                                                       
06  <MOD_NETWORK_SETTINGS>                                                                                        
07    <SPEED_AUTOSELECT VALUE = "Y"/>                                                                                                                                                                                                                               
08    <IP_ADDRESS VALUE = "10.123.183.197"/>                                                                                                        
09    <SUBNET_MASK VALUE = "255.255.255.0"/>                                                                                                                                                                                                      
10    <DNS_NAME VALUE = "esx-ilo"/>                                                                                                                                                                                                           
11    <DHCP_ENABLE VALUE = "N"/>                                                                                                                  
12    <DOMAIN_NAME VALUE = "domain.local"/>                                                                                                                                                                                                                                                                                                 
13  </MOD_NETWORK_SETTINGS>                                                                                                                       
14  </RIB_INFO>                                                                                                                                                                                                                                                                    
15 </LOGIN>                                                                                                                                       
16</RIBCL>


Note: you will not need to edit everytime all the parameters, it will be enough to add the lines you want to change. But, you will always have to add the username and password line to authenticate the changes you are doing.load the new configuration into the ILO, it will take some time to complete:
1/opt/hp/tools # ./hponcfg -f ilo.xml
2HP Lights-Out Online Configuration utility
3Version 4.0-10 (c) Hewlett-Packard Company, 2011
4Firmware Revision = 1.81 Device type = iLO 2 Driver name = hpilo
5<INFORM>Integrated Lights-Out will reset at the end of the script.</INFORM>
6
7Please wait while the firmware is reset. This might take a minute   
8Script succeeded
Finally, ILO will automatically reset to load the new parameters, and you will be able to reach the ILO via web interface and login into it. Also, ESXi will show you the new ILO configuration:

WINDOWS 

1. I installed SNMP because it was a preprequesite for HP Insight Management Agents.
2. I dowloaded and installed the HP Insight Management Agents.
3. I then downloaded HP Lights-Out Online Configuration Utility.
4. I ran into NTVDM errors trying to run the file so I just used WinRAR to extract the contents into C:\hp\ilo. I also extracted the zip file contained within the initial archive.
5. I then downloaded the HP Lights-Out XML Scripting Sample for Windows (Linux users can download the files in tgz format here or here.) extracted it and found the file I was looking for --


<ribcl VERSION="2.0">
<login USER_LOGIN="Administrator" PASSWORD="boguspassword">
<user_INFO MODE="write">
<mod_USER USER_LOGIN="Administrator">
<password value="newpass"/>
</mod_USER>
</user_INFO>
</login>
</ribcl>


6. Using notepad, I opened up the sample file and modified it slightly. Initially, I just removed the LOGIN and ran the file but HPONCFG gave me a syntax error. I then added it back and gave the Administrator a bogus password. Apparently, the LOGIN line is required for syntax reasons but it is not actually processed.
7. Next, I opened a command line and changed directories to C:\hp\ilo and typed the following:
HPONCFG.exe /f Administrator_reset_pw.xml /l log.txt > output.txt

8. I opened up Firefox, navigated to my iLO machine and voila! I was able to login as Administrator.

If changing Administrator's password seems too scary, you can also add another user with administrator privileges. You can then login as that user and change the Administrator password via the web console. Use the following code, suited to your liking:


<ribcl version="2.0">
<login USER_LOGIN="Administrator" PASSWORD="boguspass">
<user_INFO MODE="write" >
<add_USER
USER_NAME="Chrissy"
USER_LOGIN="Chrissy"
PASSWORD="mynewpass">
<reset_SERVER_PRIV value = "Y" />
<admin_PRIV value = "Y" />
</add_USER>
</user_INFO>
</login>
</ribcl>

Sonntag, 15. Dezember 2013

HOW TO INSTALL VSPHERE 5.5 CLIENT ON A DOMAIN CONTROLLER

I get really excited when a new version of software comes out because I’m anxious to try out all of the new features. While exploring vSphere 5.5 however, I noticed that there are some serious consequences to diving in head first. Whether it’s the incompatibility of vSphere 5.5 hardware version 10 with the vSphere thick client or trying to do simple things like install vSphere 5.5 client on a domain controller, VMware has really started sticking it to their fans who use their free products.
For example, note in this screen shot that “In vSphere 5.5, all new vSphere features are available only through the vSphere Web Client.” In other words, if you want to use the features we’ve released, pay us a ton of money and go buy vCenter Server. I’m completely befuddled by this response to their fans given Microsoft’s push to drive virtualization costs down by including the fairly full featured hypervisor in it’s server package.
VMwarevSphereClient
Alas, I digress…

Installing vSphere 5.5 Client on a Domain Controller

I’m certainly not going to avoid using vSphere 5.5, but I if I’m going to use it, I really needed to be able to install vSphere on a Domain Controller. If youdownload the vSphere 5.5 client and launch it on a domain controller, you get the following message.
vSphereClientOnDomainController
I started doing some research and it turns out that getting the vSphere 5.5 client installed on a domain controller is as simple as launching the installer from the CLI with a simple flag on the end.
VMware-viclient-5.5.exe /VSKIP_OS_CHECKS="1"
Launching it this way causes the client to disregard the fact that it’s installing on a domain controller.
Rumor has it that this way of disuading people from installing vSphere client on a domain controller is actually a result of Microsoft’s best practices given the following statement reportedly from VMware directly.
“We did this deliberately to enforce a Microsoft standard that our guys agree with – don’t install software on a DC, but they made that decision in isolation. Nothing more than that. So use the workaround safely and hopefully we can undo this in the future.”
In any case, I’ve done it in a production environment without any issues whatsoever and feel comfortable recommending that others do so as well, just like you’ve likely done in the past. Enjoy, and as always, let me know if this helped you. Thanks! 

Sonntag, 13. Oktober 2013

ILO update 1.16 to 1.55 fails - use 1.28 as intermediate version

Just tried to update ILO3 on a HP DL 380 G7 from version 1.16 (Dec 17 2010) to one of the latest version 1.55 (Feb 19 2013) but got the following error message in the browser:

The last firmware update attempt was not successful. Ready for the next update. 


Freitag, 11. Oktober 2013

UPGRADING VMWARE VCENTER APPLIANCE 5.X TO 5.5


Last week VMware vSphere 5.5 went GA, so it is time to update the home lab to the latest version. I am using the VMware vCenter Appliance (VCSA), and it is the latest version. I never did an upgrade of the VCSA so I start searching the knowledgebase of VMware and found an article describing the upgrade process (VMware KB2058441).
Prerequisites
  • Before attempting the upgrade, if you are using custom SSL certificates, ensure that they meet the requirements as per Configuring Certificate Authority (CA) signed certificates for vCenter Server Appliance 5.5 (2057223).
  • Ensure that you have taken a backup/snapshot of your existing vCenter Server Appliance and the external database.
Procedure
  1. Deploy the new VMware vCenter Appliance.
  2. Connect to both the old and new appliances in separate browser windows. For example, use a URL similar tohttps://ip_address_of_vCenter_VM:5480
  3. In the new appliance, start the vCenter Server Setup wizard and accept the end user license agreement.
  4. In the Configure Options panel, select Upgrade from previous version and then click Next.
  5. Copy the key from the Import this key into the source appliance field.
  6. If you are upgrading vCenter Server Appliance 5.0.x to 5.5:
    • In the old vCenter Server Appliance 5.0, click the Appliance Upgrade tab.
    • Select source for the appliance role and click Set role.
    • Click Establish Trust.
    • Paste the local appliance key into the Remote appliance key field.
    • Click Import remote key.
    • Copy the local appliance key.
    • In the new vCenter Server Appliance 5.5, paste the local appliance key into the Remote appliance key field and click Next.
  7. If you are upgrading vCenter Server Appliance 5.1 to 5.5:
    • In the old vCenter Server Appliance 5.1, paste the key from Step 5 into the Upgrade key field.
    • Click Import key.
    • Stop vCenter Server.
    • Copy the Upgrade key.
    • In the new appliance, paste the Upgrade key to the Paste the source appliance key into the field below field and click Next.
    • If there are issues detected with your SSL certificates, select the Replace the SSL certificates option. You are prompted for SSO password for user admi...@vsphere.local.
This looks pretty easy. First I deployed a new VCSA with a new name (VCSA 5.5), configured the IP settings, different than my original VCSA (VCSA 5.1). After the OVF deployment I started the VCSA and went to the management page. I accepted the EULA on my new VCSA 5.5.

Mittwoch, 9. Oktober 2013

How to Whitelist a domain or email in Exchange 2010

If you have the Edge Transport Role installed on an Exchange 2010, mail may be rejected with the following error:
My.User@domain.com
 mail.domain.com #<mail.domain.com #5.7.1 smtp; 550 5.7.1 Message rejected as spam by Content Filtering.> #SMTP#
it appears the only way to whitelist in Exchange 2010 is through the Powershell – not the GUI.
Specific Address
1
2
3
$list = (Get-ContentFilterConfig).BypassedSenders
$list.add("new.mail@address.com")
Set-ContentFilterConfig -BypassedSenders $list
Entire Domain
1
2
3
$list = (Get-ContentFilterConfig).BypassedSenderDomains
$list.add("domain.com")
Set-ContentFilterConfig -BypassedSenderDomains $list
 Verify
1
Get-ContentFilterConfig

Dienstag, 3. September 2013

How To Enable SSL 3.0 Server 2008 /SBS 2008/SBS2011


Problem

Server 2008,server 2008 SBS and SBS 2011 do have the functionality for SSL 3.0 however by default it does not understand anything that tries to connect with this protocol. For security reasons if you need to enable SSL 3.0 on your server we can enable it with some additional registry keys. Follow the step by step guide below.


Resolution

(MAKE SURE THAT YOU BACKUP YOUR REGISTRY BEFORE APPLYING THOSE CHANGES)

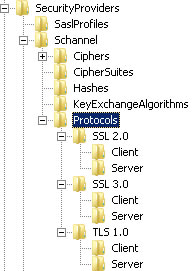
• Using regedit to add the following keys ( right click on protocols -> new -> key -> “SSL 2.0″ then “SSL 3.0″ then “TLS 1.0″ )HKEY_LOCAL_MACHINE\SYSTEM\CurrentControlSet\ Control\SecurityProviders\SCHANNEL\Protocols\SSL 2.0 HKEY_LOCAL_MACHINE\SYSTEM\CurrentControlSet\ Control\SecurityProviders\SCHANNEL\Protocols\SSL 3.0 HKEY_LOCAL_MACHINE\SYSTEM\CurrentControlSet\ Control\SecurityProviders\SCHANNEL\Protocols\TLS 1.0


• Under each of the keys above you need to create additional keys “Client” and “Server”


Enable ssl 3.0


For SSL 2.0:HKEY_LOCAL_MACHINE\SYSTEM\CurrentControlSet\ Control\SecurityProviders\SCHANNEL\Protocols\SSL 2.0\Client HKEY_LOCAL_MACHINE\SYSTEM\CurrentControlSet\ Control\SecurityProviders\SCHANNEL\Protocols\SSL 2.0\Server


For SSL 3.0:HKEY_LOCAL_MACHINE\SYSTEM\CurrentControlSet\ Control\SecurityProviders\SCHANNEL\Protocols\SSL 3.0\Client HKEY_LOCAL_MACHINE\SYSTEM\CurrentControlSet\ Control\SecurityProviders\SCHANNEL\Protocols\SSL 3.0\Server


For TLS 1.0:HKEY_LOCAL_MACHINE\SYSTEM\CurrentControlSet\ Control\SecurityProviders\SCHANNEL\Protocols\TLS 1.0\Client HKEY_LOCAL_MACHINE\SYSTEM\CurrentControlSet\ Control\SecurityProviders\SCHANNEL\Protocols\TLS 1.0\Server


Then you will have to create DWORD (32bit) value called “Enabled” under each “Client” and “Server” key for “SSL 2.0, SSL 3.0 and TLS 1.0″
DWORD (32bit) Value


Value name = Enabled

Value date = 0

Value date can be set to “1″ – Enabled or “0″ – Disabled

In my scenario the values were “enabled” (set to 1) for SSL 3.0 and TLS 1.0 and “disabled” (set to 0) for SSL 2.0

Here is a disabled value for ssl 2.0


Enable ssl 3.0 server 2008

and here is SSL 3.0 enabled


Enable ssl 3.0 server 2008


• Next step is to add correct Ciphers, to do so you will have to navigate to the following key in the registryHKEY_LOCAL_MACHINE\SYSTEM\CurrentControlSet\ Control\SecurityProviders\SCHANNEL\Ciphers


• (right click on “Cliphers” New -> Key)HKEY_LOCAL_MACHINE\SYSTEM\CurrentControlSet\ Control\SecurityProviders\SCHANNEL\Ciphers\RC2 128/128 HKEY_LOCAL_MACHINESYSTEM\CurrentControlSet\ Control\SecurityProviders\SCHANNEL\Ciphers\RC4 128/128 HKEY_LOCAL_MACHINE\SYSTEM\CurrentControlSet\ Control\SecurityProviders\SCHANNEL\Ciphers\Triple DES 168/168


• That’s all! Now you need to restart your server to apply those changes.

• If you are using TMG 2010 or ISA 2006 to publish the website externally you will need to apply exactly the same settings to registry to it.

Mittwoch, 24. Juli 2013

Manage an HP Smart Array directly from VMware ESXi

In my lab I’m using a Proliant DL380 G5 filled with disk as a storage server, running some VSA on top of the volume I created  and formatted with a vmfs filesystem.
From here, let the fun begin! There are many commands you can run on the raid controller by running /opt/hp/hpacucli/bin/hpacucli, I’m going to show you some of them:
First, I identified the controller. Remember is in slot 3, this will be needed in the next commands.
As I said, my problem seemed to be related to the cache battery, so I went to check its status:
The status seems to be ok, but I went to enable anyway the cache, the command is:
1ctrl slot=3 modify dwc=enable forced
Go to check it. As a last example, a fun stuff:
First, I identified the physical disks in the controller (pd), then I enabled the led on every single disk. This is the result 

So you can see from the output above that there’s a 1.4Tb Logical Drive and 2 unassigned 300Gb SAS drives. I ran
=> ctrl slot=0 array A add drives=2I:1:7
which added disk 7 into the array. This process took just over 24 hours.
I then ran:
=> ctrl slot=0 array A add drives=2I:1:8
which added disk 8 into the array. This process also took just over 24 hours.
A further running of
=> ctrl slot=0 show config detail
showed that both drives were added to the array. However the space as reported in the HP System Manager was still 1.4Tb (same as before).
The last step was to expand the array:
=> ctrl slot=0 ld 1 modify size=max
Once this had completed (it took a couple of seconds), all that needed to happen was a reboot for Windows to recognise the new space. I then connected to the Hyper-V host via Computer Management and extended the available space with Disk Management.
*****Command Summary *****

Utility Keyword abbreviations
Abbreviationschassisname = ch
controller = ctrl
logicaldrive = ld
physicaldrive = pd
drivewritecache = dwc
hpacucli utility
hpacucli# /opt/hp/hpacucli/bin/hpacucli (start ACUCLI --ESX HSOT)

# hpacucli

# hpacucli help

Note: you can use the hpacucli command in a script
Controller Commands
Display (detailed)hpacucli> ctrl all show config
hpacucli> ctrl all show config detail
Statushpacucli> ctrl all show status
Cachehpacucli> ctrl slot=0 modify dwc=disable
hpacucli> ctrl slot=0 modify dwc=enable
Rescanhpacucli> rescan

Note: detects newly added devices since the last rescan
Physical Drive Commands
Display (detailed)hpacucli> ctrl slot=0 pd all show
hpacucli> ctrl slot=0 pd 2:3 show detail

Note: you can obtain the slot number by displaying the controller configuration (see above)
Statushpacucli> ctrl slot=0 pd all show status
hpacucli> ctrl slot=0 pd 2:3 show status
Erasehpacucli> ctrl slot=0 pd 2:3 modify erase
Blink disk LEDhpacucli> ctrl slot=0 pd 2:3 modify led=on
hpacucli> ctrl slot=0 pd 2:3 modify led=off
Logical Drive Commands
Display (detailed)hpacucli> ctrl slot=0 ld all show [detail]
hpacucli> ctrl slot=0 ld 4 show [detail] 
Statushpacucli> ctrl slot=0 ld all show status
hpacucli> ctrl slot=0 ld 4 show status
Blink disk LEDhpacucli> ctrl slot=0 ld 4 modify led=on
hpacucli> ctrl slot=0 ld 4 modify led=off
re-enabling failed drivehpacucli> ctrl slot=0 ld 4 modify reenable forced 
Create# logical drive - one disk
hpacucli> ctrl slot=0 create type=ld drives=1:12 raid=0

# logical drive - mirrored
hpacucli> ctrl slot=0 create type=ld drives=1:13,1:14 size=300 raid=1

# logical drive - raid 5
hpacucli> ctrl slot=0 create type=ld drives=1:13,1:14,1:15,1:16,1:17 raid=5

Note:
drives - specific drives, all drives or unassigned drives
size - size of the logical drive in MB
raid - type of raid 0, 1 , 1+0 and 5
Removehpacucli> ctrl slot=0 ld 4 delete
Expandinghpacucli> ctrl slot=0 ld 4 add drives=2:3
Extendinghpacucli> ctrl slot=0 ld 4 modify size=500 forced
Sparehpacucli> ctrl slot=0 array all add spares=1:5,1:7

PXE boost SCCM 2012

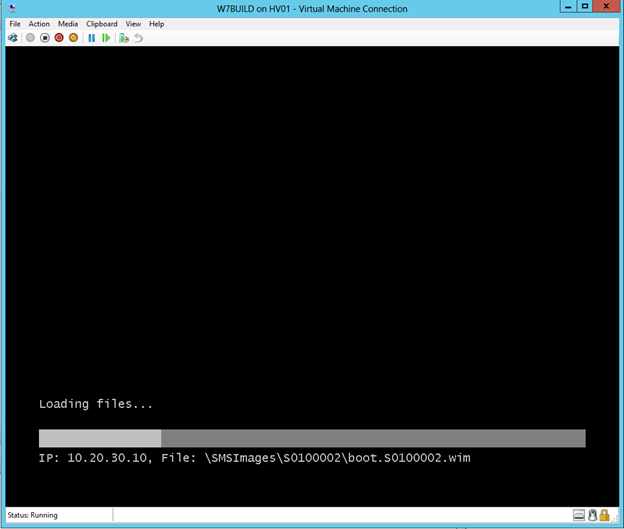
PXE booting during a OS Deployment with ConfigMgr 2012 can be a bit slow on a Windows 2008 R2 / 2012 server. This is because Microsoft has set values that will suite most network environments.
But I want SPEED. Now what?
Good news. You can tweak your PXE-enabled Distribution Point!
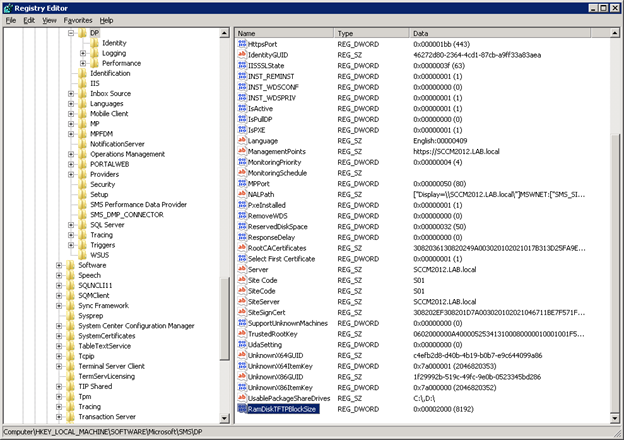
Add a registry key:
HLKM\SOFTWARE\Microsoft\SMS\DP\RamDiskTFTPBlockSize
With a REG_DWORD value of MAX 4000 Hex!!
Then restart the WDS Service.
I set this value to 2000 Hex and speed is blazing fast!

Remember the higher value the more risk of packet loss if you have a bad network connection.
Try this out carefully in your network environment.
If you experience problems, lower the value.

Donnerstag, 30. Mai 2013

Schwerwiegender Fehler bei der Systemvorbereitung des Computers - Sysprep


Ich wollte mir eben einen Referenzcomputer erstellen und habe als Administrator die Eingabeaufforderung geöffnet. Dann habe ich den Befehl
sysprep.exe /oobe /generalize /shutdown
eingegeben. Zuerst schien die Sache auch zu laufen, doch plötzlich bekam ich die Fehlermeldung
Schwerwiegender Fehler bei der Systemvorbereitung des Computers.
Seither geht bezüglich sysprep gar nichts mehr. Ich habe dann den Rechner neu gestartet und musste erstmal warten, weil scheinbar die ganzen Treiber schon rausgeworfen worden sind. Windows 7 hat sich dann die Treiber selbst wieder installiert, Neustart alles soweit wieder gut. Habe es dann erneut probiert, aber jetzt bekomme ich direkt nach dem Bestätigen des Befehls die Fehlermeldung.
Lösung:
MS hat eine KB dazu veröffentlicht: http://support.microsoft.com/kb/929828 MS bietet auch eine Anleitung als Lösung an

sysprep.exe /audit /generalize /shutdown /quiet /unattend:C:\unattend.xml

Unattend.xml:
 
<settings pass="generalize">
        <component name="Microsoft-Windows-Security-SPP" processorArchitecture="amd64" publicKeyToken="31bf3856ad364e35" language="neutral" versionScope="nonSxS" xmlns:wcm="http://schemas.microsoft.com/WMIConfig/2002/State" xmlns:xsi="http://www.w3.org/2001/XMLSchema-instance">
            <SkipRearm>1</SkipRearm>
        </component>    
</settings>

Donnerstag, 18. April 2013

Failed to connect to VMware lookup service


 have been re-building my lab yesterday with all the latest vCloud suite 5.1 GA bits.
After deploying and configuring the vCenter Virtual Appliance, when I was trying to login to the vSphere web client, I kept receiving the error “ Failed to connect to VMware Lookup Service https://[hostname]:7444/lookupservice/sdk – SSL certificate verification failed. ” and could not login.
This issue occurs if you have changed the hostname or IP address of the vCenter Virtual Appliance.  The certificate that was created on initial configuration is no longer valid.  To resolve this issue, follow the steps below:
  1. Login into vCenter VA Configuration https://[hostname]:5480
  2. Select the Admin tab
  3. Click Toggle certificate setting, you will see Certificate regeneration enabled change to Yes.
  4. Re-boot the Virtual Appliance
During the bootup procedure you will see
Hostname or IP has changed.  Regenerating self signed certificate.

Rename Onedrive Business root folder

Rename Onedrive Business root folder Here is what I remember: In the Office 365 web admin pages, change the organization name to a shorte...