Das Problem kann mit dem kostenlosen Tool Microsoft Fix it behoben werden.
Danach Rechner neu starten.
Freitag, 24. August 2012

Donnerstag, 23. August 2012
Microsoft Standalone System Sweeper - Bootable Offline Anti-Virus Scanner
Although similar to the Microsoft Safety Scanner which Synack posted about yesterday I thought this deserved its own thread.
This tool (currently in beta) enables you to create a bootable Windows PE-based anti-virus disc or USB flash drive which can scan a computer outside of Windows using the same virus definitions as Microsoft Security Essentials and ForeFront Endpoint Protection.
Some people may recognize System Sweeper from Microsoft's Diagnostics and Recovery Toolset (a.k.a. DaRT) which is part of the Desktop Optimization Pack. This new version of System Sweeper looks like it will be included with MDOP 2012 once that is released later this year too.
Website / Download (32-bit / 64-bit)
Screenshots


This tool (currently in beta) enables you to create a bootable Windows PE-based anti-virus disc or USB flash drive which can scan a computer outside of Windows using the same virus definitions as Microsoft Security Essentials and ForeFront Endpoint Protection.
Some people may recognize System Sweeper from Microsoft's Diagnostics and Recovery Toolset (a.k.a. DaRT) which is part of the Desktop Optimization Pack. This new version of System Sweeper looks like it will be included with MDOP 2012 once that is released later this year too.
Website / Download (32-bit / 64-bit)
Screenshots
Mittwoch, 22. August 2012
Entfernen vom BKA-Trojaner - Autostarteinträge unter Windows Vista/7 mit Hilfe von “msconfig” entfernen
Hilfreicher Artikel von botfrei.de!! Danke Jungs
Viele Schadprogramme nisten sich im Autostart von Windows ein und werden bei jedem Neustart mitgeladen. So zum Beispiel auch einige Versionen des BKA-Trojaners, die mit dieser Möglichkeit die Vorschaltseite beim Windows-Start einblenden und somit die Eingaben des Anwenders blockieren.
Wir zeigen Ihnen hier, wie Sie mit Hilfe des Programms “Microsoft Systemkonfiguration” die lästigen Einträge aus dem Autostart entfernen können und den Start dieser Programme verhindern:
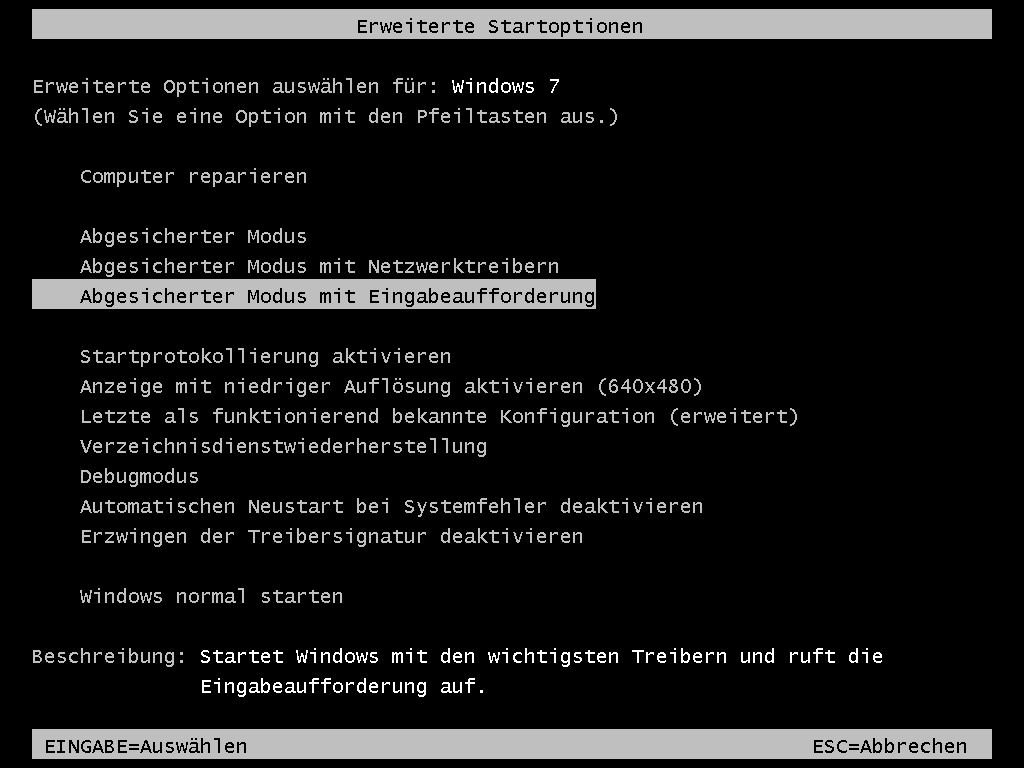
1.) Starten Sie den Rechner neu und booten Sie mit Hilfe der F8-Taste in den “abgesicherten Modus mit Eingabeaufforderung“.

- Die “erweiterten Startoptionen” von Windows 7
2.) Geben Sie folgendes in die Kommandozeile ein:
msconfig
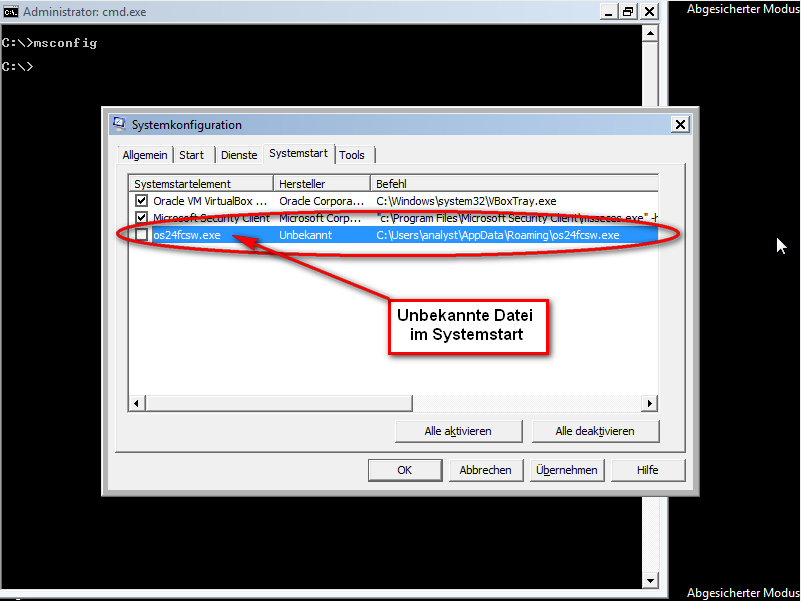
3.) Es öffnet sich die Systemkonfiguration von Microsoft. Klicken Sie auf den Reiter “Systemstart“. Hier sehen Sie nun die Programme, die beim Systemstart geladen werden.Überprüfen Sie die Einträge! Sie erkennen solche Schadprogramme oftmals schon an der Namensgebung. Meistens haben sie eine konfuse Kombination aus Zahlen und Buchstaben, manchmal tarnen Sie sich jedoch mit ähnlich klingenden Namen von Systemprogrammen. Wenn Sie sich bei einem Eintrag nicht sicher sind, überprüfen Sie auch den Hersteller! Wenn dieser “Unbekannt” ist, sollte Sie das stutzig machen. Unter “Befehl” steht der Pfad zum Programm. Hier sind alle Programme schon verdächtig, die mit “C:\Users\…” anfangen.
4.) Entfernen Sie jetzt den Haken beim Schadprogramm und klicken Sie unten auf “OK”.
In unserem Beispiel mit einer Version des BKA-Trojaners heisst der Plagegeist “os24fcsw.exe”. (Achtung, der Name beim BKA-Trojaner kann hier variieren!)

- Die Systemkonfiguration mit den Startprogrammen
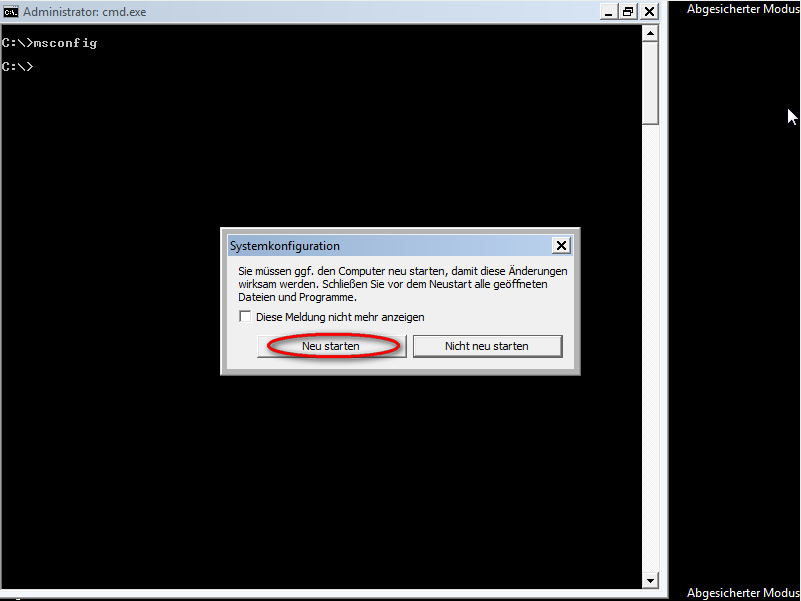
5.) Setzen Sie den Haken bei “Diese Meldung nicht mehr anzeigen” und klicken auf “Neu starten”.
6.) Nach dem Neustart sollte das Schadprogramm, in unserem Fall die Startseite des BKA-Trojaners, nicht mehr mitgeladen werden. Denken Sie daran Ihr System nach diesem Vorgang ausgiebig zu scannen, da sich immer noch Reste des Schädlings auf dem System befinden! Wir empfehlen Ihnen für die Bereinigung entweder Malwarebytes Anti-Malware oder Superantispyware. Sollte nach dem Scanvorgang das Schadprogramm in dem angegebenen Pfad aus der Systemkonfiguration (s.o.) nicht gefunden werden, löschen Sie dieses manuell.
Hinweis: Sollten Sie Hilfe benötigen, registrieren Sie sich kostenlos in unserem Support-Forum.
Mittwoch, 8. August 2012
Your home lab costs too much electricity?
ust found out my electricity bill is going up by 19% and its already stupidly high as it is. So I decided to save my own pocket to go green in what way I can. So #1 of course I’ve got my home vSphere cluster properly configured to keep off one of my servers switched off most of the time using DPM. However I want to save more energy so I had an idea about my desktop PC. Like most IT geeks I leave my home desktop PC switched on 24/7 for convenience, to have access whatever the reason I like to have it on. I started to think is there a way I can control my desktop PC like DPM and came up with this idea: I would schedule a task to place my PC into sleep mode at 2am and then schedule a Wake Up Lan task to power it on in its previous state at 7am thus saving me 5 hours of electricity. So this is how I did it:
Step1 I used the windows scheduler to schedule this command at 2am:

Click to make larger
This places my PC in a sleep state.
Step 2. I run the DD-WRT firmware on my home router (DD-WRT is configurable on tons of routers) and one of the things it can do is schedule through a cron job a wake up lan call (WOL) . Below is the command I used to wake up using my PC from its MAC address at 7:03am:

Click to make larger
Job done..
Popularity: 4% [?]
Donnerstag, 2. August 2012
Creating (a better) vSphere 5 ESXi embedded USB Stick
In a previous post I blogged about creating a vanilla vSphere 5 ESXi USB drive using the VMware .iso file from VMware. This post shows how to create one using the HP version of vSphere ESXi (5.0_Oct_2011_ESXi_HD-USB-SDImgeInstlr_Z7550-00253.iso).
The HP version comes pre-installed with all the HP CIM providers which work very well with HP servers, including the HP MicroServer. Using the HP version gives you the more details in the Hardware Status tab.

I’m going to be using a different method, recommended by Will Rodbard (thanks Will), who is a colleague of mine at VMware, you can see his comments from the previous post. In summary the steps are:
- Find and download the following tools:
- Run the HPUSBFW tool, click on the USB drive, select ‘Fat32′ and click Format
- Run UNETBOOTIN, select Diskimage and browse to the ESXi 5 ISO file
- Select the USB drive you have just formatted and click OK
- If you want to make more USB keys for more servers, then now is the time to create .IMG files using WinImage, then you can basically clone the image of the USB key to more USB keys. Or if you don’t wish to use WinImage then just perform steps 1 to 4 again.
Once completed your USB drive will boot into the ESXi 5 installer. Once booted, install the ESXi 5 Hypervisor to the USB drive (overwriting the installer). This will then leave you with the installed ESXi Hypervisor on the USB.
Note that using this method creates a brand new bootable USB key for use in a new installation of vSphere ESXi. You will have to go through the process of installing ESXi onto the USB key, or another disk or LUN on the target server. If you want a USB key that is already installed with ESXi which saves you from going through the installation wizard, you can use the other method in this post.
Mittwoch, 1. August 2012
AUTODESK Licensing: The security system (Softlock license manager) is not functioning or is improperly installed
you have corrupted installation of an Autodesk program or if you have tweaked the registry to change the license method
You might see the following error when starting the Autodesk program.
"The security system (Softlock license manager) is not functioning or is improperly installed"
Reason for the error could be a corrupted installation of an Autodesk program or a registry tweak to change the license method from Network to Standalone.
Most cases clean uninstall and reinstall of the Autodesk Program should fix the issue.
If it doesn't fix please delete the license file and re-activate the software.
License files are located here.
On Vista or Windows 7:
C:\ProgramData\FLEXnet\adskflex_00691b00_tsf.data
C:\ProgramData\FLEXnet\adskflex_00691b00_tsf.data.backup
On Windows XP:
C:\Documents and Settings\All Users\Application Data\FLEXnet\adskflex_00691b00_tsf.data
C:\Documents and Settings\All Users\Application Data\FLEXnet\adskflex_00691b00_tsf.data.backup
If the issue persists it could be related to the user permission, so please try to install and run the software as a local administrator account.
Deinstallation all Autodesk Products
Delete all Files an Folder
- C:\ProgramData\FLEXnet
- C:\Programfiles (x64)\Autodesk
- C:\Programfiles\Autodesk
Install Autodesk
Sonntag, 22. Juli 2012
Activation Loop After Completing the SBS 2003 Transition Pack
We've seen a few cases now where a server is in an activation loop (activation never completes successfully and you are continually prompted to activate on reboot) after either:
Upgrading via the SBS Transition Pack
Upgrading from Windows Server 2003 Standard Edition to SBS 2003 or
From Evaluation Version SBS 2003 to Full Package Product (FPP) SBS 2003.
All of these scenarios have identical symptoms. The behavior is as follows:
The Windows setup process completes and after the last reboot when you try to login
You receive a prompt requesting to activate the server to be able to continue.
You will get the following error:
When you click YES, nothing happens and you are thrown back to the Windows logon screen (press ctrl-alt-del to logon).
** This is very important to note, the activation wizard NEVER starts up. **
If you check the Application log of the server (from Safe Mode or from a remote machine) you will see an event similar to this one:
Event Type: Error
Event Source: Application Error
Event Category: (100)
Event ID: 1000
Date: 1/24/2007
Time: 12:26:28 PM
User: N/A
Computer: SERVER
Description:
Faulting application msoobe.exe, version 5.2.3790.0, faulting module urlmon.dll,
version 6.0.3790.2612, fault address 0x0000618c.
For more information, see Help and Support Center at
http://go.microsoft.com/fwlink/events.asp.
Data:
0000: 41 70 70 6c 69 63 61 74 Applicat
0008: 69 6f 6e 20 46 61 69 6c ion Fail
0010: 75 72 65 20 20 6d 73 6f ure mso
0018: 6f 62 65 2e 65 78 65 20 obe.exe
0020: 35 2e 32 2e 33 37 39 30 5.2.3790
0028: 2e 30 20 69 6e 20 75 72 .0 in ur
0030: 6c 6d 6f 6e 2e 64 6c 6c lmon.dll
0038: 20 36 2e 30 2e 33 37 39 6.0.379
0040: 30 2e 32 36 31 32 20 61 0.2612 a
0048: 74 20 6f 66 66 73 65 74 t offset
0050: 20 30 30 30 30 36 31 38 0000618
0058: 63 c
This issue can happen if the server has Internet Explorer 7 installed BEFORE installing the Transition Pack or before completing any of the other described scenarios.
The process is really completing correctly, but the activation wizard cannot start due to mismatched IE files.
If you are already having this problem, and In order to get out of this behavior and be able to start the activation wizard to properly activate the server you need to do the following:
1. Boot -up into Safe Mode
a. While hard drive with SBS is booting up hold down F8
b. Select first option “Safe Mode”
2. Logon as Administrator
3. Dismiss “Windows is running in Safe Mode” prompt
4. Click Start, Click Run , Type
%systemdrive%\Windows\IE7\spuninst\spuninst.exe
5. You should see a wizard with “Windows Internet Explorer 7 Removal Wizard” in the
title
6. Click Next on wizard
7. Click Finish to reboot on wizard
8. Let SBS boot up normally and logon as administrator
9. On prompt saying that you must activate to continue to log on
1. Click “Yes”
2. Activation wizard will pop-up
10. Run Activation Wizard to activate the box
11. SBS Transition Pack Wizard will continue to run and let it reboot machine
12. Logon as administrator.
13. Click Finish on SBS Transition Pack Wizard
14. Re-Install IE7 from the Web (http://www.microsoft.com/ie)
Note:
If you encounter an issue where the server is in an activation loop but the activation wizard does start (it just fails to complete the activation), make sure the Transition Pack has actually completed or you might be seeing the behavior described in:
914990 Installation of the Windows SBS 2003 Transition Pack may silently fail on a Windows SBS 2003-based computer
http://support.microsoft.com/default.aspx?scid=kb;EN-US;914990
If you are planning to install the Transition Pack, make sure that IE7 is uninstalled prior to starting the process.
Also check the following post for other things to check prior to installation:
http://blogs.technet.com/sbs/archive/2006/01/12/417350.aspx
Donnerstag, 12. Juli 2012
Disable Metro in Windows 8 Preview
For many, the Metro interface is a problem and would like to have the desktop similar to Windows 7 and other previous versions. Here is a registry edit to disable Metro UI.
1. Open regedit by typing regedit at the Start screen.
2. Navigate toHKEY_CURRENT_USER\Software\Microsoft\Windows\CurrentVersion\Explorer
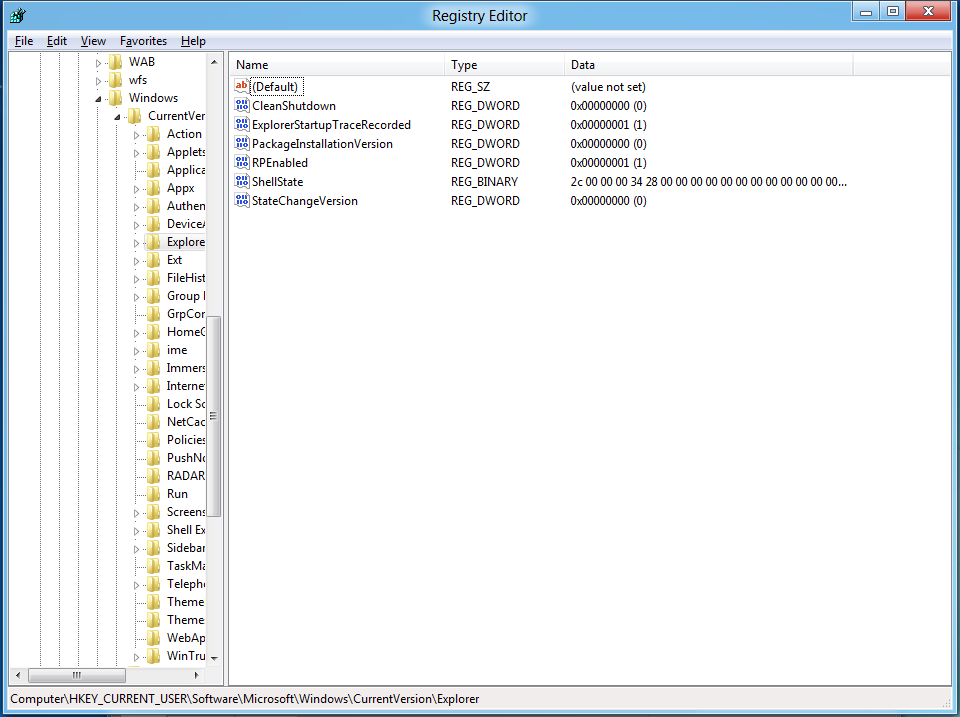
3. Modify the RPEnabled key to a “0” instead of the default “1”.
4. To return to the Metro UI, just change the value back to a “1”.
Samstag, 9. Juni 2012
Building a DD-WRT Image In vSphere 5.0
Introduction
I have a need to put a router between my test ESXi 5.0 server and my network. At home, I use a Linksys E3000 (both 2.4Ghz & 5Ghz Wireless-N, gigabit) router, with OpenSource DD-WRT custom firmware. There is a x86 variant that can be downloaded, people mention in the forums about using it on old PCs, I thought I would give making a VM a go.
Pre-Requisites
- An installed copy of ESXi 5.0 (this is almost certain to work on 4.0, but not 3.5)
- The DD-WRT x86 Image. I chose the VGA public image. This is a free version, limited to 4096 connections (fine for my purposes) and without Wi-Fi support. The image that is used is here.
- physdiskwrite – A Windows tool for writing raw images to a hard disk.
- An existing Windows image.
InstallationCreating the Virtual Machine
- Create a virtual Machine. Select a configuration type of Custom.
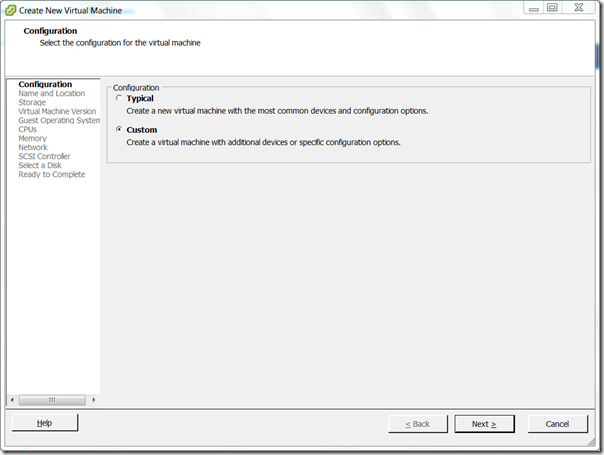
- Name the VM something appropriate.
- Select a datastore for the Virtual Machine.
- Select ‘Virtual Machine Version: 8’ (if using ESXi 4.0, using version 7)
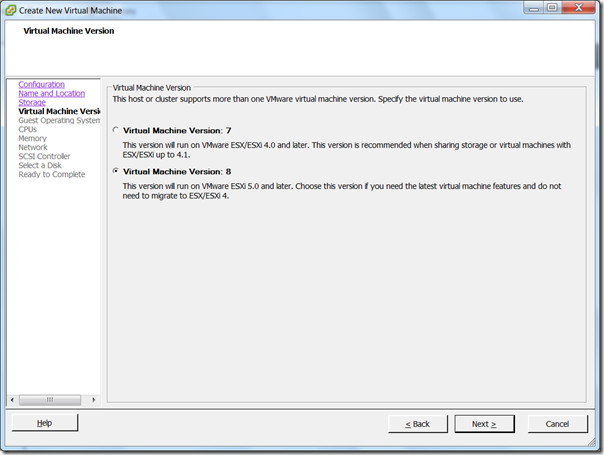
- For Guest Operating System type, choose ‘Linux’ and select ‘Other 2.6.x Linux (32-bit) from the drop down.
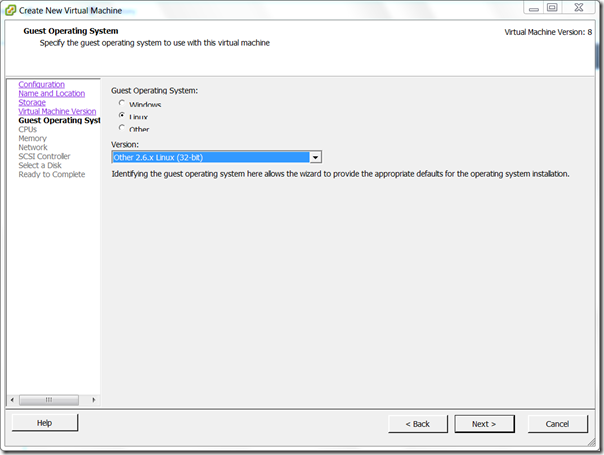
- Choose 1 virtual sockets, with one core per virtual socket.
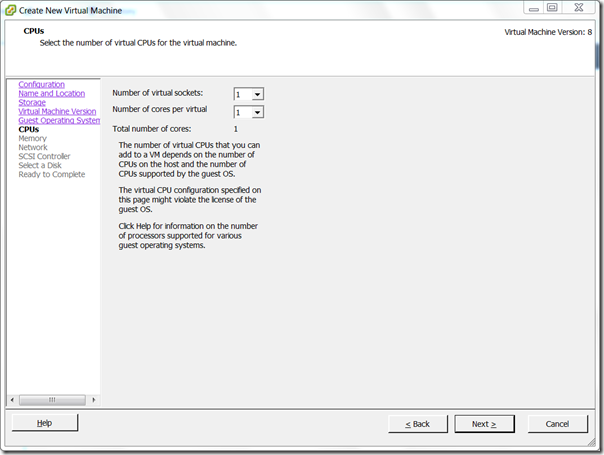
- Choose 512MB RAM.

- Select the appropriate number of NICs (nearly always 2), E1000, and choose the port groups. (I have found that the first NIC is assigned to the WAN)
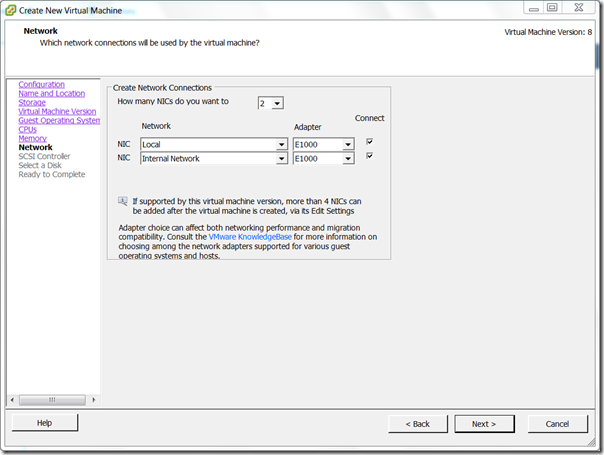
- SCSI Controller, choose any. This will be replaced.
- Choose not to create a disk.
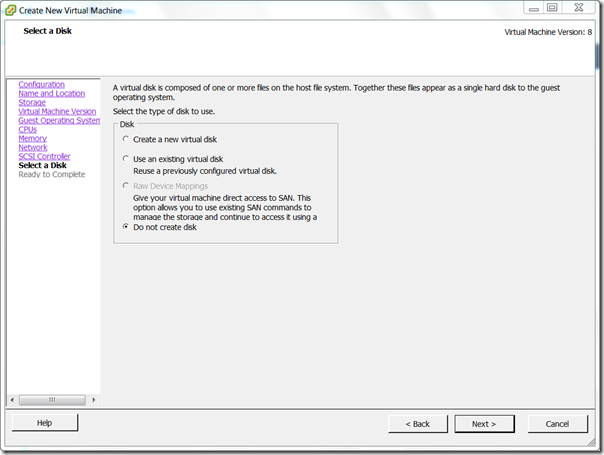
- Tick Edit the virtual machine settings before.
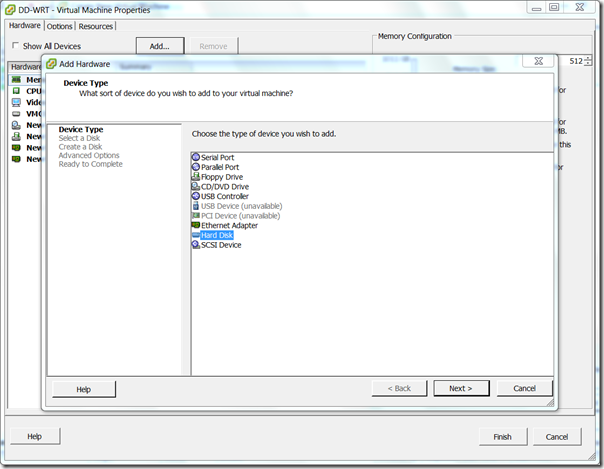
- In the Virtual Machine Properties, click Add. Select Hard Disk.
- Select ‘Create a new virtual disk’
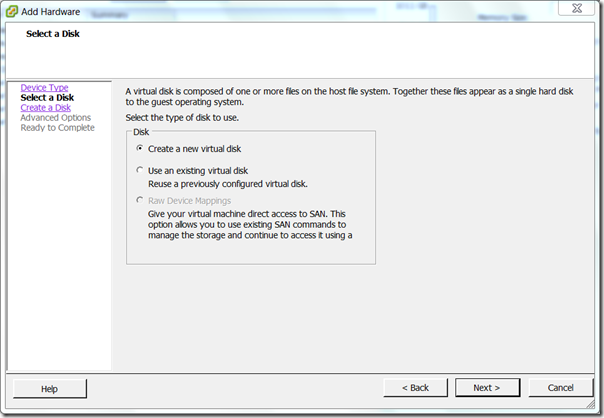
- Make the capacity of the disk 1GB. I chose to make it Thin Provisioned.
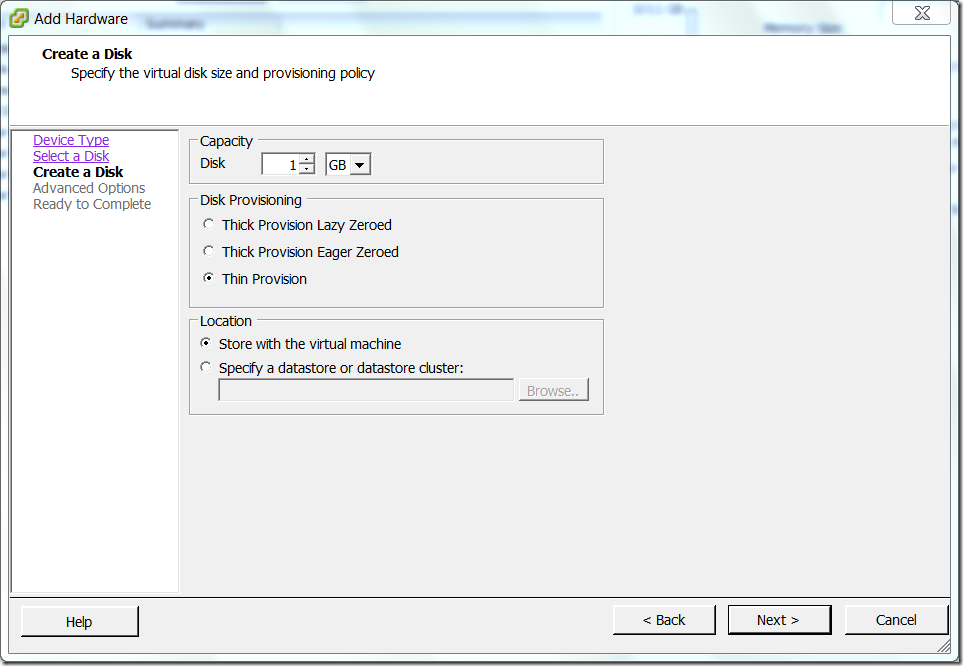
- Set the Virtual Device Node to IDE (0:0)
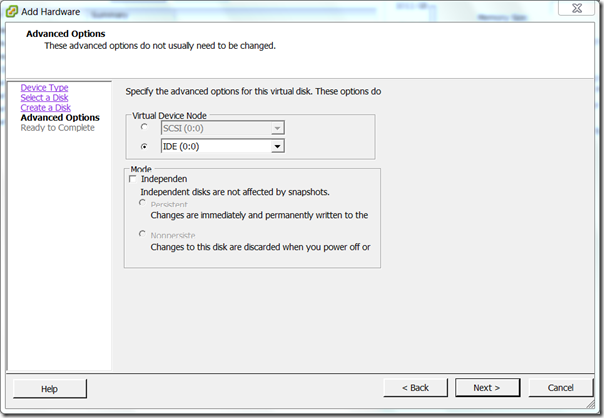
- Press OK, then Finish. Wait for the VM to be created.


Install the image to the Disk
- Choose your Windows VM. Power it off if necessary.
- Edit the Windows VM’s properties. Press Add.
- Select a Hard Disk.
- Choose ‘Use Existing Virtual Disk’
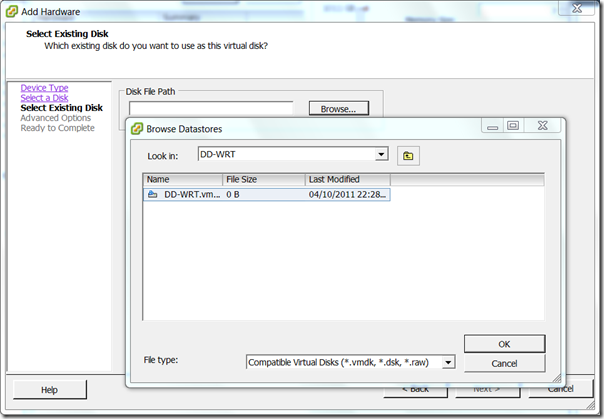
- In Advanced Options, ensure that the Virtual Device Node is ‘IDE (0:0)’
- Click OK, then Finish. Power on the Windows VM.
- Load PhysGUI (make sure you elevate it)
- Ensure that you select the ‘VMware Virtual IDE Hard Drive ATA Device’, right click select ‘Image laden’ –> ‘Öffinen’. Select the downloaded DD-WRT image.
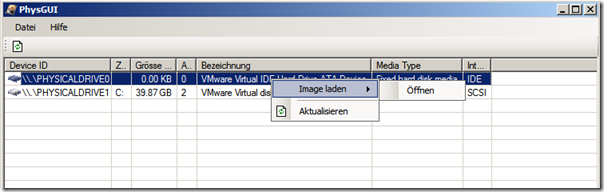
- Click OK through the prompts.
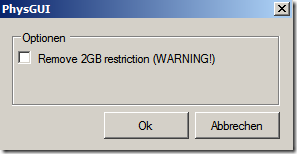
- Wait until the disk completes writing. Shut down the VM.
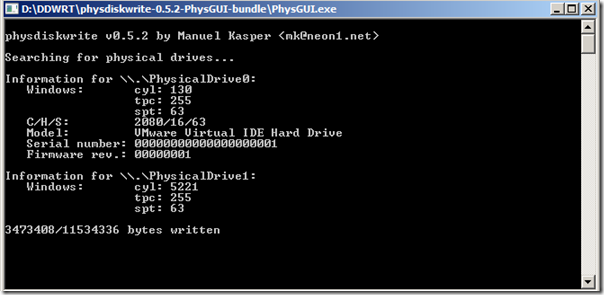
- Edit the Windows VM’s properties. Select the DD-WRT virtual disk and press remove. Ensure ‘Remove from virtual machine’ is selected. Click OK.
- Start up the DD-WRT VM.


Connecting to the Router
- Load another VM on the same LAN as the router. Ensure that it is configured to automatically obtain an IP address.
- It should be assigned an IP by the DD-WRT router’s DHCP server service. You can see this by performing an ipconfig (if using a Windows client)
- Presuming that you have an IP address, use the web browse to connect to 192.168.1.1
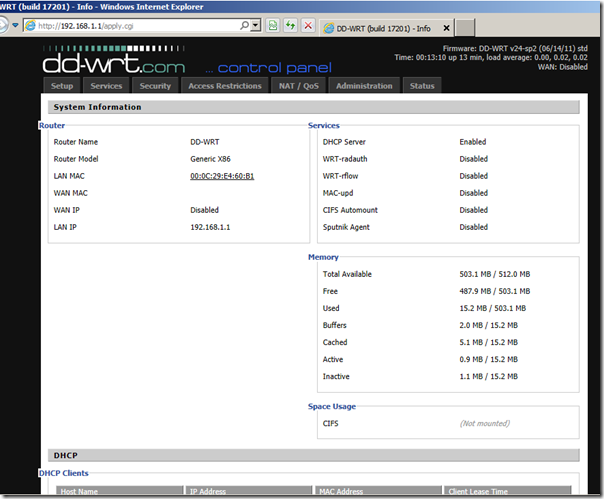
- It will ask to set the username and password. Note that if you SSH into the router at a later point, it will use the username ‘root’ with the password set here.
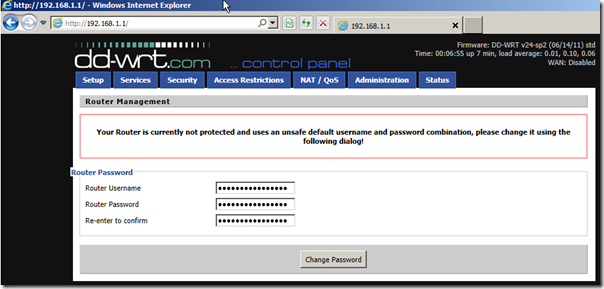
- You are presented with the DD-WRT System Information page. This will show the current hardware, configuration, DHCP client list, etc.


Wenn euch das zu viel arbeit ist könnt ihr auch hier die fertige VM herunterladen
Dienstag, 15. Mai 2012
SQL Server 2008 R2 – Error code 0x84B20001.
When we try to install a patch over SQL Server 2008, we received the following error message.

Work Around:
Open the registry and varify the value at HKEY_LOCAL_MaCHINE\\Software\Microsoft\Microsoft SQL Server\100\ConfigurationState
The values for all the keys under this should be 1. If it is not 1, then there is some issue in configuring the corresponding feature.
Fix the feature configuration issue or edit the registry to change the value to 1 to install the patch.
Mittwoch, 25. April 2012
Call fails for “HostDatastoreSystem.QueryVmfsDatastore- CreateOptions” for object “ha-datastoresystem”
As part of the post installation configuration of the VMWare ESXi server I tried to add a second (local) datastore by using the Add Storage wizard in the vSphere Client.
In the Add Storage Wizard, I specified Disk/LUN as Storage Type and selected the available disk (the RAID10 set).
In the Add Storage Wizard, I specified Disk/LUN as Storage Type and selected the available disk (the RAID10 set).

After pressing Next, the Add Storage Wizard returned the following error:
An error occured during host configuration.
Call “HostDatastoreSystem.QueryVmfsDatastoreCreateOptions” for object “ha-datastoresystem” on ESXi “192.168.1.61″ failed.
Call “HostDatastoreSystem.QueryVmfsDatastoreCreateOptions” for object “ha-datastoresystem” on ESXi “192.168.1.61″ failed.

On a side note, if you close this error message and go a step backwards and continue forward it wil not give an error anymore.
This is not a solution or workaround, because when the Wizard gets at the Formatting property sheet, it wil give the following error:
This is not a solution or workaround, because when the Wizard gets at the Formatting property sheet, it wil give the following error:

"De objectverwijzing is niet op een exemplaar van een object ingesteld" is dutch for "Object reference not set to an instance of an object"
I couldn’t find more detailed information about this error in the eventlog of the vSphere client, located in the directory: %USERPROFILE%\Local Settings\Application Data\VMware\vpx.
And a search on the Internet didn’t gave a answer either.
And a search on the Internet didn’t gave a answer either.
So I was forced to troubleshoot on my own.
I was certain that the volume was consistent , because I had performed a full initialization and integrity check when the RAID10 disk was created.
As shown in the second screenshot of this post, the Add Storage wizard indicated that the disk was blank. I further noticed that there was no Available space on this disk.
Normally speaking it would show how much space is available on the disk, so I assumed that there was something wrong with the partition table of this disk.
I couldn’t find an option in the vSphere client to remove the existing partition info on this volume.
Normally speaking it would show how much space is available on the disk, so I assumed that there was something wrong with the partition table of this disk.
I couldn’t find an option in the vSphere client to remove the existing partition info on this volume.
So I logged on to the ESXi server by using a SSH connection and issued the command fdisk -l.
The following output was shown:
The following output was shown:

The disk /dev/disks/naa.6001e4f023eb110013ffed36d40990cb is the disk on which I tried to create a datastore.
I directly knew which disk I should look for, but it can be easily identified through the Add Storage wizard of the vSphere client. (See the first screenshot in this post)
I directly knew which disk I should look for, but it can be easily identified through the Add Storage wizard of the vSphere client. (See the first screenshot in this post)
As you can see, this disk contains 3 partitions (p1, p2 and p3)!
How is this possible?
Probably a leftover of the previous installation, although I had destroyed the previous RAID set.
Fdisk also gave some warnings, indicating a non-consistent partition table on this disk.
Probably a leftover of the previous installation, although I had destroyed the previous RAID set.
Fdisk also gave some warnings, indicating a non-consistent partition table on this disk.
I decided to remove the partitions manually and used the following commands to remove them:
- fdisk /dev/disks/naa.6001e4f023eb110013ffed364d40990cb.
fdisk is started in the context of this disk. - Press d and enter 1 for the partition number, partition 1 on this disk will be deleted
- Press d again and enter 2, which will delete partition 2
- Because partition 2 is an extended partition, partition 3 will be deleted as well. There is no need or even possible to delete the third partition.
- Press w, to write the changes to disk

To verify the deletion of the partitions on this disk, I issued the fdisk -l command again:

After this procedure, I was able to create a datastore on this disk through the Add Storage wizard!
Abonnieren
Posts (Atom)
-
One of the visitors of this blog asked the question if we could publish a list of recommended post Windows Server 2008 R2 SP1 hotfixes rela...
-
With your Windows Network working and a number of resources shared, you can install the TCP/IP Protocol to allow your Windows for Workgrou...
