Freitag, 30. Dezember 2011

How To Renew Exchange Server 2010 Certificates


I am sure a lot of you have found these posts helpful. All of these posts however did not talk about the certificates issued by public CAs. I thought it would be even more helpful to put up a separate post that would talk more about the certificate renewal process in Exchange 2010 which indeed would cover few steps for Exchange 2007 certificate renewals as well.
If you run through the Exchange 2010 EMC and Certificate Management posts you would know how it really works when you are preparing, requesting and assigning a new certificate to your Exchange 2010 CAS and HT servers but these posts do not talk about renewal of the certificates once you assign them and they are just about to expire :-O
A little bit of stuff that you may or you may not know:
Whenever you work with certificates on an exchange server role installed on any OS, you are dealing with the local computer certificate stores on the at OS which is easily accessible by using Start—> Run –> MMC –> Add/Remove Snap In –> Certificates –> Local Computer. Just take a look at the local computer’s Personal certificate store and you wouldn’t be surprised to see these certificates in there. The only reason I wanted to bring this point here in this post because you may really need to run through this sometimes if you experience something that was mentioned in one of previous posts Missing Private Key on Exchange Certificate
So let’s have a look at what is it and how to do it!
GUI:
Just like above linked two posts talking about how to manage the exchange certificates using GUI, you need to locate the certificate that you need to renew in EMC. Right click on the certificate and select Renew
 
Provide the path in the wizard that appears which will save you a .req file. Once you have completed the wizard you are ready to use this .req file to be supplied to any certification authority that supports  your request. The reason I said ‘any CA that supports your request’ is because, some CAs do not support SAN extensions supplied in the request.
Once you supply the contents of the file generated above your CA will provide you a certificate that can be imported here. To import a certificate using GUI follow steps mentioned in Exchange 2010 EMC and Certificates Management Part – 2
Powershell:
We have a lot of powershell lovers by now and they feel powershell is much easier than GUI sometimes. For all of those
Find the certificate you need to renew using Get-ExchangeCertificate
Copy the certificate thumbprint and run following command to generate the CSR
Get-ExchangeCertfiicate -Thumbprint <Thumbprint> | Renew-ExchangeCertificate -GenerateRequest:$True -PrivateKeyExportable:$True
The above command displays the CSR that you need to be supplied to the CA. Copy the CSR and paste it to the CA interface.
Once you have downloaded the certificate issued by the CA use below command to import it. You need to make sure that you have not removed the certificate request generated by your last operation using EMC or powershell. This will lead you to another situation where you wouldn’t be able to import the certificate.
Import-ExchangeCertificate  -FileData ([Byte[]]$(Get-Content -Path C:\Users\Milind\Documents\Certificate.cer -Encoding Byte -ReadCount 0))
If you have recieved your certificate in .pfx format then use
Import-ExchangeCertificate  -FileData ([Byte[]]$(Get-Content -Path C:\Users\Milind\Documents\Certificate.pfx -Encoding Byte -ReadCount 0)) -Password:(Get-Credential).Password
And the final stage is to enable it for the services
Enable-ExchangeCertificate -Thumprint <Thumbprint> -Services IIS,IMAP,POP
Same procedure applies to Hub Transport Server Role certificate renewal as well but the Edge Transport Server Role. To manage certificates on the Edge Transport Server Role  you must be logged on the server and use powershell.
After you have renewed certificate on an edge transport server, you need to resubscribe it to the site since the subscription contains the certificate information in it too. Read more about Edge Transport here

Raid1 auf dem Mac Mini Snow Leopard Server aktivieren


Apple liefert die Mac Mini Server zwar mit 2 500 GB Festplatten aus, allerdings sind diese noch nicht im Raid vorkonfiguriert und DVD Laufwerk ist keines vorhanden. Nach ein wenig Recherche habe ich jedoch rausgefunden wie sich das RAID per Commandline nachträglich konfigurieren lässt ohne die ganze Installationsprozess durchzuführen.

Ich empfehle Euch den Raid gleich vor der Endkonfiguration des vorinstallierten Systems zu erstellen, da der Server sonst erheblich länger benötigt um die Platten zu spiegeln.

Auf einem entfernten Mac (der sich im selben Netzwerk wie der Server befindet) kann unter “Programme” -> “Dienstprogramme” -> “Enternte Mac OS X Installation” gestartet werden. Mit diesem Programm lässt sich über das Netzwerk die beigelegte Snow Leopard Server Installations DVD am Mac Mini mounten.

Auf dem Mac Mini muss man nun beim Starten die “Alt” Taste betätigen und nach einigen Sekunden sollte die entsprechende Server Installations Disk zur Auswahl stehen. Diese wird dann über das Netzwerk gebootet.


Der Bootvorgang kann einige Minuten in Anspruch nehmen und danach kann ein Terminal Fenster gestartet werden. Folgender Befehl listet alles Disks und Volumes auf:

diskutil list


Unser Volume “Server HD” ist hier mit dem Identifier “disk0s2″ und das Volume “Macintosh HD2 als “disk1s2″ aufgeführt. Da der Wert variieren kann und nich bei jedem System gleich ist empfehle ich euch die Bezeichnungen zu notieren.


Nun konvertieren wir unsere “Server HD” zu einem Raid1 Mirror:

diskutil appleRAID enable mirror disk0s2

Mit dem Befehl “diskutil list” kann man nun die Änderung sehen:


Am Ende der Ausgabe erscheint nun eine neue “Server HD” “disk9″.
Nun fügen wir das (zuvor notierte) 2. Volume zum Raid1 Verbund (disk9) hinzu:

diskutil appleRAID add member disk1s2 disk9

Die beiden Festplatten sind nun im Raid1 Verbund und das System beginnt die Daten zu replizieren. Der Vorgang kann einige Zeit in Anspruch nehmen. Mit folgendem Befehl kann der Rebuild Status überprüft werden.

diskutil checkRAID

Achtung: rebootet den Server auf keinen Fall bevor der Rebuild Prozess abgeschlossen ist.

Montag, 19. Dezember 2011

Gmail IMAP – Solving the [Gmail] separation

When you are using a Gmail account over IMAP in Outlook, you’ll also automatically get an [Gmail] or [Google Mail] folder containing all the “system folders” of Gmail itself.
To break yourself out of this additional subfolder and have all these folders listed directly under your mailbox in Outlook, you can set a root folder for your Gmail IMAP account. However, this has an effect on any Labels that you might use in Gmail. Luckily, there is a workaround for this as well.


Setting a root folder for your Gmail account

To make the change, you’ll have to go to the “Advanced Settings” tab of your account configuration;
  1. Open your Account Settings dialog;
    • Outlook 2003
      Tools-> E-mail Accounts…-> option: View or change existing e-mail accounts-> button Next
    • Outlook 2007
      Tools-> Account Settings…-> tab tab E-mail
    • Outlook 2010
      File-> section Info-> button Account Settings-> Account Settings…-> tab E-mail
  2. Double click on your Gmail IMAP account to open the account settings.
  3. Click on the More Settings… button.
  4. Select the Advanced tab.
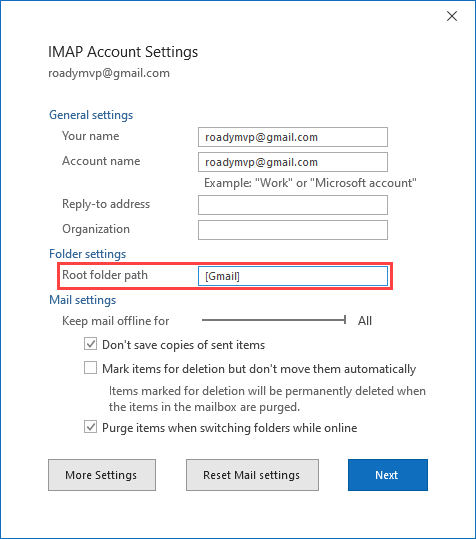
  5. At the bottom, set the “Root folder path” option to; [Gmail]  Setting the Root folder path in your IMAP account settings.
    Setting the Root folder path in your IMAP account settings.
  6. After setting the option and confirming your way out of all of the opened dialogs, you’ll get a notification that your IMAP cache needs to be rebuild.
  7. In some cases, you’ll need to set the Sent Items and Deleted Items folder for the Gmail IMAP account again.
Before - Setting a root path for your Gmail account will free you from the [Gmail] folder structure.
Before
After - Setting a root path for your Gmail account will free you from the [Gmail] folder structure.
After
Setting a root path for your Gmail account will free you from the [Gmail] folder structure.

Getting your Labels back in Outlook

Since you are now using [Gmail] as the mailbox root folder and Labels are created on a higher level, you won’t be able to see your Gmail Label folders in Outlook.
A way around this is to prefix each of your Labels with [Gmail]/. So a label called My Label 1 should be renamed to [Gmail]/My Label 1 via the Gmail web interface.
Instead of prefixing your Labels, you can also create a Label called [Gmail] and configure My Label 1 as a nested Label of the [Gmail] Label.
Before - Setting a root path for your Gmail account will free you from the [Gmail] folder structure.
Gmail
After - Setting a root path for your Gmail account will free you from the [Gmail] folder structure.
Outlook
Prefix your labels with [Gmail]/, or make them a nested label of the [Gmail] label in the web interface, will make them available in Outlook again.
Note:Any changes you make to the names and the structure of your folders via the Gmail web interface won’t be visible in Outlook until you restart Outlook.

Grouping your Labels together

As you are now working of the [Gmail] root folder in Outlook, you’ll see all your Labels directly under your main mailbox. This might end up being a long list and make the Gmail “system folders” harder to recognize (now you know why they grouped them under a [Gmail] folder ;-) ).
To solve this, create another Label under the [Gmail] Label in the web interface and call it for instance “Labels”. Now you can make all your own Labels a nested Label of the Labels folder.
As an alternative, you can also prefix your Labels with [Gmail]/Labels/ since the / character is being used as a separator to indicate a subfolder.
Before - Setting a root path for your Gmail account will free you from the [Gmail] folder structure.
Gmail
After - Setting a root path for your Gmail account will free you from the [Gmail] folder structure.
Outlook
Prefix your labels with [Gmail]/Labels, or nest them under Labels in the web interface, will group them together in Outlook.

Creating subfolders in Outlook and Labels in Gmail

Gmail itself doesn’t really use/understand the concept of subfolders; everything is a Label. If you were to create a subfolder under the Inbox folder, you’ll actually be creating the Label INBOX/My subfolder in the web interface of Gmail.
Once the mailbox is rooted to the [Gmail] folder, and since the Inbox folder lives outside it, unfortunately it is not possible anymore to create or access subfolders directly under the Inbox folder as you would be able to if it wasn’t rooted. Trying to create a subfolder for the Inbox folder will then result in the following error;
Cannot create the folder. Cannot create or navigate to the folder. You cannot create or navigate to subfolders of your Inbox when you have a non-empty Root Folder Path. (click on image to enlarge)
Setting a [Gmail] root folder prevents you from creating subfolders under the Inbox folder in Outlook. (click on image to enlarge)
To work around this, you can create a new label via the Gmail web interface called;
[Gmail]/Inbox/My subfolder
Unlike any INBOX/name subfolders, folders prefixed with [GMAIL]/Inbox/ will show up in Outlook as a subfolder of the Inbox folder even when the mailbox is rooted to [Gmail].
Before - Setting a root path for your Gmail account will free you from the [Gmail] folder structure.
Gmail
After - Setting a root path for your Gmail account will free you from the [Gmail] folder structure.
Outlook
Prefix your labels with [Gmail]/Inbox, or nest them under the Inbox label in the web interface, will allow you to create subfolders under the Inbox folder.
Note:
This is only required for any folder which should be a direct subfolder of the Inbox folder. Any subsequent subfolders can be directly created in Outlook without errors.

However, in the web interface of Gmail, this folder will be created with the name “INBOX” instead of “Inbox” which could separate the folders again in Outlook after a restart. In that case, you’ll have to rename the “INBOX” part of the label to “Inbox” in the Gmail web interface and restart Outlook.

Final thoughts

How useful is this change? Well, if you are also often using the web interface of Gmail and are a heavy user of Labels, I’d say it is not very useful at all. After all, instead of having the [Gmail] folder structure in Outlook, you’d then have it in the web interface. Combine that with the amount of work it is to set it up and the 40 character limit of Labels (including the characters of parent folders!), it’s probably not worth the trouble.
However, if you mainly use Outlook (or any another mail client for that matter), sort your mail into subfolders and don’t really care about the Gmail web interface and its Labels, setting a root folder would make sense. The result would be a flatter and more consistent folder structure in Outlook.

Freitag, 16. Dezember 2011

Mobilitätscenter deaktivieren

Wer das Mobilitätscenter ganz abschalten will, der muß unter HKEY_LOCAL_MACHINE\SOFTWARE\Microsoft\Windows\CurrentVersion\Policies
den Schlüssel MobilityCenter erstellen. Danach erstellt man einen DWORD mit dem Namen NoMobilityCenter und weist den Wert zu.
Um das ganze wieder rückgängig zu machen, ändert man den Wert auf 0, oder löscht den Eintrag wieder.

Mittwoch, 23. November 2011

Exchange ActiveSync Mailbox Policies and Exchange Remote Wipe

Exchange Active Policies help you to remotely configure Android, iPhone and Windows Phone smartphones and Exchange Remote Wipe allows you to remotely erase all data on a lost smartphone.
Since the uptake of smartphones has become more widespread, it is more than likely that your end users will require access to their corporate email via their smartphones. Whether or not the smartphone is company supplied . It is certainly a sensible idea to make sure that we have policies in place to protect our data should it end up in the wrong hands.

Exchange ActiveSync Mailbox Policies

Exchange 2010 has a feature called “Exchange ActiveSync Mailbox Policies”. You can find this in the Exchange Management Console, within the “Organization Configuration\Client Access” node from the tree view. You will notice that within the Exchange ActiveSync Mailbox Policies tab, you can create multiple policies – these can then be applied to different groups of users. I just want a common policy throughout my entire organization, so I will just modify the default policy that is already listed.
Exchange ActiveSync Mailbox Policies
Using the policy properties, you can force devices to use a passcode, set the minimum length or enable encryption, and so on.We can disable some function of an smartphone such as its camera, or Wi-Fi should this be a requirement in your organization.
Once a compatible ActiveSync device is synchronized with your Exchange organization, the appropriate policy will be applied, and the smartphone will react accordingly. It should be noted though that these policies do not apply to all devices , so it’s important to check it out first. The vast majority of smartphones in our organization are iPhones – Apple published a list of the supported policies on their developer site.

Exchange Remote Wipe

Should the inevitable happen, and a user loses their phone with all their company emails and trade secrets on it, and it doesn’t look like it’s coming back any time soon, we have a couple of ways of performing a remote device wipe. Firstly, the end user can do it on their own via Outlook Web Access (great if they lose the device when the helpdesk isn’t yet open!). The user will need to log into OWA, and select options from the top right, then select “see all options” from the menu. Once you’re in the OWA options screen, select phone from the right, and you should be presented with a list of mobile devices associated with your Exchange account. From the list of devices, simply select the device in question, and click the “wipe device button”.
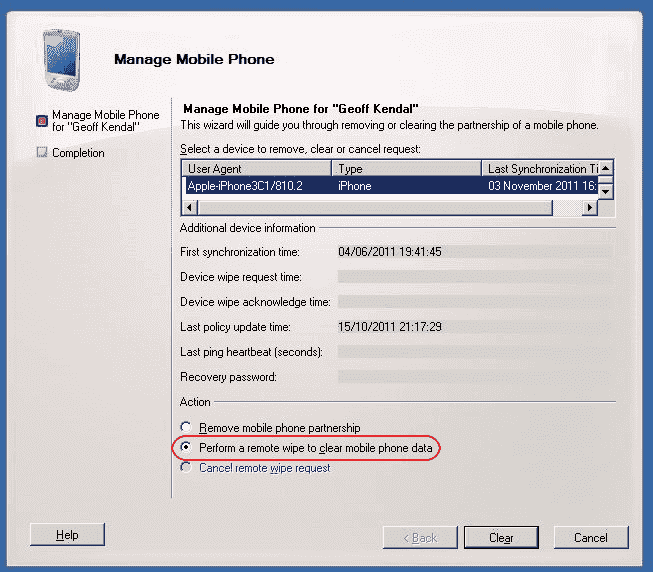
Chances are that the end users will just ring the helpdesk to request that the device be remotely wiped. An Exchange administrator can easily do this from the Exchange Management Console. Navigate to the Recipient Configuration\Mailbox node from the tree view. In the main area of the console, right click the user in question, then select “manage mobile phone” from the context menu. You will be presented with a list of mobile devices that are associated with the user’s Exchange account – select the appropriate device, click the “remote wipe” radio button, then click the “clear” button.
Exchange Remote Wipe
Shortly after this, the mobile device should perform a full wipe and erase all data. If your staff are accessing your corporate emails via their personal smartphones, it might be an idea to let them know that you have the ability to wipe mobile devices should they be lost – many users might lose their smartphones and never tell you otherwise!

Dienstag, 22. November 2011

In SBS2008 selbst erstellte Zertifikate nutzen


Es tauchen immer wieder Probleme mit SBS2008 um Bezug selbsterstellte Zertifikate und „Sites“ auf.
Dieses Problem ist wie folgt zu lösen.

Folgende Schritte sind zu machen:

1.       Zertifikat mit mehreren DNS-Namen erstellen (z.B. Kunde.dyndns.org)
2.       Zertifikat in das IIS einbinden
3.       Zertifizierungsstellenzertifikat exportieren
4.       Zertifizierungsstellenzertifikat  auf externen Clients installieren (nur nötig wenn der PC NICHT in der Domäne ist)

Inhaltsverzeichnis
Zertifikat erstellen
Zertifikat in IIS einbinden
Zertifizierungsstellenzertifikat exportieren
Zertifikat auf NICHT DomänenPC’s oder Telefonen installieren


Zertifikat erstellen


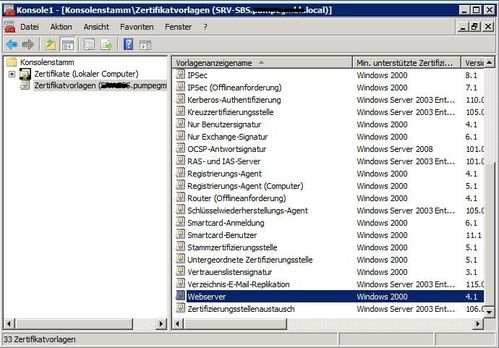
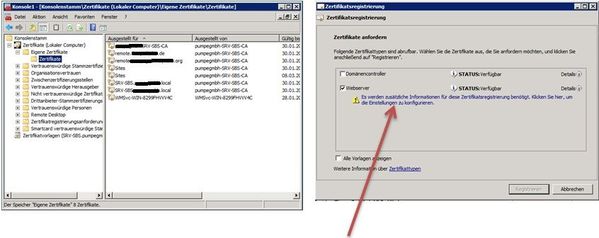
Auf dem Server MMC ausführen und die Snapins Zertifikate (Computerkonto) und Zertifikatvorlagen hinzufügen.

Bild1


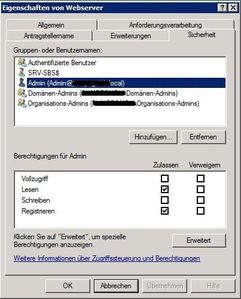
Jetzt müssen die Rechte für die Vorlage „Webserver“ anpassen.  In den Eigenschaften muss der SBS-SERVER und der ADMINISTRATOR hinzugefügt werden. Beide müssen „Lesen“ und „Registrieren“ können.
Bild2


Jetzt können wir das Zertifikat erstellen. Dazu bitte in „Zertifikate -> eigene Zertifikate -> Zertifikate“ rechte Maustaste „Alle Aufgaben -> Neues Zertifikat anfordern…“ anklicken.
Bild4
Jetzt weiter klicken, dann auf „Webserver“ klicken, dann hier klicken.

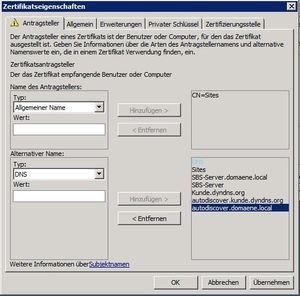
Jetzt werden die internen und externen Namen vergeben. Wichtig bei SBS ist der Eintrag „Sites“.
Bild5

Folgende Namen sollten drin sein:
Sites
remote.externaldomain.com
internaldomain.local
autodiscover.externaldomain.com
autodiscover.internaldomain.local
Servername FQDN
Servername NetBios

Und nach belieben weitere. Danach auf “ok” und dann auf “Registrieren” klicken. Das Zertifikat wurd jetzt angelegt.


Zertifikat in IIS einbinden

Jetzt müssen wir das Zertifikat in den Webserver einbinden. Dazu bitte die IIS-Konsole starten.
In der Konsole den Punkt „Sites -> SBS Web Applications“ gehen. Jetzt rechts auf „Bindungen“ klicken.
Auf den Typ „https“ gehen und auf „Bearbeiten“ gehen. Hier jetzt das neue Zertifikat auswählen.
Jetzt bitte den IIS neu starten (Start -> Ausführen -> iisreset).
 Bild6
Bild7

Zertifizierungsstellenzertifikat exportieren


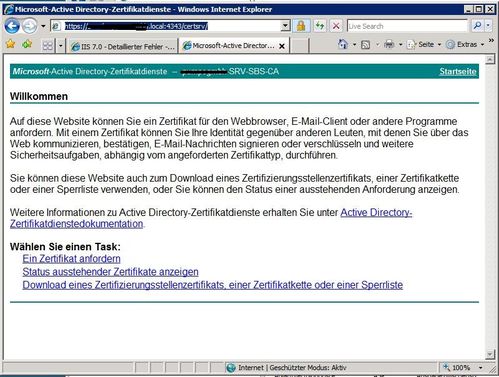
Zum exportieren des Zertifizierungsstellenzertifikat folgende Adresse eingeben:
Bild8 


Dort auf „Download eines Zertifizierungsstellenzertifikat, einer Zertifikatskette oder einer Sperrliste“ klicken.
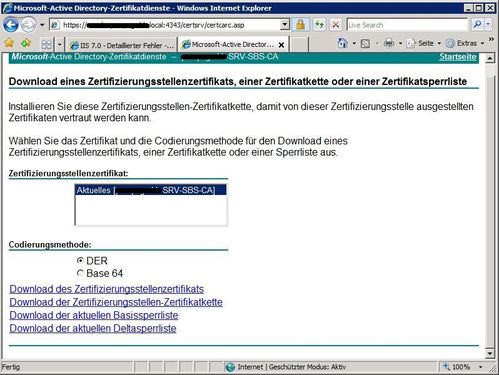
Bild9

Jetzt auf „Download des Zertifizierungsstellenzertifikats“ und das Zertifikat im Ort des Wunsches abspeichern.


Zertifikat auf NICHT DomänenPC’s oder Telefonen installieren


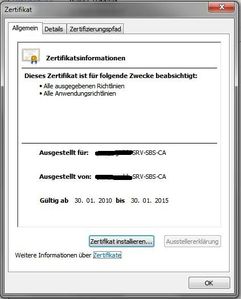
Das Zertifikat einfach auf den PC kopieren und dort mit einem Doppelklick ausführen.
Bild10    


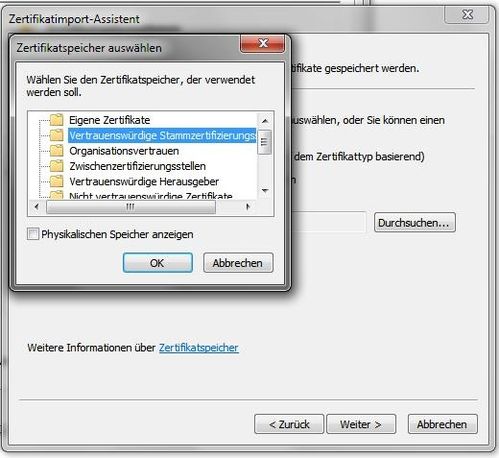
Das „Zertifikat installieren…“  klicken und das Zertifikat in die „Vertrauenswürdigen Stammzertifizierungstellen“ kopieren.
 Bild11   


Jetzt kann man vom IE oder Outlook via RPC-over-http auf den Server von Extern ohne Zertifikatsfehler zugreifen.

Dienstag, 15. November 2011

Disable permanently Outlook Team Calendar

Team Calendars , star popping up from people outlook. –Reason: the
AD Attribute called “Manager” is populated see picture
When manager is listed for given user,  outlook is automatically creating calendar in this format  Team: Name of the manager Calendar inside peoples outlook see picture

 image
Fire up reg edit on the problem workstation…..Drill down to fallowing directory
  • [HKEY_CURRENT_USER
  • Software
  • Microsoft
  • Office
  • 14.0
  • Outlook
  • Options
  • WunderBar
Create reg key if one does not exist “Value disablereportinglinegroupcalendar”
  • This policy setting prevents Reporting Line Group Calendar from appearing in the navigation pane.
    If you enable this policy setting, Reporting Line Group Calendar will not appear in the navigation pane.
    If you disable or do not configure this policy setting, My Reporting Line Group
    Calendar will appear in the navigation pane.
image
image
Before
image
After
image

Sonntag, 16. Oktober 2011

Transfers between the System Center Virtual Machine Manager server, the Library Server and the Virtualization Hosts may fail with error 12700, 2927, or 2912


System Center Virtual Machine Manager 2008 (SCVMM 2008) uses BITS (Background Intelligent Transfer Service) to transfer content between the SCVMM Server, the Library Server(s) and the Virtualization Hosts. If there is a service on one of the involved servers that is using the HTTPS port 443, the transfer may be extremely slow or even fail with one of the following errors:

Error (12700)  <path to vhd on destination host> 'The file or directory is corrupted and unreadable' (0x80070570)

Error (2927)
A Hardware Management error has occurred trying to contact server servername.contoso.com. 
 (Unknown error (0x8033811e)) 

Error (2912)
An internal error has occurred trying to contact an agent on the servername.contoso.com server. 
 (Unknown error (0x80072f06)) 

COUSE
This issue can occur if the port used by BITS to perform file transfers is in use by another application or service. BITS uses a default port of 443 (decimal) which is commonly used by secure web sites (HTTPS).
RESOLUTION
To resolve this issue, configure SCVMM to use another port for BITS transfers between its Library Server(s) and the Virtualization Hosts.

Note: You need to ensure that the newly selected port is not blocked by a Firewall between the involved hosts.

1. On your VMM Server, open the Registry.

2. Browse to HKEY_LOCAL_MACHINE\SOFTWARE\Microsoft\Microsoft System Center Virtual Machine Manager Server\Settings.

3. Locate BITSTcpPort which should have a value of decimal 443. Change this to some port unused in your environment. (e.g. 8500)

4. Restart Virtual Machine Manager Service so that the change takes effect.

Montag, 10. Oktober 2011

Find an email address in Exchange / Active Directory


In Active Directory when you have an Exchange server a user or group, even a public folder can have multiple smtp email addresses associated with the entity (user/group/public folder etc.), but finding the non-default email address can be tedious. A great way to search for it is:
Go to Active Directory Users and Computers –> right click on the domain and click find –> in the find field, change the criteria to ‘custom search’ –> click the advanced tab where you can type in a LDAP query. If you are trying to find out who hassales@yourdomain.com, type proxyAddresses=smtp:sales@yourdomain.com.
Wildcards can be added to the email address portion, and you can also type a wildcard ie. *.yourdomain.com and then change the view to add the proxyaddress column to see all of the entities with their proxyAddresses (email addresses)

Freitag, 7. Oktober 2011

Hotmail Exchange ActiveSync auf dem iPhone einrichten und konfigurieren

Hotmail Exchange ActiveSync - E-Mails, Kontakte und Kalender mit dem iPhone synchronisieren

Microsoft hat letzte Woche, wie bereits in einem Blogeintrag angekündigt, für alle Hotmail E-Mail Konten - unabhängig davon ob live.com, hotmail.com oder msn.com Adresse - die Exchange ActiveSync Funktion eingeführt, allerdings nicht zur Nutzung am PC sondern nur für mobile Endgeräte, die Microsofts Exchange ActiveSync-Protokoll unterstützen. Microsoft ermöglicht damit jedem (nicht nur) iPhone-Benutzer kostenlos, seine Windows Live Hotmail E-Mails, Kontakte, Kalender, Termine und Aufgaben zu Synchronisieren.
Hotmail Exchange ActiveSync auf dem iPhone einrichten
Mit Hotmail Exchange ActiveSync werden nicht nur eure Hotmail E-Mails und Ordner synchronisiert, sondern auch eure Kontakte, Kalender, Termine und Aufgaben – sofern Ihr Mobiltelefon es unterstützt.

Hotmail Exchange ActiveSync auf ihrem iPhone einrichten und konfigurieren

Bevor ihr mit dem iPhone E-Mails via Hotmail Exchange ActiveSync empfangen und versenden, Kontakte verwalten oder Kalender-Einträge verändern könnt, müssen auf dem iPhone einige Einstellungen vorgenommen werden. Hier folgt die Konfigurationsanleitung wie Exchange ActiveSync für eine Windows Live Hotmail-E-Mail-Adresse konfiguriert werden kann.

Einstellungen öffnen

Hotmail Exchange ActiveSync auf dem iPhone einrichten

Mail, Kontakte, Kalender öffnen

Hotmail Exchange ActiveSync auf dem iPhone einrichten

Account hinzufügen öffnen

Hotmail Exchange ActiveSync auf dem iPhone einrichten

Microsoft Exchange auswählen

Hotmail Exchange ActiveSync auf dem iPhone einrichten
Als E-Mail-Adresse und als Benutzername das einzurichtende Windows Live ID (also ihre Hotmail E-Mail Adresse) sowie das dazu gehörende Kennwort in voller Länge angeben. Die Beschreibung kann frei gewählt werden, bei mir ist es Exchange. Das "Domain" Feld könnt ihr frei lassen. Jetzt oben rechts auf "Weiter" klicken.
Hotmail Exchange ActiveSync auf dem iPhone einrichten
Die eigegebenen Daten werden nun überprüft...
Hotmail Exchange ActiveSync auf dem iPhone einrichten
Nun erscheint in der Übersicht ein neues Feld mit der Bezeichnung "Server".
Hotmail Exchange ActiveSync auf dem iPhone einrichten
Hier wird - unabhängig davon ob es sich bei eurem Windows Live ID um eine hotmail.com, hotmail.de, live.com, live.de oder msn.com Adresse handelt - m.hotmail.com als Server eingegeben. Jetzt oben rechts auf "Weiter" klicken. Die eigegebenen Daten werden nun überprüft…
Hotmail Exchange ActiveSync auf dem iPhone einrichten
Wenn alle eingegebenen Daten richtig sind werdet ihr aufgefordert das neu erstellte Hotmail Exchange ActiveSync Konto zu sichern. Hier könnt ihr auch auswählen, welche Daten ihr mittels eurem Hotmail Exchange ActiveSync Konto mit eurem iPhone synchronisieren möchtet. Zur Verfügung stehen hier Mail, Kalender und Kontakte. Hier sollte jeder für sich selber entscheiden können was er einstellen möchte.
Hotmail Exchange ActiveSync auf dem iPhone einrichten
Letztendlich bekommt ihr die Bestätigung das Hotmail Exchange ActiveSync auf eurem iPhone konfiguriert wurde.
Hotmail Exchange ActiveSync auf dem iPhone einrichten
Fertig… Hotmail Exchange ActiveSync sollte nun auf ihrem iPhone, iPad oder iPod touch funktionieren.

Hotmail Exchange ActiveSync Einstellungen

Hier nochmal die Hotmail Exchange ActiveSync Zugangsdaten im überblick, damit Sie die Hotmail Exchange ActiveSync Funktion nutzen können:
  • URL / Server -> m.hotmail.com
  • Benutzername -> Geben Sie hier ihren Ihre Windows Live ID an z. B IhreAdresse@hotmail.com
  • Domain -> leer lassen
  • SSL -> Aktivieren Sie die Verschlüsselung für eine gesicherte Verbindung.
  • Zertifikat -> Akzeptieren Sie das SSL-Zertifikat, wenn Sie dazu aufgefordert werden.
  • E-Mail, Kontakte, Kalender, Aufgaben -> Aktivieren Sie hier die zu Synchronisierenden Daten.

Und zu guter Letzt...

Denkt bitte daran dass jede Änderung auf ihrem iPhone, iPad oder iPod touch oder in Ihrem Hotmail-Posteingang - sei es das Verschieben einer E-Mail in einen anderen Ordner, Änderungen in den Einstellungen eines Termins oder die Bearbeitung eines Ihrer Kontakte unmittelbar zwischen Ihrem E-Mail-Client, Ihrem Hotmail-Posteingang und Ihrem iPhone, iPad oder iPod touch ausgetauscht wird, so dass alle Medien stets auf dem aktuellen Stand sind.

Montag, 3. Oktober 2011

AirDrop auf jedem Lion-Mac per Terminal-Befehl aktivieren


Mit der neuen Katze, dem Mac OS X 10.7 Lion, kamen große Neuerungen, aber auch kleine und unterschätzte neue Funktionen. Dateien über das Netzwerk übertragen kann man zwar schon länger, mit der Einführung von AirDrop macht Apple diese Möglichkeit aber endlich so einfach wie möglich.
Die Sache hat nur einen Haken: Wer seinen Mac vor 2009 gekauft hat, kann AirDrop standardmäßig nicht nutzen. Eine Liste der von Werk aus unterstützten Macs findet sich auf Apples Lion-Seite unter dem Punkt “AirDrop”.
Für alle Besitzer älterer Lion-Macs, die die praktische Funktion trotzdem einmal ausprobieren wollen, hat Mac OS X Hints gute Nachrichten!
Durch einen einfachen Terminal-Befehl lässt sich AirDrop anscheinend auf quasi jedem Mac mit Lion aktivieren. Einzige Bedingung ist, dass der Befehl dafür auf allen Macs, mit denen Daten übertragen werden sollen, einmal ausgeführt wird – auch auf solchen, die AirDrop schon nativ unterstützen.
Öffnet einfach das “Terminal” (mit Spotlight lässt es sich direkt finden), gebt folgenden Befehl exakt so ein…
defaults write com.apple.NetworkBrowser BrowseAllInterfaces 1
… und drückt danach die Enter-Taste.
Um den Finder danach einmal neuzustarten gebt ihr anschließend noch den Code…
killall Finder
… ein und bestätigt wieder mit Enter.
Der Code muss dabei exakt so übernommen werden – am besten kopieren und einfügen!
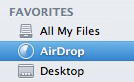
Nun sollte die Schaltfläche “AirDrop” links im Finder angezeigt werden. Ruft man diese auf, erscheinen im Radar alle anderen Benutzer, die das AirDrop-Fenster ebenfalls gerade geöffnet haben (und den Terminal-Trick benutzt haben), und man kann per Drag & Drop ganz einfach Daten übertragen.
Leider funktioniert das Ganze natürlich nur, wenn ihr Lion auf eurem Mac installiert habt. Für alle anderen bleibt nur der normale, etwas umständlichere Weg über die Netzwerkfreigaben – oder ein Update ;)

Rename Onedrive Business root folder

Rename Onedrive Business root folder Here is what I remember: In the Office 365 web admin pages, change the organization name to a shorte...