Ab und an kann es gewünscht sein dass Postfächer eines Exchange 2010 SP1 Servers direkt am Server in eine PST exportiert werden. Z.Bsp. als zusätzliche Datensicherung, oder zu Migrationszwecken, oder oder oder.
Seit Exchange 2010 SP1 gibt es in der Powershell ein “New-MailboxExportRequest” cmdlet. Hiermit können einzelne Postfächer in PST-Dateien exportiert werden. Die PST-Datei kann derzeit nur auf UNC-Pfaden (“\\Server\Share\user.pst") abgelegt werden.
Aber der Reihe nach: Zuerst muss der Administrator sich das Recht zuweisen überhaupt exportieren zu dürfen (Admin-Gruppen müssen mit der Option "-Group” angegeben werden):
New-ManagementRoleAssignment –Role “mailbox import export” –User “SBSAdmin”
Nach dem “New-ManagementRoleAssignment” cmdlet muss die Exchange-Management Shell geschlossen, und als Administrator wieder gestartet werden.
Um nun das Postfach von “Heinz Meyer” zu exportieren genügt der Befehl:
New-MailboxExportRequest –Mailbox Heinz.Meyer –FilePath “\\<servername>\Sharename\Heinz.Meyer.pst”
damit wird die Exportanforderung in Warteschlange gestellt, und in der Regel direkt abgearbeitet. Kontrollieren kann man dies mit dem Befehl (Status = Completed):
Get-MailboxExportRequest
Damit die Exportanforderungen nicht bis zum Ende der Menschheit auftauchen können fertige Anforderungen auch gelöscht werden:
Get-MailboxExportRequest -Status Completed | Remove-MailboxExportRequest
Das ganze lässt sich per “Aufgabenplanung” automatisieren, so um z.Bsp. wöchentlich oder monatlich einen Export aller Postfächer zu erstellen. Dazu wird ein PowerShell-Skript erstellt, z.Bsp. “%windir%\MailBoxExport.ps1”. Inhalt der Datei:
$Export = get-mailbox; $Export | %{$_|New-MailboxExportRequest -FilePath \\SRVBACKUP\PST$\$($_.alias).pst}
Die soeben erstellte Datei (MailBoxExport.ps1) kann nun per CMD mit folgendem Inhalt aufgerufen werden:
powershell.exe -command ". 'C:\Program Files\Microsoft\Exchange Server\V14\bin\RemoteExchange.ps1'; Connect-ExchangeServer -auto ; %windir%\MailBoxExport.ps1"
exit
Die so erstellten PST-Dateien müssen besonders geschützt werden, da Jeder, der Zugriff darauf hat, diese direkt importieren und somit lesen kann. Generell sollte bei solch einem Export-Vorgang vorher festgelegt werden wer wie wann auf die PST zugreifen kann, damit auch alles rechtskonform geschieht. Evtl. ist der Betriebsrat mit hinzuzuziehen.
Regelmäßig sollten dann noch die Exportanforderungen bereinigt werden – hierzu wieder ein PowerShell-Skript erstellen – %windir%\ExportRequestEntfernen.ps1 – Inhalt:
$ConfirmPreference="none"
Get-MailboxExportRequest -Status Completed | Remove-MailboxExportRequest
Aufruf per CMD mit folgendem Inhalt:
powershell.exe -command ". 'C:\Program Files\Microsoft\Exchange Server\V14\bin\RemoteExchange.ps1'; Connect-ExchangeServer -auto ; %windir%\ExportRequestEntfernen.ps1"
exit
So kann dann (z.Bsp. monatlich) aufgeräumt werden.
Alles ohne Garantie – alle Skripte vorher in einer Testumgebung testen!
Mittwoch, 25. Januar 2012

Samstag, 21. Januar 2012
Outlook 2010, Multiple Accounts and the Default Account
Outlook 2010, Multiple Accounts and the Default Account
Update: Outlook 2010 SP1: Mailto’s will use the default account for messages. SeeChanges in SP1 below for more information.
Update: Outlook 2010 SP1 includes the May 10 2011 hotfix addresses issues with default IMAP accounts when there are multiple accounts in the profile. See Solution for default IMAP accounts: Create a fake POP3 account below.
When you use Microsoft Outlook 2010 and have multiple accounts delivered to different *.pst files, Outlook doesn’t use the default account set in Account settings. Instead, it uses the account associated with the mailbox or *.pst file the folder you are viewing is stored in. This change in behavior takes some getting used to, but its my experience that once they understand how it works, most users with multiple POP3 or Exchange accounts like it.
This feature not as well liked by users with an IMAP account as their primary account and POP3 accounts delivered to the default *.pst file. Instead of using the default IMAP account as it did in previous versions, Outlook 2010 sends new mail using a POP3 account that is delivered to the *.pst. When the IMAP user sends a new message to a contact or starts a new message after viewing the calendar, Outlook chooses a POP3 account as the sending account.
The obvious solution is to use a different *.pst file for the POP3 accounts, but if that is not acceptable, you can use a macro to always open a new message with the default account selected. Others may want use create toolbar buttons to open a new message with a specific account selected.
Poll: Do you like Outlook 2010′s handling of default accounts?
Registry key to force account selection every time
This fix is simple, but can get annoying, fast, since it forces the user to select an account every time they send a new message. (Replies and Forwards always use the account the message arrived on.)
This might be good for people who use multiple accounts and frequently (accidently) send using the wrong account, especially if they are sending sensitive documents, as it will almost eliminate accidently sending email from the wrong account.
HKEY_CURRENT_USER\Software\Policies\Microsoft\Office\14.0\outlook\options
Value Name: ForceAccountSelection
Value type: REG_DWORD: 1 for force, 0 to disable.
Notes: You need to create the path if it does not exist. You can also set this using the Office 2010 group policy templates.
The value type is the same for both 32-bit and 64-bit Outlook.
If you don’t want to edit the registry yourself, you can run this registry file to set the ForceAccountSelection key
Warning: As reported by a user in New E-Mail Button Not Working, this tweak may prevent the New item buttons in Contacts and other folders from working.
Changes in Outlook 2010 SP1
Update: Outlook 2010 SP1 addresses issues with multiple accounts in a profile and IMAP is set as the default account.
It addresses this problem: When you have multiple accounts and an IMAP account in Outlook 2010 and you change the default sending account to the IMAP account, you may experience the following issues:
When you click a mailto link from a browser or from Outlook, the default sending account is the Exchange Server account instead of the IMAP account.
When you create a new email message, the Exchange Server account is selected instead of the IMAP account.
Out of the box, the update uses the default account for Send to commands but not for new messages created while viewing the default pst file (when a POP account is assigned to the default pst file), unless you set a registry value to always force the use of the default account.
To force all new messages to use the default account, browse to the following registry subkey:
HKEY_CURRENT_USER\Software\Microsoft\Office\14.0\Outlook\Options\Mail
Create a new DWORD value named NewItemsUseDefaultSendingAccount
Value: 1
If you prefer not to edit the registry yourself, we have a registry file ready to run:NewItemsUseDefaultSendingAccount
Solution for default IMAP accounts: Create a fake POP3 account
When clicking on a “mailto:” entry on a web page or using the Send to command in other applications, Outlook opens a new email. In older versions, the From account was the default From account in Account settings. Outlook 2010 uses the account assigned to the default message store, causing problems for users with IMAP accounts or Exchange server mailboxes where a POP3 account is default. The solutions mentioned previously won’t work because Simple MAPI is calling up Outlook.
While I don’t have a good solution for Exchange accounts (setting a PST as the default can have undesirable effects with the Exchange account), try this solution for IMAP accounts. Also, if you are using the Send to Mail Recipient command to send files in Windows Explorer, a custom SendTo shortcut may be a better solution.

Create a second account for the IMAP address
Set it up as a POP3 account, with “mail” as the pop server name.
Use the correct SMTP info for the server and logon information.
Make sure it is delivered to the default PST.
Click More Settings and configure the Outgoing server settings.
You’ll need to uncheck ‘Test account settings’ before clicking Next to complete the dialog as the POP3 account test will error.


When you return to the Account Settings dialog, set this account as your default email account.
Close the account settings dialog and return to Outlook.
Next, you’ll need to press Ctrl+Alt+S on your keyboard to open the Send & Receive Settings dialog.


Select the send and receive profile and click Edit.
Select the new “fake” account and uncheck the option to Receive mail.
Once you do this, Outlook should always use the desired account for sending but because the server is fake and you aren’t receiving mail on it, you won’t try to download mail.
Drawback: sent mail will be stored in the local Sent folder, not the IMAP sent folder. You can either use rules to move the sent items or move them manually.
Sonntag, 15. Januar 2012
Export Non-Exportable Windows Certificates
Jailbreak is a tool for exporting certificates marked as non-exportable from the Windows certificate store. This can help when you need to extract certificates for backup or testing. You must have full access to the private key on the file system in order for Jailbreak to work.
The download is available here.
Using Jailbreak to Export a Certificate with its Private Key
Jailbreak is a tool for exporting certificates with their private keys, even if the private key was marked as non-exportable in the first place. Since auto-generated self-signed certificates usually have their private key marked as non-exportable, Jailbreak can become very handy.
First, download Jailbreak from http://www.isecpartners.com/application-security-tools/jailbreak.html, and extract it. Right-click “Jailbreak.exe” and select “Run as administrator”:

Jailbreak should now launch MMC (Microsoft Management Console) with the “certificates” snap-in. Unlike the regular console, this one will allow the exporting of private keys even if they were marked as non-exportable. To start the certificate exportation wizard, go in “Certificates (Local Computer)/Remote Desktop/Certificates”, right-click the certificate listed on the right, and then select “All Tasks→Export”:

This should launch the certificate export wizard. From this point, it should be the same as a regular certificate export. Follow the rest of the instructions in the Certificate Export article.
E-Mail Signatur mit Bild/Logo und Links am iPhone!
Wie erstelle ich mir eine eigene Email Signatur am iPhone?
Wer am Mac oder PC mit einem E-Mail Programm wie Mail, Entourage oder Outlook arbeitet, kennt die E-Mail Signatur sicherlich und wird diese auch schätzen, denn sie erspart einiges an Tipparbeit und man kann Logos, Bilder und sogar Html einfügen. Auch am iPhone, wo die Tastatur um einiges kleiner ist wie am Mac oder PC, kann man sich die Tipparbeit sparen, wenn man eine E-Mail Signatur hinterelgt.
Hier bietet es sich an, mit dem Mac/PC eine E-Mail an sich selbst zu schreiben und am iPhone die Signatur dann in den Zwischenspeicher zu nehmen, um sie dann schließlich in den Einstellungen einzufügen.
Das geht so:
Die Signatur in den Zwischenspeicher nehmen, anschließend am iPhone auf “Einstellungen” tippen. Nun über den Eintrag Mail, Kontakte, Kalender zum Eintrag Signatur begeben. Im Textfeld kann die Signatur aus der Zwischenablage nun eingefügt werden. Diese Signatur wird künftig unter jede ausgehende E-Mail, die von iPhone aus versendet wird, angefügt. Dies erspart künftig unnötiges Tippen auf der iPhone Tastatur.
Wie füge ich jetzt Bilder Logos oder HTML in meine Signatur? Ganz einfach, man geht auf www.coolgeex.com gibt seine gewünschte Email Signatur an, wählt die Farbe und das aussehen, lädt ein Bild oder Logo hoch und schon bekommt man per Email seinen für das iPhone generierte Email Signatur, die man dann nur noch unter Einstellungen >Mail, Kontakte, Kalender > Signatur einfügen muss.
Zu beachten ist jedoch, daß am iPhone nur eine Signatur angelegt werden kann. Wer also verschiedene Postfächer am iPhone eingebunden hat, sollte darauf achten, mit welchem Postfach die Signatur verschickt wird. Andernfalls könnte dies bei den E-Mail Empfängern Irritationen hervorrufen.
Airprint Activator für Windows & iOS5.x
Endlich wieder AirPrint unter iOS5! Das Programm ermöglicht es, unter Windows freigegebene Drucker via AirPrint zu verwenden. Ein Jailbreak des iOS Geräts ist nicht nötig.
Installation:
- Datei herunterladen und entpacken. danach kann die exe gestartet werden. Weitere Schritte entnehmen Sie bitte dem Programm selbst
- Airprint.exe unter C:/AirPrint in der Firewall freigeben, sowie den TCP Port 631
- Drucker unter Windows 7 freigeben bzw Drucker unter WinXP freigeben
- Gastkonto aktivieren
Download
Update 10.01.11 (Version 2.6)
- Spendenbutton aktualisiert
- Erhöhte Stabilität
- Probleme bei Aktivierung und Deaktivierung behoben
- Funktion zum manuellen Starten und Beenden des Airprint Dienstes.
- Deaktivierung löscht nun auch alten AirPrint Activator komplett
- verschiedene Bugfixes
FAQ:
-Es werden keine Drucker gefunden
Stelle sicher das der Drucker im gesamten Netzwerk freigegeben ist. Desweiteren musst du den Port 631 und die Airprint.exe unter C:/Airprint/ in deiner Firewall zulassen.
-Drucker werden angezeigt aber sind nicht auswählbar (Schloss-Symbol)
Aktiviere den GastAccount unter Windows und starte den PC sowie das iOS Gerät neu. Es gibt zurzeit keine andere Möglichkeit!
-Auch nach beschriebenen Möglichkeiten funktioniert AirPrint noch nicht
Starte das iDevice sowie deinen PC neu oder poste dein Problem in die Kommentare und lass dir von mir und anderen Nutzern helfen. Bitte denke daran deine Frage ausführlich zu formulieren. “Geht bei mir nicht” etc, hilft allen beteiligten nicht weiter.
Samstag, 7. Januar 2012
New in Exchange 2010 SP2: Address Book Policies
In Exchange 2010 Service Pack 2 a new feature will be available called Address Book Policies which makes it possible to use multiple Address Books in Exchange 2010, completely separated from each other. It is sometimes referred to as multi-tenancy for Exchange 2010 although this is not entirely true. In this article I’d like to explain a bit more.
Address List Segregation
For Exchange 2007 Microsoft has a whitepaper available that describes how to implementAddress List Segregation to achieve multiple Address Lists completely invisible from each other. In other words, users in the Contoso.com Address List don’t see other Address Lists and users, like the Fabrikam Address List or the Tailspintoys Address List. In Exchange 2007 this is implemented using Access Control Lists (ACL’s) to set permissions for specific Address Lists. This works fine for Exchange 2007 but Exchange 2010 uses a different technique called the Address Book Service running on the Client Access Server. Therefore, if using (or trying to use) the Address List Segregation whitepaper on Exchange 2010 things will horribly break.
Address Book Policies
In Exchange Server 2010 Service Pack 2 the Address Book Policies (ABP’s) are introduced. Using ABP’s it is again possible to implement Global Address List (GAL) segmentation in Exchange Server 2010. But instead of setting all kinds of ACL’s in Active Directory an APB is an assignment of one or more Address Lists to a specific mailbox. It is now possible to create multiple ‘organizations’ within one Exchange 2010 environment that have independent Address Lists, completely separated from each other. For example, the Contoso and the Inframan company can be using one Exchange 2010 environment and use their own company specific Address Lists, assigned via ABP’s:

Figure 1. Contoso and Inframan using their own Address Lists via ABP’s
Let’s have a look at the following example. In this Exchange environment the following objects are created for Inframan organization:
- Global Address List;
- Address List containing all Inframan Recipients;
- Address List containing all Inframan Contacts;
- Address List containing all Inframan Distribution Groups;
- Address List containing all Inframan Resource (Room) Mailboxes.

Figure 2. The Inframan company specific Address Lists
Also an Inframan specific Offline Address Book is created containing the earlier created Address Lists:

Figure 3. The Inframan company specific Offline Address Book.
The next step is to create an Address Book Policy containing the company specific Address Lists and Offline Address Book. In Service Pack 2 a new tab is added to the Exchange Management Console (under Mailbox in the Organization Configuration). Create a new ABP and add the various Address Lists that were created earlier:

Figure 4. The Inframan specific Address Book Policy containing the Inframan Address Lists.
When finished the new ABP shows up in the Exchange Management Console:

Figure 5. The new ABP showing up in the Exchange Management Console. Notice the new Address Book Policies tab.
The last step is to add the policy to the inframan Mailboxes. When selecting the Mailbox Settings of a mailbox in Exchange 2010 Service Pack 2 a new option is added for assigning the Address Book Policy. This way the new policy can be added to a particular user:

Figure 6. Adding the new ABP to a particular mailbox.
The user can now only see the Address Lists that are assigned to him using the Address Book Policy. With only one ABP this is not too exciting of course, so multiple Address Lists can be created for specific groups of users. Suppose multiple companies use this Exchange environment (I deliberately do not use the word hosting here, I’ll get back to that later on) and each company has its own Address Lists:

Figure 7. Address Lists for multiple companies in one Exchange organization
These Address Lists can be grouped together in different Address Book Policies:

Figure 8. Each company has its own Address Book Policy
These company specific Address Book Policies are now assigned to users of the individual companies. When logging on as a user for example in the Inframan company only the Inframan specific Address Lists (and thus mailboxes) are visible. None of the other Address Lists and mailboxes available on this particular Exchange environment show up at all:

Figure 9. Only the Inframan mailboxes and address lists are available for the inframan user
Cross organization Address List membership
APB’s are extremely flexible. Since an ABP is only a policy presented to the Address Book Service on the Client Access Service it is possible to manipulate its behavior a little bit. You can use specific attributes in the Address Lists for example to have mailboxes included in multiple Address Book Policies, something that was not possible with earlier solutions for GAL segmentation. So, you can have a manager appear in Address List One of company one, but at the same time this manager can also appear in another Address List from another company. If this is on purpose, for example when this manager works for both companies, than it’s not an issue of course but you have to be aware of this when using Distribution Groups. The Exchange transport service sends e-mail to all members of a Distribution Group and doesn’t use Address Book Policies.
You might end up sending e-mail to Distribution Groups including people you don’t want your message sent to!
Hosting and Multi-Tenancy
Quite a lot of people now think of Exchange Server 2010 Service Pack 2 being native multi-tenant because of the Address Book Polices. That’s not true! ABP is only part of a multi-tenant solution. For a multi-tenant solution, something that can be used by hosting companies a lot more configuration needs to be done. For example, you have to:
- Make sure that users from one tenant can only see and access resources from their own tenant using any tool. Using Outlook or OWA this is not an issue, but think about a hosting solution with Remote Desktop and a user get access to ADSIEdit;
- Routing needs to be consistent between tenants. You don’t want users in one tenant to see the Exchange LegacyDN when sending and resolving messages. Or when a mailbox is deleted from one tenant and a user in another tenant replies to a message that as sent earlier by the deleted mailbox;
- Users from one tenant should not be able to overload the messaging infrastructure, so some kind of throttling need to be available;
Microsoft will work with some hosting System Integrators to write guidance for hosting providers to achieve all this (and more). At the same time Microsoft is working with Control Panel vendors (as mentioned in my blog Exchange /hosting discontinued) to make sure the Control Panel vendors all support these technologies. If the guidance is followed or one of these Control Panel vendors is used a fully supported hosted Exchange 2010 is created.
Freitag, 6. Januar 2012
Log-Tool für Anmeldeversuche und Anmeldungen
hier Beispiel:
echo %USERNAME%;%date% %time%;%CLIENTNAME%;%COMPUTERNAME%;%LOGONSERVER%;%SESSIONNAME%;%USERDOMAIN% >> \\SERVER\Share$\log.txtLOGON:
"echo Logon Als %USERNAME%; Am %date% Um %time%; Von %CLIENTNAME%; Über %COMPUTERNAME%;%LOGONSERVER%; An %SESSIONNAME%; Domain %USERDOMAIN% >> \\Server\Log\log.txt"
LOGOFF:
"echo Logoff Als %USERNAME%; Am %date% Um %time%; Von %CLIENTNAME%; Über %COMPUTERNAME%;%LOGONSERVER%; An %SESSIONNAME%; Domain %USERDOMAIN% >> \\Server\Log\log.txt" Montag, 2. Januar 2012
Outlook Add-in Sicherung für Persönliche Ordner herunterladen [pfbackup.exe]
Mit dem Download zur Sicherung für Persönliche Ordner werden in Outlook 2000, Outlook 2002, Outlook 2003, Outlook 2007 sowie in Outlook 2010 in regelmäßigen Abständen Sicherungskopien Ihrer Outlook PST-Dateien erstellt, wodurch eine problemlose Sicherung Ihrer Outlook-Ordner gewährleistet wird.
Das Outlook Add-in - Sicherung für Persönliche Ordner steht im Microsoft Download Center zum kostenlosen Download zur Verfügung:
Outlook Add-in - Sicherung für Persönliche Ordner herunterladen
Mit dem Download werden in Outlook in regelmäßigen Abständen Sicherungskopien Ihrer PST-Dateien erstellt.
http://www.microsoft.com/downloads/details.aspx?FamilyID=8b081f3a-b7d0-4b16-b8af-5a6322f4fd01&DisplayLang=de
Download -> pfbackup.exe
Das Feature "Sicherung für Persönliche Ordner" erleichtert und beschleunigt die Sicherung von Informationen in Microsoft Outlook. Dabei werden in Microsoft Outlook 2000, Microsoft Outlook 2002, Microsoft Office Outlook 2003, Microsoft Office Outlook 2007 sowie in Microsoft Outlook 2010 in regelmäßigen Abständen Sicherungskopien Ihrer PST-Dateien erstellt, wodurch eine problemlose Sicherung Ihrer Outlook-Ordner gewährleistet wird. Durch die Sicherung für Persönliche Ordner können Sie auswählen, welche PST-Dateien gesichert und in welchen Zeitabständen Sicherungskopien erstellt werden sollen.
Samstag, 31. Dezember 2011
Home Downloads Exchange 2010 EMC and Certificates Management
Microsoft chose moving to secure messaging and secure service access since Exchange Server 2007. The only troublesome task for administrators was to manage these certificates. Folks who are highly addicted to GUI found it little hectic. Good news for those who don’t want to take too many efforts and would like to have a graphical interface that can manage certificates for exchange!
Though not with exchange 2007, Exchange 2010 Beta offers some extended functionality of creating, removing and managing certificates using GUI.
To create a new certificate you can choose the following options;
1. Select Server Configuration from left hand side pane in EMC and Exchange Certificates tab in left hand pane.

2. Right click in free space in left hand side pane of Exchange Certificates tab and select New Exchange Certificate

3. Selecting New Exchange Certificate from the context menu will bring up the introduction screen.

Here at this screen you are prompted to enter a friendly name for the certificate that will appear in EMC as a primary reference for management of certificates if you have multiple certificates created for multiple websites.
4. Once you have specified a friendly name for the certificate you are taken to the next screen upon clicking the Next button. This New Exchange Certificate screen will now gather the actual required information where you get a chance to choose among the options to use this certificate for various services.
Services like IIS based web services including Autodiscover, OWA EAS and other services like POP/IMAP, Outlook Anywhere and UM.
You can observe the screenshot below and notice that you get an option to write the URL of the service locations for OWA, EAS, Federated Services, SMTP transport, Etc. These URLs will be used in the certificate request which will be further used to write the SAN certificate information.

5. here the wizard collects the Organization related information like company name, department, location, etc. At this stage the wizard has collected almost all the information it needed. You may notice that the path right beside the Browse button is the path to the certificate request file path.

6. Next screen summarizes the information you entered.

7. And there you go with the final screen of the wizard where it displays the powershell command it will be attempting to generate the certificate request. Once you hit the Finish button the wizard completes the certificate request.

8. Here a point to be noted is; the wizard does not create an actual certificate. It will simply generate the request and keep it accessible via EMC. So when you are done with the wizard you have to manually send this request to the online CA within your Exchange/AD premises.

Limitations of New Exchange Certificate Wizard:
- The new Exchange Certificate Wizard does not send the request to the online CA directly unless you manually complete the pending request.
- Renewals of expired certificates can not be done using Exchange Certificate Wizard. You still have to user EMS for renewal of certificates.
- New certificates created using New Exchange Certificate Wizard does not get assigned to IIS directly though you do specify the certificate utilization for Exchange Web Services and other IIS integrated exchange services. (You may refer Permanent Link to How to renew a self signed certificate in Exchange Server 2007 for renewal of certificates)
This is the second part of the blog entry Exchange 2010 EMC and Certificate Management in the previous post I wrote about creating a certificate request and the limitations of the new certificate request wizard. In this part we will be looking at obtaining a new certificate and then installing it on the server.
To complete installing a new certificate on your Exchange Server 2010 server you first need to obtain a certificate from CA within your organization or from a third party CA. As stated in last post the New certificate wizard generates a request in a .req file.
1. To obtain a certificate from a third party CA or your internal CA, your first need to copy the contents of the .req file and paste it to the web console of your certification authority. For my internal Enterprise CA the picture looked like below. Please see carefully that the Certificate Template used for this certificate request is Web Server.

2. Once you are done with above interface by pasting the contents of .req file and choosing a correct template you will be presented with another page in your browser to download the certificate. This interface may vary depending upon the configuration of your CA. You may need to wait till the certificate is approved and issued by CA administrator if configured so. You can now download the certificate in DER encoded format or Base 64 encoded format and save it to some location on your desktop or server. You will also need to download the whole certificate chain if the issuing authority is not a trusted CA by your server.

3. Now, as you have downloaded the certificate to the server. You will need to complete the pending certificate request in your EMC. Select the complete pending request by right clicking on the pending certificate request in EMC.

4. A new interface asking you the path to the certificate will pop up. This wizards will ask the location for newly downloaded certificate. Click on the Browse button, select the newly downloaded .cer file and click on complete button.

5. You may recall, Exchange 2007 to have the imported certificate to be enabled before it can be used actually used exchange services. E14 is not an exception to it but you don’t need to use Enable-ExchangeCertificate this time. You can do it using GUI easily. Now that you know, you have a new certificate imported correctly. You need to assign it to the services those will be using it.
Again, locate the new imported certificate in EMC and right click on it. Select Assign Services to Certificate… from the context menu.
One quick difference you may notice between the step 3 and now. That is the certificate status. It changes from Pending to Valid and icon in front of the certificate gets blue colored check mark on it.

6. Assign Services to Certificate… will list the services on a window those will be assigned to use this certificate. Select the services you want to use this certificate with and click on Assign button. In my case I did not have the UM role installed on the server so the Unified Messaging check box is grayed out.

7. You may notice a pop up asking your consent to assign this certificate to SMTP service on the server as the default certificate will be replaced if you have selected Simple Mail Transport Protocol to use the new certificate in step 6. Click Yes and your default self signed certificate created and assigned to SMTP during server install will be replaced with new one.

Click Finish in the wizard and you are done.
In some cases you may end up with a warning message; warning you that this certificate will not be used for TLS connections. Something like below:
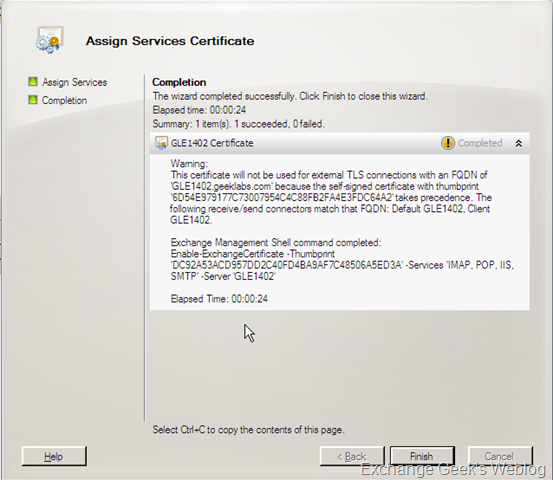
Here you need to really understand the configurations you choose at the time of new certificate request. If you want to use this new certificate for a connector which provides a TLS connections, you will have to mention that during the New Certificate Request Wizard.
Few things to note:
- You must make sure that you have chosen the option to use new certificate for TLS connections during the request generation.
- You must have the root CA and the entire certificate chain installed your Exchange Server as well as clients if you are using your internal CA for new request processing. Outlook as well as Outlook Anywhere and other web based services may be affected otherwise.
- You must back up the certificate as soon as it is enabled on the server. I will write about it in Part-3 of this series.
- I recommend backing up and removing any old certificate from the server as soon as the new certificate is active and fully functional.
Abonnieren
Posts (Atom)
-
One of the visitors of this blog asked the question if we could publish a list of recommended post Windows Server 2008 R2 SP1 hotfixes rela...
-
With your Windows Network working and a number of resources shared, you can install the TCP/IP Protocol to allow your Windows for Workgrou...
