Sonntag, 28. Juli 2019

ESX 6.5 AND 6.7 ON HPE G6/G7 SERVER PSOD FIX

Background

HP’s done it again. They’ve managed to break their custom ESX ISO on the G6 and G7 servers. I suspect it’s the same for G8.
If like me you found yourself perplexed by the PSOD (pink screen of death) after upgrading from ESX 6.0 to 6.5, keep on reading for the fix (skip to the bottom for the download link to an already fixed ISO).

The issue

It seems the “hpe-smx-provider” driver version 6.5.0 from the ESX 6.5 ISO is causing the PSOD.

The fix and the drawbacks

(Simply) Replace the driver with it’s older counterpart (version 6.0.0) and reinstall (see below for the procedure or check the “download link” section at the very end for an already fixed ISO).  Unfortunately if you decide to create a custom ISO with the previous version of “hpe-smx-provider”, you will no longer be able to upgrade to any future ESX version and will need to do a full installation every time (thank you HP!). That being said, here is the procedure to customize the ISO:

Customize your own HPE ESX ISO

  1. Install PowerCLI from here.  At the time of this writing, the latest version was 6.5.0R1.
  2. Download both the ESX 6.5 and 6.0 offline bundles and save them to a convenient place (ex: C:\HP) — download from this link. To make it easier, rename them to something like HPE_ESX6.5.zip and HPE_ESX6.0.zip.
  3. Open up PowerCLI and do the following:Add the 6.5 bundle

    # check that the profile was loaded and the vendor is HPE

    # clone the profile (feel free to specify whatever you like for the “vendor” when prompted)

    # double check the profile was indeed cloned

    # Remove the “hpe-smx-provider” driver from the clone

    # Add the 6.0 bundle

    # check the profile

    # check driver versions from both bundles

    # Add hpe-smx-provider version 6.00 to the custom profile

    # Export the profile to an ISO

Download links

The following images have hpe-smx-provider version 600.03.11.00.9-2768847. Nothing else was changed. The 6.5.0d (build 5310538) is running on an HP Proliant DL380 G7 since March 2018 and was also tested on a DL380 G6 for a couple of months. For convenience, I’ve also built a 6.7.0 ISO and at the request of a reader, 6.7.0 Update1 from April of 2019:
Enjoy!

@THX to www.claud-computing.net/

Montag, 8. Juli 2019

Veeam Error – Changed Block Tracking Will Not Be Used For This VM Until You Upgrade the VM Hardware to Version 8.0 or Later on Server 2016

f you have recently upgraded your HyperV Servers or Cluster to Server 2016 and you are running Veeam, you may see the following error:
Changed Block Tracking Will Not Be Used For This VM Until You Upgrade the VM Hardware to Version 8.0 or Later
What this means is that Veeam will only perform FULL backups and not incrementals which is a bit of a crisis for most companies.
Fortunately this is easy to fix, you simply need to upgrade the “Virtual Machine Version” (not to be confused with the Cluster Version, if you are using a Cluster):
  1. On each of your HyperV hosts, shut down all of the VM’s
    .
  2. Run the following PowerShell Command:
    Update-VMVersion *
    .
  3. Run the following PowerShell Command to ensure that all VM’s are at “8”
    Get-VM * | Format-Table Name, Version
    .
Once all of your VM’s are at version 8, you can restart your Veeam backup jobs and all will be well.
For more information on this process read this Microsoft doc.

Montag, 25. Februar 2019

Windows 10: 450-MB-Wiederherstellungspartition sichtbar - so blenden Sie sie aus

Nach dem Windows 10 Update kann es sein, dass der Windows Explorer die Wiederherstellungspartition mit 450 MB anzeigt.
So blenden Sie sie wieder aus!


Wiederherstellungspartition ausblenden mit Diskpart

Diskpart steuern Sie mit Kommandobefehlen ohne grafische Oberfläche. Zu Beginn lassen wir uns anzeigen, welche Laufwerke und Partitionen auf dem System aktiv sind. Das funktioniert mit dem Befehl „list volume“. In der Spalte „###“ suchen Sie nun die Nummer für die Partition, die Sie nicht mehr sehen sollen.

Wir wählen diese anschließend mit dem Befehl „select volume X“ aus. X steht dabei für die Zahl, die Sie der vorherigen Liste entnommen haben. Ist die richtige Partition ausgewählt, fehlt nur noch der folgende Befehl, um die Verknüpfung mit einem Laufwerksbuchstaben und somit die Anzeige auf dem Arbeitsplatz auszublenden: „remove letter=Y“. Für „Y“ wählen Sie den Buchstaben aus, den Windows der Wiederherstellungspartition erteilt hat. Ist der Befehl bestätigt, ist auf Ihrem Rechner wieder alles wie vorher.

Montag, 7. Januar 2019

User Profile Service Event 1534

Finally found a FIX for 1534 error !

1. Open Regedit and navigate to the following two keys
HKEY_LOCAL_MACHINE\SOFTWARE\Microsoft\Windows NT\CurrentVersion\ProfileNotification
HKEY_LOCAL_MACHINE\SOFTWARE\WOW6432Node\Microsoft\Windows NT\CurrentVersion\ProfileNotification
2. Under ProfileNotification check if you have the TDL key
3. Export the TDL key at each location
4. Delete the TDL key at each location
5. Reboot PC to verify

Note:
You'll need take ownership of the TDL Key to be able to delete it.

Right-click on the key, select Permissions.
In the permissions for.. dialog, click the Advanced button, then click the "Change" link in the Advanced Security Settings dialog.
Enter your domain\username in the edit box, click Check names and ensure it finds your name
Click OK
You should be able to delete the key at that point. If it doesn't want to, try deleting each item in the key, then the key itself.

Freitag, 21. Dezember 2018

Ihr Viren- und Bedrohungsschutz wird von ihrer Organisation verwaltet


Was bedeutet „Ihr Viren- und Bedrohungsschutz wird von ihrer Organisation verwaltet“?
Diese Meldung sieht man auch als „Privatperson“, die gar keiner „Organisation“ angehört. Das „wird von ihrer Organisation verwaltet“ beim Virenschutz soll nur heißen, dass der Windows Defender eine Einstellung gefunden hat, die er nicht selbsttätig ändern oder überschreiben kann. In diesem Fall geht es zum Beispiel darum, dass in der Windows-Registry ein Wert gesetzt wurde, der den eingebauten Virenschutz deaktiviert. In wenigen Schritten könnt ihr das ändern und den Virenschutz wieder aktivieren.
So könnt ihr den Viren- und Bedrohungsschutz von Windows 10 wieder aktivieren:
  1. Drückt die Tasten Windows + R gleichzeitig, um ein „Ausführen-Fenster“ zu öffnen.
  2. Dort tippt ihr den Befehl regedit ein und klickt auf OK.
  3. Jetzt klickt euch durch bis zu
    HKEY_LOCAL_MACHINE/SOFTWARE/Policies/Microsoft/Windows Defender
  4. Rechts seht ihr nun den Eintrag „DisableAntiSpyware“.
  5. Führt einen Doppelklick auf den Eintrag aus und ändert den Wert von 1 auf 0.
  6. Schließt den Registry-Editor und startet Windows neu, um die Änderung zu übernehmen.
Danach könnt ihr das „Windows Defender Security Center“ öffnen und werdet feststellen, dass der Bereich „Viren- & Bedrohungsschutz“ einen grünen Haken hat, der anzeigt, dass alles störungsfrei funktioniert.

Samstag, 15. Dezember 2018

Windows 10 Update Fehler 0x80d02002, 0x80244019 und 0xc1800118

Wir haben in den letzten Tagen bereits mehrfach über die Verteilung des Windows 10 Anniversary Updateüber den WSUS (Windows Server Update Services) berichtet. Allerdings scheinen endlose Anwender große Probleme bei der Installation des Updates zu haben, denn uns haben zahlreiche E-Mails erreicht, die von den unterschiedlichsten Fehlern berichtet. Scheinbar treten die unterschiedlichsten Fehlercodes beim Abruf des Anniversary Updates für Windows 10 auf.
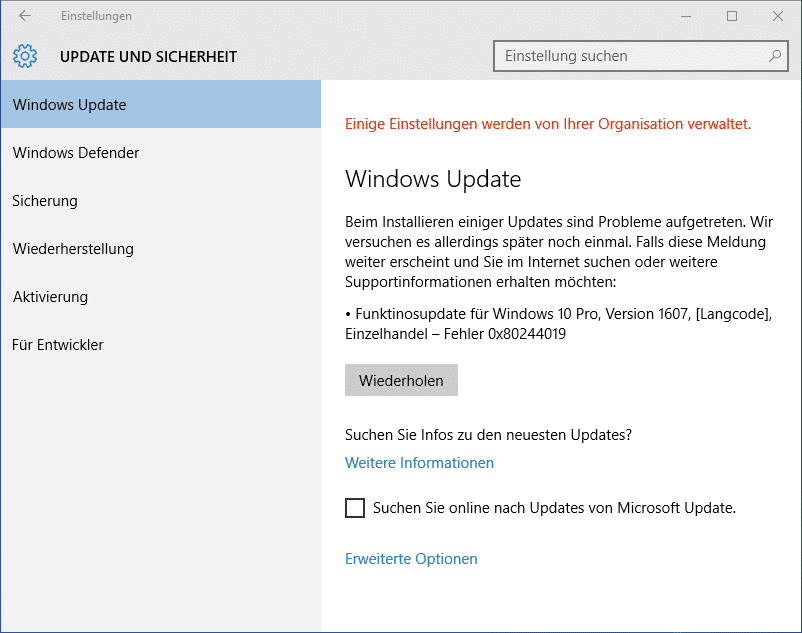
Wir haben bei dem Herunterladen und der nachfolgenden Installation des Funktionsupdates für Windows 10 nacheinander folgende 2 Fehlermeldungen erhalten:

Windows 10 Updatefehler 0x800244019

Windows 10 Funktionsupdate 0x80244019

Windows 10 Updatefehler 0x80d02002

Windows 10 Funktionsupdate 0x80d02002

Windows 10 Updatefehler 0xc1800118

Von dieser Fehlermeldung liegt uns leider kein Bild vor.

Ursache:

Warum es zu diesen Problemen kommt, können wir derzeit leider noch nicht sagen. Wir haben zahlreiche Lösungsmöglichkeiten ausprobiert, u.a. auch das Löschen des Ordners „Softwaredistribution“, welches Windows 10 eigentlich veranlasst, das Update erneut vom Server herunterzuladen.
  • DOS Eingabeaufforderung als Administrator
  • net stop wuauserv
  • rename c:\windows\softwaredistribution softwaredistribition.alt
  • net start wuauserv
Danach beginnt Windows 10 zwar erneut mit dem Download des Updates, bricht aber nach einiger Zeit mit der gleichen Fehlermeldung wieder ab. Scheinbar sind zahlreiche Administratoren derzeit ratlos, woran es wirklich liegt. Bei einigen Installationen scheint es ja wohl auch zu funktionieren, bei vielen Anwendern hingegen nicht.
Habt Ihr die gleichen Probleme? Konntet Ihr sie lösen und wenn ja, wie? Wir würden gerne Eure Meinung zu den Windows 10 WSUS Updateproblemen hören, vielleicht können wir ja auf diese Art und Weise einigen Administratoren das Leben wieder ein wenig einfacher machen.
Wir haben die letzten Tage mehrfach über das Verteilen der Windows 10 Feature Updates (1607 Anniversary Update) berichtet und auch darüber geschrieben, dass viele Anwender Probleme damit haben. Scheinbar sind doch einige Voraussetzungen zu erfüllen, damit der WSUS (Windows Server Updates Services) die Feature Updates einwandfrei verteilen kann.
Wir haben bereits in einem anderen Beitrag die Grundanforderungen aufgezeigt. Dies könnt Ihr in dem Beitrag „Windows 10 Anniversary Update 1607 über WSUS korrekt verteilen“ nachlesen.
Wichtigste Voraussetzung ist die Installation des Windows Updates KB3095113 (Microsoft Update zur Aktivierung der WSUS-Unterstützung für Windows 10 Feature-Upgrades). Natürlich müsst Ihr im Bereich „Produkte/Klassifizierungen“ die notwendigen Windows 10 Komponenten aktivieren und die danach heruntergeladenen Updates auch für die Installation freigeben.

Lösung des Problems:

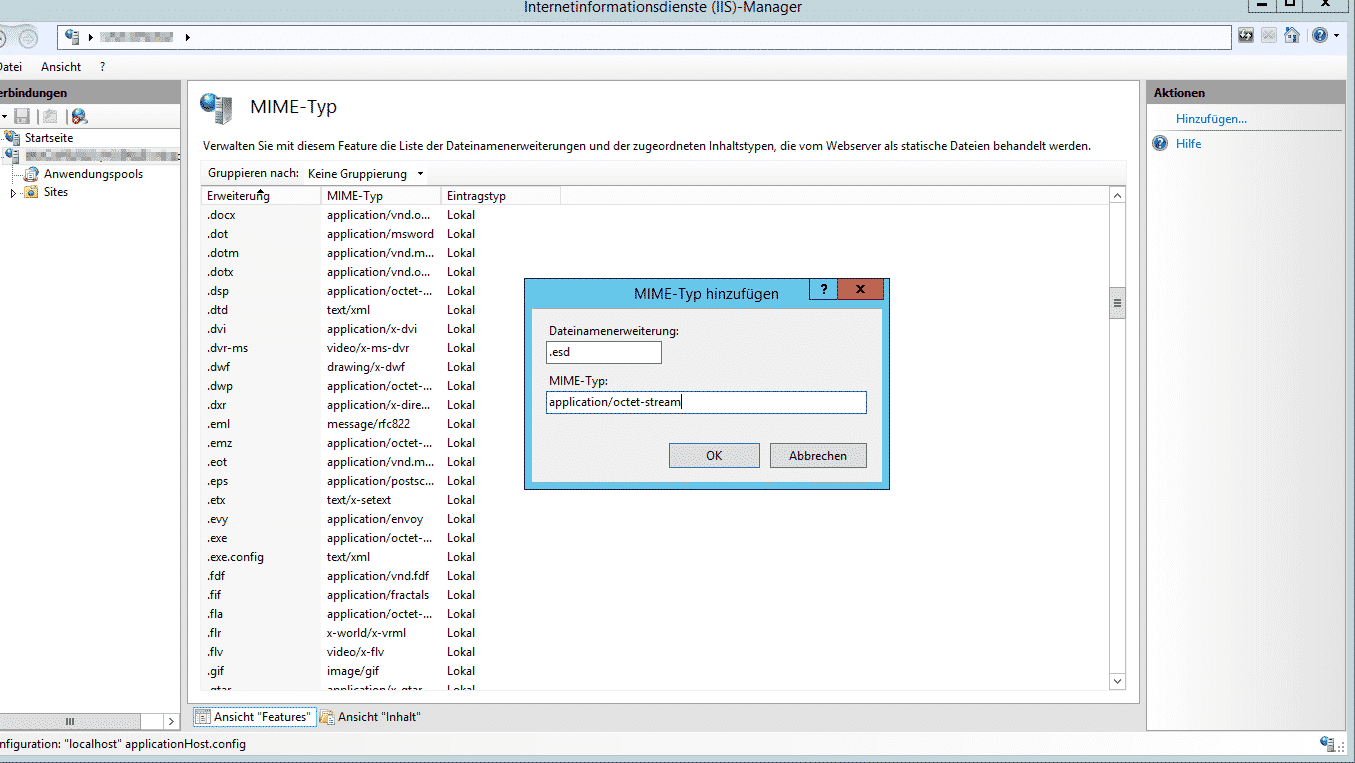
Entscheidend allerdings ist, und danach haben auch wir extrem lange gesucht, ist eine Anpassung um Internetinformationsdienste (IIS)-Manager. Dort müsst Ihr nämlich unbedingt den MIME Typ .ESDhinzufügen.
wsus application-octet-stream feature updates windows 10
Wichtig ist, dass die Dateinamenerweiterung „.ESD“ mit dem MIME-Typ
application/octet-stream
angelegt bzw. vorhanden ist. Nachdem Ihr diesen MIME Typ hinzugefügt habt, solltet Ihr einmal den WSUS Server neu starten. Nachdem der WSUS Server neu gestartet ist, beginnen die Clients sofort mit dem Download des Windows 10 Funktionsupdates.
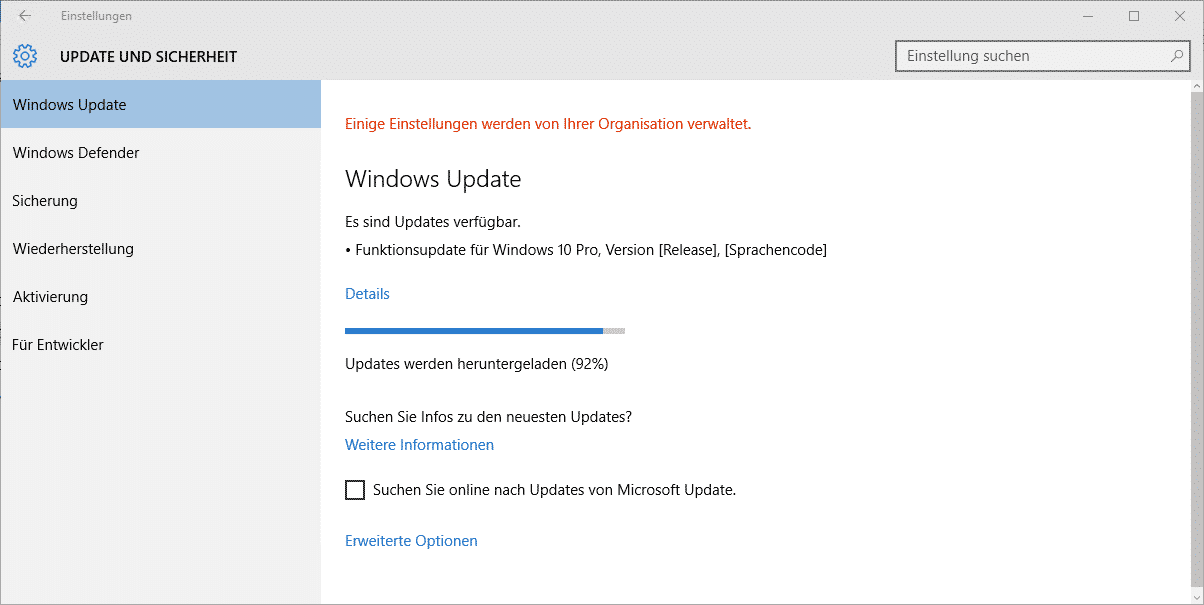
Windows 10 Funktionsupdate Download
Innerhalb kürzester Zeit haben sich die Clients dann das Update heruntergeladen, wie Ihr oben erkennen könnt. Danach kann das Update dann problemlos installiert werden. Somit ist das Problem endlich gelöst. Wir hoffen wir konnte Euch helfen. Über einen entsprechenden Kommentar am Ende dieses Beitrages würden wir uns natürlich sehr freuen.

Samstag, 24. November 2018

HP PCs - Blue Screen Error 'WDF_Violation' After Installing Windows Update (Windows 10)

This document is for HP and Compaq computers with Windows 10.
After installing updates through Windows Update, your computer might display the blue screen error with the error message WDF_Violation.
This issue is related to Windows update KB4464330. Use the steps in this document to resolve the blue screen issue.

Blue screen error 'WDF_Violation' after updating

Use the following steps to resolve the WDF_Violation blue screen error:
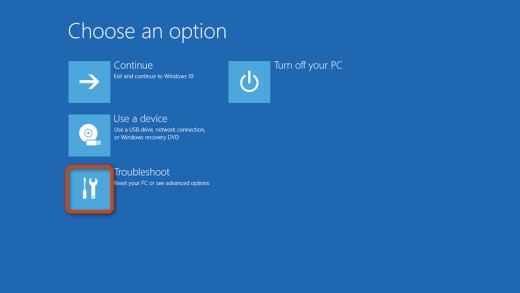
  1. Restart your computer and immediately press the F11 key repeatedly until the Choose an option screen opens.
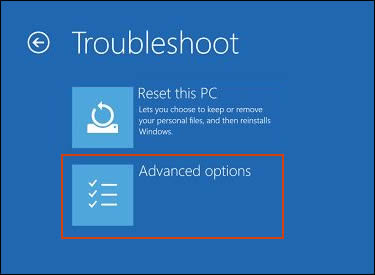
  2. Click Troubleshoot.
    The Troubleshoot option selected on the Choose an option screen
  3. Click Advanced Options.
    Advanced options selected in the Troubleshoot menu
  4. Click Command Prompt.
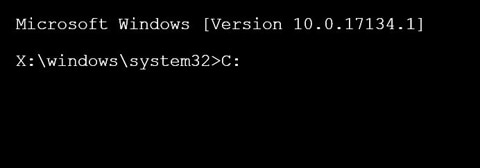
  5. At the Command Prompt, type C:, and then press Enter.
    Command Prompt showing C: entered
  6. Type cd C:\Windows\System32\drivers, and then press Enter.
    Command Prompt showing cd C:\Windows\System32\drivers entered
  7. Type ren HpqKbFiltr.sys HpqKbFiltr.sys.bak, and then press Enter.
  8. Close the Command Prompt window.
  9. Click Continue.
    The computer restarts.
If the blue screen error is not resolved after following these steps, see HP devices may experience blue screen error WDF_VIOLATION after installing HP keyboard driver (version 11.0.3.1) from Microsoft Support.

Rename Onedrive Business root folder

Rename Onedrive Business root folder Here is what I remember: In the Office 365 web admin pages, change the organization name to a shorte...