Sonntag, 22. Juli 2012
Activation Loop After Completing the SBS 2003 Transition Pack
We've seen a few cases now where a server is in an activation loop (activation never completes successfully and you are continually prompted to activate on reboot) after either:
Upgrading via the SBS Transition Pack
Upgrading from Windows Server 2003 Standard Edition to SBS 2003 or
From Evaluation Version SBS 2003 to Full Package Product (FPP) SBS 2003.
All of these scenarios have identical symptoms. The behavior is as follows:
The Windows setup process completes and after the last reboot when you try to login
You receive a prompt requesting to activate the server to be able to continue.
You will get the following error:
When you click YES, nothing happens and you are thrown back to the Windows logon screen (press ctrl-alt-del to logon).
** This is very important to note, the activation wizard NEVER starts up. **
If you check the Application log of the server (from Safe Mode or from a remote machine) you will see an event similar to this one:
Event Type: Error
Event Source: Application Error
Event Category: (100)
Event ID: 1000
Date: 1/24/2007
Time: 12:26:28 PM
User: N/A
Computer: SERVER
Description:
Faulting application msoobe.exe, version 5.2.3790.0, faulting module urlmon.dll,
version 6.0.3790.2612, fault address 0x0000618c.
For more information, see Help and Support Center at
http://go.microsoft.com/fwlink/events.asp.
Data:
0000: 41 70 70 6c 69 63 61 74 Applicat
0008: 69 6f 6e 20 46 61 69 6c ion Fail
0010: 75 72 65 20 20 6d 73 6f ure mso
0018: 6f 62 65 2e 65 78 65 20 obe.exe
0020: 35 2e 32 2e 33 37 39 30 5.2.3790
0028: 2e 30 20 69 6e 20 75 72 .0 in ur
0030: 6c 6d 6f 6e 2e 64 6c 6c lmon.dll
0038: 20 36 2e 30 2e 33 37 39 6.0.379
0040: 30 2e 32 36 31 32 20 61 0.2612 a
0048: 74 20 6f 66 66 73 65 74 t offset
0050: 20 30 30 30 30 36 31 38 0000618
0058: 63 c
This issue can happen if the server has Internet Explorer 7 installed BEFORE installing the Transition Pack or before completing any of the other described scenarios.
The process is really completing correctly, but the activation wizard cannot start due to mismatched IE files.
If you are already having this problem, and In order to get out of this behavior and be able to start the activation wizard to properly activate the server you need to do the following:
1. Boot -up into Safe Mode
a. While hard drive with SBS is booting up hold down F8
b. Select first option “Safe Mode”
2. Logon as Administrator
3. Dismiss “Windows is running in Safe Mode” prompt
4. Click Start, Click Run , Type
%systemdrive%\Windows\IE7\spuninst\spuninst.exe
5. You should see a wizard with “Windows Internet Explorer 7 Removal Wizard” in the
title
6. Click Next on wizard
7. Click Finish to reboot on wizard
8. Let SBS boot up normally and logon as administrator
9. On prompt saying that you must activate to continue to log on
1. Click “Yes”
2. Activation wizard will pop-up
10. Run Activation Wizard to activate the box
11. SBS Transition Pack Wizard will continue to run and let it reboot machine
12. Logon as administrator.
13. Click Finish on SBS Transition Pack Wizard
14. Re-Install IE7 from the Web (http://www.microsoft.com/ie)
Note:
If you encounter an issue where the server is in an activation loop but the activation wizard does start (it just fails to complete the activation), make sure the Transition Pack has actually completed or you might be seeing the behavior described in:
914990 Installation of the Windows SBS 2003 Transition Pack may silently fail on a Windows SBS 2003-based computer
http://support.microsoft.com/default.aspx?scid=kb;EN-US;914990
If you are planning to install the Transition Pack, make sure that IE7 is uninstalled prior to starting the process.
Also check the following post for other things to check prior to installation:
http://blogs.technet.com/sbs/archive/2006/01/12/417350.aspx

Donnerstag, 12. Juli 2012
Disable Metro in Windows 8 Preview
For many, the Metro interface is a problem and would like to have the desktop similar to Windows 7 and other previous versions. Here is a registry edit to disable Metro UI.
1. Open regedit by typing regedit at the Start screen.
2. Navigate toHKEY_CURRENT_USER\Software\Microsoft\Windows\CurrentVersion\Explorer
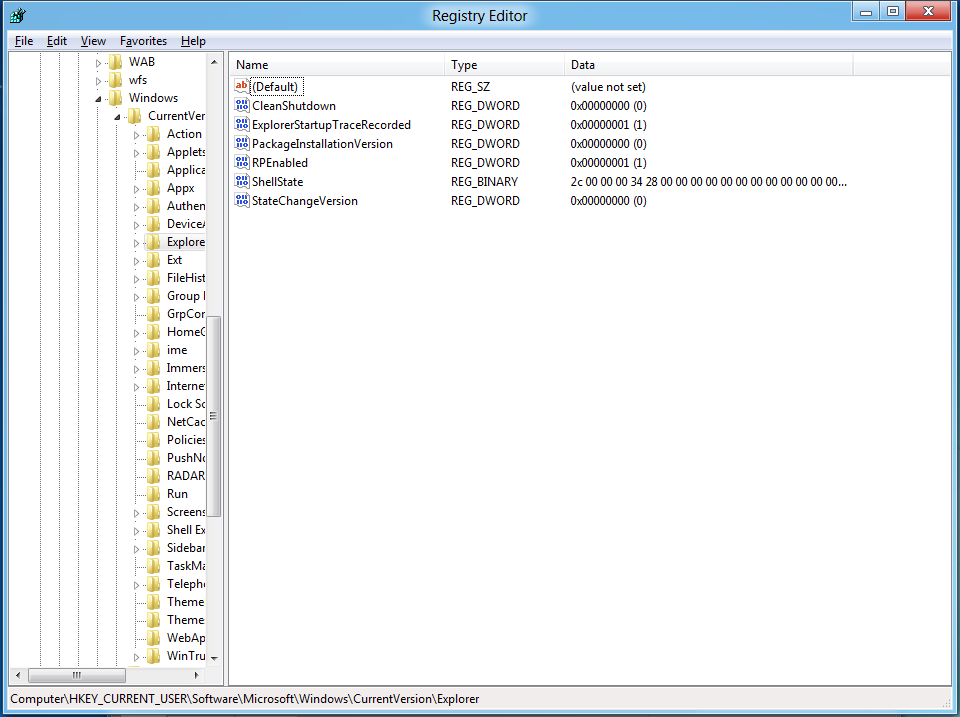
3. Modify the RPEnabled key to a “0” instead of the default “1”.
4. To return to the Metro UI, just change the value back to a “1”.
Samstag, 9. Juni 2012
Building a DD-WRT Image In vSphere 5.0
Introduction
I have a need to put a router between my test ESXi 5.0 server and my network. At home, I use a Linksys E3000 (both 2.4Ghz & 5Ghz Wireless-N, gigabit) router, with OpenSource DD-WRT custom firmware. There is a x86 variant that can be downloaded, people mention in the forums about using it on old PCs, I thought I would give making a VM a go.
Pre-Requisites
- An installed copy of ESXi 5.0 (this is almost certain to work on 4.0, but not 3.5)
- The DD-WRT x86 Image. I chose the VGA public image. This is a free version, limited to 4096 connections (fine for my purposes) and without Wi-Fi support. The image that is used is here.
- physdiskwrite – A Windows tool for writing raw images to a hard disk.
- An existing Windows image.
InstallationCreating the Virtual Machine
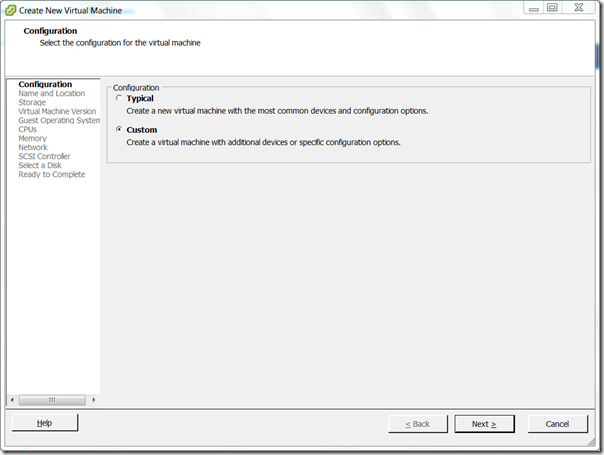
- Create a virtual Machine. Select a configuration type of Custom.
- Name the VM something appropriate.
- Select a datastore for the Virtual Machine.
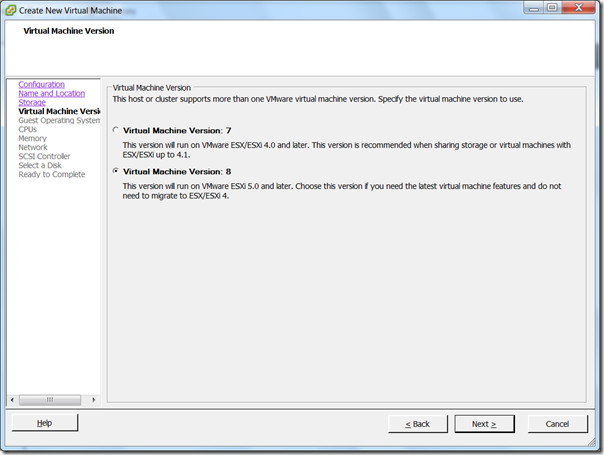
- Select ‘Virtual Machine Version: 8’ (if using ESXi 4.0, using version 7)
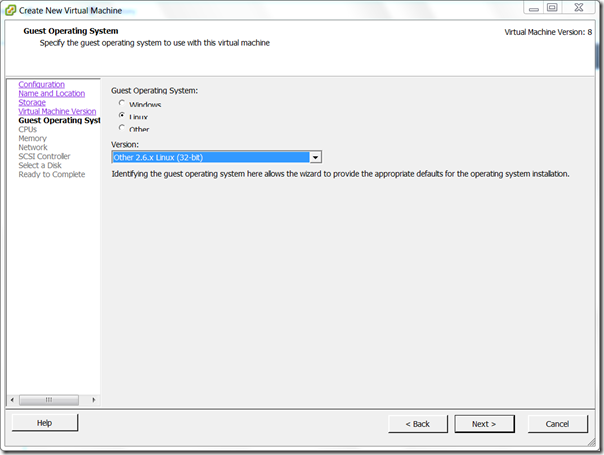
- For Guest Operating System type, choose ‘Linux’ and select ‘Other 2.6.x Linux (32-bit) from the drop down.
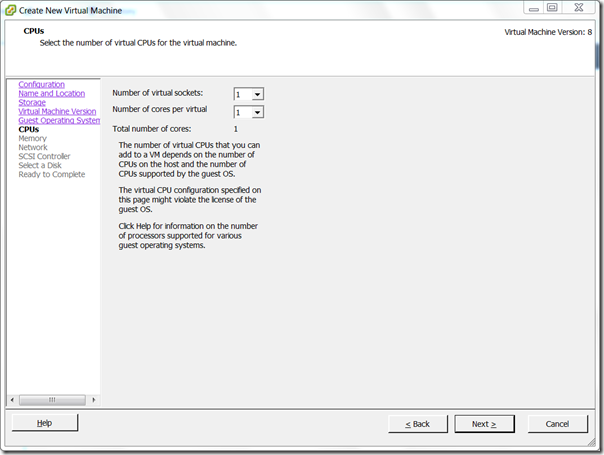
- Choose 1 virtual sockets, with one core per virtual socket.
- Choose 512MB RAM.

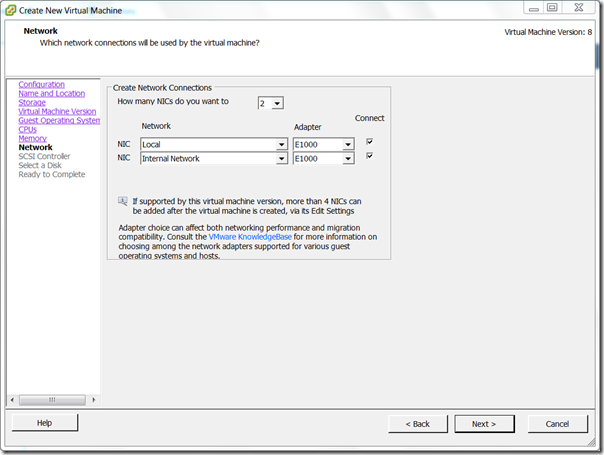
- Select the appropriate number of NICs (nearly always 2), E1000, and choose the port groups. (I have found that the first NIC is assigned to the WAN)
- SCSI Controller, choose any. This will be replaced.
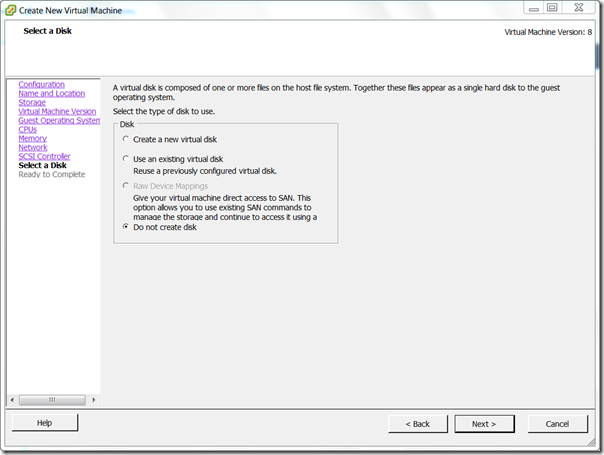
- Choose not to create a disk.
- Tick Edit the virtual machine settings before.
- In the Virtual Machine Properties, click Add. Select Hard Disk.
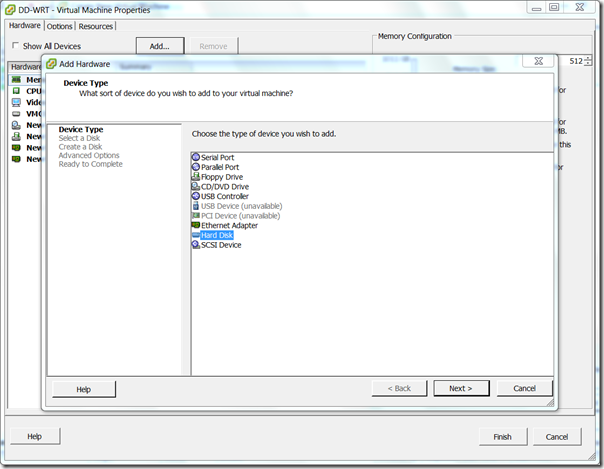
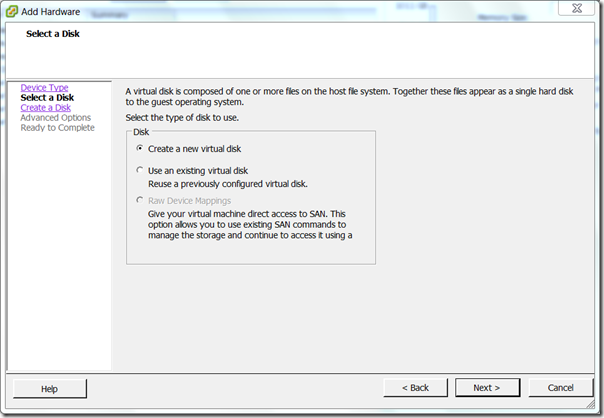
- Select ‘Create a new virtual disk’
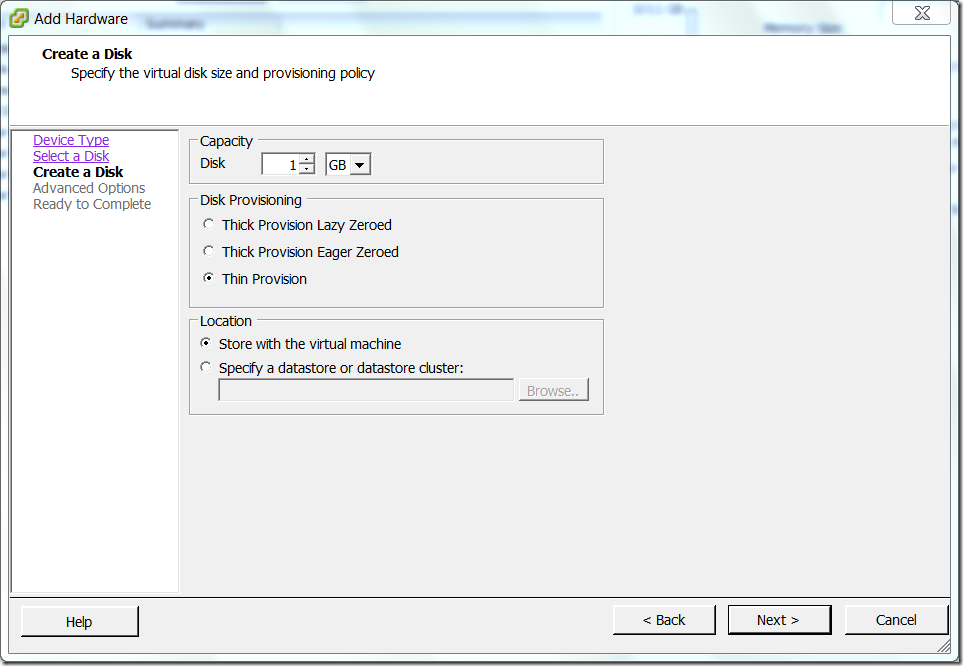
- Make the capacity of the disk 1GB. I chose to make it Thin Provisioned.
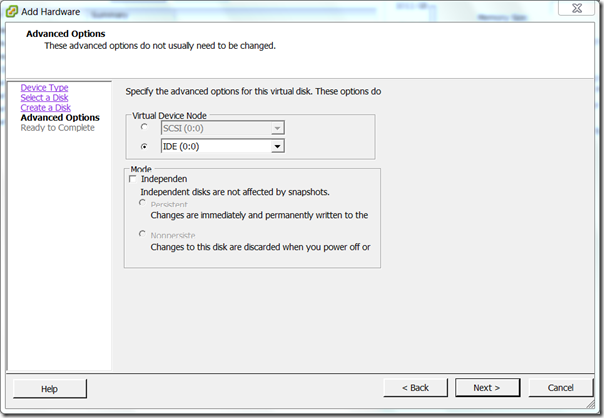
- Set the Virtual Device Node to IDE (0:0)
- Press OK, then Finish. Wait for the VM to be created.


Install the image to the Disk
- Choose your Windows VM. Power it off if necessary.
- Edit the Windows VM’s properties. Press Add.
- Select a Hard Disk.
- Choose ‘Use Existing Virtual Disk’
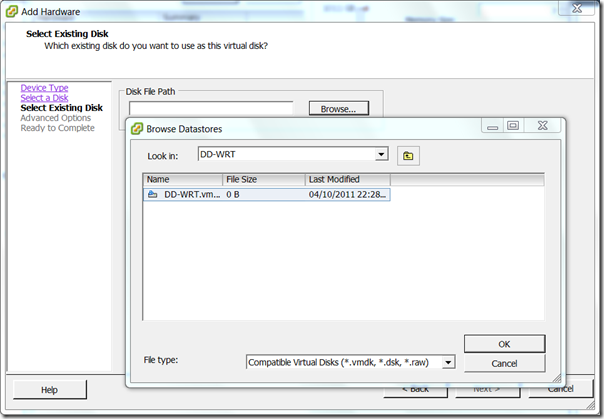
- In Advanced Options, ensure that the Virtual Device Node is ‘IDE (0:0)’
- Click OK, then Finish. Power on the Windows VM.
- Load PhysGUI (make sure you elevate it)
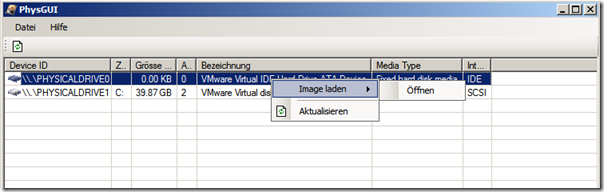
- Ensure that you select the ‘VMware Virtual IDE Hard Drive ATA Device’, right click select ‘Image laden’ –> ‘Öffinen’. Select the downloaded DD-WRT image.
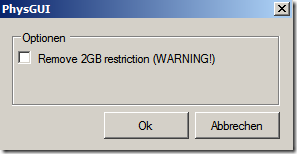
- Click OK through the prompts.
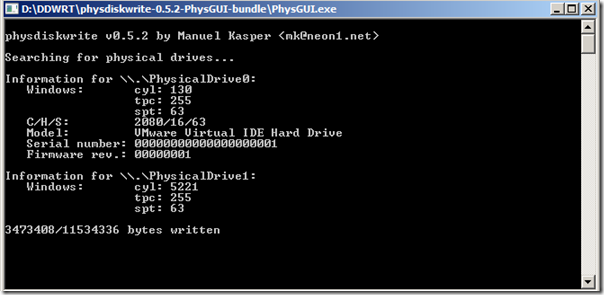
- Wait until the disk completes writing. Shut down the VM.
- Edit the Windows VM’s properties. Select the DD-WRT virtual disk and press remove. Ensure ‘Remove from virtual machine’ is selected. Click OK.
- Start up the DD-WRT VM.


Connecting to the Router
- Load another VM on the same LAN as the router. Ensure that it is configured to automatically obtain an IP address.
- It should be assigned an IP by the DD-WRT router’s DHCP server service. You can see this by performing an ipconfig (if using a Windows client)
- Presuming that you have an IP address, use the web browse to connect to 192.168.1.1
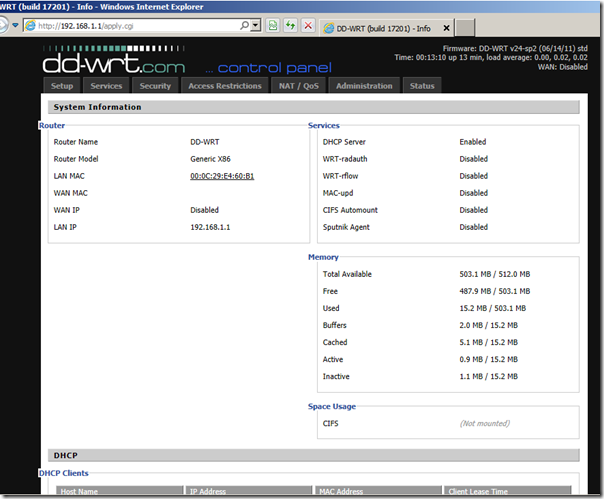
- It will ask to set the username and password. Note that if you SSH into the router at a later point, it will use the username ‘root’ with the password set here.
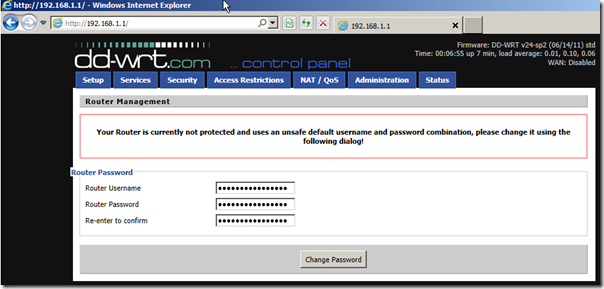
- You are presented with the DD-WRT System Information page. This will show the current hardware, configuration, DHCP client list, etc.


Wenn euch das zu viel arbeit ist könnt ihr auch hier die fertige VM herunterladen
Dienstag, 15. Mai 2012
SQL Server 2008 R2 – Error code 0x84B20001.
When we try to install a patch over SQL Server 2008, we received the following error message.

Work Around:
Open the registry and varify the value at HKEY_LOCAL_MaCHINE\\Software\Microsoft\Microsoft SQL Server\100\ConfigurationState
The values for all the keys under this should be 1. If it is not 1, then there is some issue in configuring the corresponding feature.
Fix the feature configuration issue or edit the registry to change the value to 1 to install the patch.
Mittwoch, 25. April 2012
Call fails for “HostDatastoreSystem.QueryVmfsDatastore- CreateOptions” for object “ha-datastoresystem”
As part of the post installation configuration of the VMWare ESXi server I tried to add a second (local) datastore by using the Add Storage wizard in the vSphere Client.
In the Add Storage Wizard, I specified Disk/LUN as Storage Type and selected the available disk (the RAID10 set).
In the Add Storage Wizard, I specified Disk/LUN as Storage Type and selected the available disk (the RAID10 set).

After pressing Next, the Add Storage Wizard returned the following error:
An error occured during host configuration.
Call “HostDatastoreSystem.QueryVmfsDatastoreCreateOptions” for object “ha-datastoresystem” on ESXi “192.168.1.61″ failed.
Call “HostDatastoreSystem.QueryVmfsDatastoreCreateOptions” for object “ha-datastoresystem” on ESXi “192.168.1.61″ failed.

On a side note, if you close this error message and go a step backwards and continue forward it wil not give an error anymore.
This is not a solution or workaround, because when the Wizard gets at the Formatting property sheet, it wil give the following error:
This is not a solution or workaround, because when the Wizard gets at the Formatting property sheet, it wil give the following error:

"De objectverwijzing is niet op een exemplaar van een object ingesteld" is dutch for "Object reference not set to an instance of an object"
I couldn’t find more detailed information about this error in the eventlog of the vSphere client, located in the directory: %USERPROFILE%\Local Settings\Application Data\VMware\vpx.
And a search on the Internet didn’t gave a answer either.
And a search on the Internet didn’t gave a answer either.
So I was forced to troubleshoot on my own.
I was certain that the volume was consistent , because I had performed a full initialization and integrity check when the RAID10 disk was created.
As shown in the second screenshot of this post, the Add Storage wizard indicated that the disk was blank. I further noticed that there was no Available space on this disk.
Normally speaking it would show how much space is available on the disk, so I assumed that there was something wrong with the partition table of this disk.
I couldn’t find an option in the vSphere client to remove the existing partition info on this volume.
Normally speaking it would show how much space is available on the disk, so I assumed that there was something wrong with the partition table of this disk.
I couldn’t find an option in the vSphere client to remove the existing partition info on this volume.
So I logged on to the ESXi server by using a SSH connection and issued the command fdisk -l.
The following output was shown:
The following output was shown:

The disk /dev/disks/naa.6001e4f023eb110013ffed36d40990cb is the disk on which I tried to create a datastore.
I directly knew which disk I should look for, but it can be easily identified through the Add Storage wizard of the vSphere client. (See the first screenshot in this post)
I directly knew which disk I should look for, but it can be easily identified through the Add Storage wizard of the vSphere client. (See the first screenshot in this post)
As you can see, this disk contains 3 partitions (p1, p2 and p3)!
How is this possible?
Probably a leftover of the previous installation, although I had destroyed the previous RAID set.
Fdisk also gave some warnings, indicating a non-consistent partition table on this disk.
Probably a leftover of the previous installation, although I had destroyed the previous RAID set.
Fdisk also gave some warnings, indicating a non-consistent partition table on this disk.
I decided to remove the partitions manually and used the following commands to remove them:
- fdisk /dev/disks/naa.6001e4f023eb110013ffed364d40990cb.
fdisk is started in the context of this disk. - Press d and enter 1 for the partition number, partition 1 on this disk will be deleted
- Press d again and enter 2, which will delete partition 2
- Because partition 2 is an extended partition, partition 3 will be deleted as well. There is no need or even possible to delete the third partition.
- Press w, to write the changes to disk

To verify the deletion of the partitions on this disk, I issued the fdisk -l command again:

After this procedure, I was able to create a datastore on this disk through the Add Storage wizard!
Dienstag, 24. April 2012
Backup Exec 12.5 Failure - can't find q57nd60a.sys
I'm backing up a ProLiant Server, with Windows Server 2008 x64 (SBS2008) installed, using Backup Exec 12.5 and I've noticed my backups are starting to complete with exceptions and it is only becuase of one file. The warning message is:
VSS Snapshot warning. File c:\windows\systems32\drivers\q57nd60a.sys is not present on the snapshot.
I did some research at Symantec and their support pages just state to contact the driver manufacturer for removal/cleanup instructions as the file has not been uninstalled/removed properly.
I've checked this driver and it is currently named b57nd60a.sys & NOT q57nd60a.sys. I'm guessing that a previous network driver update renamed the file.
Would updating to latest available driver resolve the issue? Should I uninstall all network drivers & then install latest version? Or does anyone else have any advice on how to resolve this?
First, you can just ignore this error
Second, you can create "fake" file with name q57nd60a.sys in c:\windows\systems32\drivers\ In such way you will not have exception.....
VSS Snapshot warning. File c:\windows\systems32\drivers\q57nd60a.sys is not present on the snapshot.
I did some research at Symantec and their support pages just state to contact the driver manufacturer for removal/cleanup instructions as the file has not been uninstalled/removed properly.
I've checked this driver and it is currently named b57nd60a.sys & NOT q57nd60a.sys. I'm guessing that a previous network driver update renamed the file.
Would updating to latest available driver resolve the issue? Should I uninstall all network drivers & then install latest version? Or does anyone else have any advice on how to resolve this?
First, you can just ignore this error
Second, you can create "fake" file with name q57nd60a.sys in c:\windows\systems32\drivers\ In such way you will not have exception.....
Donnerstag, 19. April 2012
Abgelehnte Besprechungsanfragen bei Exchange 2007
Will man einen Raum länger als 1440 Minuten (24 Stunden) buchen, dann bekommt man (in der Standardeinstellung) folgende Mitteilung vom Exchange 2007 Server:
Ihre Besprechungsanfrage wurde abgelehnt.Diese Ressource akzeptiert keine Besprechungen, die länger als 1440 Minuten dauern.
Bei einem Exchange 2010 Server kann man dies leicht umgehen und jeden Raum in der grafischen Oberfläche einstellen. In der 2007er Version muss man dies über die Shell machen.
Der Befehl für einen Raum lautet (Änderung auf 5 Tage):
Set-MailboxCalendarSettings -Identity "Raumname" -MaximumDurationInMinutes 7200
Um alle Räume zu ändern (auch 5 Tage):
get-mailbox | Where-Object { $_.IsResource -eq 'true'} | Set-MailboxCalendarSettings -MaximumDurationInMinutes 7200
Um die Funktion komplett zu deaktivieren (für alle angelegte Räume)
get-mailbox | Where-Object { $_.IsResource -eq 'true'} | Set-MailboxCalendarSettings -EnforceSchedulingHorizon $falseWinSxS-Ordner von Windows 7 und Server 2008 R2 verkleinern
Nach der erfolgreichen Installation eines Service Packs in Windows 7 lässt sich ein Teil des vom WinSxS-Ordner belegten Speichers zurück gewinnen. Der folgende Befehl führt dazu, dass die Service Pack-Sicherungsdateien entfernt werden:
dism /Online /Cleanup-Image /spsuperseded
Der Befehl sollte in der Eingabeaufforderung mit Administrationsrechten ausgeführt werden.
Vorsicht: Nach Ausführung des Befehls ist die Deinstallation des Service Packs nicht mehr möglich!
dism /Online /Cleanup-Image /spsuperseded
Der Befehl sollte in der Eingabeaufforderung mit Administrationsrechten ausgeführt werden.
Vorsicht: Nach Ausführung des Befehls ist die Deinstallation des Service Packs nicht mehr möglich!
Sonntag, 15. April 2012
Windows 7 / Vista Switch AHCI TO IDE
Switch AHCI TO IDE (Tutorial HowTo) !!!
Welcome all , so let me explain I installed Windows 7 With AHCI set from Bios , but after that i wanted to use ide (becose it boots faster) and when i set Ide from Bios , the windows 7 loading screan camed upp and BSOD (Blue screen of death) with an error code 0x0000005B , i tryed the regedit trick by setting in the "HKEY_LOCAL_MACHINESystemCurrentControlSetServicesMsahci" and then in the right pan the START value from 0 i set it to 1 and it supposed to be working but it was a failiure , it still did the Bsod and i was so pissed of , i wanted to make it work ... AND I DID IT !
Here are the pases :
1) I assume u have installed Windows Vista or Windows 7 with AHCI set from BIOS !
2) Download my registry fix (to add the ide keys to regeditor) simply apply the key
3) Now the manually regedit part Go to :
HKEY_LOCAL_MACHINE_System_CurrentControlSet_Services_Msahci
HKEY_LOCAL_MACHINE_System_CurrentControlSet_Services_iaStor
HKEY_LOCAL_MACHINE_System_CurrentControlSet_Services_iaStorV
And in thease three keys in the right pan u will find a key named "START" change at all three (Msahci,iaStor,iaStorV) values from 0 To 1
Now navigate to HKEY_LOCAL_MACHINE_System_CurrentControlSet_Services_PciIde
,then change the start value to "0"
4) Now u are allmost done , restart your computer/laptop , and go to Bios and set from AHCI to IDE !!! , save settings in Bios and restart
5)Windows will be loading , and VOILA !!! NO BSOD !!! , windows Vista/Seven will install new Ide drivers and u will see in windows device manager that you dont have AHCI drivers anymore , u have Ide drivers !
6)It will prompt for another restart , just restart it and u will be happy
Credits goes for ME ! ONLY ME !!!!! , i searched all the internet and i couldn`t find something like this , so i began from literally everything to everything , a LOT OF REBOOTS AND BSOD`s believe me it was a pain in the ass !
But i done it !, now im ussing Windows 7 With ide mode ...
Every article on the internet when i searched it sayd : Change from the Msahci the start key to 1 if u want to make it boot from ide , but no it is much much more !
For some people it works like that , for some people it doesn`t.
Welcome all , so let me explain I installed Windows 7 With AHCI set from Bios , but after that i wanted to use ide (becose it boots faster) and when i set Ide from Bios , the windows 7 loading screan camed upp and BSOD (Blue screen of death) with an error code 0x0000005B , i tryed the regedit trick by setting in the "HKEY_LOCAL_MACHINESystemCurrentControlSetServicesMsahci" and then in the right pan the START value from 0 i set it to 1 and it supposed to be working but it was a failiure , it still did the Bsod and i was so pissed of , i wanted to make it work ... AND I DID IT !
Here are the pases :
1) I assume u have installed Windows Vista or Windows 7 with AHCI set from BIOS !
2) Download my registry fix (to add the ide keys to regeditor) simply apply the key
3) Now the manually regedit part Go to :
HKEY_LOCAL_MACHINE_System_CurrentControlSet_Services_Msahci
HKEY_LOCAL_MACHINE_System_CurrentControlSet_Services_iaStor
HKEY_LOCAL_MACHINE_System_CurrentControlSet_Services_iaStorV
And in thease three keys in the right pan u will find a key named "START" change at all three (Msahci,iaStor,iaStorV) values from 0 To 1
Now navigate to HKEY_LOCAL_MACHINE_System_CurrentControlSet_Services_PciIde
,then change the start value to "0"
4) Now u are allmost done , restart your computer/laptop , and go to Bios and set from AHCI to IDE !!! , save settings in Bios and restart
5)Windows will be loading , and VOILA !!! NO BSOD !!! , windows Vista/Seven will install new Ide drivers and u will see in windows device manager that you dont have AHCI drivers anymore , u have Ide drivers !
6)It will prompt for another restart , just restart it and u will be happy
Credits goes for ME ! ONLY ME !!!!! , i searched all the internet and i couldn`t find something like this , so i began from literally everything to everything , a LOT OF REBOOTS AND BSOD`s believe me it was a pain in the ass !
But i done it !, now im ussing Windows 7 With ide mode ...
Every article on the internet when i searched it sayd : Change from the Msahci the start key to 1 if u want to make it boot from ide , but no it is much much more !
For some people it works like that , for some people it doesn`t.
Samstag, 14. April 2012
Service Pack 2 für Office 2011 ist fertig
Microsoft hat das Service Pack 2 für Office 2011 freigegeben. Dieses enthält zahlreiche Verbesserungen für die Büroprogramme von Microsoft. Unter anderem wurden die deutsche Schreibkorrektur und die Anbindung an Skydrive verbessert. Nutzer von Mac OS X 10.7 alias Lion können nun in der Dokumentenverbindung Drag-and-Drop benutzen.
Outlook-Nutzer können nun eine optimierte Datenbank im Hintergrund nutzen. Dadurch soll auch die Arbeitsgeschwindigkeit erhöht worden sein. Vor allem beim Verschicken und Anzeigen von E-Mails soll das spürbar sein.
Mit dem Update unterstützt Powerpoint außerdem den neuen Vollbildmodus von Lion. Insgesamt hat Microsoft etwas mehr als 100 Fehlerbehebungen und Verbesserungen aufgelistet. Die meisten davon betreffen Outlook.
Das Service Pack 2 kann bereits heruntergeladen werden. Weitere Informationen finden sich in einem Knowledge-Base-Artikel von Microsoft.
OUTLOOK:MAC 2011. ATTACHMENT LIMIT FÜR EXCHANGE AUFHEBEN
Glaubt man der Fachpresse ist der in Office:Mac 2011 enthaltene Mailclient Outlook 2011 der professionellste Mailclient, um in Exchange dominierten Umgebungen E-Mail, Kalender und Termine perfekt unter OSX einzubinden. Im Großen und Ganzen stimmt das auch. Umso überraschender ist es, dass Outlook:Mac aus dem Hause Microsoft nicht die Exchange MAPI Schnittstelle, sondern die Web Services nutzt – und ebenso wie Apple Mail am 10 MB Limit der Exchange Web Services (EWS) in Microsoft Exchange scheitert. Mails über 6 MB lassen sich in der default Konfiguration von Exchange also auch unter Outlook für Mac nicht versenden. Besser noch – obwohl beide Pakete aus dem Hause Microsoft stammen, werden auch keine Administrator Tools, oder zumindest ein Whitepaper für Exchange Administratoren geboten, die verraten wie dieses Problem gelöst wird. Alles was Microsoft zu diesem Thema verrät, ist folgender lapidarer Satz im Helpforum: “Outlook (gemeint ist Outlook for Mac 2011) has no limit on the size of attachments you may send. The limitation is on the server (gemeint ist ein Exchange Server 2007 0der 2010 – denn Outlook for Mac unterstützt keine älteren Exchange Systeme). Outlook along with Entourage, Web Services Edition, uses a new protocol for communicating with an Exchange server called Exchange Web Services (EWS). Entourage 2008 and earlier use an older protocol called WebDAV. Das ist richtig und schön gesagt – nur leider fehlt jeder Ansatz einer Lösung!! Peinlich für einen Mailclient der seine höchste Performance ja gerade im Exchange Umfeld entwickeln sollte. Ursache dieser limitierung sind ganz einfach die Standardwerte der Excchange Web Services (EWS), die Outlook für Mac 2011 ebenso wie Apple Mail zum connect mit dem Exchange Server verwendet. Per default sind diese Werte auf 10 MB begrenzt. Addiert man die Filegröße der Attachements und die generierten Mime Files, so ist die erzeugte Mailgröße um ca. 1/3 größer als die Ursprungsdatei des Anhangs und die Mail wird vom Sever abgelehnt. Der Lösungsweg: ! Nur für Leute die wissen, was sie tun – und wie sie es ggf. auch rückgängig machen können ! Wie Microsoft richtig bemerkt kann das Problem nur serverseitig behoben werden, indem die default Werte für die EWS und OWA Dienste im Exchange Server neu konfiguriert werden. Dummerweise können diese Einstellungen nicht per Klick über die Exchange Verwaltungskonsole ausgeführt werden, sondern durch das händische Editieren der Config-Dateien mit einem Texteditor. Grundsätzlich sollte natürlich von jeder Config-Datei vor dem Editieren eine Sicherungskopie angelegt und an einem sicheren Ort gespeichert werden, um im worst case den Originalzustand des Exchange Servers wieder herstellen zu können – aber das ist ja selbstverständlich. Um die Arbeiten auszuführen, benötigen wir Administratorenrechte auf dem Exchange Server. Anpassen der Exchange Web Services (EWS) web.config: Die Datei befindet im Regelfall auf dem Exchange Server unter dem Pfad “C:\Program Files\Microsoft\Exchange Server\ClientAccess\exchweb\ews\web.config”. Wir öffnen die Datei mit dem Editor und suchen nach dem String “maxrequestlength” (natürlich ohne Anführungszeichen). Die Zeile befindet sich fast am Ende der Datei. Ändern Sie nun den Wert zwischen den Anführungszeichen auf die gewünschte Attachementgröße plus 30 Prozent. Die Angaben erfolgen in Kilobyte. Zum Beispiel: Man möchte Anhänge mit einer Größe von 21 MB versenden. Also muß man 30 Prozent für die Mime Codierung hinzurechnen – ergibt insgesamt 28 MB. Plus Reserve sind wir also mit 30 MB auf der sicheren Seite. Nun müssen wir diesen Wert in Kilobyte umrechnen (Umrechner z.B. unter http://www.fischerclan.de/byte_umrechner.html). In unserem Beispiel ist der entsprechende Wert in Kilobyte “30720″. Wenn die Änderungen vorgenommen wurden, kann die Datei gesichert werden. Anpassen des Outlook Web Access (OWA) web.config: Die Datei befindet sich im Regelfall unter dem Pfad “C:\Program Files\Microsoft\Exchange Server\ClientAccess\owa\web.config”. Wir öffnen die Datei mit dem Editor und suchen nach dem String “maxrequestlength” (natürlich ohne Anführungszeichen). Die Zeile befindet sich fast am Anfang der Datei. Wir editieren den Wert mit den exakt gleichen Kilobyte Werten, die wir in der Datei web.config unter den EWS verwendet haben und sichern die Datei. Als letzen Schritt müssen wir den Server neu starten – und schon können wir Mails in der gewünschetn Größe versenden.
Abonnieren
Posts (Atom)
-
One of the visitors of this blog asked the question if we could publish a list of recommended post Windows Server 2008 R2 SP1 hotfixes rela...
-
With your Windows Network working and a number of resources shared, you can install the TCP/IP Protocol to allow your Windows for Workgrou...
