Best of Blogs. In meinen Blog veröffentliche alle Lösungen für Probleme mit denen ich selbst zu tun gehabt habe. Die meisten Beiträge sind von anderen Blogs oder Webseiten kopiert.
Montag, 25. April 2011
SBS 2008/2011, Receive- + POP3-Connector und das Problem mit der Nachrichtengröße
Donnerstag, 21. April 2011
Exportieren von PST aus Exchange 2010 automatisieren
In diesem Artikel habe ich euch gezeigt, wie Ihr den Export von PST-Dateien aus Microsoft Exchange 2010 aktiviert, nun zeige ich euch, wie ihr das ganze automatisieren könnt.
Als erstes erstellen wir eine Datei namens “Export.ps1” mit folgendem Inhalt
Get-Mailbox -Database “Mailbox Database“ | Export-Mailbox -PSTFolderPath d:\PST
wobei ihr noch der Datenbanknamen anzupassen ist, und das Verzeichniss muss noch auf eures geändert werden. Mit diesem Befehl werden alle Mailboxen in ihre entsprechende PST Datei exportiert, also eine komplette Sicherung. Speichert diese Datei am besten in den PST Ordner.
Erstellt in diesem eine BAT oder CMD Datei mit folgendem Inhalt
powershell -PSConsoleFile “C:\Program Files\Microsoft\Exchange Server\V14\Bin\exshell.psc1″ -command D:\pst\export.ps1 > D:\pst\pstbackup-log.txt
Hier ist darauf zu achten das der Pfad zur “exdhell.psc1” angepasst wird, genauso wie zu unserer “export.ps1” und das Log muss noch wo abgelegt werden. Unsere erstellt “BAT oder CMD Datei kann somit als Task eingerichtet werden. Somit haben wir eine komplette Exchange 2010 Sicherung
Export PST von Exchange 2010
Man sollte glauben, dass Microsoft etwas dazugelernt hat, seit Exchange 2007, was das exportieren von PST-Dateien angeht, leider nein, darum hier eine Anleitung und Fehlerbehebung bis das Ganze funktioniert.
Zuerst einmal müssen wir das Mailbox-Export CMDlet aktivieren, also für einen User oder Gruppe freischalten.
Wir öffnen die Powershell Konsole am Exchange 2010 Server und tippen folgendes ein für einen User
New-ManagementRoleAssignment –Role “Mailbox Import Export” –User “Administrator”
oder eine Gruppe
New-ManagementRoleAssignment –Role “Mailbox Import Export” –Group “MailboxAccessGroup”
danach sollte das “Export-Mailbox” CMDlet” verfügbar sein, jedoch war das noch lange nicht alles.
Auf dem Exchange 2010 Server muss ein Outlook 2010 x64 installiert werden, nicht wie früher auf einer Remote Maschine, sondern direkt am Mail Server. Was früher ein No-Go von Microsoft war, ist heute Voraussetzung. Nachdem wir Outlook installiert haben, testen wir mal den Befehl.
Export-Mailbox –Identity *USER* –PSTFolderPath *PFAD*
Laut Microsoft solls nun bei allen funktionieren, bei mir, und vielen anderen, tut es das nicht sondern es folgt ein Fehler
Fehler für Admin (Admin@domain.com). Ursache: Fehler im Schritt: Das Objekt wird genehmigt. Unbekannter Fehler., Fehlercode
: -2147221219.
+ CategoryInfo : InvalidOperation: (0:Int32) [Export-Mailbox], RecipientTaskException
+ FullyQualifiedErrorId : E54E4C23,Microsoft.Exchange.Management.RecipientTasks.ExportMailbox
Laut einigen Artikeln, sollte man einen zusätzlichen Microsoft Exchange 2010 Server installieren, einmal die Postfächer verschieben, und das war, is ja ein Klacks. ![]()
Hier eine etwas schnellere Lösung.
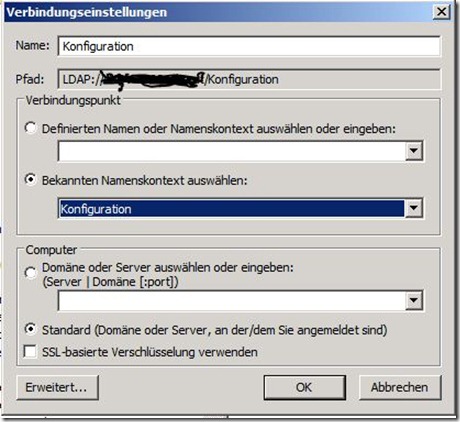
Startet am DomainController ADSI Edit, öffnet eine Verbindung laut Screenshot
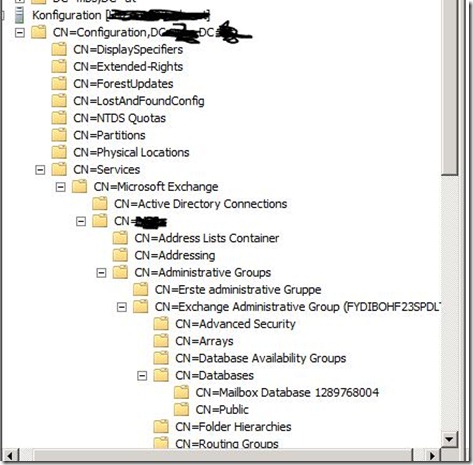
Wechselt laut Screenshot zu eurer Mail DB,
Rechtsklick auf die gewünschte Database, Registerkarte Sicherheit, fügt ihr den “System” Benutzer hinzu und gebt ihm folgende Rechte.
- Read
- Administer information store
- Allow Impersonation to Personal Exchange…
- Create named properties in the information store
- Open mail send queue
- Receive as
- Send as
- View information store status
Danach noch zur Sicherheit den Information Store neu starten, danach sollte euer PST Export ohne Probleme durchlaufen. Im nächste Artikel zeige ich euch wie Ihr das ganze automatisieren könnt, damit alle User in PST Files exportiert werden.
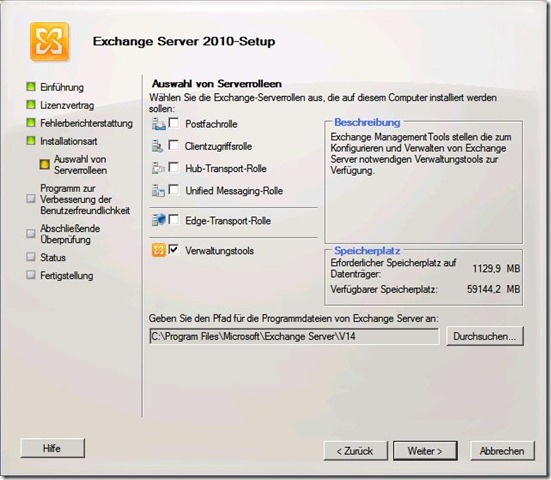
Wenn ihr den Export-Job denoch von einer Remote-Maschine starten wollt, müsst Ihr auf dieser noch die Microsoft Exchange 2010 Verwaltungstools installieren und unbedingt Outlook 2010 x64 auf dem Mail Server
Mittwoch, 20. April 2011
Hosted Exchange 2010 Setup Guide
A few days ago, Exchange Server 2010 SP1 just released and it’s time to install a Hosted Exchange organization without HMC. Before SP1 installation, you should not install any Exchange Server on your current domain forest. If you have one, you should remove it or create a new forest for the Exchange Server 2010 SP1. What I will have in my environment:
* 2 x 1 CAS + Mailbox Role
I don’t have enough resource to split CAS and Mailbox Role. If you don’t need a huge infrastructure, you can do same thing as me. Now I’m ready to install Exchange Server 2010 SP1.
Download Microsoft Exchange Server 2010 SP1 from here:
It’s an exe file. You should extract it first. For your information, for the Hosted Exchange infrastructure, you should install SP1 by command line. There is no option on GUI for Hosted Exchange.
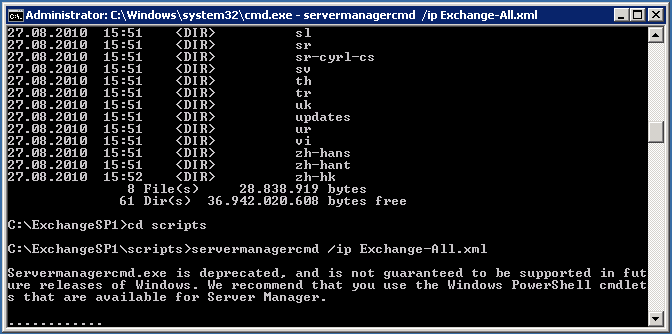
I’m going to install one of my Hub Transport server called EXGW01. As the first step, install required features:
servermanagercmd /ip Exchange-All.xml
Set “NetTcpPortSharing” startup type as Automatic with Powershell:
Set-Service NetTcpPortSharing –startuptype AutomaticAlso Exchange setup has to extend active directory scheme so you need to install:
ServerManagerCmd -i RSAT-ADDS
After required features installation, you should restart the server.
When restart is completed, install Office 2010 filter pack.
Now we are ready to go.
Open a command prompt windows (CMD) and type install command.
setup.com /mode:install /role:HT,MT /organizationName:HostedExchange /hosting
Full list of Role codes:
ClientAccess: CA
Mailbox: MB
EdgeTransport: ET
ManagementTools: MT
So Step 1 is below:
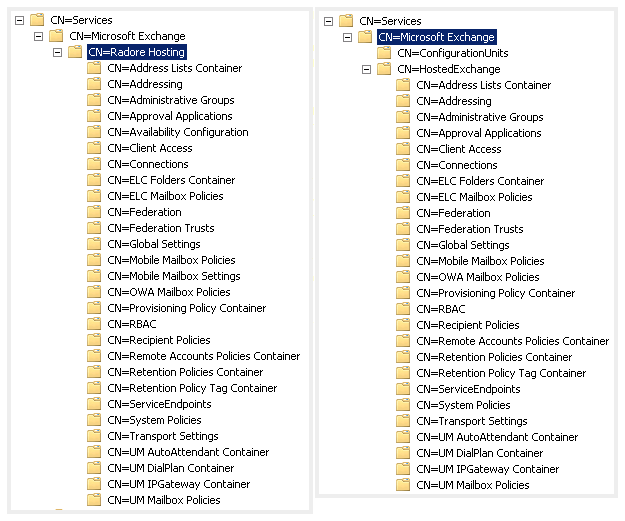
At the same time lets check schema status:
Do you see differences between Exchange Server 2010 and Hosted Exchange 2010? Yes, in the Hosted Exchange configuration, you see a new unit called ConfigurationUnits.
Btw, installation is going on well..
And finally, we finished our first server installation. Now we have a Hub Transport server.
I’ll do same thing to my second Hub Transport server. After installation, I’ll will make them load balanced servers. I’ll show how to load balanced them later.
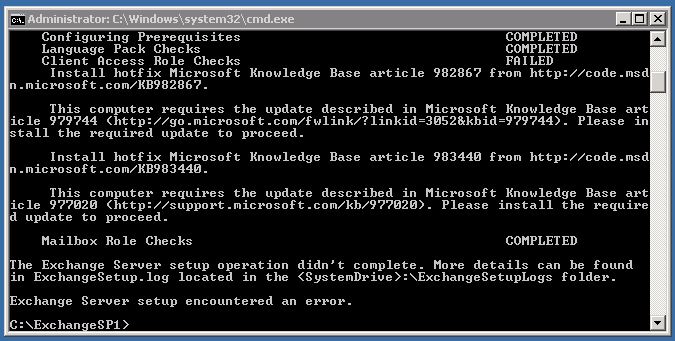
Next, I’ll start setup of CAS and Mailbox Server. As I said, they will on the same server because I don’t have so many resources. Also as you know, much servers means much license prices. I use CMD again for the installation. But before the installation, install required updates.
You don’t need to reboot your server after updates.
If you don’t install required updates, Exchange setup fails.
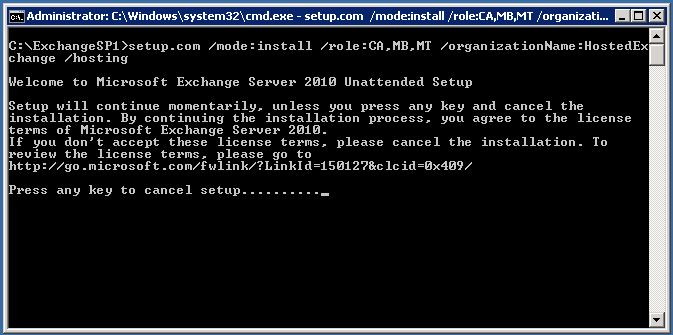
Start installation:
setup.com /mode:install /role:CA,MB,MT /organizationName:HostedExchange /hosting
If you installed all required features, then setup would finish without errors.
After setup completed, you have to reboot your server.
Now go to second server and do same processes to other CAS + Mailbox Server.
If you finish installation of second server, we can continue with configuration of our Hosted Exchange environment.
If you followed, at the Part 1, I installed two CAS + Mailbox Server and two Hub Transport Server. At the second part, I’ll configure Database Availability Groups between my two Mailbox servers.
First of all, you have to install Failover Cluster feature from Server Manager. After that I need to create Database Availability Group. I have to choose a Witness server. Witness server should be Hub Transport server in a recommended environment. So I choose it as my first Hub Transport Server called EXGW01.
New-DatabaseAvailabilityGroup -Name 'RadoreDAG' -WitnessServer 'EXGW01' -WitnessDirectory 'C:\RadoreDAG'
You should execute this command on Exchange Management Shell. After the command, lets check our DAG.
As you see, I don’t have any member servers right now. I’ll join my Mailbox servers to DAG.
Add-DatabaseAvailabilityGroupServer -Identity 'RadoreDAG' -MailboxServer 'EXCAS01'
After adding first mailbox server, you can check your witness file directory. It should be created by Exchange DAG. Now let’s add second server to DAG. Also our cluster is created on Failover Cluster Manager.
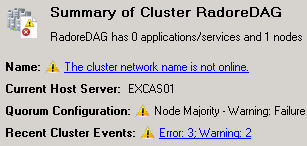
But as you see there is no network right now. So we should add them.
Let’s see ipv4 status.
Get-DatabaseAvailabilityGroup | FL Name,*IP*
DatabaseAvailabilityGroupIpv4Addresses : {}
DatabaseAvailabilityGroupIpAddresses : {}
So we don’t have any network for DAG. Let’s create them now.
We should have 2 different networks. One is Public, other one is Replication network. On my environment, I use Replication network as a Backup Network. I’ll backup my Exchange servers with Microsoft System Center Data Protection Manager 2010 using replication network.
My Replication Network: 192.168.0.0/16
Now, it’s time to create networks. For public network:
New-DatabaseAvailabilityGroupNetwork -DatabaseAvailabilityGroup RadoreDAG -Name Internet -Description "Internet Network" -Subnets 94.101.92.0/24 -ReplicationEnabled:$False
For replication network:
New-DatabaseAvailabilityGroupNetwork -DatabaseAvailabilityGroup RadoreDAG -Name Backup -Description "Backup Network" -Subnets 192.168.0.0/16 -ReplicationEnabled:$True
After configuration of networks, we should configure Group IP.
Set-DatabaseAvailabilityGroup -Identity RadoreDAG -DatabaseAvailabilityGroupIPAddresses 94.101.92.10
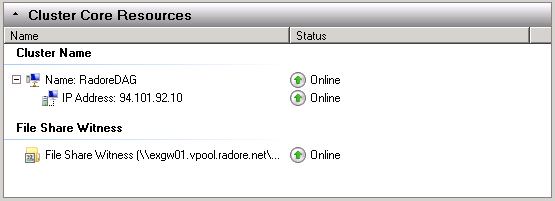
Ok, now check the Failover Cluster Manager:
As you see our DAG name is active. Also our networks are active.
So now we can add our second server to DAG.
Add-DatabaseAvailabilityGroupServer -Identity 'RadoreDAG' -MailboxServer 'EXCAS02'
Ok, our second server is active on DAG.
After second server, also our witness file share is active.
I configured the DAG and networks. Next, I’ll create 3 different databases for customers.
New-MailboxDatabase -Server 'EXCAS01' -Name 'Database01' -EdbFilePath 'C:\Program Files\Microsoft\Exchange Server\V14\Mailbox\Database01\Database01.edb' -LogFolderPath 'C:\Program Files\Microsoft\Exchange Server\V14\Mailbox\Database01'
New-MailboxDatabase -Server 'EXCAS01' -Name 'Database02' -EdbFilePath 'C:\Program Files\Microsoft\Exchange Server\V14\Mailbox\Database02\Database02.edb' -LogFolderPath 'C:\Program Files\Microsoft\Exchange Server\V14\Mailbox\Database02'
New-MailboxDatabase -Server 'EXCAS01' -Name 'Database03' -EdbFilePath 'C:\Program Files\Microsoft\Exchange Server\V14\Mailbox\Database03\Database03.edb' -LogFolderPath 'C:\Program Files\Microsoft\Exchange Server\V14\Mailbox\Database03'
Let’s check our databases:
Get-MailboxDatabaseI created the databases. Now I should check databases status.
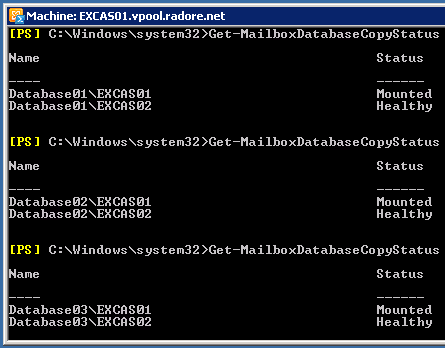
Get-MailboxDatabaseCopyStatusWe have to mount them:
Mount-Database -Identity 'Database01'
Mount-Database -Identity 'Database02'
Mount-Database -Identity 'Database03'
Lets check it again:
Now we can replicate them with other mailbox server:
Add-MailboxDatabaseCopy -Identity 'Database01' -MailboxServer 'EXCAS02' -ActivationPreference '2'
Add-MailboxDatabaseCopy -Identity 'Database02' -MailboxServer 'EXCAS02' -ActivationPreference '2'
Add-MailboxDatabaseCopy -Identity 'Database03' -MailboxServer 'EXCAS02' -ActivationPreference '2'
You may get this error when you try operation:
hile processing a request on server ‘EXCAS01′. Error: Database ‘bb1e972e-a343-4cfe-8544-39f18facd816′ was not active on
source server ‘EXCAS01′.. [Database: Database01, Server: EXCAS02.vpool.radore.net]
+ CategoryInfo : InvalidOperation: (:) [Add-MailboxDatabaseCopy], SeedInProgressException
+ FullyQualifiedErrorId : E25C52CD,Microsoft.Exchange.Management.SystemConfigurationTasks.AddMailboxDatabaseCopy
Thats a replication issue. Don’t worry about it. Let’s make them available.
First check their replicate status:
Get-MailboxDatabaseCopyStatus -Identity 'Database01'
Get-MailboxDatabaseCopyStatus -Identity 'Database02'
Get-MailboxDatabaseCopyStatus -Identity 'Database03'
We have to start replication:
Resume-MailboxDatabaseCopy -Identity 'Database01\EXCAS02'
Resume-MailboxDatabaseCopy -Identity 'Database02\EXCAS02'
Resume-MailboxDatabaseCopy -Identity 'Database03\EXCAS02'
So let’s move default mailboxes to new DAG databases.
Get-Mailbox | New-MoveRequest -TargetDatabase "Database01"
To check Move Request status:
Get-MoveRequestSo if you see that as “Completed” than you can remove requests:
Get-MoveRequest | Remove-MoveRequest
Now it’s time to move hidden mailboxes. First see them:
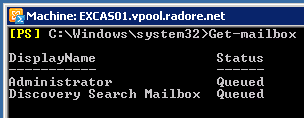
Get-Mailbox -Arbitration
Get-Mailbox -Arbitration | New-MoveRequest -TargetDatabase “Database01”
Get-MoveRequestGet-MoveRequest | Remove-MoveRequest
So we moved all default mailboxes. Now we can delete default mailbox databases.
'Mailbox Database 0342336127 (YOUR UNIQUE ID) ' | Remove-MailboxDatabase
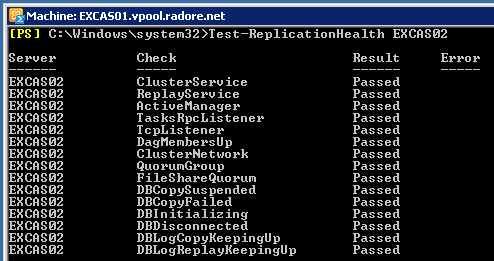
We completed our steps. As a final step, let’s check replication health status.
Test-ReplicationHealth 'EXCAS01'
Test-ReplicationHealth 'EXCAS02'
Now we have 3 databases and a fully working DAG environment. At the next part, I’ll show you how to create mailboxes for customers. Then we will see how to backup databases with Data Protection Manager 2010.
At the part 2, we configured mailbox databases. Also we made them high available with Exchange DAG.
Now at this part will see how to configure OWA load balancing and Certificate. I’ll use Citrix Netscaler for all load balancing requirements but you can use other hardware load balancing solutions like Brocade or software solutions. Idea is same for all nlb solutions :)
As the first part, I’ll load balance Exchange OWA.
Add your first CAS server as a service in Citrix.
Do same thing for the second CAS Server.
Now, go to EXCAS01 and create certificate request for OWA.
Lets see default certificates:
Get-ExchangeCertificate -Server 'EXCAS01'
So create your certificate request on EXCAS01:
New-ExchangeCertificate -FriendlyName 'exchange.radore.com.tr' -GenerateRequest -PrivateKeyExportable $true -KeySize '2048' -SubjectName 'C=TR,S="Metrocity",L="Istanbul",O="Radore Hosting",OU="IT",CN=exchange.radore.com.tr' -DomainName 'exchange.radore.com.tr','autodiscover.radore.com.tr','EXCAS01','EXCAS02','EXGW01','EXGW02' -Server 'EXCAS01'
Buy your commercial certificate and save certificate code to C:\cert.txt.
Import your certificate on EXCAS01:
Import-ExchangeCertificate -FileData ([Byte[]]$(Get-Content -Path C:\cert.txt -Encoding byte -ReadCount 0)) -Password:(Get-Credential).password
Assign IMAP, POP and IIS services to certificate. Don’t forget to use your own Thumbprint.
Enable-ExchangeCertificate -Server 'EXCAS01' -Services 'IMAP','POP','IIS' -Thumbprint '03BB616D714D04D133FDACEC3B9476'
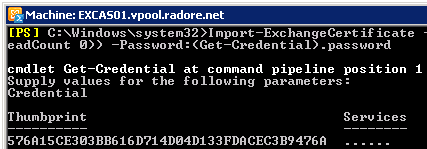
Lets check certificate status again:
Get-ExchangeCertificate -Server 'EXCAS01'
As you see, services are assigned to new SSL certificate.
We will export our certificate and import it to second CAS server, EXCAS02.
1 2 | $File = Export-ExchangeCertificate -Thumbprint '03BB616D714D04D133FDACEC3B9476' -BinaryEncoded:$true -Password (Get-Credential).password Set-Content -Path "C:\htcert.pfx" -Value $File.FileData -Encoding Byte |
Now, transfer your pfx file to EXCAS02 and import it:
Import-ExchangeCertificate -FileData ([Byte[]]$(Get-Content -Path c:\htcert.pfx -Encoding Byte -ReadCount 0)) -Password:(Get-Credential).password -PrivateKeyExportable $true
Lets check certificate status again:
Get-ExchangeCertificate -Server 'EXCAS02'
Enable same services for EXCAS02:
Enable-ExchangeCertificate -Server 'EXCAS02' -Services 'IMAP','POP','IIS' -Thumbprint '03BB616D714D04D133FDACEC3B9476'
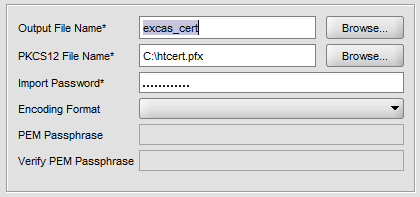
Now import same certificate to Citrix Netscaler. Navigate to SSL and click import PKCS#12.
Choose your pfx file and give a name like excas_cert for local usage.
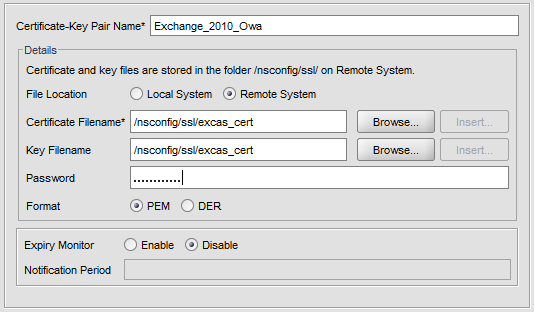
Then navigate to SSL -> Certificates and click Add.
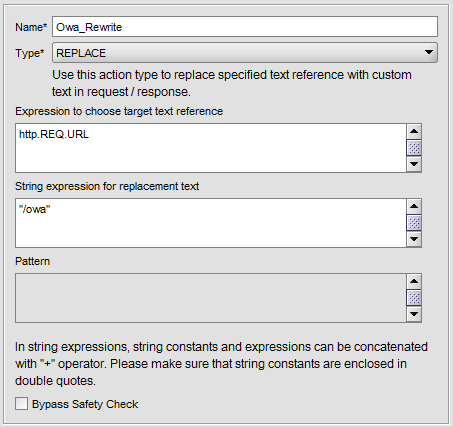
Now navigate to Rewrite -> Actions on Netscaler and click Add.
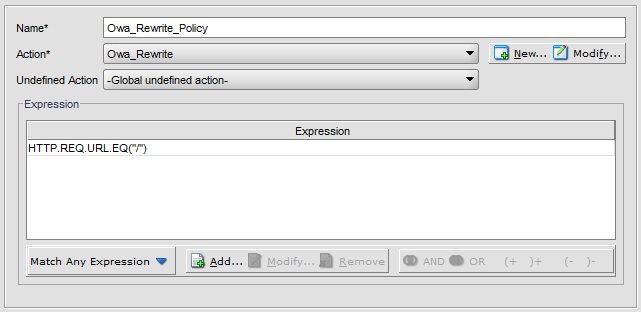
Navigate to Rewrite -> Policy and click Add.
We finished pre-required steps. Now navigate to Load Balancing -> Virtual Servers and click Add.
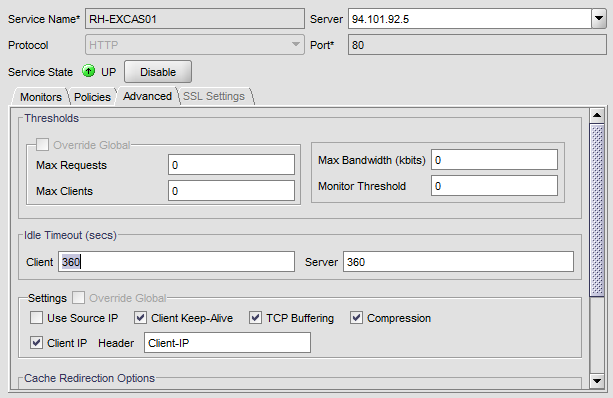
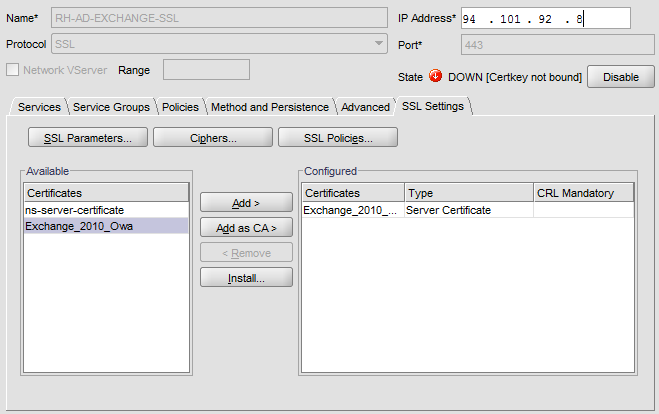
Give NLB IP Address. Choose SSL and port 443. Go to SSL and choose OWA certificate and click Add:
Add Owa services:
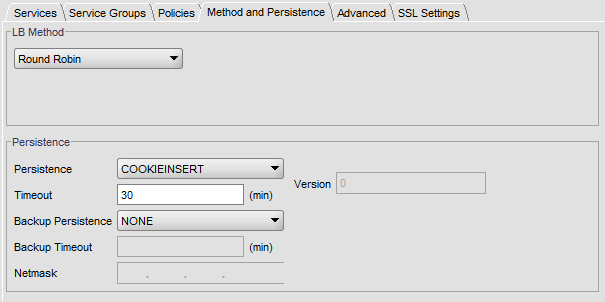
Configure Method and Persistence:
Configure OWA Redirection:
Click Create and finish SSL Virtual Server Load Balancing.
Now lets create another Virtual Server to redirect HTTP requests to HTTPS.
Navigate to Load Balancing -> Virtual Servers and click Add.
Give same NLB IP Address. Choose HTTP and port 80. Do NOT choose any service.
Go to Advanced Tab:
Also configure Method and Persistence:
Click Create and finish HTTP Virtual Server Load Balancing.
Because of you don’t select any service, Virtual Server should seen as Down.
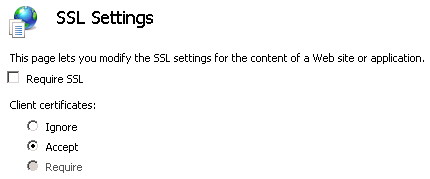
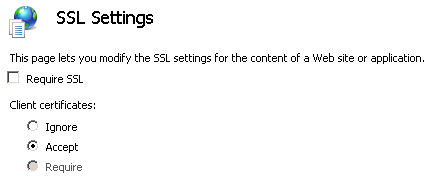
Last step, go to IIS on EXCAS01 and EXCAS02. Configure SSL Security:
Clear “Require SSL” and click Accept from SSL settings. Do same things for: OWA, EWS, ECP..
All virtual directories should accept non HTTPS traffics.
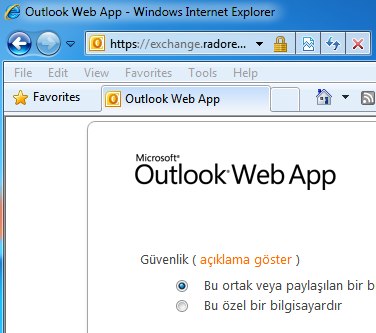
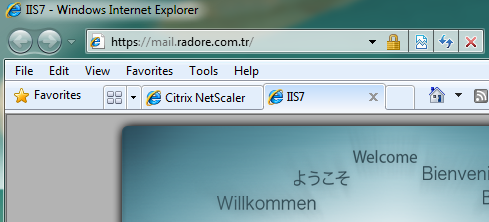
Now test your Exchange Server 2010 OWA:
Wadaaaa! We finished Citrix Netscaler Load Balancing for OWA.
Next Part, We will see how to configure CAS arrays and Hub Transport server load balancing.
Thanks for reading.
At Part 3, We configured OWA service and SSL certificate. This part, we will configure our 2 Hub Transport servers, EXGW01 and EXGW02. I’ll use Citrix Netscaler again to make a load balance between them.
Now on EXGW01, open Exchange Management Shell and execute;
New-ReceiveConnector -Name 'Inbound SMTP Array' -Usage 'Custom' -Bindings '94.101.92.2:25','94.101.92.2:587' -Fqdn 'mail.radore.com.tr' -RemoteIPRanges '0.0.0.0-255.255.255.255' -Server 'EXGW01'
Do same thing on EXGW02:
New-ReceiveConnector -Name 'Inbound SMTP Array' -Usage 'Custom' -Bindings '94.101.92.2:25','94.101.92.2:587' -Fqdn 'mail.radore.com.tr' -RemoteIPRanges '0.0.0.0-255.255.255.255' -Server 'EXGW02'
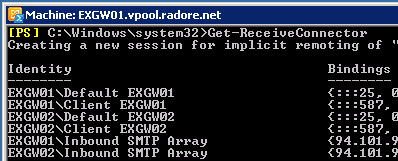
Use Get-ReceiveConnector to see recently added connectors:
Get-ReceiveConnectorEnable receive connectors to get mail from external mail address:
Get-ReceiveConnector "Inbound *" | Set-ReceiveConnector -PermissionGroups:AnonymousUsers,ExchangeUsers,ExchangeServers
Execute same command on EXGW02. Also allow relay from that ip address:
Get-ReceiveConnector "Inbound *" | Add-ADPermission -User "NT AUTHORITY\ANONYMOUS LOGON" -ExtendedRights "ms-Exch-SMTP-Accept-Any-Recipient"
Execute same command on EXGW02.
Disable default receive connectors:
1 2 3 4 | 'EXGW01\Default *' | Set-ReceiveConnector -Enabled $false 'EXGW02\Default *' | Set-ReceiveConnector -Enabled $false 'EXGW01\Client *' | Set-ReceiveConnector -Enabled $false 'EXGW02\Client *' | Set-ReceiveConnector -Enabled $false |
Now add new receive connectors for EXGW01 and EXGW02:
New-ReceiveConnector -Name 'EXGW01 SMTP' -Usage 'Custom' -Bindings '94.101.92.3:25','94101.92.3:587' -Fqdn 'mail.radore.com.tr' -RemoteIPRanges '0.0.0.0-255.255.255.255' -Server 'EXGW01'
New-ReceiveConnector -Name 'EXGW02 SMTP' -Usage 'Custom' -Bindings '94.101.92.4:25','94101.92.4:587' -Fqdn 'mail.radore.com.tr' -RemoteIPRanges '0.0.0.0-255.255.255.255' -Server 'EXGW02'
Configure load balancing on Citrix Netscaler. First add service definition as TCP – 25 for EXGW01.
Add same service definition for EXGW02 and Create a Virtual Server:
Choose Least Connection as LB Method:
Now telnet your NLB ip and you should see your FQDN:
Ok, now lets create a send connector to send mails to external address:
New-SendConnector -Name 'Exchange Gateway' -Usage 'Custom' -AddressSpaces 'SMTP:*;1' -DNSRoutingEnabled $true -UseExternalDNSServersEnabled $false -Fqdn 'mail.radore.com.tr' -SourceTransportServers 'EXGW01','EXGW02'
Create a SSL request for EXGW01:
New-ExchangeCertificate -FriendlyName 'mail.radore.com.tr' -GenerateRequest -PrivateKeyExportable $true -KeySize '2048' -SubjectName 'C=TR,S="Metrocity",L="Istanbul",O="Radore Hosting",OU="IT",CN=mail.radore.com.tr' -DomainName 'mail.radore.com.tr','autodiscover.radore.com.tr','EXCAS01','EXCAS02','EXGW01','EXGW02' -Server 'EXGW01'
Buy your commercial certificate and save certificate code to C:\cert.txt.
Import your certificate on EXGW01:
Import-ExchangeCertificate -FileData ([Byte[]]$(Get-Content -Path C:\Cert.txt -Encoding byte -ReadCount 0)) -Password:(Get-Credential).password
Assign SMTP services to certificate. Don’t forget to use your own Thumbprint.
Enable-ExchangeCertificate -Server 'EXGW01' -Services 'SMTP' -Thumbprint '5C9F5C946CAC544F054D24'
We will export our certificate and import it to second Hub Transport server, EXGW02.
1 2 | $File = Export-ExchangeCertificate -Thumbprint '5C931E54FDA054D24' -BinaryEncoded:$true -Password (Get-Credential).password Set-Content -Path "C:\htcert2.pfx" -Value $File.FileData -Encoding Byte |
Now, transfer your pfx file to EXGW02 and import it:
Import-ExchangeCertificate -FileData ([Byte[]]$(Get-Content -Path c:\htcert2.pfx -Encoding Byte -ReadCount 0)) -Password:(Get-Credential).password -PrivateKeyExportable $true
Enable SMTP service for EXGW02:
Enable-ExchangeCertificate -Server 'EXGW02' -Services 'SMTP' -Thumbprint '03BB616D714D03B9476'
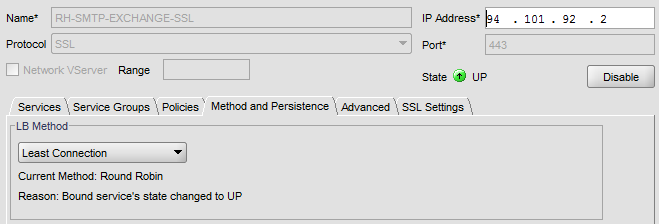
Go to Citrix Netscaler again and create a Virtual Server for SMTP.
Choose SSL as protocol and 443 as port number.
Configure LB method as Least Connection.
Check Hosted Exchange 2010 Setup Guide Part 3 for how to import SSL Certificate to Citrix:
Bind SSL certificate to virtual server.
Also you can add HTTP, 80 as another Virtual Server.
Please follow Hosted Exchange 2010 Part 3 for how to add HTTP 80 Virtual Server.
Go to EXGW01 and EXGW02, open IIS manager (inetmgr) and navigate to SSL Security for Default Web Site.
Clear “Require SSL” and click Accept from SSL settings.
Now test your Exchange Server 2010 SMTP address:
Wadaaaa again! We finished Citrix Netscaler Load Balancing for Hub Transport Servers.
Next Part, We will see how to configure Forefront Protection 2010 for Exchange Servers.
Thanks for reading.
Last parts of guide, I configured Exchange server roles. We have 2 Mailbox + CAS Servers and 2 Hub Transport servers. I made load balanced CAS servers and Hub Transport server with Citrix Netscaler Hardware Load Balancer. Now this part I’ll configure CAS arrays, IMAP, POP and SMTP services. Also I’ll show you configuration of Forefront Protection 2010 for Exchange Server.
First of all, go to EXCAS01 and create a new CAS array.
New-ClientAccessArray -Fqdn "exchange.radore.com.tr" -Site "Default-First-Site-Name"
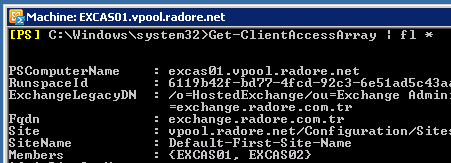
See Client Access Array:
Get-ClientAccessArray | fl *
Assign DAG databases to new Client Access Array:
Get-MailboxDatabase | Set-MailboxDatabase -RPCClientAccessServer “exchange.radore.com.tr”
Okay, we created our CAS array and assigned a database to it. Now we should configure POP and IMAP settings for client access.
Go to EXCAS01 and set Pop settings:
Set-PopSettings -LoginType PlainTextLogin
Set-PopSettings -ExternalConnectionSettings 'exchange.radore.com.tr:995:SSL','exchange.radore.com.tr:110:TLS'
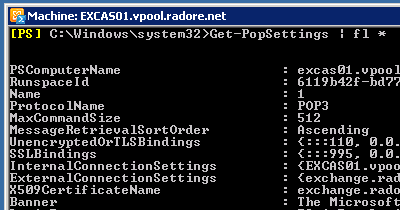
See POP settings:
Get-POPSettings | fl *
Set IMAP settings:
Set-ImapSettings -LoginType PlainTextLogin
Set-ImapSettings -ExternalConnectionSettings 'exchange.radore.com.tr:993:SSL','exchange.radore.com.tr:143:TLS'
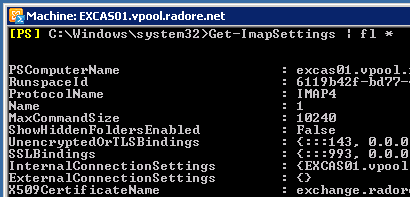
See IMAP settings:
We use PlainTextLogin because you can’t get Authenticated with SecureLogin in Hosted Exchange environment. So you should use PlainTextLogin. But don’t worry, we use Citrix Netscaler to secure connection.
Also we should configure Outlook access. First install RPC over HTTP:
ServerManagerCmd -i RPC-over-HTTP-proxy
Then configure Outlook Anywhere:
Enable-OutlookAnywhere -ExternalHostname exchange.radore.com.tr -DefaultAuthenticationMethod:Basic -SSLOffloading $False
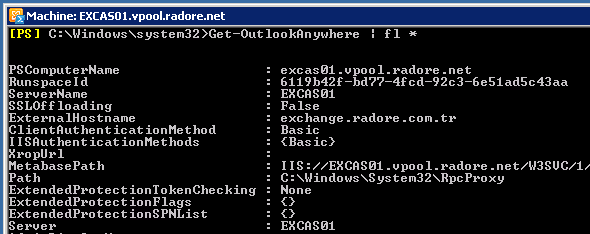
You can see your Outlook Anywhere configuration:
Get-OutlookAnywhere | fl *
You should change Autodiscover External URL:
Set-AutodiscoverVirtualDirectory -Identity 'autodiscover (default Web site)' -ExternalURL 'https://exchange.radore.com.tr/autodiscover' -InternalURL 'https://exchange.radore.com.tr/autodiscover' -BasicAuthentication $true
Change OAB virtual directory external URL:
Set-OABVirtualDirectory -Identity "EXCAS01\OAB (Default Web Site)" -ExternalUrl 'https://exchange.radore.com.tr/OAB' -InternalURL 'https://exchange.radore.com.tr/OAB' -BasicAuthentication $true
Change Web services virtual directory external URL:
Set-WebServicesVirtualDirectory -Identity "EXCAS01\EWS (default Web site)" -BasicAuthentication $true -ExternalUrl 'https://exchange.radore.com.tr/EWS/exchange.asmx' -InternalUrl 'https://exchange.radore.com.tr/EWS/exchange.asmx'
We finished changes on POP, IMAP and Outlook Anywhere. Don’t forget to do same steps on EXCAS02. Now it’s time to configure SMTP. Now go back to EXGW01 and EXGW02.
Configure EXGW01 Receive Connector for Outlook Authentication:
Get-ReceiveConnector 'EXGW01\EXGW01 SMTP' | Set-ReceiveConnector -PermissionGroups 'AnonymousUsers','ExchangeUsers','ExchangeServers'
Also configure Inbound SMTP Array for Outlook Authentication:
Get-ReceiveConnector 'EXGW01\Inbound SMTP Array' | Set-ReceiveConnector -PermissionGroups 'AnonymousUsers','ExchangeUsers','ExchangeServers'
Configure Encryption on Receive Connectors:
Get-ReceiveConnector 'EXGW01\EXGW01 SMTP' | Set-ReceiveConnector -AuthMechanism 'Tls','Integrated','BasicAuth'
Get-ReceiveConnector 'EXGW01\Inbound SMTP Array' | Set-ReceiveConnector -AuthMechanism 'Tls','Integrated','BasicAuth'
Also you should change binded ip address of Inbound SMTP Array.
But first you should remove old ones:
Get-ReceiveConnector 'EXGW01\Default *' | Remove-ReceiveConnector Get-ReceiveConnector 'EXGW02\Default *' | Remove-ReceiveConnector Get-ReceiveConnector 'EXGW01\Client *' | Remove-ReceiveConnector Get-ReceiveConnector 'EXGW02\Client *' | Remove-ReceiveConnector
Now see the Receive Connectors:
Get-ReceiveConnector | fl *
Get-ReceiveConnector 'EXGW01\Inbound SMTP Array' | Set-ReceiveConnector -Bindings '0.0.0.0:25','0.0.0.0:587'
Do same thing for EXGW02:
Get-ReceiveConnector 'EXGW02\Inbound SMTP Array' | Set-ReceiveConnector -Bindings '0.0.0.0:25','0.0.0.0:587'
Now lets check again:
Get-ReceiveConnector | fl *
Go back to Citrix Netscaler and configure services for IMAP, POP and RPC:
Also configure virtual servers:
Be sure to choose SOURCEIP for load balancing. After this, you can start to test POP3 and IMAP connection via Outlook. You shouldn’t choose any encryption method like TLS or SSL because of Hosted Exchange AD structure. Now I’ll show you how to configure Forefront Protection 2010. I installed Forefront on EXGW01 and EXGW02.
Enable connection filtering:
Enable DNSBL checking:
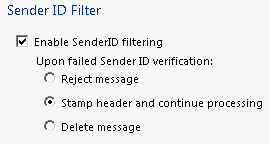
Enable SenderID and leave “Stamp header” option:
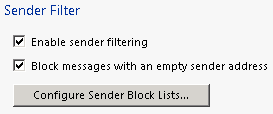
Enable Sender Filter:
Enable Receipent Filtering:
Enable Backscatter:
Enable Content Filter:
Configure SCL:
You can leave default other options and services of Forefront Protection. I finished this part. Next part, I’ll show you how to create organizations and users. But if you did exact same steps with me, that means you have a fully working Hosted Exchange 2010.
Rename Onedrive Business root folder
Rename Onedrive Business root folder Here is what I remember: In the Office 365 web admin pages, change the organization name to a shorte...
-
One of the visitors of this blog asked the question if we could publish a list of recommended post Windows Server 2008 R2 SP1 hotfixes rela...
-
Fehlermeldung: Funktion wurde vom Systemadministrator oder der Person gesperrt, von der der Drucker eingerichtet wurde. Wenn dein HP Office...
