Samstag, 24. Oktober 2015

Excel-Termine in Outlook importieren

Sie können diese Tabelle so erstellen, dass die Kollegen oder Kunden diese Tabelle automatisch in Outlook importieren können. 

Sie haben eine Terminliste in Excel erstellt und wollen diese Termine an Mitarbeitern oder Kollegen weitergeben, z. B. mehrer Schulungsveranstaltungen oder eine Arbeitseinteilung. 

Überschriften: 
Die Excel-Tabelle muss die Überschriften Beginntam, Betreff, Beginntum, Endetum Kategorie, Ort und ganztägigesEreignis haben. 
Achten Sie darauf dass die Namen so geschrieben sind wie in der Vorlage ohne Zwischenraum. 
Tragen Sie nun die entsprechenden Daten ein und achten Sie auf die richtige Schreibweise von Datums- bzw. Zeitangaben. 

Bereichsnamen: 
Wichtig ist das Sie den Bereich einen Namen vergeben. Markieren Sie den ganzen Bereich von der 1 Zelle bis zur letzten beschriebenen Zelle und tragen Sie im Namenfenster oben einen beliebigen Namen ein, in unserem Beispiel wurde der Name Kalender verwendet. Bestätigen Sie diesen Eintrag mit der [Eingabe-Taste]. Das Bestätigen mit der Eingabetaste ist wichtig, weil erst durch diese Bestätigung der Name im Namenfeld übernommen wird. 
Um zu kontrollieren ob dieser Eintrag auch gespeichert worden ist klicken Sie in eine beliebige Zelle und dann im Namenfeld auf den Pfeil und wählen Sie noch einmal den vergebenen Namen, in unserem Beispiel Kalender, aus. 
Speichern Sie die Datei unter einen ansprechenden Namen in ein beliebiges Verzeichnis. 


Öffnen Sie das Outlook-Programm und wählen den Kalender. 
Öffnen Sie das Menü Datei / importieren / exportieren und wählen Sie imImport/Export-Assistenten den Eintrag Importieren aus anderen Programmen oder Dateien und klicken auf die Schaltfläche Weiter>
Wählen Sie im nächsten Fenster den Eintrag Microsoft-Excel und klicken aufWeiter>
Im Fenster Zu importierenden Datei klicken Sie auf Durchsuchen… und wählen die entsprechende Datei. 
Bei den Optionen können Sie entscheiden ob bereits vorhandene Einträge durch die importierten Elemente ersetzt werden sollen, ob bei Terminen die zum gleichen Zeitpunkt sind doppelt eingetragen werden sollen oder ob keine Duplikate importiert werden sollen. 
Wenn Sie auf Weiter> klicken, können Sie noch einmal den Zielordner auswählen dies ist in diesem Fall der Kalender, dann klicken Sie auf Weiter>. Nachdem Sie die Datei gewählt haben, werden Sie gefragt er ob der Kalender, das ist der Bereich den Sie zuvor festgelegt haben, importiert werden soll. 
Klicken Sie nun auf Fertigstellen dann werden Ihre Termin importiert und Sie können in Outlook kontrollieren ob diese Termine eingetragen worden sind. 

Wichtig:
Falls Sie keinen Bereich festgelegt haben, kann die Tabelle nicht importiert werden. 
Die Exceldatei muss geschlossen sein, sonst kann die Datei nicht importiert werden. 

Windows 10: Update erzwingen


Das kostenlose Upgrade von Windows 10 wird bekanntlich in Wellen ausgeliefert, der Download geschieht dann im Hintergrund - der User bekommt es gar nicht direkt mit. Wer sich das Upgrade von Windows 10 reserviert hat, wird deshalb nicht unbedingt direkt den Download angeboten bekommen, damit die Server von Microsoft nicht überlastet werden. Wenn Sie zu den ganz Ungeduldigen gehören: Die Kollegen von drwindows.de berichten jedoch über eine Möglichkeit, wie sich das Upgrade vom Nutzer forcieren lässt. Beim Surface 3 soll das funktioniert haben, eine Garantie für die Methode gibt es aber nicht - die Durchführung geschieht wie immer auf eigene Gefahr. Die Anleitung lautet wie folgt:
  1. Windows 10 über das Symbol in der Taskleiste reservieren
  2. Windows Update auf "Updates automatisch installieren" einstellen
  3. Zum Ordner "C:\Windows\SoftwareDistribution\Download" navigieren und dessen Inhalt komplett löschen (nicht den Ordner selbst)
  4. Kommandozeile mit Administratorrechten starten ("cmd" suchen und mit Rechtsklick als Administrator öffnen) und dort "wuauclt.exe /updatenow" eingeben
  5. Unter Windows Update sollte jetzt der Download von Windows 10 laufen

Montag, 7. September 2015

SSL Certificates CSR Creation :: IIS 8 and IIS 8.5

IIS 8 and IIS 8.5 SSL Certificate CSR Creation

If you already have your SSL Certificate and just need to install it, see IIS 8 and IIS 8.5 SSL Certificate Installation.
How to create a CSR on Windows Server 2012 - IIS 8 and Windows Server 2012 R2 - IIS 8.5
You can use the to create your CSR and to automatically install the certificate on any Windows server.
  1. From the Start screen, click or search for Internet Information Services (IIS) Manager and open it.
  2. Click on the server name.
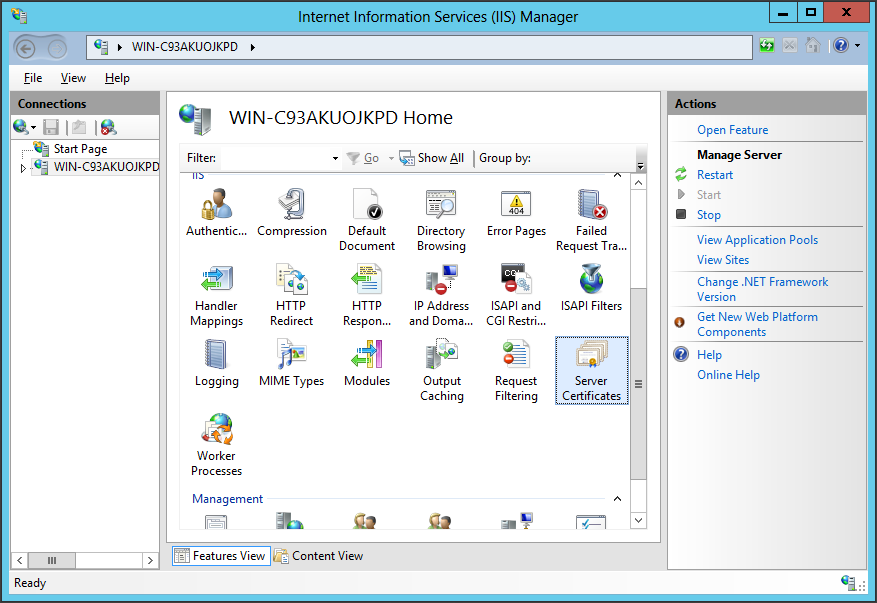
  3. From the center menu, double-click the "Server Certificates" button in the "IIS" section (it is in the middle of the menu).
    IIS 8 Security Certificates
  4. Next, from the "Actions" menu (on the right), click on "Create Certificate Request..." This will open the Request Certificate wizard.
    IIS 8 Create Certificate Request
  5. In the "Distinguished Name Properties" window, enter the information as follows:
    Common Name - The name through which the certificate will be accessed (usually the fully-qualified domain name, e.g., www.domain.com or mail.domain.com).
    Organization - The legally registered name of your organization/company.
    Organizational unit - The name of your department within the organization (frequently this entry will be listed as "IT," "Web Security," or is simply left blank).
    City/locality - The city in which your organization is located.
    State/province - The state in which your organization is located.
    Country/region - If needed, you can find your two-digit country code in our list.
    IIS 8 Distinguished Name Properties
  6. Click Next.
  7. In the "Cryptographic Service Provider Properties" window, enter the following information and then, click Next:
    Cryptographic service provider - In the drop-down list, select Microsoft RSA SChannel..., unless you have a specific cryptographic provider.
    Bit length - In the drop-down list, select 2048 (or higher).
    IIS 8 Cryptographic Service Provider Properties
  8. Click the ... box to browse to a location where you want to save the CSR file. If you just enter a filename without browsing to a location, your CSR will end up in C:\Windows\System32.
    Remember the filename that you choose and the location to which you save it. You will need to open this file as a text file and copy the entire body of it (including the Begin and End Certificate Request tags) into the online order process when prompted.
    IIS 8 CSR Pending Request Filename
  9. After you receive your SSL Certificate, you can install it.
After DigiCert issues your SSL Certificate, you will first need to install it to the server from which the certificate request was generated. Instructions for:
How to install and configure your SSL Certificate on Windows Server 2012 - IIS 8 and Windows Server 2012 R2 – IIS 8.5 (Single Certificate)
  1. Open the ZIP file containing your certificate. Save the file named your_domain_name.cer to the desktop of the web server you are securing.
  2. From the Start screen, click or search for Internet Information Services (IIS) Manager and open it.
  3. Click on the server name.
  4. From the center menu, double-click the "Server Certificates" button in the "IIS" section (it is in the middle of the menu).
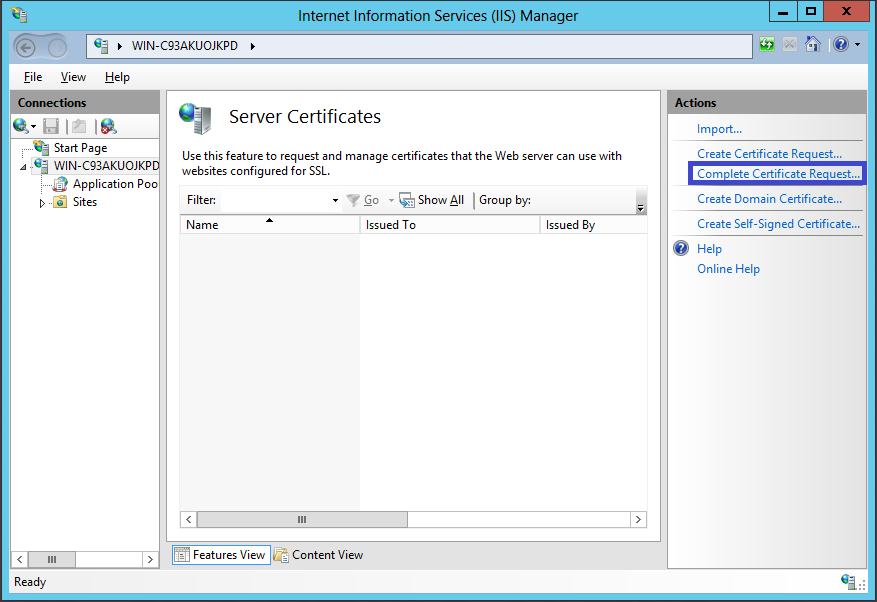
  5. From the "Actions" menu (on the right), click on "Complete Certificate Request..." This will open the Complete Certificate Request wizard.
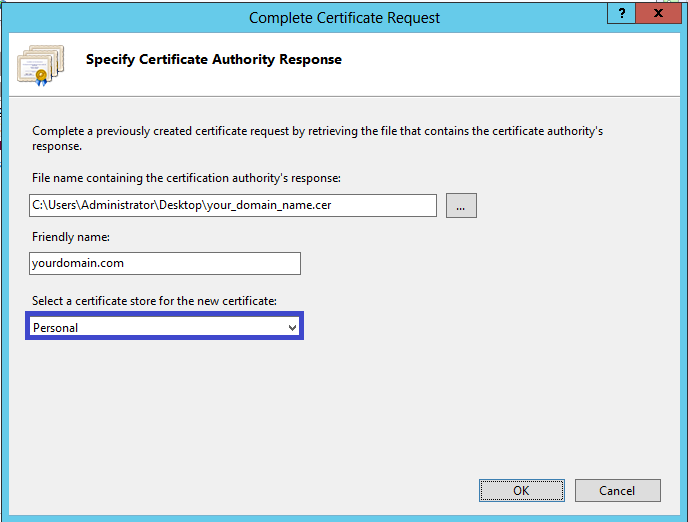
  6. Browse to your_domain_name.cer file that was provided to you by DigiCert. You will then be required to enter a friendly name. The friendly name is not part of the certificate itself, but is used by the server administrator to easily distinguish the certificate. Choose to place the new certificate in thePersonal certificate store.
  7. Clicking "OK" will install the certificate to the server.
  8. Once the SSL Certificate has been successfully installed to the server, you will need to assign that certificate to the appropriate website using IIS.
  9. From the "Connections" menu in the main Internet Information Services (IIS) Manager window, select the name of the server to which the certificate was installed.
  10. Under "Sites," select the site to be secured with SSL.
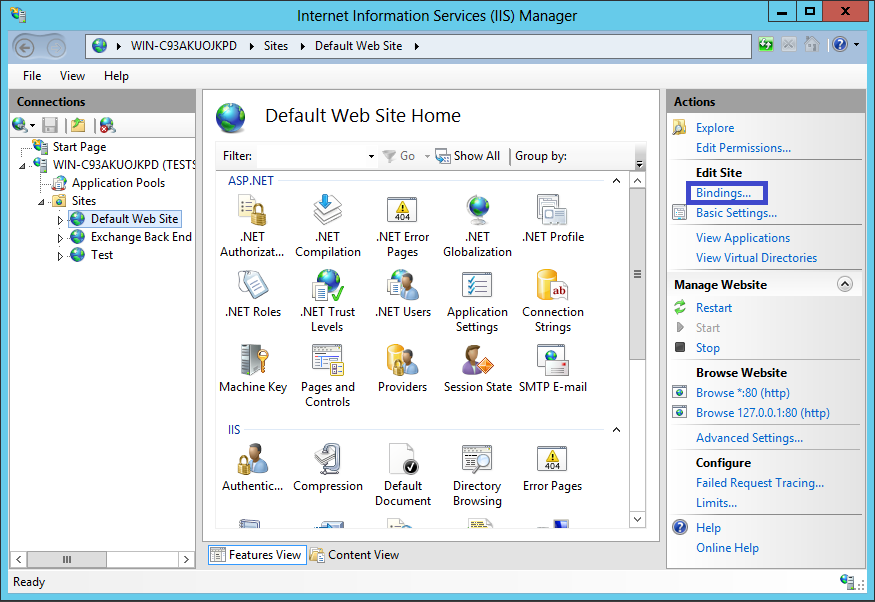
  11. From the "Actions" menu (on the right), click on "Bindings..." This will open the "Site Bindings" window.
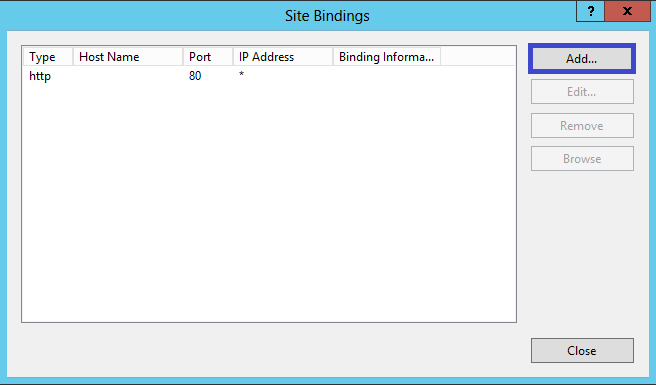
  12. In the "Site Bindings" window, click "Add..." This will open the "Add Site Binding" window.
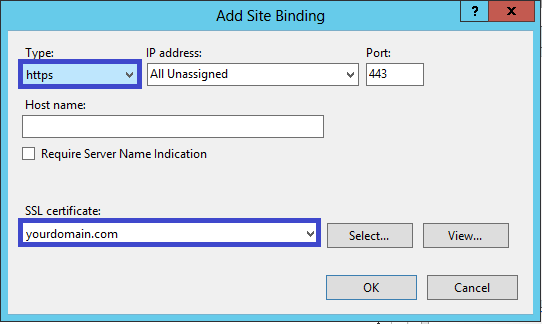
  13. Under "Type" choose https. The IP address should be the IP address of the site or All Unassigned, and the port over which traffic will be secured by SSL is usually 443. The "SSL Certificate" field should specify the certificate that was installed in step 7.
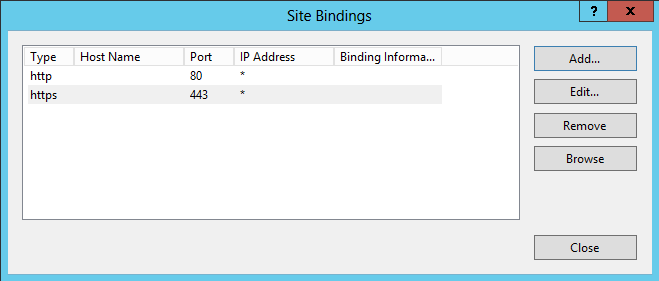
  14. Click "OK."
  15. Your SSL certificate is now installed, and the website configured to accept secure connections.
To enable your SSL certificate for use on other Windows servers, see our PFX export instructions for help.
How to install and configure your SSL Certificate on Windows Server 2012 - IIS 8 and Windows Server 2012 R2 - IIS 8.5 (Multiple Certificates Using SNI)
  1. Open the ZIP file containing your certificate. Save the file named your_domain_name.cer to the desktop of the web server you are securing.
  2. From the Start screen, click or search for Internet Information Services (IIS) Manager and open it.
  3. Click on the server name.
  4. From the center menu, double-click the "Server Certificates" button in the "IIS" section (it is in the middle of the menu).
  5. From the "Actions" menu (on the right), click on "Complete Certificate Request..." This will open the Complete Certificate Request wizard.
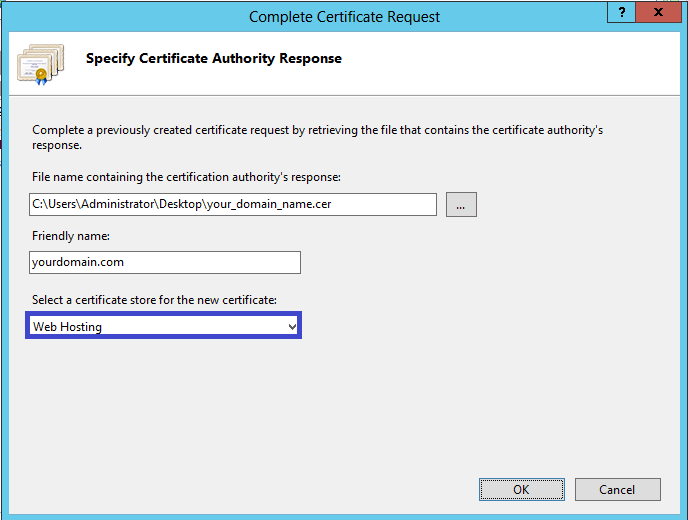
  6. Browse to your_domain_name.cer file that was provided to you by DigiCert. You will then be required to enter a friendly name. The friendly name is not part of the certificate itself, but is used by the server administrator to easily distinguish the certificate. Choose to place the new certificate in the Web Hosting certificate store.
  7. Clicking "OK" will install the certificate to the server.
    Note: There is a known issue in IIS 8 giving the following error: "Failed to remove the certificate" If this is the same server that you generated the CSR on then, in most cases, the certificate is actually installed. Simply cancel the dialog and press "F5" to refresh the list of server certificates. If the new certificate is now in the list, then it did install to the server, but you may want to check and make sure the certificate is in the Web Hosting certificate store. If not, you can move it there (see our How to Move Certificate to Another Certificate Store instructions) If it is not in the list, you will need to reissue your certificate using a new CSR (see our CSR creation instructions for IIS 8). After creating a new CSR, login to your DigiCert account and click the re-key button for your certificate.
  8. Once the SSL Certificate has been successfully installed to the server, you will need to assign that certificate to the appropriate website using IIS.
  9. From the "Connections" menu in the main Internet Information Services (IIS) Manager window, select the name of the server to which the certificate was installed.
  10. Under "Sites," select the site to be secured with SSL.
  11. From the "Actions" menu (on the right), click on "Bindings..." This will open the "Site Bindings" window.
  12. In the "Site Bindings" window, click "Add..." This will open the "Add Site Binding" window.
  13. Under "Type" choose https. The IP address should be the IP address of the site or All Unassigned, and the port over which traffic will be secured by SSL is usually 443. The "SSL Certificate" field should specify the certificate that was installed in step 7.
  14. Click "OK."
  15. Your first SSL certificate is now installed, and the website configured to accept secure connections.
  16. Repeat the steps for creating a CSR for your 2nd+ site.
  17. Install the certificate file as mentioned above, up through step 12.
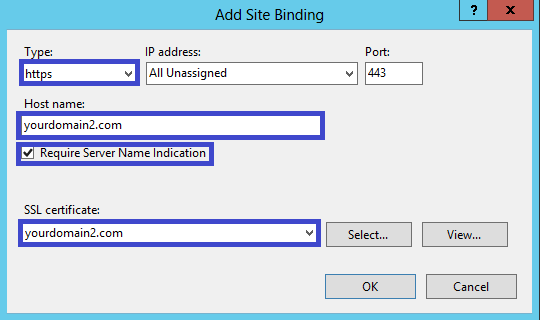
  18. Under "Type" choose https. The IP address should be the IP address of the site or All Unassigned, and the port over which traffic will be secured by SSL is usually 443. Enter the host name you will be securing and check the box that says Require Server Name Indication. This is required for all additionalsites (not required on the primary site as shown in step 13) The "SSL Certificate" field should specify the certificate that was installed in step 7 for your additional certificate.
  19. Click "OK."
  20. Your second SSL certificate is now installed, and the website configured to accept secure connections.
  21. Repeat steps sixteen through nineteen to set up any other additional sites.

Freitag, 24. April 2015

DISABLING SBCORE SERVICE – SBS SHUTDOWN EVERY HOUR

With a few SBS 2003 to 2008 migrations going over the 21 day limit (unfortunately due to third party support on line-of-business applications) we found it necessary to use the below to stop the SBS 2003 server shutting down every hour. I do not recommend this or support this as it is in breach of Microsofts EULA – however in some scenario’s it may be critical to ensure a smooth decommissioning of the old SBS 2003 server.
The below is the error log you should see:
Event ID: 1001
Type: Error
Source: SBCore
Description:
The server was shut down because it did not comply with the EULA. For more information, contact Microsoft.
To disable we followed the below:
  1. Download the Process Explorer tool from SysInternals – Here
  2. Load Process Explorer and look for the SBS Licensing Service – C:\Windows\system32\sbscrexe.exe
  3. Select this service and Suspend it – you should find the service greys out
  4. Open Regedit and expand the following key – HKEY_LOCAL_MACHINE\SYSTEM\CurrentControlSet\Services\SBCore
  5. Right click this Key and add the Administrators group giving them Full Permission to the key (refresh this and you should see all the key entries now)
  6. Select the Start DWORD and change it from 2 to 4 (this sets the Disabled state)
  7. Open a File Explorer window and browse to the C:\Windows\system32\sbscrexe.exe file
  8. Right click this and load Properties / Security
  9. Add the Everyone group and set the Deny permission for Full Access (should then tick the sub permissions)
  10. Go back to Process Explorer and now kill the sbscrexe.exe service – this should now be disabled
  11. Check the SBCore service via services.msc – it should have a disabled state and now longer be running
  12. Job Done.

Dienstag, 14. April 2015

ROK Windows auf VMware ESXi installieren

Schon mal versucht einen HP ROK Windows 2008/2008R2/2012/2012R2 Server auf VMware ESXi zu installieren?
Der Installer versucht über das Bios herauszufinden ob es sich um einen HP Server handelt. Beim Zugriff auf das VMware Bios findet er aber die notwendigen Informationen nicht und bricht die Installation ab.

Abhilfe schafft ein Parametereintrag in der Konfiguration der virtuellen Maschine:SMBIOS.reflectHost=TRUE


Samstag, 24. Januar 2015

Microsoft Office 2013 aktivieren via Kommandozeile

Wie man das neue Microsoft Office 2013 aktiviert via Kommandozeile, das werde ich euch in dem folgenden Beitrag Schritt für Schritt erklären.
Gerade in grösseren Systemumgebungen in welchen die Clients und Standard Software automatisiert installiert werden, kann das sehr hilfreich sein und erspart einem viel Arbeit nach der Installation des Clients. Das Ziel sollte sein, möglichst viel zu automatisieren und soweit möglich, wenig noch händisch zu konfigurieren. Da kommt dieser Beitrag sicherlich nicht ungelegen.
Die folgenden Befehle könnte man beispielsweise ganz einfach in eine MDT (Microsoft Development Toolkit) Umgebung mit einbeziehen oder auch mit anderer Software benutzen. Wichtig zu wissen ist, dass dies nur dann funktioniert, wenn Microsoft Office 2013 über das Internet aktiviert wird. Hat man einen eigenständigen Aktivierungsserver (KMS), funktioniert dies nicht.
Zudem müssen die Befehle alle mit Administrator Rechte ausgeführt werden. Normale Benutzerberechtigungen genügen nicht.

Lokaler Rechner

Als erstes müsst ihr der Microsoft Office 2013 Installation den entsprechenden Key zuweisen:
cscript "c:\program files\Microsoft office\office15\ospp.vbs" /inpkey:xxx−xxx−xxx−xxx
Jetzt kann Microsoft Office 2013 mit dem zuvor zugewiesenen Key aktiviert werden:
cscript "c:\program files\Microsoft office\office15\ospp.vbs" /act

Entfernter Rechner im Netzwerk

Um den Key einem im Netzwerk befindlichen Rechner zuzuweisen, kann folgender Befehl genutzt werden:
cscript "c:\program files\Microsoft office\office15\ospp.vbs" /inpkey:xxx−xxx−xxx−xxx RECHNERNAME
Der obige Befehl setzt voraus, dass ihr mit den angemeldeten Benutzer auf dem Rechner im Netzwerk Administrator Rechte habt. Sollte dies nicht der Fall sein, so könnt ihr euch mit deinem entsprechenden Benutzer am entfernten Rechner anmelden:
cscript "c:\program files\Microsoft office\office15\ospp.vbs" /inpkey:xxx−xxx−xxx−xxx RECHNERNAME BENUTZERNAME PASSWORT
[sam id="3" codes="true"]
Dazu ein Beispiel wie das aussehen könnte:
cscript "c:\program files\Microsoft\office\office15\ospp.vbs" /inpkey:xxx−xxx−xxx−xxx DESKTOP01 contoso\Administrator Pa$$word
Um das Office dann zu aktivieren, wäre folgender Befehl nötig:
cscript "c:\program files\Microsoft office\office15\ospp.vbs" /act RECHNERNAME
Mit entsprechenden Benutzer am entfernten Rechner anmelden und zu aktivieren wäre dementsprechend dieser Befehl:
cscript "c:\program files\Microsoft office\office15\ospp.vbs" /act RECHNERNAME BENUTZERNAME PASSWORT

KMS Server Installation on Windows Server 2012 R2

Own KMS server allows to make Microsoft products activation in a corporate network easier and in contrast to a usual activation process doesn’t require granting each computer access to the Internet to Microsoft activation servers. KMS infrastructure is rather simple, reliable and easily scalable (a single KMS server can maintain thousands of clients).
In this article, we describe how to install and activate the KMS server on Windows Server 2012 R2 on the corporate network.

Installation and Configuration the Volume Activation Services Role

KMS requires installation and configuration of a separate role – Volume Activation Services. You can do it in Server Manage console or PowerShell:
1
Install-WindowsFeature -Name VolumeActivation  -IncludeAllSubFeature
Install Volume Activation Services role in Windows Server 2012 R2After the installation is over, start Volume Activation Tools console. An activation service installation wizard will start. Specify that you are going to install Key Management Service (KMS) server.
  NoteIf all Windows OSs activated on this KMS server belong to one and the same Active Directory domain, you can use a special KMS extension — Active Directory Based Activation.
install key managment service win 2012 r2
NoteThe account must have Enterprise Admin rights.
Next you need to get your corporate KMS key (GVLK – Generic Volume License Key) on Microsoft website (https://www.microsoft.com/Licensing/servicecenter/home.aspx). You can find it in the sectionDownloads and Keys –> Windows Server –> Windows Server 2012 R2.
get gvlk key for kms service at Microsoft Site
Find the key with type KMS (not MAK) and copy it to the clipboard.
Paste the GVLK key in the corresponding field of the wizard (Install your KMS host key).
install kms key
If the system accepts the key, you will immediately be suggested to activate it. The system will define a product by the key you entered and suggest two ways of activation (by phone or online).
activating of kms server
After the key is activated, you have to configure Key Management Service options: activation and renewal intervals, port (by default, KMS listens on port 1688) and Windows Firewall exceptions. To automatically create a DNS record necessary to automatically search a KMS server in the domain (SRV record _vlmcs._tcp), check the option DNS Records – Publish.
publicate kms server in dns
Now the configuration is over. Make sure that a special DNS record pointing to your KMS server was created:
1
nslookup -type=srv _vlmcs._tcp.corp.woshub.com
Then get the information on the KMS server status:
1
slmgr.vbs /dlv
check kms server status
Pay attention to the following fields:
  • Partial Product Key – the last 5 symbols of the key are shown
  • License status – license activation status (it should be Licensed)
  • Total requests received  – the number of activation requests (0 yet)
  AttentionRemember that a KMS server has so called activation threshold. It means that an activated KMS server starts to activate clients only when the number of clients that addressed it in the last 30 days exceeds the certain limit (activation count):
  1. The activation threshold for client OS Vista / Windows 7 / Win 8 is 25 clients
  2. In case of server OSs Windows Server 2008/ 2008 R2 / 2012 / 2012 R2 it is 5 clients
Now the KMS server can activate its clients.

  Some tips.
The same KMS server can activate  MS Office (details in article Activating MS Office 2013 VL
Public KMS keys for Windows 8.1 / Server 2012 R2 here.

Rename Onedrive Business root folder

Rename Onedrive Business root folder Here is what I remember: In the Office 365 web admin pages, change the organization name to a shorte...