Dienstag, 4. August 2020

Rename Onedrive Business root folder

Rename Onedrive Business root folder


Here is what I remember:
  1. In the Office 365 web admin pages, change the organization name to a shorter version (I used a 4 letter abbreviation). I had to wait about 24 hours for the change to go through Microsoft's systems.
  2. On the computer unlink OneDrive.
  3. Relink

That seems too easy, so I might be leaving something out, but I think the important part is waiting for the change to go through Microsoft's systems.


I also figured out a hack that allows the folder name to be completely changed, even the "OneDrive - " prefix.
  1. Exit/close OneDrive App from tray.
  2. Go to this directory: %LOCALAPPDATA%\Microsoft\OneDrive\settings\Business1
    1. Find ".ini" file with the long somewhat random name similar to this: 31c26d83-4db2-4503-a8g0-a3e14e7bcchd.ini
    2. Right click and choose Edit on the file above.
      1. At the end of the first line you will find the full path to your folder.
      2. Change the folder name to desired name.
    3. Save file and close.
  3. Go to your OneDrive folder and change the name to match choice above.
  4. Start OneDrive app.

Sonntag, 14. Juni 2020

Failed to Deploy OVF package

ailed to deploy package: File ds:///vmfs/volumes/UUID/_deviceImage-0.iso was not found


While working on setup for a Custom version of our Exchange 2013/2016 Ultimate Bootcamp today, I came across a problem which is not new, but was new to me.

A colleague had saved some VMs to OVA format for deployment in a Master vApp.  As I went to deploy them, I received the following error message:


After doing some research, I came across a couple of articles.  Neither gave me what I needed, but through combining bits and experimenting, I found a solution.

PROBLEM: 

   The VMs had ISOs attached to their CD-ROMs when the were exported to OVA format.
   The OVF file inside the OVA package has information about the attached ISO.


SOLUTION:

  1. Uncompressed the OVA file using either TAR on Linux/ESXi or 7-Zip on Windows.
  2. Located the OVF file which contains the configuration of the VM to deploy.


  3. In the VMname.OVF file, I searched for “vmware.cdrom.iso
  4. I replaced vmware.cdrom.iso with vmware.cdrom.remotepassthrough and saved the file.

  5. Calculated a new SHA1 hash for the updated VMname.OVF file using HashMyFiles (Download here: http://www.nirsoft.net/utils/hash_my_files.html)

  6. Edited the VMname.mf file and replaced the SHA1 hash for the VMname.ovf with the new one & saved the file.


  7. Deployed a new VM using the OVF file.
  8. Optionally you could repackage the OVF to an OVA using either OVFTool or TAR in a host.
    tar cvf VMname.ova VMname.ovf
    tar uvf VMname.ova *.mf *.vmdk

Another option would be to simply delete the MF file.  vSphere deployment of the OVF then wouldn't do a hash check at all and the install will complete as expected.  Your choice!

Dienstag, 7. April 2020

Ubiquiti USG Remote User VPN RADIUS Authentication

The following steps will setup Windows Server 2012 R2 RADIUS authentication via Network Policy Server (NPS) with your Ubiquiti UniFi Security Gateway (USG) for a USG Remote User VPN. This will allow users to use their current Active Directory Domain Services (AD DS) credentials to authenticate to the Virtual Private Network (VPN).
I am using the UniFi controller version 5.4.14 hosted in Microsoft Azure on a Linux Server with PostFix for alerting.
Step 1: Configure Windows NPS Server
  1. From the Server Manager Dashboard, install the Network Policy and Access Server role using Add Roles and Features accepting all defaults.
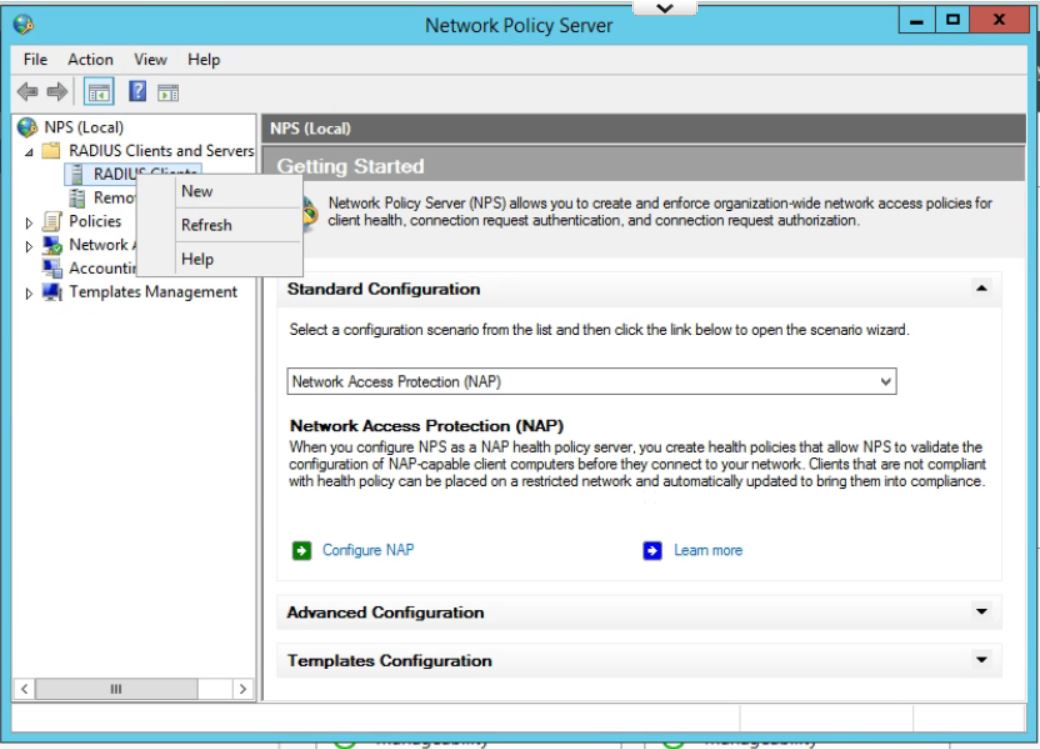
  2. Once installed,  open the Network Policy Server Administrator Tool. Expand the RADIUS Clients and Servers, then right Click on RADIUS Clients and click New.
    USG Remote User VPN - Create New RADIUS Client
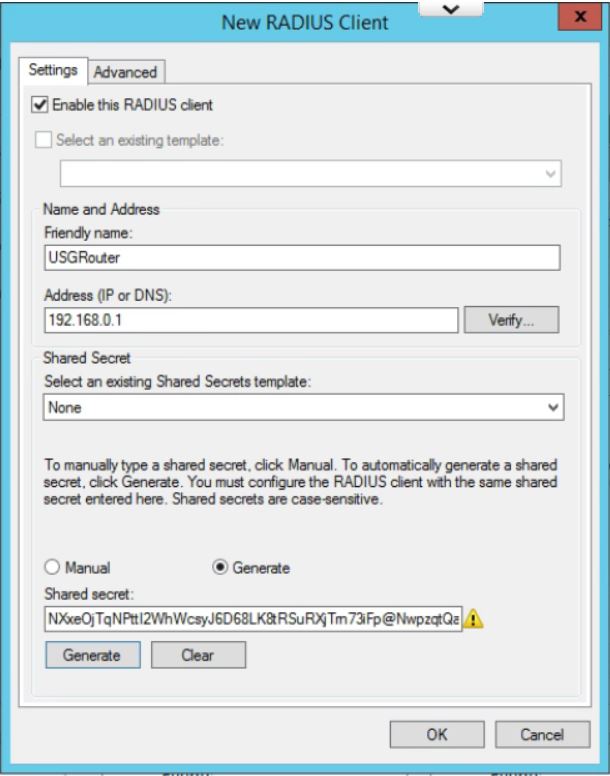
  3. Give the USG router a Friendly Name. Type in the IP Address of the inside interface of the USG on the same network as the Windows Server. (This is the IP that the RADIUS requests will come from.) Click the Generate radio button, then click the generate button. Copy this Shared Secret to be pasted later. Click OK. USG Remote User VPN - Create New RADIUS Client
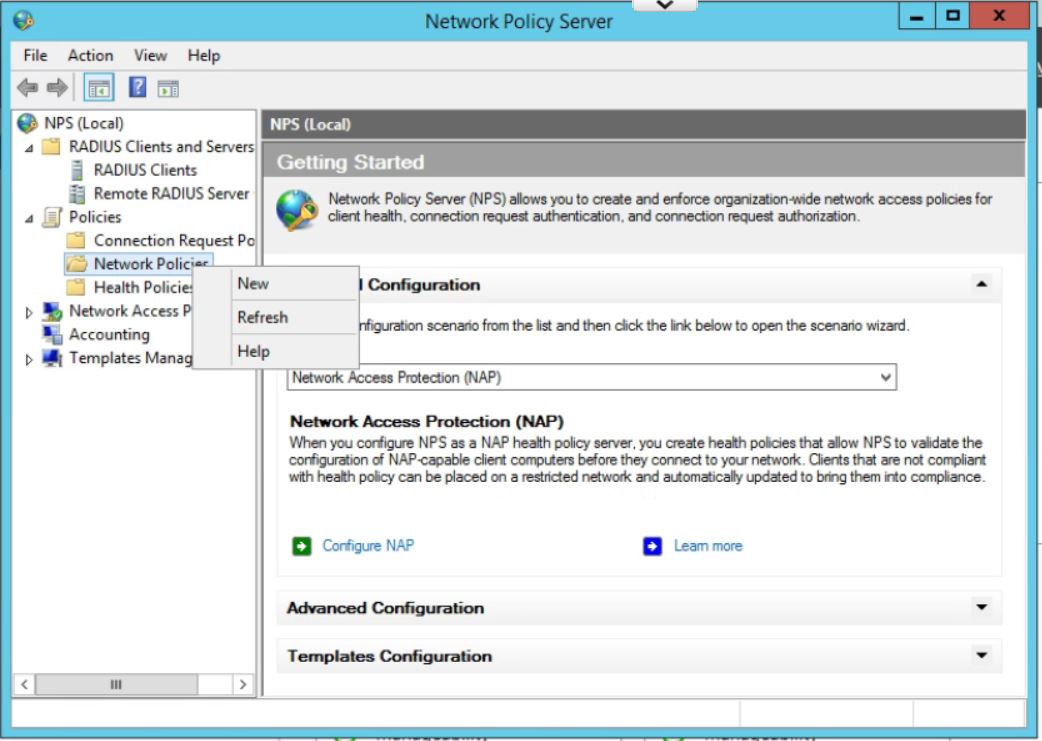
  4. In the Network Policy Server window, expand Policies, right click on Network Policies, and then click New.
    USG Remote User VPN - Create New Network Policy
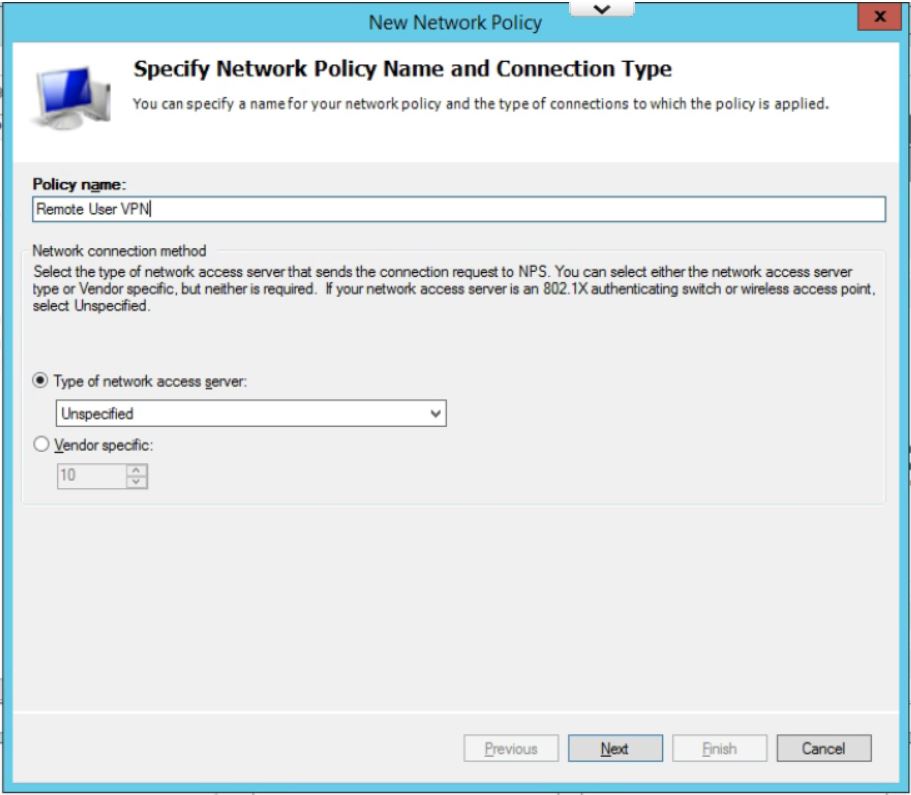
  5. Enter a policy name and leave Type of Network Access Server as Unspecified. Click on Next.
    USG Remote User VPN - Create New Network Policy
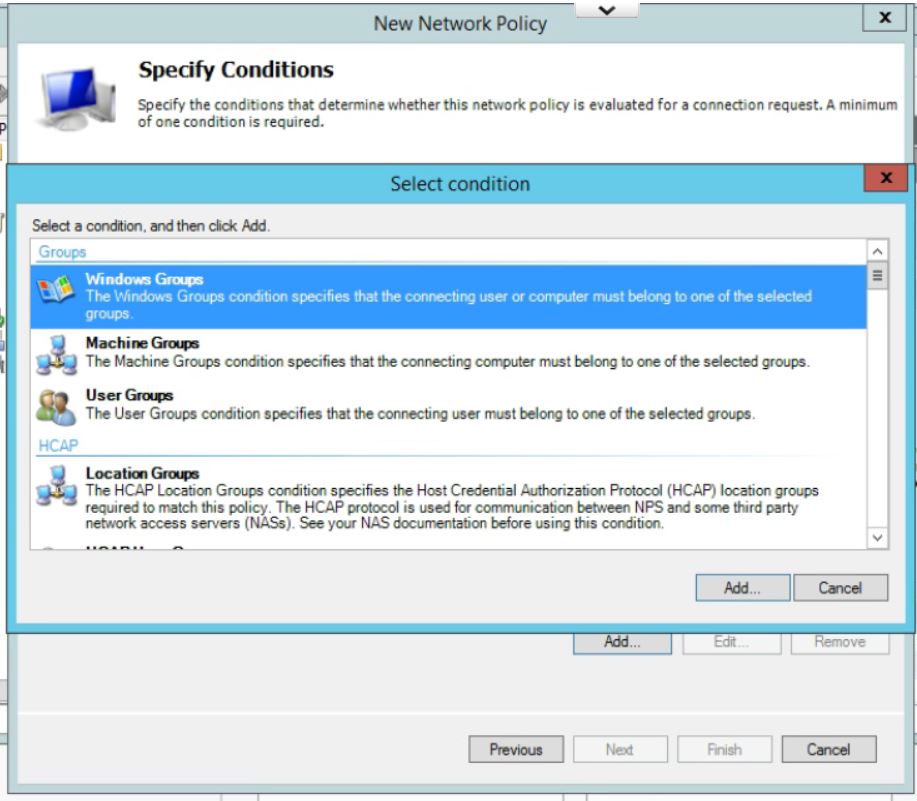
  6. In Specify Conditions click Add.. and then select Windows Group, and pick the AD Group you want to use to allow VPN access.  (If you have not already then you will need to add all users who will be accessing the VPN into a seperate group.) Click Add… then Add Groups… which brings up the typical AD search box. Type in the name of the VPN Windows Group and click on OK. Click OK again. Click on Next
    USG Remote User VPN - Create New Network Policy
  7. Leave the Specify Access Permissions at the defaults (Access Granted, Dial-in box unchecked). Click Next.
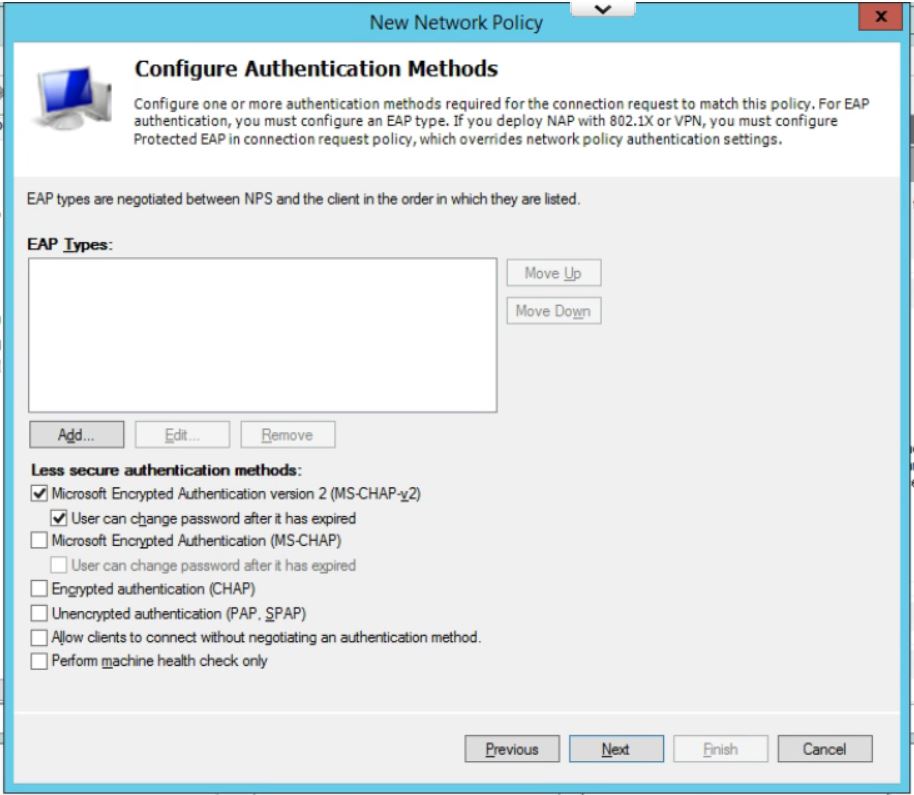
  8. Uncheck all authentication methods other than MS-CHAPv2. Click on Next.
    USG Remote User VPN - Create New Network Policy
  9. Accept the defaults under Configure Constraints. Click Next.
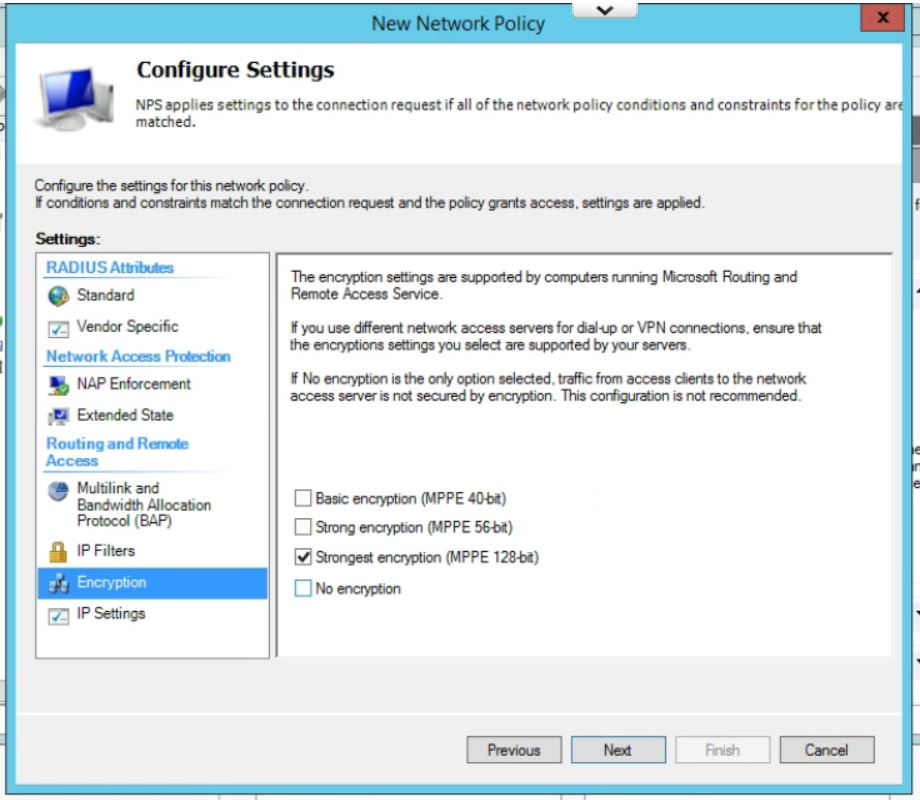
  10. Leave all setting at the default on this page except for under Encryption. Uncheck everything except for MPPE 128-bit. Click Next.USG Remote User VPN - Create New Network Policy
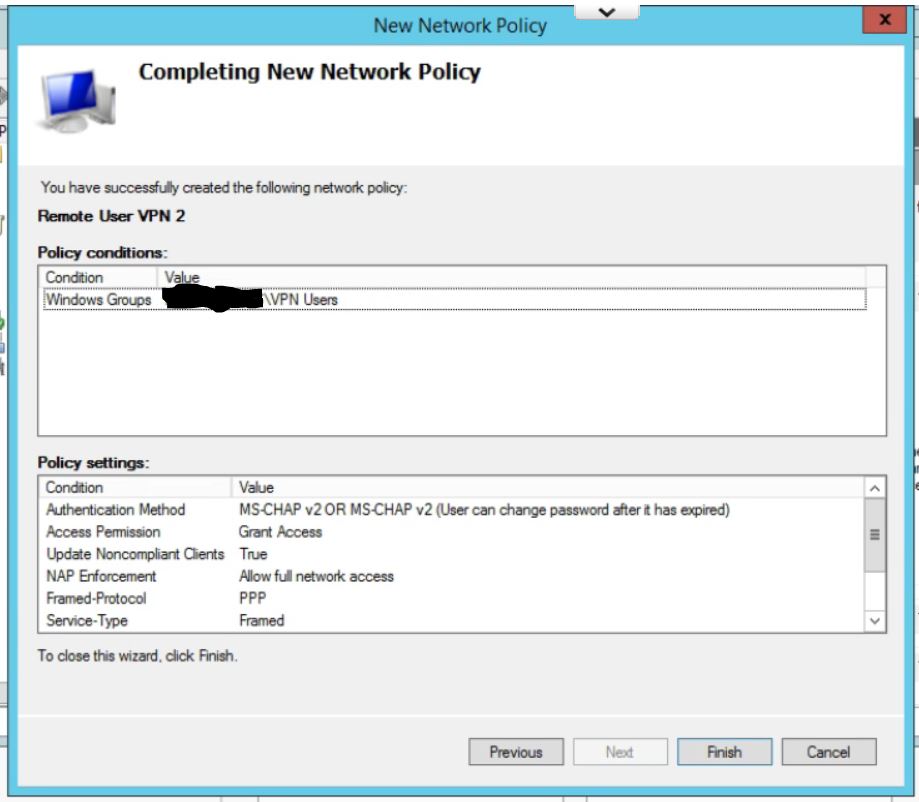
  11. Check your settings on the last page. Click Finish.
    USG Remote User VPN - Create New Network Policy
  12. Finally, move the new policy above the two default policies in the list by right clicking and choosing Move  Up.
Step 2: Configure the USG Remote User VPN
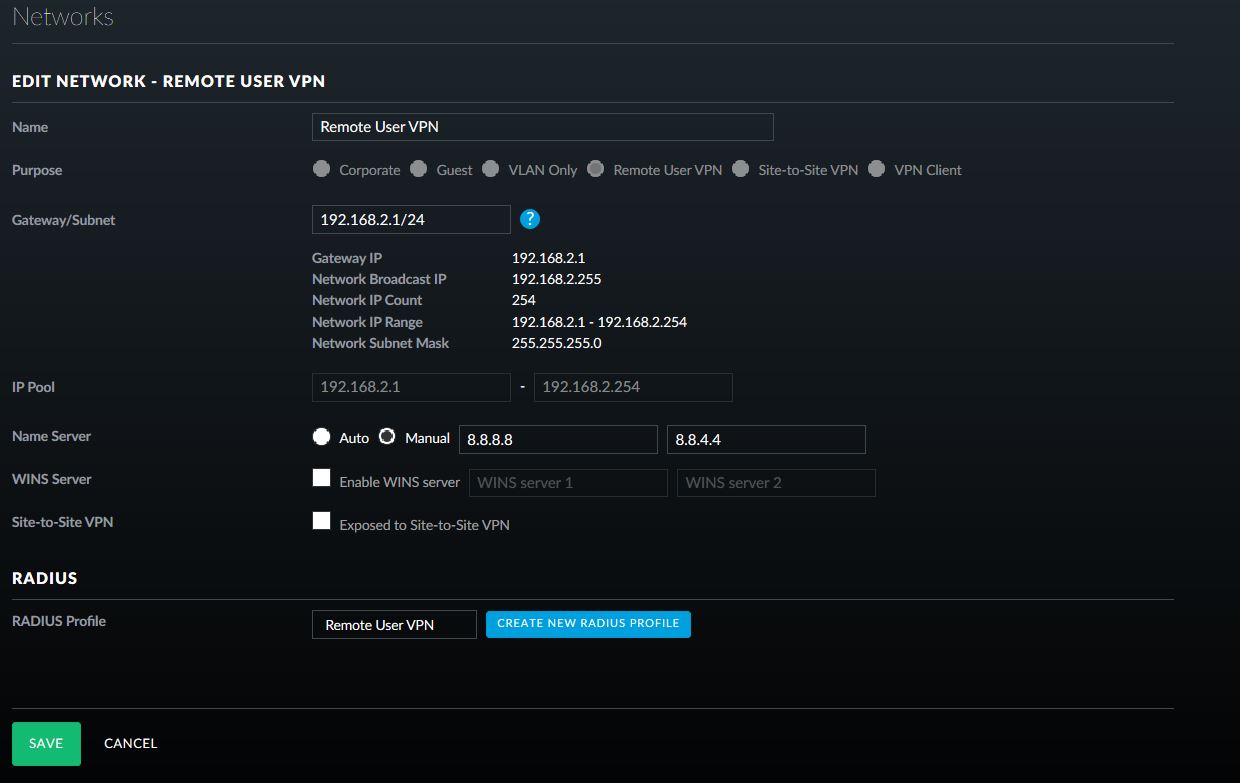
  1. To create the remote access network, in the UniFi controller, go to Settings, then Networks, and click Create New Network, give the network a name and select Remote User VPN.
    USG Remote User VPN - Network Setup
  2. Fill in the appropriate Gateway/Subnet information for your environment. Make sure it is not the same as any of your current networks.
  3. Add Manual DNS servers, if required for your environment.
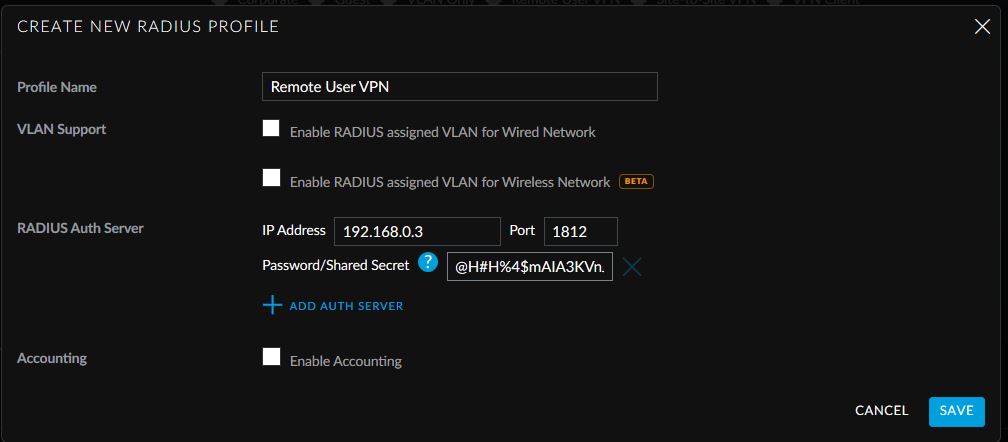
  4. Click on Create New RADIUS Profile.
  5. Give the Profile a name, enter in the IP address of the Windows Server 2012 R2 server that will be used for RADIUS authentication and paste in the generated shared secret.USG Remote User VPN - Create New RADIUS Profile
  6. Click Save. Click on Save again.
This allows easy access from Windows default VPN connections to network assets behind the USG device.

Die Vertrauensstellung zwischen dieser Arbeitsstation und der primären Domäne konnte nicht hergestellt werden

Das Anmelden an einem Rechner, der Mit­glied in einer Domäne ist, scheitert manch­mal mit der Fehler­meldung, wonach eine Vertrauens­stellung mit der pri­mären Domäne nicht herge­stellt werden konnte. Die Ursache dafür liegt in einem ungültigen Pass­wort für das Computer-Konto, das man zurück­setzen muss.
Die genannte Meldung (auf Englisch lautet sie "The trust relationship between this workstation and the primary domain failed") zeigt sich am Anmelde­bildschirm, eine Erklärung dazu gibt es nicht. Auch das entsprechende Support-Dokument von Microsoft schweigt sich über mögliche Ursachen aus und empfiehlt lapidar, den Rechner aus der Domäne zu nehmen und ihr anschließend erneut beizutreten.

Zwei Cmdlets für Password Reset

Nach der Anmeldung mit dem lokalen Account (am einfachsten gibt man diesen beim Logon in der Notation .\Administrator an) öffnet man PowerShell und führt einen Befehl nach diesem Muster aus:
Reset-ComputerMachinePassword -Server MyDC -Credential contoso\admin
Der Parameter Server erwartet den Namen eines Domain Controllers und über Credentials gibt man ein Domänenkonto an, das zum Zurücksetzen des Passworts berechtigt ist.
Alternativ kann man folgenden Aufruf verwenden:
Test-ComputerSecureChannel -Repair -Server MyDC -Credential contoso\admin
Anders als beim oberen Kommando erhält man hier $true als Ergebnis, wenn die Operation gelungen ist. Ruft man Test-ComputerSecureChannel ohne den Schalter Repair auf, dann kann man auch nach der Verwendung von Reset-ComputerMachinePassword damit prüfen, ob eine sichere Verbindung zum AD besteht.

Dienstag, 11. Februar 2020

iPhone: Fotos werden beim Versenden immer eingebettet und nicht als echter Anhang verschickt

Frage:
Wenn ich Fotos per E-Mail versende, werden sie immer eingebettet. Viel besser wäre es, wenn diese als echte Anhänge eingefügt werden.

Antwort:
Wenn man Bilder aus der Fotorolle eines iPhones oder iPads verschicken möchte muss man darauf achten, dass im E-Mail Programm des iPhones keine Signatur voreingestellt ist! Wenn man in den Einstellungen eine Signatur vor eingestellt hat, wird diese immer nach den Bildern eingefügt und somit werden die Bilder nicht als Anhang, sondern Eingebettet übertragen was Vielerlei Probleme vor allem beim Empfänger verursachen kann.
Man sollte nur darauf achten, dass unter den Bildern keinerlei Text mehr steht! Darüber ist es kein Problem.

Samstag, 18. Januar 2020

HP WINDOWS SERVER ROK UND HYPER-V

Je nach Windows-Server-Version sind verschiedene Virtualisierungsrechte enthalten. Möchte man z.B. Windows Server 2012 nicht nur physikalisch sondern auch virtuell installieren, schließlich sind zwei Instanzen in der Standard-Edition enthalten, so muss im Falle eines HP ROK-Mediums eine Änderung an Hyper-V vorgenommen werden.
Hintergrund dieser Notwendigkeit ist, das die ROK-Medien einen Bios-Lock enthalten. Ohne entsprechend angepasste Hyper-V-Konfiguration kann von diesen Medien nicht installiert werden.
Um Windows Server 2012 als virtuellen Computer unter Hyper-V installieren zu können muss folgender Befehl ausgeführt werden:
Reg Add "HKLM\SOFTWARE\Microsoft\Windows NT\CurrentVersion\Virtualization" /v BiosLockString /t REG_SZ /d "HP                              "
Achtung: Die Leerstellen zwischen >“HP< und dem abschließenden >“< beachten!

Freitag, 17. Januar 2020

Entfernen von Gruppenrichtlinien hinsichtlich WSUS

Die ungewünschten Einstellungen der GPO müssen auf "nicht konfiguriert"
zurückgesetzt werden, dann werden automatisch die Einträge aus der
%systemroot%\System32\GroupPolicy\Machine\registry.pol gelöscht und
spätestens nach NEustart verschwinden sie dann auch aus:
HKEY_LOCAL_MACHINE\SOFTWARE\Policies\Microsoft\Windows\WindowsUpdate
bzw.
HKEY_LOCAL_MACHINE\SOFTWARE\Policies\Microsoft\Windows\WindowsUpdate\AU

Freitag, 6. Dezember 2019

Veeam Error – Changed Block Tracking Will Not Be Used For This VM Until You Upgrade the VM Hardware to Version 8.0 or Later on Server 2016


If you have recently upgraded your HyperV Servers or Cluster to Server 2016 and you are running Veeam, you may see the following error:


Changed Block Tracking Will Not Be Used For This VM Until You Upgrade the VM Hardware to Version 8.0 or Later

What this means is that Veeam will only perform FULL backups and not incrementals which is a bit of a crisis for most companies.

Fortunately this is easy to fix, you simply need to upgrade the “Virtual Machine Version” (not to be confused with the Cluster Version, if you are using a Cluster):
On each of your HyperV hosts, shut down all of the VM’s
.
Run the following PowerShell Command:
Update-VMVersion *
.
Run the following PowerShell Command to ensure that all VM’s are at “8”
Get-VM * | Format-Table Name, Version
.

Once all of your VM’s are at version 8, you can restart your Veeam backup jobs and all will be well.

For more information on this process read this Microsoft doc.

Sonntag, 24. November 2019

ESXi Upgrade from 6.0 to 6.7 on HP DL380 oder ML350 Gen8


When upgrading VMware vSphere and your ESXi hosts to version 6.5 or 6.7 you may experience an error similar to: “The upgrade contains the following set of conflicting VIBs: Mellanox_bootbank_net.XXXXversionnumbersXXXX. Remove the conflicting VIBs or use Image Builder to create a custom ISO.”. This is due to conflicting VIBs on your ESXi host. This post will go in to detail as to what causes it, and how to resolve it.


The issue

After successfully completing the migration from vCenter 6.0 (on Windows) to the vCenter 6.5 Appliance, all I had remaining was to upgrade my ESXi hosts to ESXi 6.5.

In my test environment, I run 2 x HPe Proliant DL360p Gen8 servers. I also have always used the HPe customized ESXi image for installs and upgrades.

It was easy enough to download the customized HPe installation image from VMware’s website, I then loaded it in to VMware Update Manager on the vCenter appliance, created a baseline, and was prepared to upgrade the hosts.

I successfully upgraded one of my hosts without any issues, however after scanning on my second host, it reported the upgrade as incompatible and stated: “The upgrade contains the following set of conflicting VIBs: Mellanox_bootbank_net.XXXXversionnumbersXXXX. Remove the conflicting VIBs or use Image Builder to create a custom ISO.”
The fix

I checked the host to see if I was even using the Mellanox drivers, and thankfully I wasn’t and could safely remove them. If you are using the drivers that are causing the conflict, DO NOT REMOVE them as it could disconnect all network interfaces from your host. In my case, since they were not being used, uninstalling them would not effect the system.

I SSH’ed in to the host and ran the following commands:
  • esxcli software vib list | grep Mell


(This command above shows the VIB package that the Mellanox driver is inside of. In my case, it returned “net-mst”)
  • esxcli network nic list


(This command above verifies which drivers you are using on your network interfaces on the host)
  • esxcli software vib remove -n net-mst


(This command above removes the VIB that contains the problematic driver)
After doing this, I restarted the host, scanned for upgrades, and successfully applied the new vCenter 6.5 ESXi Customized HPe image.

Sonntag, 10. November 2019

Office 365 auf einem Remotedesktop od. Terminalserver installieren

Über die Einführung des Office Deployment Toolkits kann man denken, was man will. Einerseits unheimlich praktisch, aber manchmal auch wieder nicht. Besonders, wenn man als Administrator mehrere Firmen betreut, die wiederum eine Vielzahl verschiedener Versionen einsetzen, verflucht man diese Form der Bereitstellung schon einmal.
Bei der Lizenzierung von Office 365 gilt es zunächst die folgende Frage zu beantworten: Welche Versionen von Microsoft Office 365 können auf einem Remote Desktop Server installiert werden? Bzw. welche Lizenzen kann ich darauf aktivieren?
Alle Abonnements mit Office 365 Pro Plus können auf einem Terminalserver unter Windows Server 2016 installiert werden:
  • Microsoft Office 365 ProPlus
  • Microsoft Office 365 Enterprise E3
  • Microsoft Office 365 Enterprise E5
Die Installation sollte über das Office Deployment Tool (ODT) erfolgen, da bei der Installation ein wichtiger Parameter gesetzt werden muss: Die Aktivierung gemeinsam genutzter Computer. Fehlt dieser Parameter, lässt sich zwar Office 365 auf einem Terminalserver installieren, jedoch wirst Du später Probleme mit der Aktivierung bekommen (siehe weiter unten).
Die folgenden Schritte sind bis zur erfolgreichen Installation von Office 365 auf einem Terminalserver durchzuführen:
  1. Download Office Deployment Toolkit (https://docs.microsoft.com/de-de/DeployOffice/overview-of-the-office-2016-deployment-tool).
  2. Installation des ODT (z.B. in den Ordner C:\MSODT).
  3. Konfigurationsdatei über das Office Customization Tools erstellen (https://config.office.com/). Hier muss darauf geachtet werden, die Aktivierung gemeinsam genutzter Computer zu aktivieren
  4. Konfigurationsdatei als Configuration.xml exportieren und die Datei in das Verzeichnis der ODT Installation kopieren.
  5. Die Eingabeaufforderung (cmd) öffnen und im ODT Verzeichnis den Befehl „setup.exe /download Configuration.xml“.
  6. Warten bis Download abgeschlossen wurde (Prompt in der cmd erscheint wieder).
  7. Mit dem Befehl „setup.exe /configure Configuration.xml“ wird das Setup gestartet.

Office 365 lässt sich nicht aktivieren?

Wenn Office 365 bereits über die ausführbare Setup-Datei aus dem Office Online Portal installiert wurde, dann erhält man beim Verwenden der Anwendungen den Hinweis, dass die installierte Version nicht auf einem Server mit aktivierten Remote Desktop Diensten verwendet werden darf. In diesem Fall kann man das Shared Computer Licensing manuell aktivieren – durch das Setzen einer neuen Zeichenfolge (Reg_SZ) in der Windows Registry:
Die Option kann aber auch bequemer über die Gruppenrichtlinien auf die betreffenden Server verteilt werden. Die Richtlinie nennt sich „Use shared computer activation“ und ist zu finden unter
Computer
-> Configuration
-> Policies
-> Administrative Templates
-> Microsoft Office 2016 (Machine)
-> Licensing Settings
Voraussetzung ist die vorherige Installation der administrativen Template Files (ADMX/ADML) für Microsoft Office. Diese findest Du unter https://go.microsoft.com/fwlink/p/?linkid=626001.

Mittwoch, 18. September 2019

HP Officejet Fehlermeldung: Funktion wurde vom Systemadministrator oder der Person gesperrt, von der der Drucker eingerichtet wurde.

Fehlermeldung: Funktion wurde vom Systemadministrator oder der Person gesperrt, von der der Drucker eingerichtet wurde.


Wenn dein HP OfficeJet oder HP PageWide Pro den Zugriff auf die Netzwerkeinstellungen am Display blockiert, so wurde offensichtlich die Bedienfeldsperre aktiviert.
  1. Um diese wieder zu entfernen, öffne die IP des Druckers in einem Internetbrowser. Es öffnet sich der EWS des Druckers.
  2. Wähle hier den Reiter Einstellungen, dann links den Punkt Administratoreinstellungen.
  3. Wenn diese Seite geöffnet ist, deaktiviere den Haken bei "Bedienfeldsperre". Klicke "Übernehmen" und OK.
Danach wird das Bedienfeld wieder normal nutzbar sein. Eventuell ist es noch notwendig, den Drucker einmal neu zu starten.

Montag, 16. September 2019

ONEDRIVE-ICON AUS EXPLORER ENTFERNEN

In Windows10 erscheint die OneDrive-Cloud automatisch im System, auch im Explorer. Wer Dateien in einer anderen Cloud oder nur lokal speichert, kann das Symbol von OneDrive getrost aus dem Datei-Explorer verbannen.


Hier die nötigen Schritte, um das OneDrive-Icon aus dem Explorer zu entfernen:
Zunächst [Win]+[R] drücken, regedit eingeben und auf OK klicken.

Jetzt links zum Schlüssel HKEY_CLASSES_ROOT, CLSID, {018D5C66-4533-4307-9B53-224DE2ED1FE6} navigieren.

Dort doppelt auf den Wert IsPinnedToNameSpaceTree klicken und den Eintrag auf 0 ändern.
Nutzer von 64-Bit-Systemen öffnen auch den Schlüssel HKEY_CLASSES_ROOT, Wow6432Node, CLSID, {018D5C66-4533-4307-9B53-224DE2ED1FE6} und führen dort die gleiche Änderung aus Schritt 3 aus.

Nach einem Neustart des Explorers oder des ganzen PCs ist das OneDrive-Symbol aus dem Explorer verschwunden.

Samstag, 24. August 2019

WSUS Server - Client sendet keine berichtet an WSUS Server


Beschreibung

Diese Kurzanleitung soll die Schritte darstellen, wie Sie einen Windows Client (egal ob Workstation oder Server) anpassen so das dieser dem Ihm zugewiesenen WSUS Server wieder berichtet.


Variante 1:
Melden Sie sich mit administrativen Rechten am Client an.
Öffnen Sie eine CMD Console um Command Befehle auszuführen.

net stop wuauserv
rd /s /q %windir%\softwaredistribution
net start wuauserv
wuauclt /resetauthorization /detectnow
wuauclt /detectnow
wuauclt /reportnow

20 Minuten später erneut nach Update suchen


Variante 2:
Melden Sie sich mit administrativen Rechten am Client an.
Öffnen Sie eine CMD Console um Command Befehle auszuführen.
Beenden Sie den Windows Update Dienst:

net stop wuauserv


Öffnen Sie die Windows Registry und navigieren in folgenden Pfad:

HKEY_LOCAL_MACHINE\SOFTWARE\Microsoft\Windows\CurrentVersion\WindowsUpdate


Löschen Sie folgende Schlüssel:
SusClientId
SusClientIdValidation


Starten Sie den Windows Update Dienst:

net start wuauserv


Geben Sie folgendes Kommando über die CMD Console ein:

wuauclt.exe /resetauthorization /detectnow


Wenn Sie die oben genannten Schritte durchgeführt haben, wird der Client dem WSUS wieder Bericht erstatten.


UPDATE: Sie können folgende Kommando's via CMD oder PS Console verwenden:

Bei 32Bit System:
REG DELETE "HKEY_LOCAL_MACHINE\SOFTWARE\Microsoft\Windows\CurrentVersion\WindowsUpdate" /v SusClientId /f>> C:\temp\wsus_reset_SusClientId.txt


REG DELETE "HKEY_LOCAL_MACHINE\SOFTWARE\Microsoft\Windows\CurrentVersion\WindowsUpdate" /v SusClientIdValidation /f>> C:\temp\wsus_reset_SusClientId.txt


Bei 64Bit System:
REG DELETE "HKEY_LOCAL_MACHINE\SOFTWARE\Wow6432Node\Microsoft\Windows\CurrentVersion\WindowsUpdate" /v SusClientId /f>> C:\temp\wsus_reset_SusClientId.txt


REG DELETE "HKEY_LOCAL_MACHINE\SOFTWARE\Wow6432Node\Microsoft\Windows\CurrentVersion\WindowsUpdate" /v SusClientIdValidation /f>> C:\temp\wsus_reset_SusClientId.txt

Montag, 12. August 2019

Realtek PCIE Card Reader Uninstall for Windows 10 Upgrade

I'm trying to upgrade to Windows 10. However, I am continually running into a barrier. Windows 10 Setup is telling me I need to manually uninstall Realtek PCIE Card Reader. I uninstalled it in the programs. It's gone in the device manager. I've even tried deleting registry files relating to the reader. I cannot get it uninstalled enough for windows 10 to finish the installation. How can I fix this issue?

I took a differrent aproach.
Searched for realtek in regedit, but instead of deleting the keys found I noticed that one of the folders was related to Windows 10 installation. The folder was:
HKEY_LOCAL_MACHINE\SOFTWARE\Microsoft\Windows NT\CurrentVersion\AppCompatFlags\UpgradeCompatibilityTemp\
Inside, it has many {guid} with apps that may have trouble with the upgrade.
Image
Inside one of them I find the realtek one and it has a key with name ExeFullPath witch pointed me to the folder with rtspstor.sys file.
I deleted the folder that contained that file (you maybe asked for admin permissions) and clicked in update on the windows installer.
The installer then continued without hickups.
Let me know if this works.

Samstag, 10. August 2019

HPE Service Pack for ProLiant (SPP) Versionen

Wie in letzter Zeit leider üblich, verschanzt HPE das nun aktuelle SPP mal wieder hinter praktisch undurchdringlichen Login-Portal.
Ich werden weitere nach Veröffentlichung wieder bereitstellen.
Hinweis die Nutzung ist nur gestattet mit einem gültigen Servicevertrag oder gültiger Servergarantie!
Download Links diverser SPP Versionen

Sonntag, 28. Juli 2019

ESX 6.5 AND 6.7 ON HPE G6/G7 SERVER PSOD FIX

Background

HP’s done it again. They’ve managed to break their custom ESX ISO on the G6 and G7 servers. I suspect it’s the same for G8.
If like me you found yourself perplexed by the PSOD (pink screen of death) after upgrading from ESX 6.0 to 6.5, keep on reading for the fix (skip to the bottom for the download link to an already fixed ISO).

The issue

It seems the “hpe-smx-provider” driver version 6.5.0 from the ESX 6.5 ISO is causing the PSOD.

The fix and the drawbacks

(Simply) Replace the driver with it’s older counterpart (version 6.0.0) and reinstall (see below for the procedure or check the “download link” section at the very end for an already fixed ISO).  Unfortunately if you decide to create a custom ISO with the previous version of “hpe-smx-provider”, you will no longer be able to upgrade to any future ESX version and will need to do a full installation every time (thank you HP!). That being said, here is the procedure to customize the ISO:

Customize your own HPE ESX ISO

  1. Install PowerCLI from here.  At the time of this writing, the latest version was 6.5.0R1.
  2. Download both the ESX 6.5 and 6.0 offline bundles and save them to a convenient place (ex: C:\HP) — download from this link. To make it easier, rename them to something like HPE_ESX6.5.zip and HPE_ESX6.0.zip.
  3. Open up PowerCLI and do the following:Add the 6.5 bundle

    # check that the profile was loaded and the vendor is HPE

    # clone the profile (feel free to specify whatever you like for the “vendor” when prompted)

    # double check the profile was indeed cloned

    # Remove the “hpe-smx-provider” driver from the clone

    # Add the 6.0 bundle

    # check the profile

    # check driver versions from both bundles

    # Add hpe-smx-provider version 6.00 to the custom profile

    # Export the profile to an ISO

Download links

The following images have hpe-smx-provider version 600.03.11.00.9-2768847. Nothing else was changed. The 6.5.0d (build 5310538) is running on an HP Proliant DL380 G7 since March 2018 and was also tested on a DL380 G6 for a couple of months. For convenience, I’ve also built a 6.7.0 ISO and at the request of a reader, 6.7.0 Update1 from April of 2019:
Enjoy!

@THX to www.claud-computing.net/

Rename Onedrive Business root folder

Rename Onedrive Business root folder Here is what I remember: In the Office 365 web admin pages, change the organization name to a shorte...