Mittwoch, 11. August 2010

Installing Windows 2008 R2 ADRMS and Configuring for Exchange 2010 IRM - Part 4

In previous three posts of this series I showed the procedures to install and do initial configurations for AD RMS and Exchange 2010. In this part of the post I will show how to configure desired permissions for each set of users using AD RMS policy templates. Like said in the third part of this post, the permissions assigned by default policy templates may not be enough sometimes; or you may need more rights be assigned to some users. To achieve this a functionality of AD RMS known as Rights Policy Templates comes into play. We will see how to configure these templates.
32. To create a new policy template: Select Rights Policy Templates from the left hand side pane and then click Create Distributed Rights Policy Template.
image
33. Create a folder named RMS_Templates at desired location. Share this folder and add Authenticated Users to View the folder content. After that add RMS Service account to give full control of this folder. Right click the Rights Policy Template node in above figure and then select properties. Read more at Creating an AD RMS Rights Policy Template
image
34. This will pop up Create Distributed Rights Policy Templates wizard on the screen. Click on the Add button on the wizard.
image
35. Provide a meaningful name and description to the new template that you are going to create and click on Add button.
image
36. Click Next button the wizard page that is shown in step 33.
37. Let’s us consider that you have a group of people where these people should only be able to view certain emails and should not be able to forward, reply or print these emails. You need to create a distribution group for such people using EMC and add all of them as members of it. After you have completed creating a group and adding appropriate people into it, you can now specify this group of individual users in AD RMS wizard that is open. Now you can select the ONLY View rights front the rights list box. If you want to configure the expiration, revocation or extension in policies you can do so using the wizard or can simply click to Finish.
image
38. You can set the expiration polices on the next page. Expiration policy settings are totally dependant of your company requirements.
image
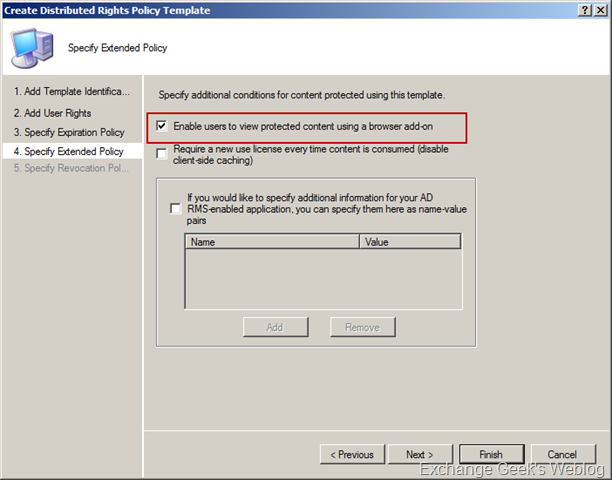
39. On the next page you can specify the extended policies as shown in figure below. When you have OWA users it is recommended that you choose this setting. Click to Finish the wizard.
image
40. After you have completed the wizard you will see a new template in the AD RMS management snap in. To review the rights configured in this template you can simply right click it and select View Rights Summary.
image
41. Now the next and important steps are to deploy this template to the clients. There are few more steps to be configured and are beautifully explained in Technet article Configuring the AD RMS client.
42. Once you have configured the templates please do follow Configuring the AD RMS client for configuring clients. You can use group policy or Systems Centre Configuration Manager for deploying the settings to the whole organization.
43. If you have followed the article Configuring the AD RMS client correctly, you will be able to see the newly created templates in your AD RMS aware application. For an instance; outlook.
image
44. You will also see the XML templates downloaded the to %LocalAppData%\Microsoft\DRM\Templates folder of the currently logged on user.
    • If you do not see the content of this folder or the folder itself you must create this folder hierarchy manually.
    • Also, the registry key HKEY_CURRENT_USER\Software\Microsoft\Office\12.0\Common\DRM does not exist then it should be created manually to specify the value of AdminTemplatePath expandable string value.
    • The registry key for Office 2010 would change to HKEY_CURRENT_USER\Software\Microsoft\Office\14.0\Common\DRM
    Again, you must follow the article Configuring the AD RMS client.
    image
    In the next part of the post I will show how to use Microsoft Exchange 2010 rules to use these templates and automate the email protection to email messages and office attachments.

    Installing Windows 2008 R2 ADRMS and Configuring for Exchange 2010 IRM - Part 3

    In last two posts of this series I posted about basic configurations needed on AD RMS cluster and Exchange 2010 server. In this post I will show how to test the configured features using an application that has an RMS client.
    So, to test the configuration we need to have at least one client computer installed Microsoft Office. I have used Microsoft Office 2010 RTM on a Windows 7 Ultimate computer for demonstration purposes.As we are discussing IRM in terms of its use with Exchange I have limited the scope of client to Outlook 2010 only.
    24. Logon to the computer with a user account with a valid mailbox and launch outlook. Point to new message and select New Message. Select the Options tab on the new message window and click the drop down menu on the Permissions button, and select Manage Credentials as shown in the below picture.
    image
    25. Select Use a Microsoft Windows account option on the Select Service dialog box and click OK
    image
    26. After you selected the correct option the built in RMS client in outlook will retrieve the SCP from Active Directory and will find out the server name of your AD RMS cluster. You must provide your credentials in order to access your rights.
    image
    27. Select your user name from the list that appears in the list after you provide the credentials. In case you have been given more than one credentials you can manage those credentials in the following way. Click OK. Now your client knows where to look for the rights you have been assigned in the AD RMS database.
    image
    28. Now time to send a protected content in the form of an email. Again, follow step 24 and select Do not Forward from the drop down before you click send. The moment you select Do not Forward from the drop down, outlook shows a message in the windows and lets the user know that recipients of this email will not be able forward this email.
    image
    29. Let’s see how it looks like on the recipient end. Again, the recipient is also notified about the restriction that is on the content.
    image
    30. If this message is opened by the recipient, the email options for forwarding are disabled automatically.
    image
    31. One can also view the permissions that he or she has on a restricted email that they received by clicking on the information bar highlighted in step 29.
    SNAGHTMLfd6626
    Now if you see the last figure correctly the recipient has permissions like saving the file and editing the file. In some cases even these additional permissions may be dangerous. In the next post I will show how to configure additional templates and assign them to specific group of people so that these permissions can be used correctly.

    Installing Windows 2008 R2 ADRMS and Configuring for Exchange 2010 IRM - Part 2

    In my previous part of this post I showed the steps for installing AD RMS on a Windows Server 2008 R2 system. In this part I will show how to configure AD RMS so that it can be used with Exchange 2010 for securing emails.
    14. After you have logged off and logged back on to the AD RMS system. Open the Active Directory Rights Management Services Console either by using Server Manager or by pointing your mouse to Administrative Tools. Below is the first screen that you get after you launch AD RMS management snap in. Results pane shows the general settings used during the installation.
    SNAGHTML890234[5]
    15. You can also change the registered SCP by right clicking on the server name, right clicking and selecting Properties. On the Properties page select SCP tab. You can also use the same page to remove the SCP.
    image
    16. When AD RMS is installed Only SYSTEM account gets full control on the ServerCertification.asmx page.
    image
    17. For Exchange 2010 to read data from the certification URL, it needs to have at least Read permissions. To set permissions on the certification URL browse to location C:\inetpub\wwwroot\_wmcs\certification and right click on file ServerCertification.asmx, select Security Tab, Click Edit button and then Add the Read and Read & Execute permissions to RMS service account and Exchange Server group as shown below. Read more about this here http://technet.microsoft.com/en-us/library/ee849850(WS.10).aspx:
    image
    18. Next step is to enable Super Users on AD RMS cluster. To enable click Enable Super User in actions pane of AD RMS management snap in.
    image
    19. Click on Browse button and specify the name of the group that we created during the prerequisite preparation. This might take up to 24 hours to take effect. Read more athttp://technet.microsoft.com/en-us/library/cc720274(WS.10).aspx
    image
    20. Next is to test the IRM configuration on Exchange 2010 server. To test the configuration open EMS and run the cmdlet Test-IRMConfiguration –Sender "email address of a valid mailbox”. If you see the below screen capture correctly you will notice that the text marked in yellow shows a warning and failure, but this is fine unless you have federated infrastructure. To resolve this problem you must add the FederatedEmailxxxxxxxxxxxxxxxx account must be added as a member of the Super User group that we just configured in previous step.
    image
    21. Next is to enable Internal Licensing on Exchange 2010. You can use Set-IRMConfiguration –InternalLicensingEnabled:$True cmdlet to do so. The InternalLicensingEnabled parameter specifies whether to enable IRM features for messages sent to internal recipients. In on-premises deployments, licensing is disabled for internal messages by default. To enable licensing, set the value to $true. Read more here http://technet.microsoft.com/en-us/library/dd979792.aspx
    SNAGHTML2087c5
    22. If you are using Exchange 2010 Journaling within your organization you must also enable the journal report decryption using Set-IRMConfiguration –JournalReportDecryptionEnabled:$True . The result should appear like below:
    image
    23. Exchange 2010 OWA can also use IRM to protect your email and their attachments. You must make sure that  OWA is correctly configured to use IRM by running Get-OWAVirtualDirectory |FL *RM*cmdlet.
    image
    For more information on configurable parameters using Set-IRMConfiguration cmdlet you can read at http://technet.microsoft.com/en-us/library/dd979792.aspx.
    In the next part of this post I will post the ways to use IRM on client side and a little about the considerations about clients.

    Installing Windows 2008 R2 ADRMS and Configuring for Exchange 2010 IRM - Part 1

    Information theft and leakage is a major concern for every organization. Information leakage in one form or another can happen despite of many precautions. Humans are the weakest link of information leakage. Organizations always try to protect their sensitive information from being leaked by any means. Sensitive information is passed out to inappropriate hands using many media. For most of the information theft and information leakage cases email has become a major media. Because of huge traffic flowing in and out it becomes really hard for administrators and security teams to manage this security hole.
    The worry of information theft and leakage to unauthorized sources gave birth to the concept of Information Rights Management very well-known as IRM. Microsoft launched its product named Rights Management Server first to help their customers protecting and securing their sensitive data. Because of easy configuration and easy administration it has become a popular solution for most of the companies these days. Later with the launch of Windows 2008 the product was made available built inside the operating system and was renamed to Active Directory Rights Management Services. To minimize the risk of such things AD RMS can prove its usability and reliability both. AD RMS on Windows Server 2008 SP2 or Windows Server 2008 R2 can be used to minimize the risk of information leakage significantly. As you all know that RMS (legacy version of AD RMS) could be used with outlook to protect office documents and email messages created using Microsoft Office but with very limited support and integration with email server (Exchange Server and mostly on the server-side).
    Exchange 2010 extends the use of ADRMS with better features and manageability. With the IRM features in Exchange 2010, your organization and users can control the rights recipients have for e-mail message. IRM also helps allow or restrict recipient actions such as forwarding a message to other recipients, printing a message or attachment, or extracting message or attachment content by copying and pasting. IRM protection can be applied by users in Microsoft Outlook or Outlook Web App, or it can be based on your organization’s messaging policies and applied by using transport protection rules or Outlook protection rules. Unlike other e-mail encryption solutions, IRM also allows your organization to decrypt protected content to enforce policy compliance.
    In short IRM can help you with:
  • Prevent an authorized recipient of IRM-protected content from forwarding, modifying, printing, faxing, saving, or cutting and pasting the content.

  • Protect supported attachment file formats with the same level of protection as the message.

  • Support expiration of IRM-protected messages and attachments so they can no longer be viewed after the specified period.

  • Prevent IRM-protected content from being copied by using the Snipping Tool in Windows.

  • In this post I will show how to install AD RMS on a Windows Server 2008 R2 system and configure it to be usable by Exchange 2010. Yet, if you are planning to implement ADRMS for your organization in order to integrate it with your Exchange 2010 deployment then you must know some facts about AD RMS or any IRM solution:
    IRM fails to protect you from:
  • Third-party screen capture programs

  • Use of imaging devices such as cameras to photograph IRM-protected content displayed on the screen

  • Users remembering or manually transcribing the information

  • And, more to add into limitations of AD RMS and Exchange Server 2010 in terms of supportability:
    ScenarioIRM-protection supported?
    Messages sent to mailbox users within your Exchange organizationYes
    Messages sent to distribution groups within your organizationYes, If the distribution group includes recipients outside your Exchange organization, see “Messages sent to recipients outside your organization”.
    Messages sent between on-premises and Exchange Online recipients in a cross-premise deploymentYes, Recipients with mailboxes located on an on-premises exExchange2010 SP1 server can send and receive IRM-protected messages to/from recipients within their organization with mailboxes located in Exchange Online
    Messages sent to recipients outside your organizationNo, Exchange 2010 doesn’t include a solution for sending IRM-protected messages to external recipients. AD RMS offers solutions by using trust policies. You can configure a trust policy between your AD RMS cluster and Windows Live ID. For messages sent between two organizations, you can create a federated trust between the two Active Directory forests by using Active Directory Federation Services (AD FS). To learn more you can read at http://technet.microsoft.com/en-us/library/cc755156(WS.10).aspx
    Messages sent to distribution groups or distribution lists external to your Exchange organizationNo, External distribution list or distribution group expansion doesn’t occur within your Exchange organization. IRM-protected messages sent to external distribution groups contain a license for the group, but not for group members. Group members will be unable to access the message.
    For detailed information on IRM and Exchange 2010 here: http://technet.microsoft.com/en-us/library/dd638140.aspx. The table above comes from the same document.
    Okay, looks like we are good to go with installation if you have prepared yourself to accept the benefits and limitations of IRM. I am demonstrating a configuration from my lab setup. Below table shows my lab setup:
    Computer NameOperating SystemRole
    ExchangeDCWindows Server 2003 SP2DC, GC, CA
    E1401Windows Server 2008 R2Exchange Server 2010 CAS, HT and MBX
    E1402Windows Server 2008 R2Exchange Server 2010 CAS, HT and MBX
    DBSRVWindows Server 2003 SP2SQL Server 2005 SP3
    ADRMSWindows Server 2008 R2AD RMS
    Preparing Prerequisites for ADRMS installation:
    • Create a service account named RMSSvc. This account will later be used during the installation of AD RMS. This server must have permissions to logon locally to the server.
    • Make sure you have at least one database server installed SQL server 2005 database server. Please see AD RMS SQL Server Requirements for more information. If you are using the MSDE 2000 to host the Rights Management Services (RMS) databases, you cannot upgrade to AD RMS. An upgrade is only supported if you are using Microsoft SQL Server 2000 or Microsoft SQL Server 2005 to host the AD RMS databases. Also, if the upgrade is to AD RMS in Windows Server 2008 RTM, SQL 2000 will work. If the upgrade is to AD RMS in Windows Server 2008 R2 then it must be either SQL 2005 or SQL 2008.
    • A distribution group named RMS SU Group in your exchange organization. This group will be used for Super User Group later.
    • And following components on the server where you are installing AD RMS:
    Web Server Role (IIS) and its features:
    • Web Server (IIS)
      • Web Server
        • Common HTTP Features
          • Static Content
          • Directory Browsing
          • HTTP Errors
          • HTTP Redirection
        • Performance
          • Static Content Compression
        • Health and Diagnostics
          • HTTP Logging
          • Logging Tools
          • Request Monitor
          • Tracing
        • Security
          • Windows Authentication
      • Management Tools
        • IIS Management Console
        • IIS 6 Management Compatibility
          • IIS 6 Metabase Compatibility
          • IIS 6 WMI Compatibility
    Operating System Features:
    • Message Queuing
    • Message Queuing Services
    • Message Queuing Server
  • .NET Framework 3.5.1 Features

    • .NET Framework 3.5.1
    Installing AD RMS Using Server Manager:
    1. Open Server Manager and select Roles node in left hand side pane and click Add Roles in the action pane.
    2. The Add Roles Wizard appears on the screen. Select Active Directory Rights Management Services from the list. Now, if you do not have the software prerequisites installed on the server, the wizard will add them for you automatically
    image
    3. Click Next on the page that appears.
    image
    4. If you are installing the first RMS Server in your organization then the following screen with one of the options disabled will appear. This page allows you to create a new AD RMS cluster.
    image
    5. Specify the database server settings on the next page.
    image
    6. Specify the service account details on the next page. This is the service account we created earlier.
    image
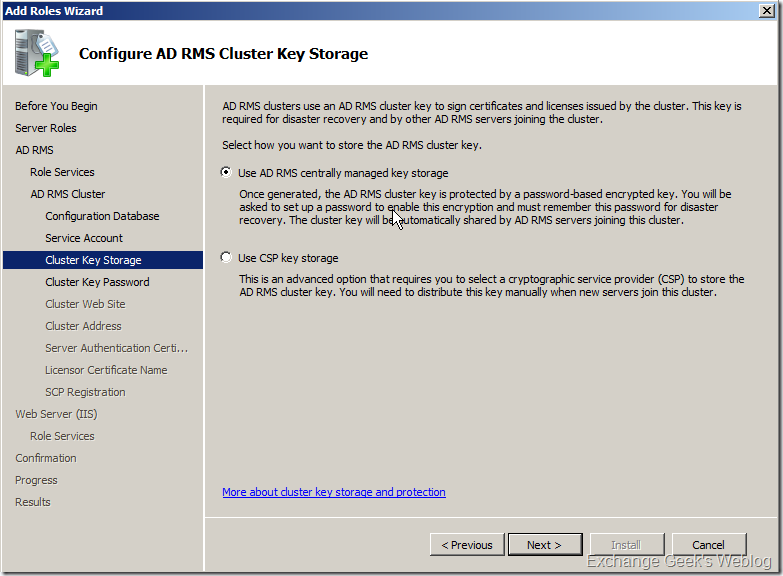
    7. Specify the location where you want to store the cluster key. Allow setup wizard to store the key in the centrally managed storage. This helps you to get over the trouble of providing the cluster key when you add new nodes to the cluster.
    image
    8. Provide a strong password for the cluster key in the next step.
    image
    9. Select the website in IIS where you want to host your certification virtual directories. If you have more than one IIS websites created on the server then you can select anything other than the Default Web Site.
    image
    10. Select the options as shown below. Do not select to use HTTP which is a non secure access. Also, keep in mind that the URL your are specifying here will be used by clients for licensing requests so if you are using anything other than the server name then you must create the aliases in DNS.
    image
    11. Specify the certificate options on the next page. The certificate you are going to use in this step must contain the FQDN of the cluster address specified in the last step. I have used a certificate issued by my internal CA.
    image
    12. The next step is to provide the licensor certificate name. Just click next on this page.
    image
    12. After you clicked next the SCP (Service Connection Point) Registration page appears. SCP is registered in AD and can be modified anytime later using AD RMS management console. Select Register the AD RMS service connection point now.
    image
    13. After this step you can simply keep clicking next and wait till the wizard completes installing AD RMS. As you can see on the last page of the wizard, you must log off from the computer and log back in in order to manage the AD RMS cluster that you just created.
    image
    That is all for now, in the next post I will show how to configure AD RMS server to use with Exchange 2010 and vice versa.

    Dienstag, 10. August 2010

    MS Exchange 2010 Systemvoraussetzungen

    Software Requirements


    DAGs are available in both Exchange 2010 Standard Edition and Exchange 2010 Enterprise Edition. In addition, a DAG can contain a mix of servers running Exchange 2010 Standard Edition and Exchange 2010 Enterprise Edition.


    Each member of the DAG must also be running the same operating system. Exchange 2010 is supported on both the Windows Server 2008 and Windows Server 2008 R2 operating systems. All members of a DAG must run either Windows Server 2008 or Windows Server 2008 R2. They can't contain a combination of both Windows Server 2008 and Windows Server 2008 R2.


    In addition to meeting the prerequisites for installing Exchange 2010, there are operating system requirements that must be met. DAGs use Windows Failover Clustering technology, and as a result, they require the Enterprise version of Windows.


    Um Microsoft Exchange 2010 zu installieren, muss man ein wenig Vorarbeit leisten.

    Systemvoraussetzungen: MS Windows Server 2008 (x64, min. SP2); MS Windows Server 2008 R2

    Was müssen wir nun noch alles installieren?
    - 2007 Office System Converter: Microsoft Filter Pack (http://www.microsoft.com/downloads/details.aspx?displaylang=de&FamilyID=60c92a37-719c-4077-b5c6-cac34f4227cc)

    Die nachfolgenden Komponenten sind alle Teil von Windows 2008 Server, müssen allerdings separat installiert werden. Dazu gibt man am einfachsten über die Windows PowerShell folgende Befehle ein:
    Add-WindowsFeature Web-Server
    Add-WindowsFeature Web-Basic-Auth
    Add-WindowsFeature Web-Windows-Auth
    Add-WindowsFeature Web-Metabase
    Add-WindowsFeature Web-Net-Ext
    Add-WindowsFeature Web-Lgcy-Mgmt-Console
    Add-WindowsFeature Web-ISAPI-Ext
    Add-WindowsFeature Web-Digest-Auth
    Add-WindowsFeature Web-Dyn-Compression
    Add-WindowsFeature WAS-Process-Model
    Add-WindowsFeature RSAT-ADDS
    Add-WindowsFeature RSAT-Web-Server
    Add-WindowsFeature NET-Framework
    Add-WindowsFeature NET-HTTP-Activation
    Add-WindowsFeature RPC-Over-HTTP-Proxy

    Des Weiteren muss man noch den Dienst “Net. TCP-Portfreigabedienst” auf automatischen Start setzen.
    Set-Service NetTcpPortSharing -StartupType Automatic

    Abschließend ein Neustart des Servers und der Installation von MS Exchange 2010 sollte nichts mehr im Wege stehen.

    Schlagwörter: Systemvoraussetzungen MS Exchange 2010 Installation, nettcpportsharing, Exchange 2010 Installation, Exchange 2010 Systemvoraussetzungen

    Dienstag, 3. August 2010

    FaceTime Telefonat über 3G mit My3G 4.1 jetzt möglich

    Vor kurzem wurde die Version 4.1 von My3G veröffentlicht. Dieses Tool täuscht dem iPhone bei bestehender 3G -- Verbindung eine WiFi Verbindung vor. So können alle Programme, die nur im WiFi Netz funktionieren auch im 3G-Netz genutzt werden.
    Mit der neuen Version kann man jetzt auch FaceTime-Telefonate über 3G führen. My3G kann für $2.79 im Cydia Store (ModMyi Source) heruntergeladen werden.
    Das iPhone 4 kann mit JailbreakMe gejailbreakt werden.
    /Update 1
    9to5mac hat ein Video von einem 3G-FaceTimeCall veröffentlicht:

    Enabling Dynamic Memory

    If you have not tried out dynamic memory yet – here is a handy step-by-step guide for how to get it setup.
    The first thing you need to do is to install the Windows Server 2008 R2 SP1 beta release.  To do this you should:
    1. Download the beta from here: http://www.microsoft.com/windowsserver2008/en/us/sp1.aspx
    2. Shutdown any virtual machines before installing the service pack in the parent partition
      • Saved states and snapshots from Windows Server 2008 R2 RTM are compatible with the SP1 beta release – so there is no need to discard them.  Note – this may not be the case with the SP1 RTM release.
    3. Apply the service pack
    4. Reboot the physical computer
    At this stage you will have the service pack 1 beta applied to your system – but you will not have enabled dynamic memory for any of your virtual machines.  There are two main steps to enabling dynamic memory.
    Step 1: Upgrading the integration services inside the virtual machine
    Dynamic memory needs new integration components to be installed in the virtual machine.  If you are running Windows Server 2008 R2 or Windows 7 inside of the virtual machine you can do this by either upgrading the integration services or by just installing the service pack 1 beta inside the virtual machine as well.  For all other supported operating systems you will need to upgrade the integration services.  To do this you will need to:
    1. Boot the virtual machine
    2. Connect using the Virtual Machine Connection window from the Hyper-V manager
    3. Log in with an account that has local administrator rights on the virtual machine
    4. Open the Action menu and select Insert Integration Services Setup Disk
      Capture2 (2)
    5. Depending on the guest operating system you are running – you may need to select to start the integration services installer (or it may run automatically)
      Capture3
    6. When prompted to upgrade the Hyper-V integration services – click OK
      Capture4
    7. When the installation is completed and you are prompted to reboot – click No
      Capture5
    8. Now shutdown the virtual machine
    The next step is to enable dynamic memory in the virtual machine settings.  To do this the virtual machine needs to be turned off, which is why you needed to shutdown the virtual machine instead of letting it reboot.

    Step 2: Enabling dynamic memory in the virtual machine settings
    Once the virtual machine is no longer running, you will need to:
    1. Open the virtual machine settings
    2. Change to the Memory page
    3. Select the Dynamic option
    4. Set the Startup RAM to be as low as is necessary for the virtual machines guest operating system to boot.  512mb is a good figure to choose for most operating systems
    5. Set the Maximum RAM to an appropriate value (it will default to 64GB of RAM – and for many people this will be fine.  All of my virtual machines have a maximum RAM value of 64GB)
    6. Hit OK
      Capture6

    You can now start the virtual machine.  You should be able to tell when dynamic memory starts functioning inside the virtual machine as you will see a percentage getting reported in the Memory Available column for any virtual machine which has dynamic memory enabled.

    Hyper-V R2 Bugcheck 0x00000101


    Wer schon einmal einen Bluescreen of death während einer Demo live erlebt hat, weiß, wie unangenehm eine solche Situation sein kann. 
    The computer has rebooted from a bugcheck.  The bugcheck was: 0x00000101 (0x0000000000000019, 0x0000000000000000, 0xfffff88001e5d180, 0x0000000000000002). A dump was saved in: C:\Windows\MEMORY.DMP. Report Id: 080210-15054-01.
    Bugcheck
    Nach einer kurzen Suche im Internet war der Verursacher des Problems schnell lokalisiert. Der TechNet-Forumeintrag Hyper-v Server Blue Screen with bugcheck 101 verweist auf ein bekanntes CLOCK_WATCHDOG_TIMEOUT-Problem, welches auf Computern mit einem oder mehreren Intel-CPUs mit dem Codenamen Nehalem aufritt. Ein in den folgenden Intel-Dokumenten beschriebener CPU-Fehler verursacht fehlerhafte Interrupts, weswegen Windows einen Bluescreen auslöst:
    Die Microsoft stellt allen betroffenen Kunden kostenlos einen Hotfix zur Verfügung, mit der Windows Server 2008 R2 das Hardwareproblem abfangen kann. Weitere Informationen und die Downloadquelle für den Hotfix sind im Artikel Stop error message on an Intel Xeon 5500 series processor-based computer that is running Windows Server 2008 R2 and that has the Hyper-V role installed: "0x00000101 - CLOCK_WATCHDOG_TIMEOUT" zu finden.

    Montag, 2. August 2010

    on 64-bit 2k8 server, trying to add x86 drivers asks for ntprint.inf


    STEP BY STEP GUIDE TO GET A WORKING NTPRINT FOLDER FROM WINDOWS 7 MEDIA.

    If you have a Windows 7 32-bit CD, perhaps with a new computer, OEM disc should work fine, do the following:

    1. Make a folder on your C Drive called Win7Mount
    2. Obtain a copy of ImageX. This can be downloaded from Microsoft. It is their new imaging software.
    3. Insert your Windows 7 DVD or mount your ISO. Note the drive letter.
    4. Open a command prompt and change directories to wherever ImageX is installed. I have the Windows AIK installed so mine was at C:\Program Files\AIK\Tools\x86.
    5. Type the following command: imagex /mount H:\Sources\install.wim 1 C:\Win7Mount and press ENTER.
    6. Wait for imagex to complete. Will take 2-3 minutes to fully mount DVD.
    7. Now browse to C:\Win7Mount\Windows\winsxs\
    8. Copy the contents of x86_ntprint.inf_31bfxxxxxxxxxxxxxxxxxxxxxxx to wherever you save your Print Drivers. I called it "Windows 7 32-bit NTPRINT". That way when I need it in the future I will remember what it was for. (Note: there is another folder called x86_ntprint.inf.resources_xxxxxxxxxxxxxxxxxx. I copied the contents of that one as well, but didn't need it. I figured I might in the future so I went ahead and grabbed it now.)
    9. Now type: imagex /unmount C:\Win7Mount and press ENTER. This process will take 60 seconds or so.
    10. Now when the print server asks for the Windows media, just browse to that new folder you created and it will find the files needed.

    Thanks for KESWADMIN and BRYANT FONG for the winsxs help. I just thought I would put all the steps together for people that might not have it installed, but do have the media available.

    HowTo: iOS 4.0 + 3.1.2 / 3.1.3 Jailbreak in 10 Sekunden (iPhone 4!, 3GS, 3G sowie iPod Touches und iPad mit 3.2) [jailbreakme.com]


    Endlich ist es soweit. Viele von euch dürften schon gespannt auf einen Jailbreak für das neue iPhone 4 gewartet haben. Das iPhone 3G mit iOS 4 lässt sich schon länger knacken. An den iOS 4-Kern des 3GS und 4 kam bis jetzt aber noch niemand. Auch die dritte Generation des iPod Touchs blieb bislang unter iOS “verschont”. Nun haben Saurik und Comex es aber tatsächlich geschafft, die noch aus früheren iPhone Classic-Zeiten bekannte Website “jailbreakme.com” wieder auf die Beine zu stellen. Dort konnte man 2007 und 2008 ganz leicht das iPhone jailbreaken: ein Aufruf der Website im iPhone-eigenen “Safari”-Browser genügte, um den Cydia-Vorgänger “Installer” auf dem iPhone geladen und installiert zu bekommen, um damit weitere zusätzliche Programme installieren zu können. Das war damals schon eine beachtliche Leistung, denn bis Mitte 2008 gab es ja noch gar keinen App Store…und genau nach diesem Prinzip funktioniert nun auch die neue Website; mit allen iPhones und iPod Touches ab 3.1.2. Wie das Ganze genau funktioniert, erfahrt ihr in folgender Anleitung. Bitte die Hinweise beachten!

    Wichtige Hinweise und bekannte Probleme:

    • Der Jailbreak ist weder illegal noch verboten! Allerdings sollte ein Gerät vor einem Einsenden zu Apple (beispielsweise bei einer Garantieabwicklung) wieder auf die Werkseinstellungen zurückgesetzt werden (iTunes > Gerät wählen > Wiederherstellen).
    • Die Beta-Firmware 4.1 wird NICHT unterstützt!
    • Die iPad-Firmware 3.2.1 bereitet derzeit noch einige kleinere Probleme. Betroffene Nutzer sollten auf ein Update von Jailbreakme warten.
    • Noch nicht alle Programme wurden an die neue Firmware bzw. an das neue iPhone 4 angepasst. Bitte vorher in der jeweiligen Beschreibung auf Kompatibilität überprüfen.
    • Bei einigen Nutzern funktionierte nach dem Jailbreak und einem Neustart FaceTime und das Verschicken von MMS nicht mehr. Laut Comex sei dieses Problem aber bereits behoben. (Mittlerweile vollständig behoben! Noch betroffene Nutzer können Cydia öffnen und das Update installieren…) Dennoch könnten weitere, bislang noch unbekannte Probleme auftreten.
    • Die Seite ist aufgrund zu vieler Zugriffe zeitweise überlastet. Notfalls kann der Mirror http://jailbreakme.modmyi.com genutzt werden (exakt die selbe Seite, nur eben auf einem anderen Server).
    • Durchführung auf eigene Gefahr! Viel passieren kann aber dennoch nicht. Notfalls kann einfach wieder ein Backup eingespielt werden.
    • Der Software Unlock ist beim iPhone 4 aktuell noch nicht verfügbar – soll aber innerhalb der nächste 48 Stunden folgen. Beim iPhone 3G / 3GS kann weiterhin ultrasn0w per Cydia installiert werden, um den Software Unlock durchzuführen.

    Voraussetzungen:

    • iPhone 4 (2010), iPhone 3GS (2009), iPhone 3G (2008), iPhone 2G (2007)
    • iPod Touch 1G (Sep 2007 bis Sep 2008), iPod Touch 2G (Sep 2008 bis Sep 2009), iPod Touch 3G (seit Sep 2009)
    • Firmware 3.1.2, 3.1.3 oder 3.2 oder 4.0, 4.0.1 (3.2.1 und 4.1 wird nicht unterstützt)
    • Internetverbindung auf dem zu jailbreakenden Gerät (WiFi empfohlen, aber nicht dringend notwendig!)
    • Backup empfohlen, falls doch mal etwas schief geht!
    • keine Erfahrung nötig

    Anleitung:

    Datensicherung (Backup)

    Backup des zu jailbreakenden Gerätes durchführen (strengstens empfohlen!)

    1. Dazu das iPhone oder den iPod Touch mit dem Computer verbinden. iTunes sollte sich, insofern noch nicht geschehen, nun öffnen. Ansonsten selber starten. Das Gerät sollte jetzt links in der “Geräte”-Liste erscheinen. Rechtsklick auf das gewünschte Gerät und “Sichern” anklicken. iTunes wird nun das komplette iPhone sichern (inklusive Lesezeichen etc.). Dies kann, je nach Datenmenge, zwischen einer und 30 Minuten dauern.

    Jailbreak

    1. Safari öffnen und die Seite “www.jailbreakme.com” aufrufen. Sollte sich die Seite nicht öffnen lassen, http://jailbreakme.modmyi.com (Mirror) öffnen.
    2. Es erscheint eine Lockscreen-ähnliche Seite mit einem Slider “Slide to Jailbreak”. Diesen Slider jetzt, wie beim Entsperren, nach rechts schieben.Sollte ein Fehler auftreten, auch hier bitte das selbe über den Mirror http://jailbreakme.modmyi.com probieren!
    3. Nun wird ein kleines Download-Fenster erscheinen. Cydia wird an dieser Stelle heruntergeladen und anschließend installiert.
    4. Abschließend das iPhone bzw. den iPod Touch noch neustarten. Cydia sollte sich jetzt irgendwo auf dem Homescreen befinden.
    5. Fertig!

    Software Unlock

    Solltet ihr einen Software Unlock benötigen – geht es hier weiter

    1. ultrasn0w Quelle (Source) Hinzfügen: repo666.ultrasn0w.com ( Manage>Sources>Add)
    2. ultrasn0w 0.93 installieren
    3. iPhone neustarten
    4. Fertig

    Rename Onedrive Business root folder

    Rename Onedrive Business root folder Here is what I remember: In the Office 365 web admin pages, change the organization name to a shorte...