Information theft and leakage is a major concern for every organization. Information leakage in one form or another can happen despite of many precautions. Humans are the weakest link of information leakage. Organizations always try to protect their sensitive information from being leaked by any means. Sensitive information is passed out to inappropriate hands using many media. For most of the information theft and information leakage cases email has become a major media. Because of huge traffic flowing in and out it becomes really hard for administrators and security teams to manage this security hole.
The worry of information theft and leakage to unauthorized sources gave birth to the concept of Information Rights Management very well-known as IRM. Microsoft launched its product named Rights Management Server first to help their customers protecting and securing their sensitive data. Because of easy configuration and easy administration it has become a popular solution for most of the companies these days. Later with the launch of Windows 2008 the product was made available built inside the operating system and was renamed to Active Directory Rights Management Services. To minimize the risk of such things AD RMS can prove its usability and reliability both. AD RMS on Windows Server 2008 SP2 or Windows Server 2008 R2 can be used to minimize the risk of information leakage significantly. As you all know that RMS (legacy version of AD RMS) could be used with outlook to protect office documents and email messages created using Microsoft Office but with very limited support and integration with email server (Exchange Server and mostly on the server-side).
Exchange 2010 extends the use of ADRMS with better features and manageability. With the IRM features in Exchange 2010, your organization and users can control the rights recipients have for e-mail message. IRM also helps allow or restrict recipient actions such as forwarding a message to other recipients, printing a message or attachment, or extracting message or attachment content by copying and pasting. IRM protection can be applied by users in Microsoft Outlook or Outlook Web App, or it can be based on your organization’s messaging policies and applied by using transport protection rules or Outlook protection rules. Unlike other e-mail encryption solutions, IRM also allows your organization to decrypt protected content to enforce policy compliance.
In short IRM can help you with:
In this post I will show how to install AD RMS on a Windows Server 2008 R2 system and configure it to be usable by Exchange 2010. Yet, if you are planning to implement ADRMS for your organization in order to integrate it with your Exchange 2010 deployment then you must know some facts about AD RMS or any IRM solution:
IRM fails to protect you from:
And, more to add into limitations of AD RMS and Exchange Server 2010 in terms of supportability:
| Scenario | IRM-protection supported? |
| Messages sent to mailbox users within your Exchange organization | Yes |
| Messages sent to distribution groups within your organization | Yes, If the distribution group includes recipients outside your Exchange organization, see “Messages sent to recipients outside your organization”. |
| Messages sent between on-premises and Exchange Online recipients in a cross-premise deployment | Yes, Recipients with mailboxes located on an on-premises exExchange2010 SP1 server can send and receive IRM-protected messages to/from recipients within their organization with mailboxes located in Exchange Online |
| Messages sent to recipients outside your organization | No, Exchange 2010 doesn’t include a solution for sending IRM-protected messages to external recipients. AD RMS offers solutions by using trust policies. You can configure a trust policy between your AD RMS cluster and Windows Live ID. For messages sent between two organizations, you can create a federated trust between the two Active Directory forests by using Active Directory Federation Services (AD FS). To learn more you can read at http://technet.microsoft.com/en-us/library/cc755156(WS.10).aspx |
| Messages sent to distribution groups or distribution lists external to your Exchange organization | No, External distribution list or distribution group expansion doesn’t occur within your Exchange organization. IRM-protected messages sent to external distribution groups contain a license for the group, but not for group members. Group members will be unable to access the message. |
For detailed information on IRM and Exchange 2010 here: http://technet.microsoft.com/en-us/library/dd638140.aspx. The table above comes from the same document.
Okay, looks like we are good to go with installation if you have prepared yourself to accept the benefits and limitations of IRM. I am demonstrating a configuration from my lab setup. Below table shows my lab setup:
| Computer Name | Operating System | Role |
| ExchangeDC | Windows Server 2003 SP2 | DC, GC, CA |
| E1401 | Windows Server 2008 R2 | Exchange Server 2010 CAS, HT and MBX |
| E1402 | Windows Server 2008 R2 | Exchange Server 2010 CAS, HT and MBX |
| DBSRV | Windows Server 2003 SP2 | SQL Server 2005 SP3 |
| ADRMS | Windows Server 2008 R2 | AD RMS |
Preparing Prerequisites for ADRMS installation:
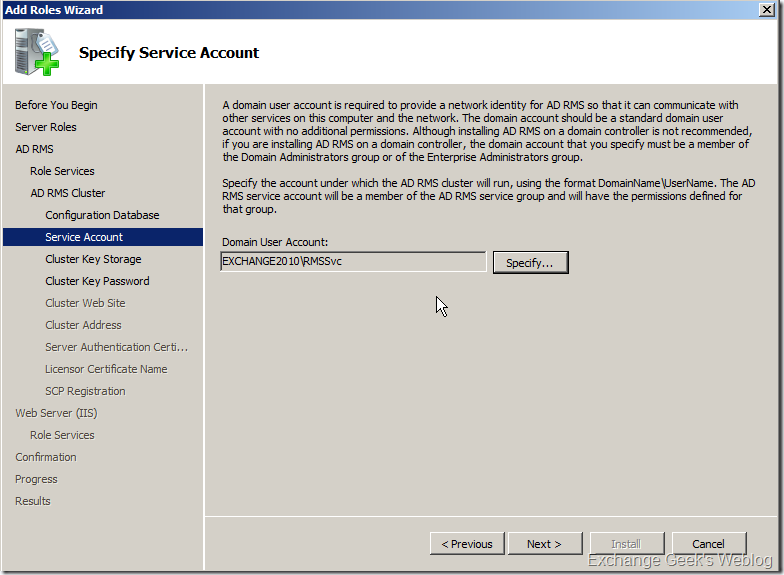
- Create a service account named RMSSvc. This account will later be used during the installation of AD RMS. This server must have permissions to logon locally to the server.
- Make sure you have at least one database server installed SQL server 2005 database server. Please see AD RMS SQL Server Requirements for more information. If you are using the MSDE 2000 to host the Rights Management Services (RMS) databases, you cannot upgrade to AD RMS. An upgrade is only supported if you are using Microsoft SQL Server 2000 or Microsoft SQL Server 2005 to host the AD RMS databases. Also, if the upgrade is to AD RMS in Windows Server 2008 RTM, SQL 2000 will work. If the upgrade is to AD RMS in Windows Server 2008 R2 then it must be either SQL 2005 or SQL 2008.
- A distribution group named RMS SU Group in your exchange organization. This group will be used for Super User Group later.
- And following components on the server where you are installing AD RMS:
Web Server Role (IIS) and its features:
- Web Server (IIS)
- Web Server
- Common HTTP Features
- Static Content
- Directory Browsing
- HTTP Errors
- HTTP Redirection
- Performance
- Static Content Compression
- Health and Diagnostics
- HTTP Logging
- Logging Tools
- Request Monitor
- Tracing
- Security
- Windows Authentication
- Common HTTP Features
- Management Tools
- IIS Management Console
- IIS 6 Management Compatibility
- IIS 6 Metabase Compatibility
- IIS 6 WMI Compatibility
- Web Server
Operating System Features:
- Message Queuing
- Message Queuing Services
- Message Queuing Server
- .NET Framework 3.5.1
Installing AD RMS Using Server Manager:
1. Open Server Manager and select Roles node in left hand side pane and click Add Roles in the action pane.
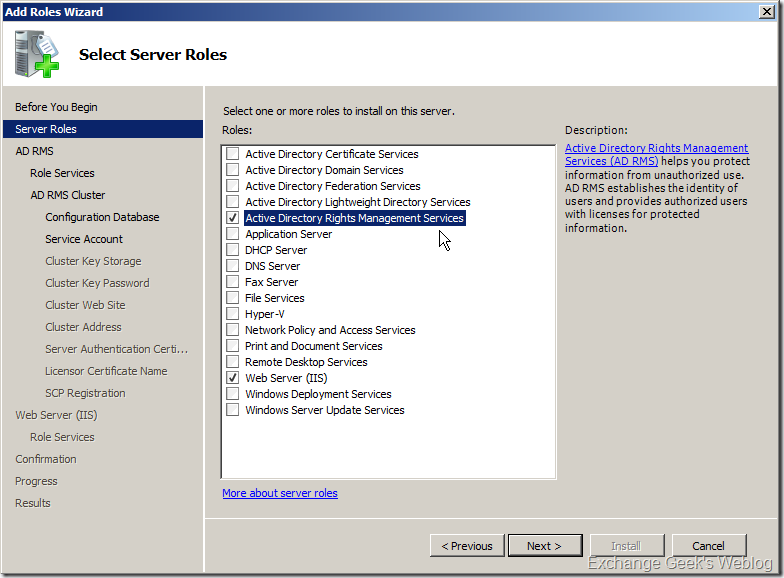
2. The Add Roles Wizard appears on the screen. Select Active Directory Rights Management Services from the list. Now, if you do not have the software prerequisites installed on the server, the wizard will add them for you automatically
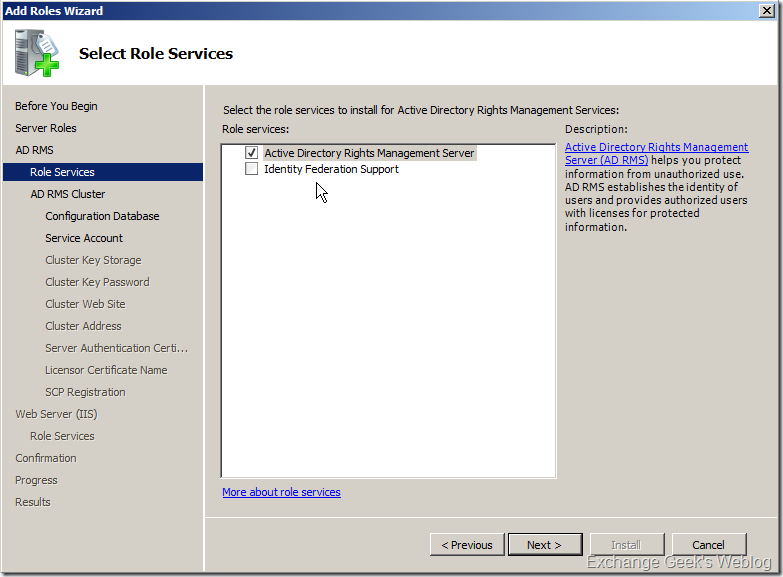
3. Click Next on the page that appears.
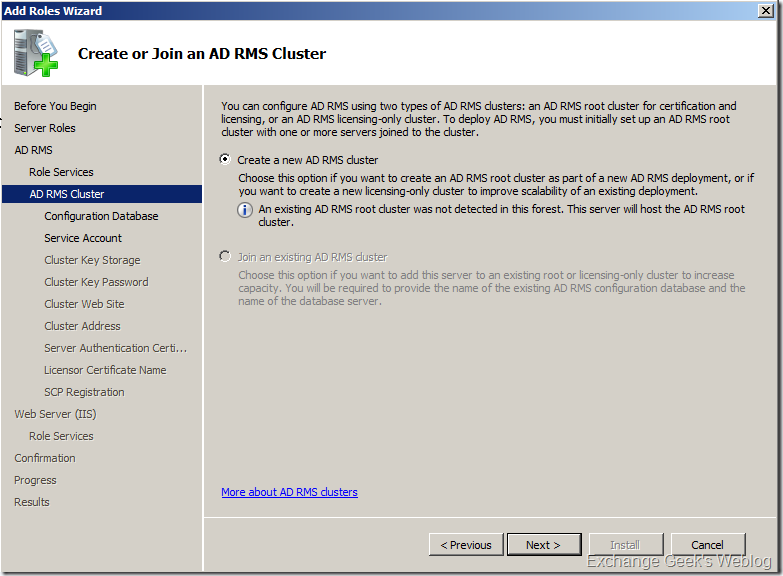
4. If you are installing the first RMS Server in your organization then the following screen with one of the options disabled will appear. This page allows you to create a new AD RMS cluster.
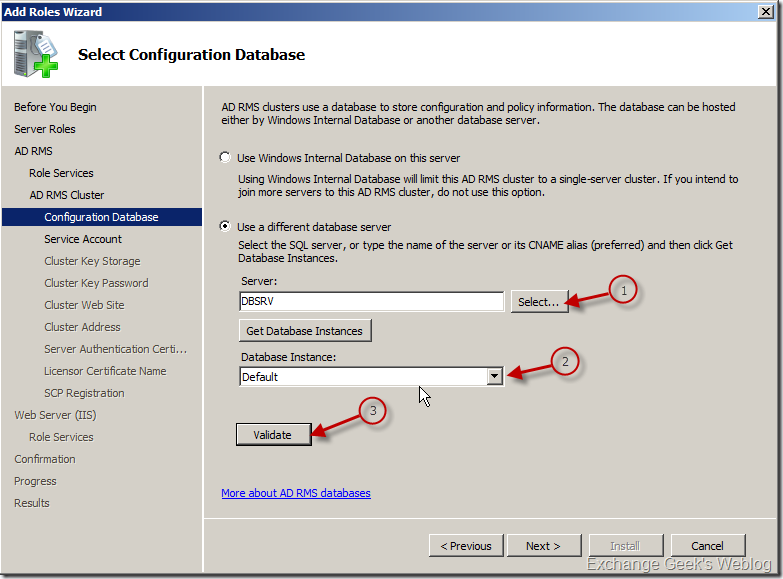
5. Specify the database server settings on the next page.
6. Specify the service account details on the next page. This is the service account we created earlier.
7. Specify the location where you want to store the cluster key. Allow setup wizard to store the key in the centrally managed storage. This helps you to get over the trouble of providing the cluster key when you add new nodes to the cluster.
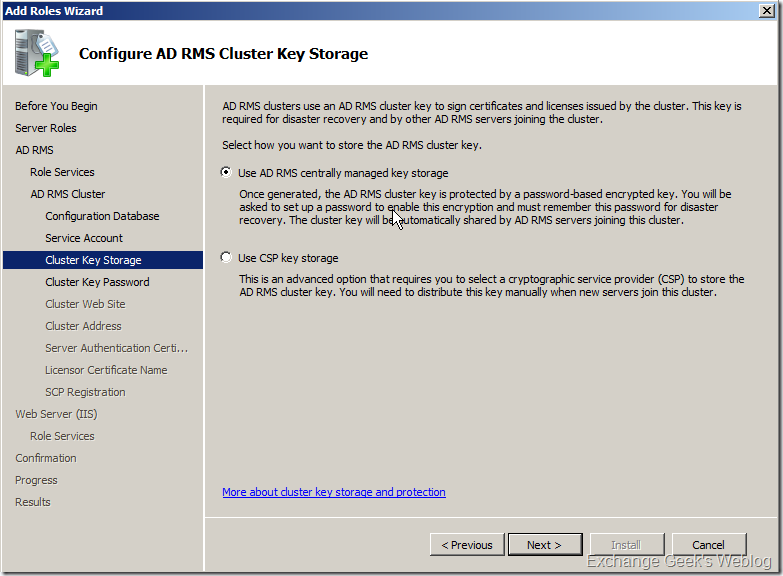

8. Provide a strong password for the cluster key in the next step.
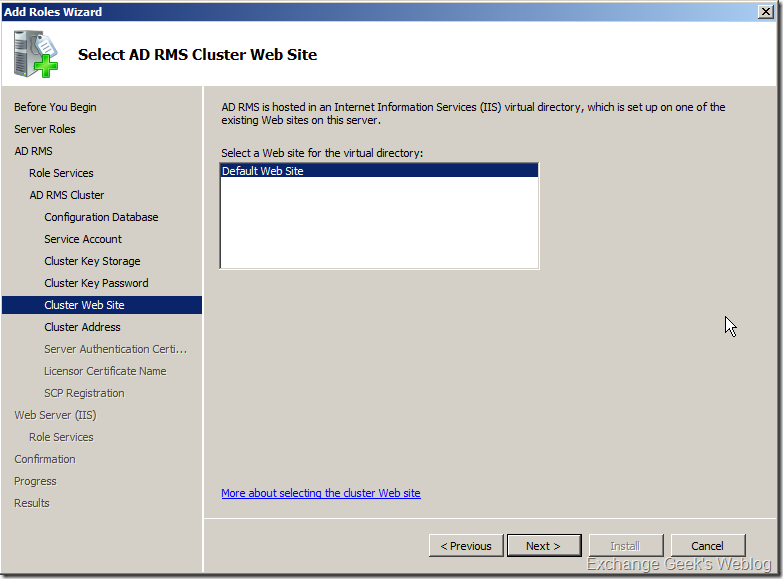
9. Select the website in IIS where you want to host your certification virtual directories. If you have more than one IIS websites created on the server then you can select anything other than the Default Web Site.
10. Select the options as shown below. Do not select to use HTTP which is a non secure access. Also, keep in mind that the URL your are specifying here will be used by clients for licensing requests so if you are using anything other than the server name then you must create the aliases in DNS.
11. Specify the certificate options on the next page. The certificate you are going to use in this step must contain the FQDN of the cluster address specified in the last step. I have used a certificate issued by my internal CA.
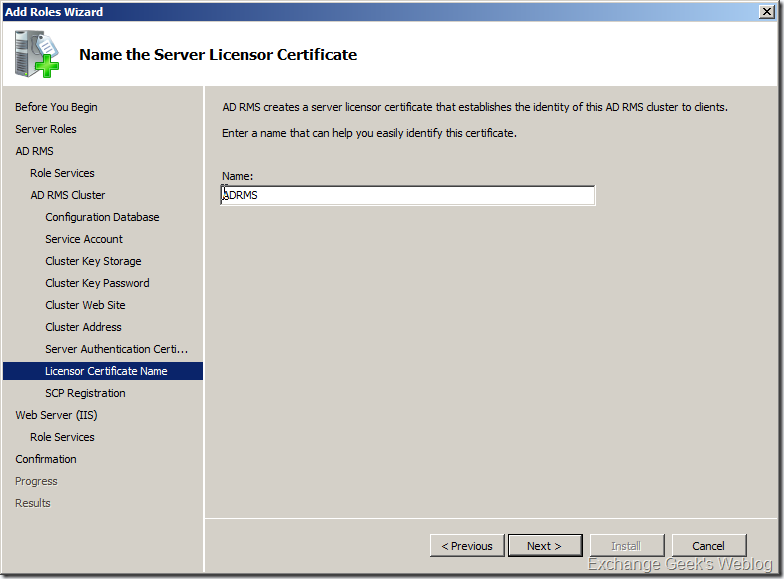
12. The next step is to provide the licensor certificate name. Just click next on this page.
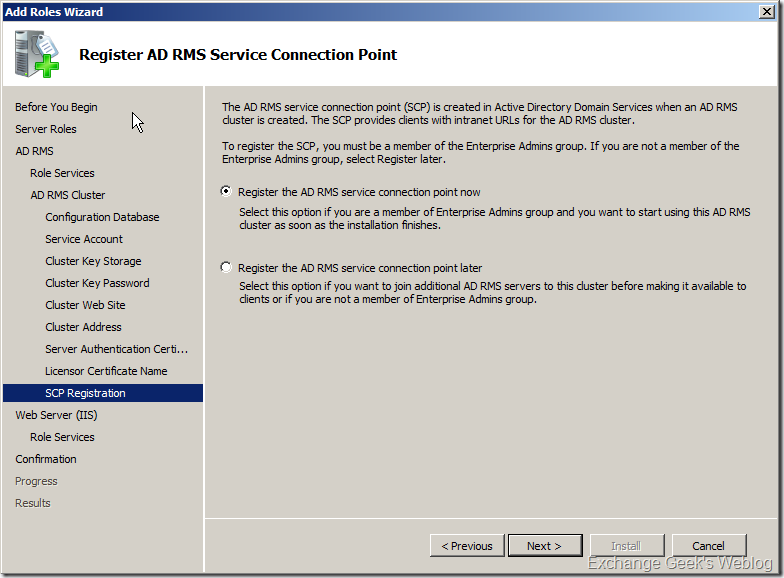
12. After you clicked next the SCP (Service Connection Point) Registration page appears. SCP is registered in AD and can be modified anytime later using AD RMS management console. Select Register the AD RMS service connection point now.
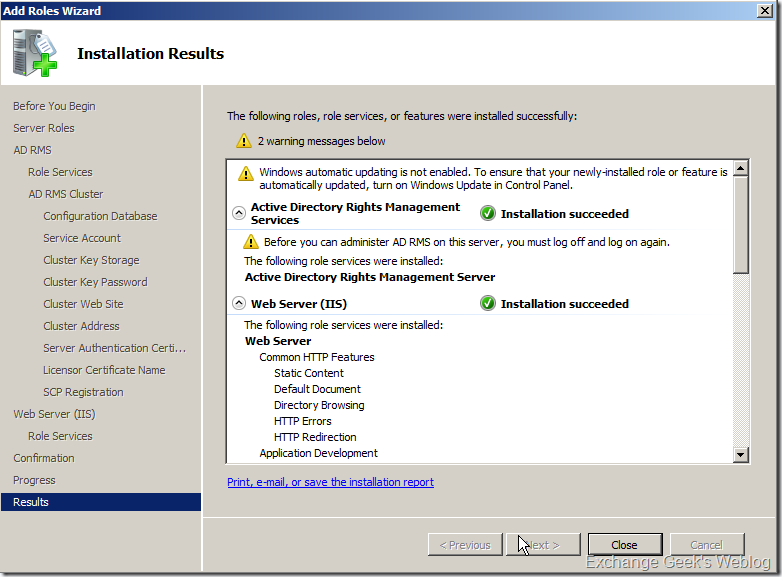
13. After this step you can simply keep clicking next and wait till the wizard completes installing AD RMS. As you can see on the last page of the wizard, you must log off from the computer and log back in in order to manage the AD RMS cluster that you just created.
That is all for now, in the next post I will show how to configure AD RMS server to use with Exchange 2010 and vice versa.



Keine Kommentare:
Kommentar veröffentlichen