In my previous part of this post I showed the steps for installing AD RMS on a Windows Server 2008 R2 system. In this part I will show how to configure AD RMS so that it can be used with Exchange 2010 for securing emails.
14. After you have logged off and logged back on to the AD RMS system. Open the Active Directory Rights Management Services Console either by using Server Manager or by pointing your mouse to Administrative Tools. Below is the first screen that you get after you launch AD RMS management snap in. Results pane shows the general settings used during the installation.
![SNAGHTML890234[5] SNAGHTML890234[5]](http://milindn.files.wordpress.com/2010/07/snaghtml8902345_thumb.png?w=769&h=593)
15. You can also change the registered SCP by right clicking on the server name, right clicking and selecting Properties. On the Properties page select SCP tab. You can also use the same page to remove the SCP.
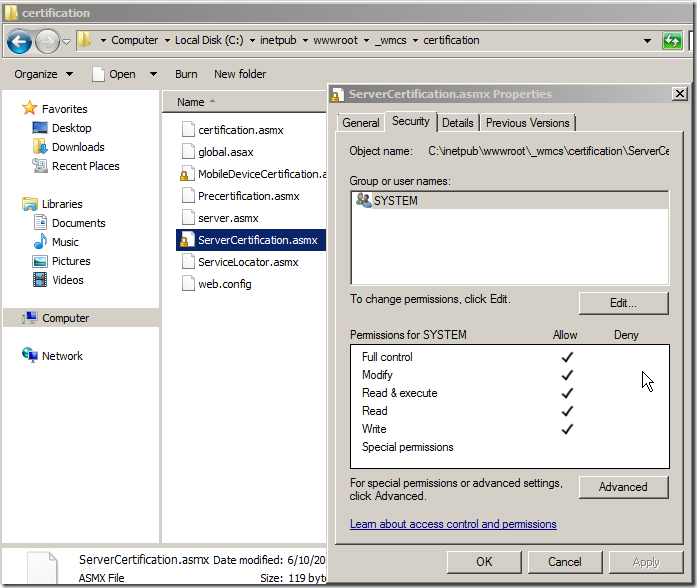
16. When AD RMS is installed Only SYSTEM account gets full control on the ServerCertification.asmx page.
17. For Exchange 2010 to read data from the certification URL, it needs to have at least Read permissions. To set permissions on the certification URL browse to location C:\inetpub\wwwroot\_wmcs\certification and right click on file ServerCertification.asmx, select Security Tab, Click Edit button and then Add the Read and Read & Execute permissions to RMS service account and Exchange Server group as shown below. Read more about this here http://technet.microsoft.com/en-us/library/ee849850(WS.10).aspx:
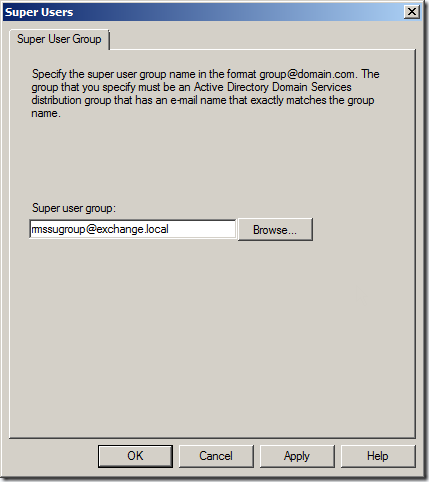
18. Next step is to enable Super Users on AD RMS cluster. To enable click Enable Super User in actions pane of AD RMS management snap in.
19. Click on Browse button and specify the name of the group that we created during the prerequisite preparation. This might take up to 24 hours to take effect. Read more athttp://technet.microsoft.com/en-us/library/cc720274(WS.10).aspx
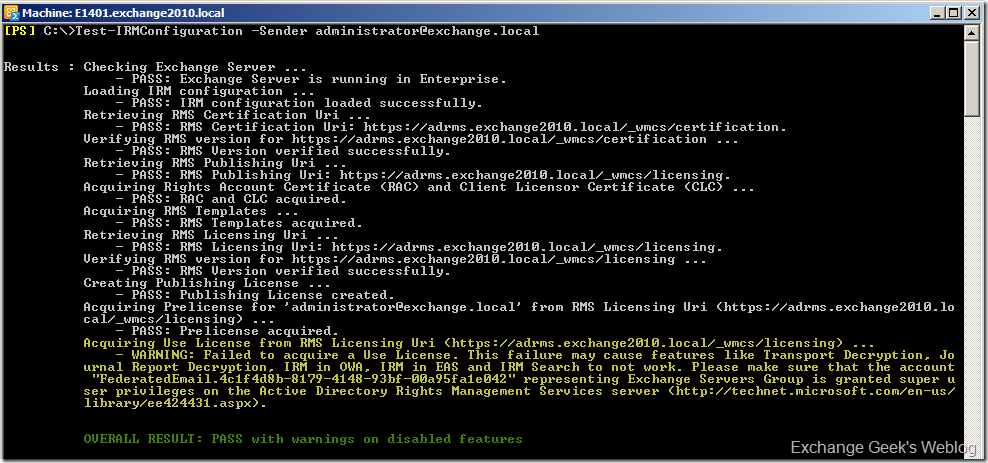
20. Next is to test the IRM configuration on Exchange 2010 server. To test the configuration open EMS and run the cmdlet Test-IRMConfiguration –Sender "email address of a valid mailbox”. If you see the below screen capture correctly you will notice that the text marked in yellow shows a warning and failure, but this is fine unless you have federated infrastructure. To resolve this problem you must add the FederatedEmailxxxxxxxxxxxxxxxx account must be added as a member of the Super User group that we just configured in previous step.
21. Next is to enable Internal Licensing on Exchange 2010. You can use Set-IRMConfiguration –InternalLicensingEnabled:$True cmdlet to do so. The InternalLicensingEnabled parameter specifies whether to enable IRM features for messages sent to internal recipients. In on-premises deployments, licensing is disabled for internal messages by default. To enable licensing, set the value to
$true. Read more here http://technet.microsoft.com/en-us/library/dd979792.aspx22. If you are using Exchange 2010 Journaling within your organization you must also enable the journal report decryption using Set-IRMConfiguration –JournalReportDecryptionEnabled:$True . The result should appear like below:
23. Exchange 2010 OWA can also use IRM to protect your email and their attachments. You must make sure that OWA is correctly configured to use IRM by running Get-OWAVirtualDirectory |FL *RM*cmdlet.
For more information on configurable parameters using Set-IRMConfiguration cmdlet you can read at http://technet.microsoft.com/en-us/library/dd979792.aspx.
In the next part of this post I will post the ways to use IRM on client side and a little about the considerations about clients.


Keine Kommentare:
Kommentar veröffentlichen