Samstag, 30. Juli 2011

Using TMG, one-time passwords and Kerberos Constrained Delegation


Access to corporate resources from external computers requires secure authentication methods. This article explains how to configure One-Time Password pre-authentication.
In the previous article of this Kerberos Delegation series, you learned how to configure Kerberos Constrained Delegation. Today, I will discuss pre-authentication methods that are not based on Active Directory. Users can pre-authenticate using Windows Active Directory authentication, RADIUS OTP authentication, Certificate authentication or LDAP authentication, and even with PKI certificates.
In the example here, we will use a one-time password solution that provides a simple, user friendly and very secure solution that is ideal for securing access to corporate resources when used with Microsoft (TMG) and Kerberos Constrained Delegation. I will describe how Protocol Transition works with TMG, i.e. how you can authenticate users with one method and then pass the credentials to the backend using Kerberos.
So how is the end-user experience when multiple pre-authentication methods are used without Credential Delegation? If you were to use RADIUS One-Time Password pre-authentication on the TMG Listener, a user would have to enter his OTP credentials first and then provide his Windows credentials for access to the web server.
Why is this not good? You expose critical security information (Domain username and password, which are static) when a user has to enter Domain credentials on a machine that doesn’t belong to your corporate network. This is especially problematic in a “hostile” environment such as internet cafes or the “mother-in-law” computer (I heard this term at a Microsoft presentation for UAG and I just had to use it). You can probably imagine the variety of threats in those environments. Such a machine could run key logging malware that collects static passwords and other information that could be used in a subsequent attack.
How can a security minded administrator make sure that users would enter only OTP credentials when accessing backend HTTP/HTTPS based services? It’s obvious that you can’t achieve this by using Basic Credential Delegation which means passing username and password from the TMG server to the backend server. For working with OTP credentials, Kerberos Constrained Delegation and Protocol Transition is required.
In my previous article, I already explained how to configure Kerberos Constrained Delegation in a Publishing rule. In this post, I will describe how to configure the Listener to use OTP and PKI pre-authentication. But first we have to configure TMG to query an authentication server. We will do this by defining a RADIUS server with TMG. First select “Tasks” in the TMG console.
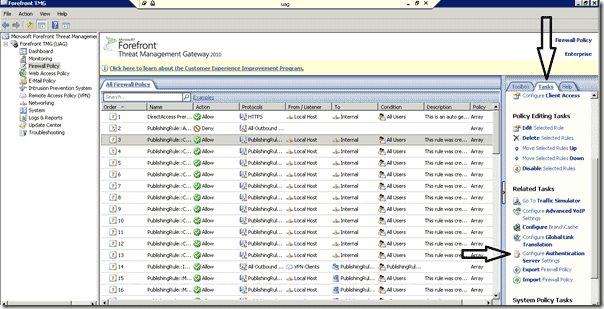
One-time passwords TMG - Configure Autentication
TMG – Configure Authentication
Locate “Configure Authentication Server settings”
A new window will pop up, click “add” and enter the relevant information (IP, Shared Secret And Port). Also be aware, that if your RADIUS server uses a port other than 1812, you will have to allow it independently.
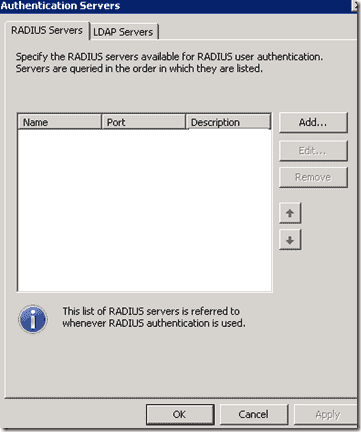
TMG One-time passwords Configure authentication server
TMG – Authentication Servers
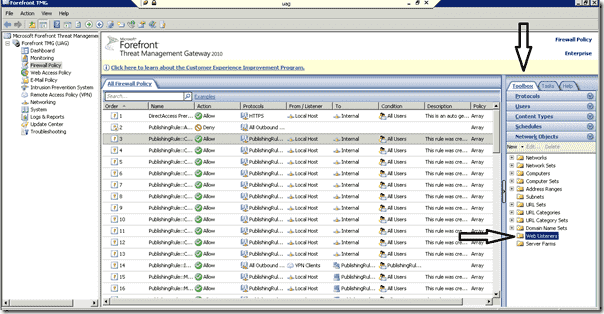
I continue by reconfiguring the Listener on the TMG from the previous article. Select “Toolbox” and then click on “Network Objects” in the TMG Console.
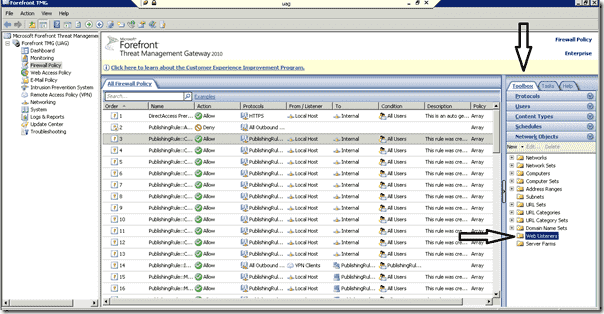
One-time passwords TMG - Web Listener
TMG – Web Listeners
Locate and open the “Web Listener” dialog at the bottom and right click the Listener that you created in the previous article.
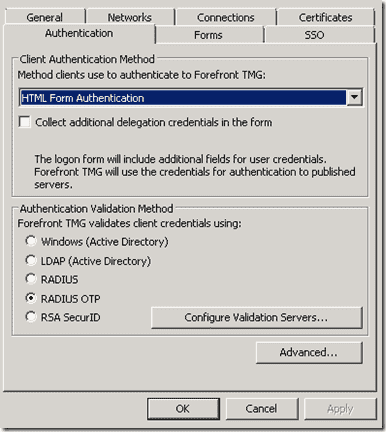
One-time passwords - Authentication Validation Method
Authentication Validation Method
Now select “RADIUS OTP” authentication in the Authentication settings tab. You can then use this Listener in a Publishing Rule. The Publishing Rule from the previous article can be used without reconfiguration. Click OK and Apply.
How would an end user experience this? When a user first accesses the URL of the published web application, he will be asked to enter his OTP credentials. The TMG would then authenticate him to the backend application using a Kerberos Token by delegating the credentials. The user has successfully logged in using only his OTP credentials without being asked to enter his domain credentials. In the next article, I will explain how to use Smart Cards and PKI credentials to access published resources.

Exchange 2010 Update Rollup4 re-released


Hallo zusammen,
Heute war auf dem Exchange Team Blog zu lesen, dass das Update Rollup 4 für Exchange 2010 SP1 in der V2 wiederveröffentlicht worden ist. Was genau das Problem war kann in diesem Blog Post nachgelesen werden.
Download: http://www.microsoft.com/download/en/details.aspx?displaylang=en&id=26910
Falls man Forefront Protection for Exchange installiert hat muss dieser zuerst deaktiviert werden.
cd C:\Program Files (x86)\Microsoft Forefront Protection for Exchange Server
fscutility /disable

Das Update sollte immer aus einem "elevated Command Promt" - sprich als Administrator ausgeführt werden.


So, nun muss nur noch Forefront Protection for Exchange wieder gestartet werden.
cd C:\Program Files (x86)\Microsoft Forefront Protection for Exchange Server
fscutility /enable


Alte Management Tools müssen ebenfalls upgedatet werden, andernfalls erscheint die folgende Fehlermeldung.

How to configure TMG for SSL Client Certificate Authentication


SSL Client Certificate Authentication allows users authenticate to TMG using smart cards. This post explains how to configure TMG and Active Directory for certificate authentication.
In my previous article I explained the use of one-time passwords with Forefront Threat Management Gateway (TMG). Today, I will discuss an alternative to this method that leverages smart cards and Public Key Infrastructure (PKI). I will describe how to use certificates that are published on the TMG.
For this to work, you don’t’ have to deploy an Enterprise Certification Authority. You can use any certificate issued by a public or private CA. Two things are required for this:
  1. The CA that issued the user certificate has to be added to the Certificate trust list (CTL) on the TMG Listener
  2. The user certificate has to be mapped to the user’s Active Directory credentials
First, locate the Listener from our previous articles.
SSL Client Certificate Authentication TMG Web Listener
TMG Web Listener
Next, click the Toolbox tab, and then Network Objects.
Now, right click on the listener that you created before and select the “Authentication” tab.
SSL Client Certificate Authentication
Select “SSL Client Certificate Authentication” from the dropdown menu. You can only choose “Windows Active Directory” to validate the credentials.
Click on “Advanced”, and then select the Client Certificate Trust list. You have two options here:
SSL Client Certificate Authentication - Advanced Authentication Options
SSL Client Certificate Authentication – Advanced Authentication Options
You can either allow certificates from all issuers that are trusted on the TMG, or select only specific trusted certificates. I suggest accepting certificates only from those CAs that your users will actually use. If you want to accept certificates from a public CA that is not in the Trust List, you must also add the CA Root certificate to the TMG.
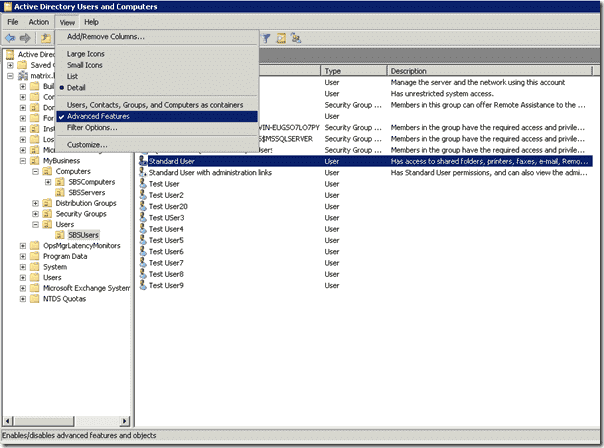
You can map a certificate to a user account using Active Directory, but first you need the user’s exported public key. Open Active Directory Users and Computers, select “View” and click on “Advanced Features”.
SSL Client Certificate Authentication - Active Directory Advanced Features
SSL Client Certificate Authentication – Active Directory Advanced Features
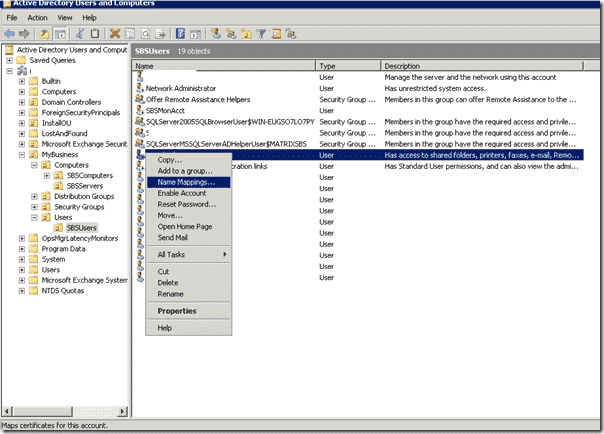
Now, navigate to the user account, right click the user name and select “Name Mappings”,
SSL Client Certificate Authentication - Name Mappings
SSL Client Certificate Authentication – Name Mappings
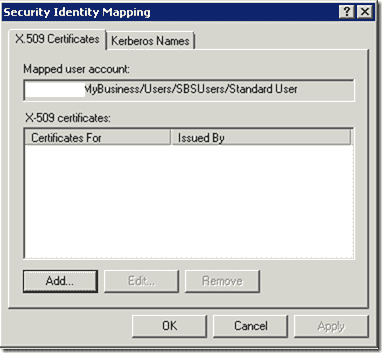
Click “Add” and point to the CER file that contains the user’s public key. This user can now be authenticated on the TMG Listener.
SSL Client Certificate Authentication - Security Identity Mapping
SSL Client Certificate Authentication – Security Identity Mapping
Do not confuse this method with smart card authentication on workstations; you will still require specific certificates for smart card logins. I strongly recommend that you allow only user certificates that are stored on smart cards. As far as I know, this can’t be enforced on the TMG.
When a user accesses Outlook Web Access (OWA), he will be asked to provide a certificate and a smart card PIN. Once he authenticated successfully to the TMG, he will be automatically logged on to OWA.

Freitag, 29. Juli 2011

WSUS Daten verschieben


ch hatte gerade das Problem, das mein Laufwerk auf dem die WSUS Daten abgespeichert werden, schon ziemlich voll war, somit musste ich den WSUS Pfad verändern. Natürlich wollte ich dabei die bereits vorhanden Updates nicht verlieren, also musste ich diese irgendwie mitnehmen. Es gibt hier aber einen Unterschied ob es sich um einen WSUS handelt der nachträglich auf einem Windows Server installiert wurde oder ob der WSUS Teil eines Small Business Servers ist. Ich zeige euch beide Methoden.

WSUS Daten verschieben am SBS

Wie man das vom SBS kennt, wird alles per Wizard gesteuert, so auch das verschieben der WSUS Daten. Also öffnet die Windows SBS Console und wechselt auf den Reiter “Datensicherung und Serverspeicher” und dann unter die Registerkarte “Serverspeicher”. Hier gibt es in der Actionbar den Punkt “Windows Update-Repository-Daten verschieben
Windows SBS Console
Der Wizard führt euch mit ein paar Klicks durch den Verschiebungsprozess. Ihr müsst hier nur das gewünschte Ziellaufwerk angeben, auf diesem wird dann ein Ordner “WSUS” angelegt, in welchen die benötigten Daten verschoben werden. Der Kopiervorgang dauert je nach Umfang bis zu 10 Minuten.
Daten aus Windows Update-Repository verschiebenDaten aus Windows Update-Repository verschiebenDaten aus Windows Update-Repository verschiebenDaten aus Windows Update-Repository verschieben

WSUS Daten verschieben mittels wsusutil.exe

Diese Methode funktioniert übrigens auch am SBS, jedoch nur per Kommandozeile. Wir suchen uns die Dateiwsusutil.exe, sollte normalerweise unter C:\Programme\Update Services\Tools zu finden sein.
Öffnen jetzt eine Kommandozeile und wechseln in das oben beschriebene Verzeichnis. Wir möchten unsere WSUS Daten auf das Laufwerk D: in den Ordner WSUS verschieben. Anders als beim SBS Wizard, müssen wir zuvor noch den Ordner D:\WSUS anlegen. Danach können wir mit folgendem Kommando das verschieben starten.
wsusutil.exe movecontent D:\WSUS\ D:\move.log

15 Minuten späte sollte folgendes Bild erscheinen und das move.log sollte voller Erfolgsmeldung sein.
image
Move.log
2011-07-05T06:42:47 Successfully stopped WsusService.
2011-07-05T06:42:47 Beginning content file location change to D:\WSUS\
2011-07-05T06:59:11 Successfully copied content files.
2011-07-05T06:59:11 Successfully copied application files.
2011-07-05T06:59:12 Successfully changed WUS configuration.
2011-07-05T06:59:15 Successfully changed IIS virtual directory path.
2011-07-05T06:59:15 Successfully removed existing local content network shares.
2011-07-05T06:59:16 Successfully created local content network shares.
2011-07-05T06:59:16 Successfully changed registry value for content store directory.
2011-07-05T06:59:16 Successfully changed content file location.
2011-07-05T06:59:18 Successfully started WsusService.
2011-07-05T06:59:18 Content integrity check and repair…
2011-07-05T06:59:18 Initiated content integrity check and repair.

Wer noch etwas Platz sparen möchte kann zum Schluss noch die Bereinigung im WSUS selbst starten.

Microsoft NAS OOBE has stopped working

I installed the OOBE (Windows6.1-KB976836-x64-OOBE.msu) but I get the message "Microsoft NAS OOBE has stopped working" when I log on. What's wrong?


You have to install .NET Framework 3.51 to use the Windows Storage Server 2008 R2 OOBE.


How to verify if .NET Framework 3.5 SP1 is installed:
Here are the steps to verify that .NET Framework 3.5.1 is installed on Windows Server 2008 R2.
  1. Click the Start button in the lower left hand corner of the display.
  2. Highlight Administrative Tools and select Server Manager.
  3. In the Server Manager interface, click Features to display all the installed Features in the right hand pane. Verify that .NET Framework 3.5.1 is listed.
If .NET Framework 3.5.1 feature is not listed, you can use either of the following methods to install it:
Method 1: Using Server Manager Interface
  1. In the Server Manager interface, select Add Features to displays a list of possible features.
  2. In the Select Features interface, expand .NET Framework 3.5.1 Features.
  3. Once you expand .NET Framework 3.5.1 Features, you will see two check boxes. One for .NET Framework 3.5.1 and other for WCF Activation. Check the box next to .NET Framework 3.5.1and click Next.
    Note: If you do not expand .NET Framework 3.5.1 Features and check it, you will get a pop-up titled Add Features Wizard  as shown below.
    Click Cancel and expand .NET Framework 3.5.1 Features and then check .NET Framework 3.5.1 check box below it.
     
    You cannot install .NET Framework 3.5.1 Features unless the required role services and features are also installed.

  4. In the Confirm Installation Selections interface, review the selections and then click Install.

  5. Allow the installation process to complete and then click Close.

Method 2: Using PowerShell
  1. Click the Start button in the lower left hand corner of the display.
  2. Highlight All Programs and select Accessories
  3. Expand Windows PowerShell and right click Windows PowerShell and select Run as administrator. Click Yes on the User Account Control box.
  4. At the PowerShell command prompt, type the following commands, and then press ENTER after each command:
    • Import-Module ServerManager
    • Add-WindowsFeature as-net-framework
Note: A screenshot is shown below:
 

Mittwoch, 27. Juli 2011

Linux Integration Services 3.1 for Hyper-V


I had a mad busy day with meetings at customer sites today and that’s when this great news breaks out.  Microsoft has released version 3.1 of the Linux Integration Components (or Services) for Hyper-V.
The supported operating systems for 3.1 are:
  • “Red Hat Enterprise Linux (RHEL) 6.0 and 6.1 x86 and x64 (Up to 4 vCPU)
  • CentOS 6.0 x86 and x64 (Up to 4 vCPU)”
SLES 10 SP3 and 11, and RHEL 5.2 / 5.3 / 5.4 / 5.5 still have support using Integration Services 2.1 for Hyper-V.
Supported Host OS’s include:
  • “Windows Server 2008 Standard, Windows Server 2008 Enterprise, and Windows
  • Server 2008 Datacenter (64-bit versions only)
  • Microsoft Hyper-V Server 2008
  • Windows Server 2008 R2 Standard, Windows Server 2008 R2 Enterprise, and Windows
  • Server 2008 R2 Datacenter
  • Microsoft Hyper-V Server 2008 R2”
Service Packs 1 or 2 of those host OSs are supported too.
The features of V3.1 of the Linux Integration Services are:
  • “Driver support: Linux Integration Services supports the network controller and the IDE and
    SCSI storage controllers that were developed specifically for Hyper-V.
  • Fastpath Boot Support for Hyper-V: Boot devices now take advantage of the block
    Virtualization Service Client (VSC) to provide enhanced performance.
  • Timesync: The clock inside the virtual machine will remain synchronized with the clock on
    the virtualization server with the help of the pluggable time source device.
  • Integrated Shutdown: Virtual machines running Linux can be shut down from either Hyper-V
    Manager or System Center Virtual Machine Manager by using the “Shut Down” command.
  • Symmetric Multi-Processing (SMP) Support: Supported Linux distributions can use up to 4 virtual processors (VP) per virtual machine.  SMP support is not available for 32-bit Linux guest operating systems running on Windows Server 2008 Hyper-V or Microsoft Hyper-V Server 2008.
  • Heartbeat: Allows the virtualization server to detect whether the virtual machine is running
    and responsive.
  • KVP (Key Value Pair) Exchange: Information about the running Linux virtual machine can
    be obtained by using the Key Value Pair exchange functionality on the Windows Server 2008
    virtualization server”.
The really big news about the new Integration Components is that they now install using rpm, making the installation much easier (Windows admins thank you!).
You should really take a look at the KVP feature in the PDF (on the download page).  There’s some interesting information and links on how to use it to get information, such as the Linux IC version from the VMs on your hosts using PowerShell.

Montag, 25. Juli 2011

Outlook Nikname Cache *.NK2


Der Nickname Cache von Outlook speichert Emailaddressen von gesendeten Emails. Diese werden vorgeschlagen wenn etwas im "An" Feld eingegeben werden.

Der Nickname Cache wird in einer [OutlookProfilename].nk2 Datei gespeichert.
Windows XP: C:\Documents and Settings\Username\Application Data\Microsoft\Outlook
Windows Vista / Win7: C:\Users\Username\AppData\Roaming\Microsoft\Outlook


Um einzelne Einträge zu löschen einfach die ersten paar Zeichen eingeben und dann "Delete" drücken. Unter Outlook 2010 kann einfach auf das "x" geklickt werden um den Eintrag zu entfernen. Mehr dazu gibts im folgenden KB Artikel: http://support.microsoft.com/kb/287623/en-us
 
Um den kompletten Nickname Cache zu löschen kann einfach die *.NK2 Datei gelöscht werden. Ab Outlook 2010 kann dies in den Optionen erledigt werden.

Um Einträge in der .NK2 Datei zu bearbeiten gibt es auch Freeware Tools wie beispielsweise NK2Edit von Nirsoft. http://www.nirsoft.net/utils/outlook_nk2_edit.html

Outlook 2010 hat keine NK2 Datei mehr, sondern speichert dies in einer Hidden Message in der Inbox (IPM.Configuration.Autocomplete).
Beim ersten start von Outlook 2010 wird die *.NK2 Datei importiert und das File in .nk2.old umbenennt. Mehr dazu im folgenden KB Artikel http://support.microsoft.com/kb/980542/en-us

Freitag, 22. Juli 2011

How to Make a Bootable Mac OS X Lion USB Install Key

Step One
Connect a 8GB or larger USB key to your computer then launch the Mac App Store from your dock.


Step Two
Click the Purchased tab at top of the window the hold down the Option key and click the Purchased tab again.


**If you have not yet installed Lion then you can follow these instructions to buy it and begin downloading.

Step Three
Press the Install button for OS X Lion and wait while the operating system downloads. If the LaunchPad appears press the Escape key.


Step Four
Once the download has completed the Mac OS X Lion Installer will launch. Select Quit from the Install Mac OS X Lion to exit the installer.


Step Five
Click to launch a new Finder window from your dock.


Step Six
Navigate to the Applications folder and right click the new "Install Mac OS X Lion" icon then select Show Package Contents from the contextual menu.


Step Seven
Double click the Contents folder.


Step Eight
Then double click the SharedSupport folder


Step Nine
Locate the InstallESD.dmg file then open a new Finder window by pressing Command + N on your keyboard.


Step Ten
Navigate to your Applications:Utilities folder then double click Disk Utility to launch the application


Step Eleven
Select your USB thumb drive from the list on the left and click the Partition tab.


Step Twelve
Set the Partition Layout to 1 Partition, set the Name to OS X Lion, and set the Format to Mac OS Extended (Journaled) and then click the Options button.


Step Thirteen
Choose GUID Partition Table from the popup window then click the OK button.


Step Fourteen
Next click the Apply button to save your changes.


When asked to confirm click the Partition button.


Step Fifteen
Once the USB drive has been partitioned correctly, select the new OS X Lion partition from the list on the left and click the Restore tab.


Step Sixteen
Drag the InstallESD.dmg file we located earlier from the Finder window into the Source field. Then drag theOS X Lion partition from the list on the left into the Destination field.


Step Seventeen
Click the Restore button then click the Erase button from the confirmation popup to begin building your install key.


Another popup will appear asking you to log in. Enter your administrative username and password then clickOK.


Step Eighteen
When the restore is complete the Mac OS X Lion USB Install Key will be mounted and it will be ready to use.

How to upgrade from Mac OS X Lion GM to Final release


If you ran one of the beta releases of Mac OS X Lion, you probably ran into a problem when trying to upgrade to the final release of OS X Lion.
When I tried to upgrade one of my dev-machines, I was prompted with an error saying “A newer version of this app is already installed on this computer”
Of course, you know that isn’t the case, as OS X Lion, just came out.
After some digging, I found the solution. It turns out that all you need to do is to hold the option key (⌥) while pressing install. That will force the Lion to install.

Donnerstag, 21. Juli 2011

How to remove “sign into asdfff2011@mail.ru” on Mac App Store and Keep Final Cut Pro X


Do you have in your Mac App Store an update for Angry Birds but when you click update it says sign into asdfff2011@mail.ru?


Okay I made a post on a different way to remove it but if you want to be still illegal here’s how to remove it.
*DISCLAIMER*
In no way do I recommend downloading pirating software, If you have pirated software you should support the developers for making the software because without them, that program wouldn’t exist.
Okay now that I put that out lets dig in… Okay first you need the Twitter App from the Mac App Store, once you have that open up to Show Package Contents> Contents then copy the _MASReciept. Once you have that copied go into Final Cut Pro X>Show Package Contents>Contents then replace FCPX’s _MASReciept with the one from Twitter. Once you did that, The “Sign into asdfff2011@mail.ru” on the Mac App Store should be gone.

Dienstag, 19. Juli 2011

Internet Explorer 9 Tip, get to your intranet sites quickly using /


One thing you will notice using Internet Explorer 9 Beta is that there is no extra search box and you can search direct from the address bar which is great and helps declutter the design IMO.  However this can cause a problem if you enter in an intranet address, as it will not find it and take you to a search results for that term:
If you are lucky the intranet name might be recognised and you will get the new Notification Bar  pop up asking you if you want to go to the intranet site:
However you can get IE9 to go straight to your intranet site by simply adding a / onto the end of your address
IE9 then adds the additional http:// and you are sent direct to your intranet page.
You can of course add your sites as well to the Intranet Zone within  the settings.
Choose Options - Internet options - Secuity tab - Local Intranet - Sites - Advanced

Forefront TMG Console – Script Error


Seit der Installation von Internet Explorer 9 bekomme ich auf meinem Windows 7 Client folgende Fehlermeldungen beim Öffnen der Forefront TMG Management Console:
Script Error: An Error has occurred in the script on this page.
image
Forefront TMG Error: Refresh failed
Error 0x80020003: Member not found
image
Dieses Problem kann man einfach lösen, man schnappt sich ein Notepad (Achtung: mit administrativen Rechten) und öffnet die Datei “TabsHandler.htc”. Diese befindet sich standardmäßig unter folgendem Pfad: “C:\Program Files\Microsoft Forefront Threat Management Gateway\UI_HTMLs\TabsHandler”
In dieser Datei gibt es drei Zeilen die mit “m_aPages [niPage].m_tdMain.style.paddingTop” beginnen. Diese drei Zeilen müssen mit “//” auskommentiert werden und schon läuft die Konsole wieder normal. Hier noch ein Beispiel:
// m_aPages [niPage].m_tdMain.style.paddingTop             = ((m_nBoostUp < 0) ? -m_nBoostUp : 0) ;

Wo steht die Version von Office …


Wo steht die Version von Office …

10072010
office2010logo… ist schein­bar sehr gefragt, denn viele Leser errei­chen die­sen Blog unter ande­rem über Google, indem Sie dort “wo steht die ver­sion von office” eingeben!
Nichts ist leich­ter als das, Sie fin­den die Ver­si­ons­num­mer Ihres Micro­soft Office wie wei­ter unten beschrieben.
Soll­ten Sie glau­ben, Sie haben das Office 2010, und Sie fin­den den dar­ge­stell­ten Weg nicht, dann pro­bie­ren Sie die Vor­ge­hens­weise für das Office 2007. Das Office 2002 bzw. 2003 kann es nicht sein, da diese sehr viel anders aus­se­hen als die neue­ren Versionen.

Office 2010

Das neue Micro­soft Office 2010, hier an Bei­spiel von Word dar­ge­stellt. Sie bege­ben sich ins Backend (bei Word der blaue Datei Knopf), dann “Hilfe” und am rech­ten Rand erschließt sich Ihnen die instal­lierte Ver­sion. Hier Micro­soft Word Ver­sion 14.0.4760.1000 (32-Bit).
Microsoft Word Version 14.0.4760.1000 (32-Bit)

Office 2007

Beim Office 2007, bei dem erst­ma­lig die Fluent-Oberfläche ein­ge­führt wurde, fin­den Sie die Ver­sion Ihres Office über die runde Office-Schaltfläche, dann wäh­len Sie “Word Optio­nen” und dann in der Gruppe “Res­sour­cen” kli­cken Sie bitte auf “Info”.
Hier Micro­soft Word 2007 Ver­sion 12.0.4518.1014.
Office 2007 - Wordoptionen auswählen Office 2007 - Wordoptionen - Info auswählen
Microsoft Word 2007 Version 12.0.4518.1014

Office 2003

Office 2003 habe ich aktu­ell nicht greif­bar, also benutzte ich die “Inter­ak­tive Befehls­re­fe­renz­an­lei­tung für Word 2007 im Ver­gleich zu Word 2003” die ich im Blog­post “Hand­bü­cher für die Benut­zer­ober­flä­che von 2007 Office Sys­tem” beschrieb.
Dort wer­den Sie sehen, dass Sie im Office 2003 den glei­chen Weg gehen kön­nen um sich Ihre Ver­sion anzei­gen zu las­sen wie beim Office 2002.
Interaktive Befehlsreferenzanleitung für Word 2007 im Ver­gleich zu Word 2003

Office XP bzw. Office 2002

Beim Office 2002, bzw. Office XP, fin­den Sie die Ver­si­ons­in­for­ma­tion über das Menü: “?” und dann “Info”. Hier Micro­soft Word 2002 Ver­sion 10.6612.6626 SP3.
Office 2002 - Menüe "?" - Info Microsoft Word 2002 Version 10.6612.6626 SP3

Älter als Office 2002

Die Vor­ge­hens­weise ist iden­tisch mit der beim Office 2002.
Viel Erfolg beim Ermit­teln der Ver­si­ons­num­mer Ihres Micro­soft Office.

Rename Onedrive Business root folder

Rename Onedrive Business root folder Here is what I remember: In the Office 365 web admin pages, change the organization name to a shorte...