Montag, 30. August 2010

KMS: Aktivierung ohne Domänenmitgliedschaft

Der KMS (Key Management Service) bietet reichlich Anlass für hitzige Diskussionen; oft missverstanden und unbeachtet, traut sich so mancher Admin nur unter Vorbehalt an dieses Thema heran. Eine beliebte Frage ist, in wie fern die Aktivierung über den KMS für ein Nicht-Domänenmitglied gesteuert werden kann.
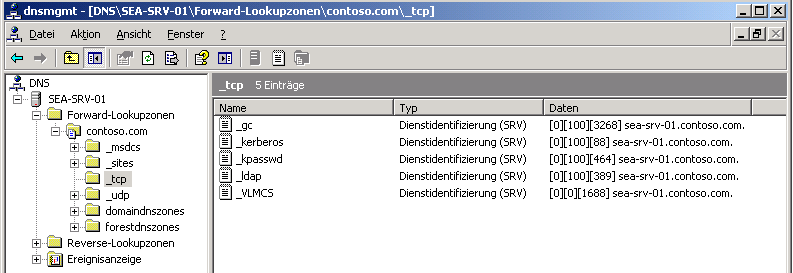
KMS-SRV-Eintrag im DNS
Wie man an der Abbildung oben erkennt, wird ein KMS über einen SRV-Eintrag im DNS gefunden. Damit dieser vom Client nun aucht tatsächlich zum Zwecke der Aktivierung angefragt wird , muss das primäre DNS-Suffix des KMS-Clients so konfiguriert werden, dass es der DNS-Domäne entspricht, in der der “_VLCMS“-Eintrag erstellt wurde. Im Beispiel oben ist das “contoso.com“.
Das besondere ist hierbei, dass ausschließlich der Eintrag über die Systemeigenschaften relevant ist (rechte Maustaste auf den Arbeitsplatz bzw. “Computer”, Eigenschaften). DNS-Suffixe, die in der Netzwerkkonfiguration festgelegt werden, beachtet das System diesbezüglich nicht. Da beim Eintritt in eine Domäne genau dieser Wert automatisch festgelegt wird, ist bei vielen Admins der falsche Eindruck enstanden, dass der Eintritt in die Active Directory-Domäne erforderlich sei. Im Umkehrschluss ließe sich daraus eine Grundsicherung des KMS ableiten. Diese Annahme ist falsch.
Die zweite Möglichkeit, einen KMS ohne Domänenmitgliedschaft zu nutzen, zeigt die folgende Abbildung:
SLMGR.VBS -SKMS
Dieser Fall wird in den Microsoft Whitepapern empfohlen. Durch den Aufruf von
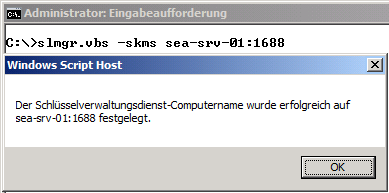
slmgr.vbs -skms
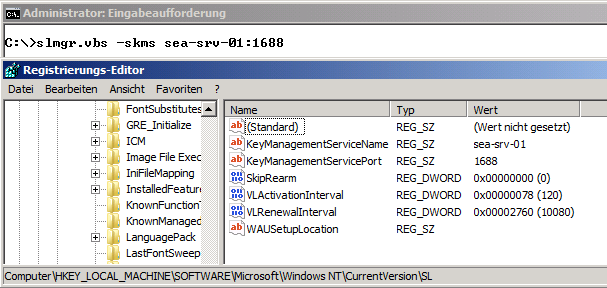
wird ein Registrywert gesetzt, wie in der dritten Abbildung zu sehen ist:
SLMGR.VBS -SKMS erzeugt einen Registryeintrag
Abschließend ist noch die Frage offen, wie man diese Aktivierung denn nun verhindern kann. Die Antwort ist: nicht über den KMS, der kennt keine Zugriffsbeschränkungen. Welche Clients aktiviert werden dürfen lässt sich nur über den beschränkten Zugriff auf das Intranet definieren. VLANs, 802.1X-Authentifizierung, IPSec etc. bieten Möglichkeiten der Absicherung des Datenverkehrs. Andererseits gibt es keinen Anlass für übertriebene Panik: ein KMS aktiviert unabhängig von der tatsächlich lizensierten Hardware prinzipiell unbegrenzt Clients. Man braucht also nicht zu fürchten, dass der KMS die Dienste ab irgendeinem Schwellwert einstellt.
KMS Host Client Count not Increasing Due to Duplicate CMID'S


This issue seems to be more prevalent today due to the various tools used to clone images, create images based on a templates, Physical to Physical (P2V) tools, etc... 
Generally the symptom you will see is that the count on your KMS host will not show the correct number of clients or it will not increase.  There are a number of reasons why this can occur but a common reason is that sysprep was not used when preparing images for deployment. 
Any time you use imaging as your deployment method it is required that you run sysprep to prepare the image for deployment. 
This policy is outlined in the following KB article:  http://support.microsoft.com/default.aspx?scid=kb;EN-US;162001
To determine if you are encountering this you can use the Key Management Service Log do the following:
1. On your KMS host open Event Viewer
2. Right click the Key Management Service Log and choose “Save all events as”
3. Change the Save as type to Text(Tab Delimited)(*.txt)
4. Save the file as KMS.TXT
5. Close out of the Event Viewer completely
6. Open Excel
7. Click File, Open, and browse to KMS.TXT
8. You should see the Text Import Wizard. Choose the following options
    Delimited
    Start Import at Row: 8
    Delimiters: Comma
9. When complete the data may look all messed up. Don’t worry we will correct that
10. Click the upper left of the spreadsheet to select the entire spreadsheet
11. Click Data, Sort, In the Sort By selection choose “Column D”
12. When complete you should see the data sorted in columns.

The Client Machine ID (CMID) is how we uniquely identify a KMS client.  When sysprep is run one of its jobs is to generalize this GUID so when the image is deployed every machine has a unique CMID.  Here is an example output
Column C-Computername

Column D-CMID

TEST-03.contoso.com

01eb9985-230c-49ad-a8c2-c24914da4739

TEST-04.contoso.com

01eb9985-230c-49ad-a8c2-c24914da4739

TEST-02.contoso.com

01eb9985-230c-49ad-a8c2-c24914da4739

TEST-01.contoso.com
01eb9985-230c-49ad-a8c2-c24914da4739

From this output you can see that multiple computernames have the same CMID. Each computer should have a unique CMID. This means that sysprep /generalize was not used to prepare these computers for deployment. So to KMS those 4 machines appear as one. That what be why the count would not be increasing or not reflect the true number of machines deployed.
While it is possible to run slmgr.vbs /rearm to reset the machines CMID that does not leave the machine in a supported state. Images deployed without using Sysprep to prepare the image are not supported by Microsoft. Sysprep executes ~30 sysprep providers. These providers are written to correct issues with various components when you duplicate the installation. By not running sysprep it is unknown what types of issues you could encounter and many components will be in a broken state. The supported solution is to rebuild the image using the Sysprep /generalize switch and redeploy the systems.

Sonntag, 29. August 2010

Windows 7 Autologin ohne Kennwort

Wer alleiniger Nutzer eines PCs ist, kann durch einautomatisches Login/Logon Zeit beim hochfahren des Systems sparen.

Hierzu einfach WindowsTaste + R drücken, dann im "Ausführen" Feld "control userpasswords2" eintippen und Enter drücken.
Der Passwortmanager erscheint. Jetzt den Benutzer markieren, der angemeldet werden soll und anschliessend oben den Haken rausnehmen "Benutzer müssen Benutzernamen und Kennwort eingeben".
Nach dem Übernehmen der Einstellungen öffnet sich ein Fenster (Anhang3). Hier muss NUR der Benutzername eingegeben werden, der angemeldet werden soll. In die Kennwortfelder muss das aktuelle Kennwort des Users rein, der angemeldet werden soll. 

Neustart und fertig!

Freitag, 27. August 2010

Small Business Server 2008 benötigte Ports

Dienst oder AnwendungTCPUDPExterne PortnummerInterne PortnummerAn IP-Adresse weiterleitenAktivieren?
SMTP
TCP
      25     
      25     
192 . 168 . ________ . ________
Ja
Simple Mail Transfer Protocol (SMTP) ist ein TCP/IP-Protokoll zum Senden von Nachrichten von einem Computer an einen anderen in einem Netzwerk. Dieses Protokoll wird im Internet verwendet, um E-Mail-Nachrichten weiterzuleiten.
HTTP
TCP
      80     
      80     
192 . 168 . ________ . ________
Ja
Hypertext Transfer Protocol (HTTP) ist ein Protokoll für die Übertragung von Anforderungen von einem Browser an einen Webserver sowie für die Übermittlung von Seiten von Webservern zurück an den anfordernden Browser.
HTTPS
TCP
     443     
     443     
192 . 168 . ________ . ________
Ja
Secure Hypertext Transfer Protocol (HTTPS) ist eine HTTP-Version, die Daten mithilfe von SSL (Secure Sockets Layer) verschlüsselt.
HTTPS für RWW
TCP
     987     
     987     
192 . 168 . ________ . ________
Über diesen HTTPS-Port (Secure Hypertext Transfer Protocol) können Windows SharePoint-Dienste über einen Remote-Webarbeitsplatz angezeigt werden.
VPN
TCP
    1723     
    1723     
192 . 168 . ________ . ________
Ein virtuelles privates Netzwerk (Virtual Private Network, VPN) ist ein Netzwerk, das einen oder mehrere Computer über das Internet mit einem großen Netzwerk verbindet, z. B. einem Unternehmensnetzwerk. Ein VPN ist verschlüsselt, um sicherzustellen, dass nur autorisierte Personen darauf zugreifen zu können.
RDP
TCP
    3389     
    3389     
192 . 168 . ________ . ________
Microsoft Remote Desktop Protocol (RDP) ist ein Standardsatz an Kommunikationsregeln, mit dem Sie sich über Ihren Computer mit einem Computer an einem anderen Standort verbinden können.
192 . 168 . ________ . ________
192 . 168 . ________ . ________
192 . 168 . ________ . ________
192 . 168 . ________ . ________
192 . 168 . ________ . ________

Mittwoch, 25. August 2010

Exchange 2007 needs command line to set FQDN of external host name on Send Connector

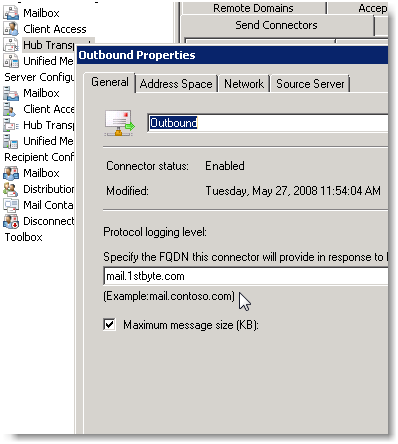
In Exchange 2007, you have a nice little GUI to set your FQDN on your Send Connector. (Mine is called Outbound, as shown below.)
You can see my FQDN, set under the Hub Transport/Send Connectors of the Exchange Management Console.
However, if you send mail out to an external address, you’ll notice in the headers that your internal server name is still listed! What!? What’s the point of the GUI?
You have top open Exchange Management Shell, and type in a command to solve this. It’s easy.
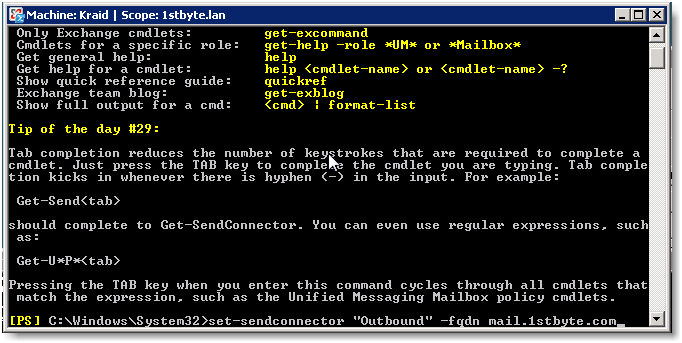
As shown above, you just type in the command:
set-sendconnector “Outbound” –fqdn mail.1stbyte.com
Replace “outbound” with the name of your send connector, and of course, change to your own FQDN, not mine.
It will come back in error, or success. If success, you can check your headers on and external account right away.

Reverse DNS matches SMTP Banner

Dies Einstellung wird unter
Serverkkonfiguration
--Hubtransport
----Empfangsconnectors
----//Allgemein // Protokolliergrad - und den FQDN ändern.

Dienstag, 24. August 2010

Mittwoch, 18. August 2010

Windows Storage Server 2008 – Default Password

As MSDN or Technet Subscriber you have the possibility to download and Install-DVD for Windows Storage Server 2008. Normally it will be shipped just by OEM’s. So when you want to play around with it like me, for example to use it as an iSCSI-Target for a Cluster-Lab you’ll be surprised that the installation finish without asking for a Administrator password. It just stops at the logon window.

The default Administrator password is “wSS2008!” (without the quotes).

How to find the Reference ID (RefID) of a message or calendar item

When trying to troubleshoot missing messages or message problems you'll need to get the Reference ID (RefID) of that message or calendar item. You can either get the RefID from an Outlook client or the BlackBerry smartphone. Here is how to do both:

From Outlook:

  1. Open the Outlook client on a workstation that has Outlook Spy installed on it.
  2. Highlight the message of which you would like to see the hidden properties for.
  3. If Outlook Spy is installed you will have an additional toolbar in Outlook client. One of the buttons on this additional toolbar is called IMessage. Please click this button.
  4. A separate window will open, displaying the hidden properties of this message.
  5. The RefID will be a PT_LONG type property. The Property Tag will typically be '0x*** ????????D' (where * can vary in it's characters) and the Value will be a 9-12 digit number.
From BlackBerry smartphone (except for BlackBerry Storm):

Within the message (or calendar item) in question press: ALT + V-I-E-W

From BlackBerry Storm smartphone:
  1. Hold the BlackBerry Storm smartphone in portrait view.
  2. Display the menu and then select Show Keyboard.
  3. Hold the number key to lock the number keyboard. The 123 icon appears on the screen, and a small lock appears on the number key.
  4. To display the refid, in landscape view type $-21, or in portrait view type 77331!!.
Note: Email received on the smartphone will have a negative value RefID, whereas email sent from the smartphone will have a positive value for the RefID.

Montag, 16. August 2010

Und plötzlich geht DirectAccess nicht mehr


Ich hatte heute ein Problem mit DirectAccess das mich einige Nerven gekostet hat: zwei DirectAccess Clients die schon funktioniert hatten konnten nicht mehr auf die interne Struktur zugreifen. Ich habe mehrere Stunden nach dem Problem und damit auch nach der Lösung gesucht: Ergebnis die ActiveDirectory Controller hatten ihre IPv6 DNS-Einträge verloren.
Aber hier das Phänomen und die Lösung:
Nachdem ich viele mögliche Fehlerquellen auf dem Client ausgeschlossen hatte blieb ich an der Ausgabe des Befehls:
nltest /dsgetdc: /force
Fehler beim Abrufen des Domänencontrollernames: Status = 1355 0x54b ERROR_NO_SUCH_DOMAIN

hängen. Mit diesem Fehler als Hinweis testete ich die IPv6 Namesauflösung der internen Domain: Ergebnis diese funktionierte auch nicht.
Nach Aufwahl auf den DirectAccess Server entdeckte ich dann in der “DirectAccess Verwaltung” im Punkt “Überwachung” das die DNS Server einen Fehler aufweisen. Der Fehler lautet:
Keiner der internen DNS-Server von den DirectAccess-Clientcomputern für die Namensauflösung verwendet werden, reagiert. Dadurch wird verhindert, dass mithilfe der DirectAccess-Clients Namen im internen Namespace aufgelöst und Verbindungen muss dem internen Netzwerk hergestellt werden können. Stellen Sie sicher, dass die DNS-Server online sind und auf Namensauflösungsabforderungen reagieren

clip_image001
Ursprung dieses Fehlers ist, dass die Nameserver zwar über IPv4 angesprochen werden können aber nicht über IPv6. Wenn man sich auf den DNS Server die Auflösung der ADS Controller anschaut, dann bemerkt man das nur die IPv4 Adressen registriert sind und nicht auch die IPv6 Adressen wie im Beispiel beim DirectAccess Server vDirectAccess.

clip_image002
Diese kann man beheben indem man sich an den ADS Controller anmeldet, dort eine administrative Kommandozeile startet und dann mit den Befehlen:
net stop iphlpsvc
net start iphlpsvc
den IP-Hilfsdienst neustartet. Dieser sollte dann die IPv6 Adressen des Rechners wieder in den DNS-Server eintragen. Danach sehen die Einträge im DNS-Server folgendermaßen aus:

clip_image003
Auch das Tool “DirectAccess Verwaltung” zeigt dann an das alles in Ordnung ist:

clip_image004Fazit: wer mal ab und zu in die mitgelieferten Tools schaut der kann sich einige Zeit bei der Problemsuche sparen

Reporting improvements in Forefront TMG SP1


Forefront TMG SP1 includes some significant improvements to the reporting functionality:
- New look-and-feel for all existing reports – cleaner aesthetics that match other Forefront products.
- User Activity Report: provides detailed information about the activity of specific users.
- Reports added for new features introduced in SP1 - User Overrides and BranchCache integration.
Here are some examples of how the existing reports look after redesign:
image
image

User Activity Reports

This kind of report allows you to see the web activity of specified users. User Activity report does not take its data from the summaries, but extracts it directly from Forefront TMG logs, so the report is always up-to-date at creation time.
This is a One-Time report which means that you can’t make a recurring User Activity report.
The users can be specified by their username (e.g. contoso\evgeny) or by IP address. Forefront TMG must require user authentication in order to be able to specify users for the report by username, otherwise all web traffic will be marked as anonymous and the report can only be generated by specifying IP addresses instead of usernames.
Here is a walk-through for generating a User Activity Report:
1. Go to ‘Logs & Reports’ à Reporting Tab and click Create User Activity Report Job
image
2. After typing the new report name in the wizard, a Reporting Details dialog will open.
In this dialog you should choose the period of time and list of the users you want to get a report for.
The list of users (and IP addresses) should be separated by semicolons.
image
3. After that you need to configure publishing location and email address to send the report to, finish the wizard and click Apply the configuration.
4. Select the just created report and click Generate Selected Report.
Please note, the generation is expected to take more time than a generation of regular one-time report, since the data is taken directly from the logs rather than from summary tables.
image
5. And this is the report that we get:
image

Reports for User Override feature

User Override for blocked URL categories is a feature introduced in SP1 which allows the user to override the policy restriction when permitted and access the blocked site.
This feature has two reports:
- The first report displays which URLs were overridden most by the users. This can indicate a need to reevaluate the policy regarding these URLs.
image
- The second report displays a list of ‘Top overriders’ and the URLs overridden by them.
If the authentication is not enabled by access rules, IP addresses will be shown instead of user names.
- This report can indicate a possible abuse of the policy by these users and may require further investigation of the users’ actions.
image

Reports for BranchCache feature

This report summarizes the overall cache utilization for both the Forefront TMG cache and BranchCache. It provides an estimation of the amount of bandwidth saved by the combination of caches.
image

Rename Onedrive Business root folder

Rename Onedrive Business root folder Here is what I remember: In the Office 365 web admin pages, change the organization name to a shorte...